
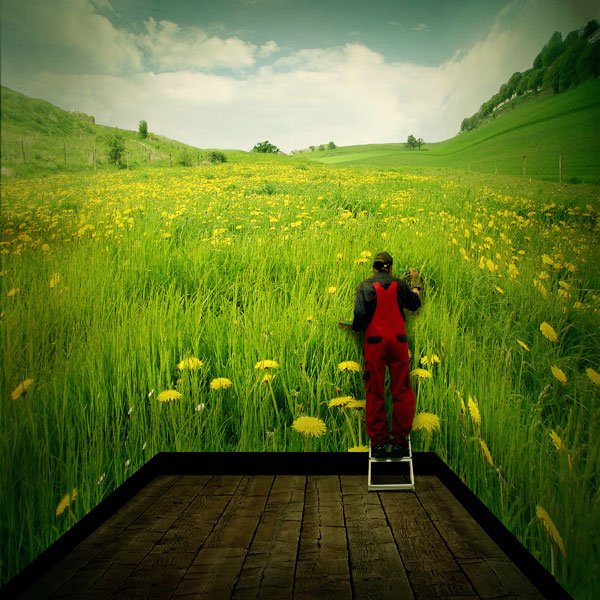
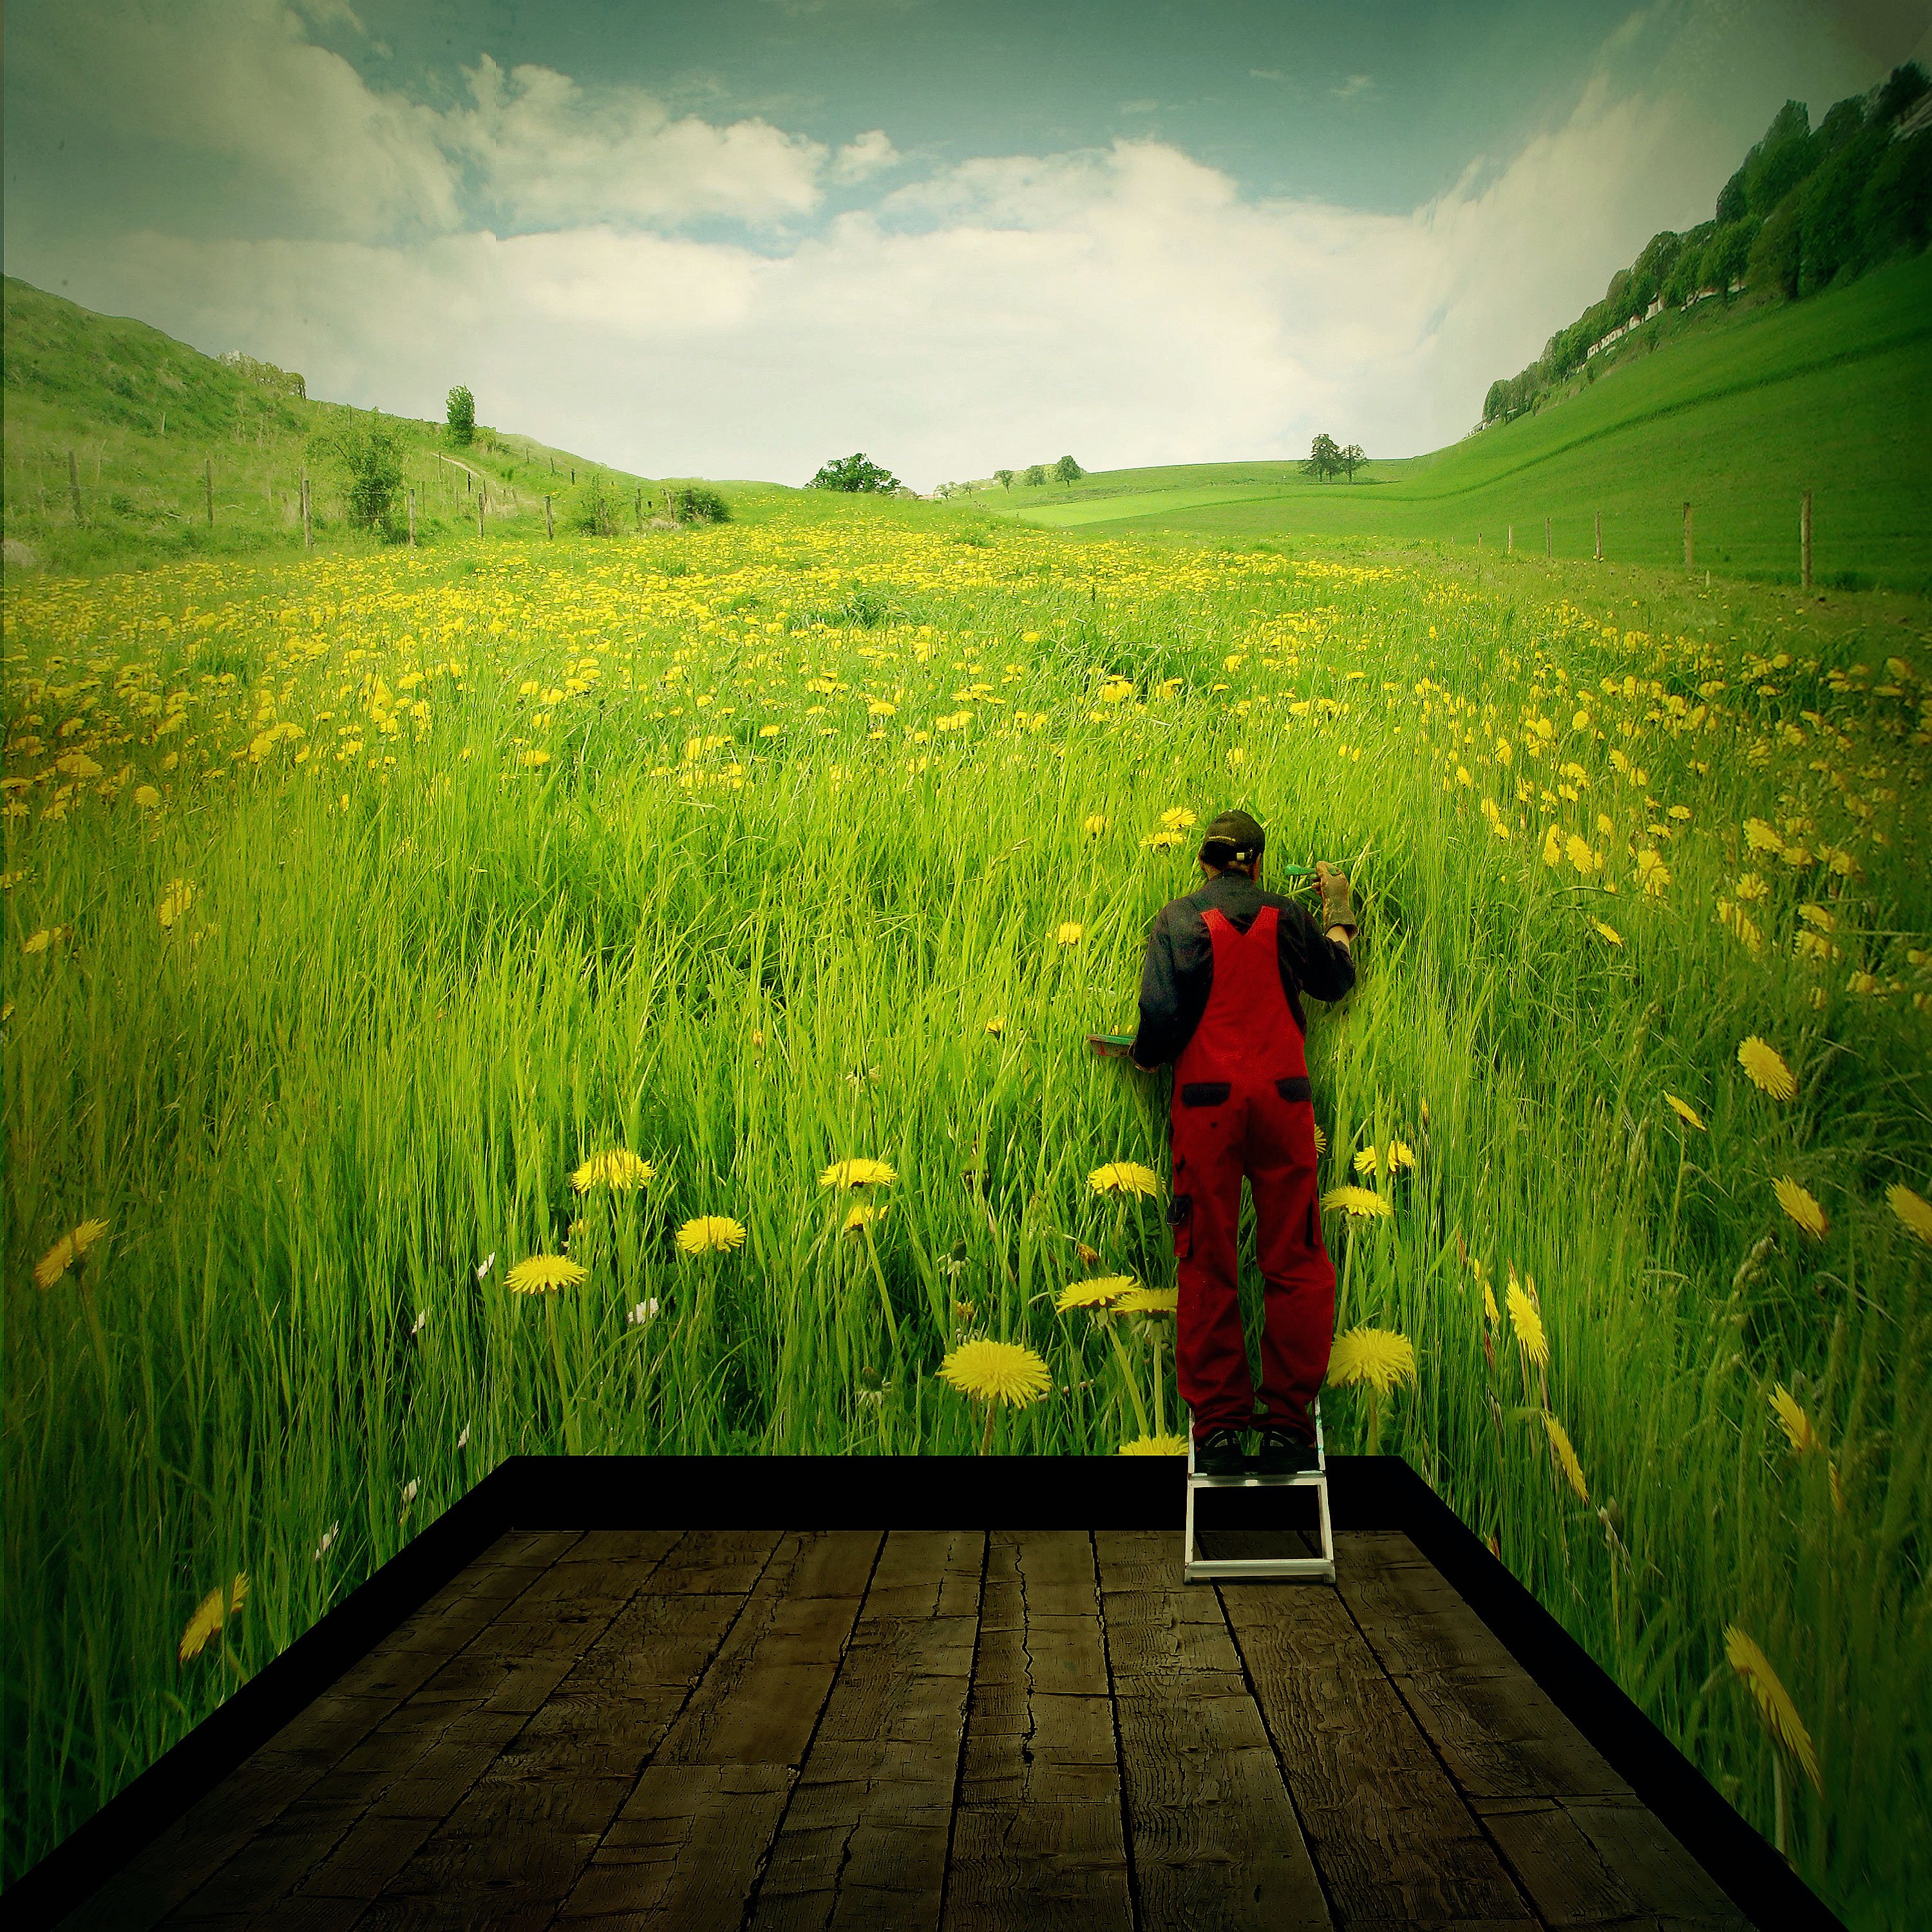
Preview
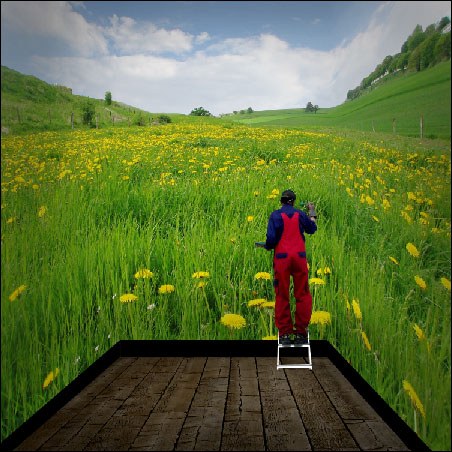
Here is the scene that we will create. Click on the image for a full sized view.
Resources
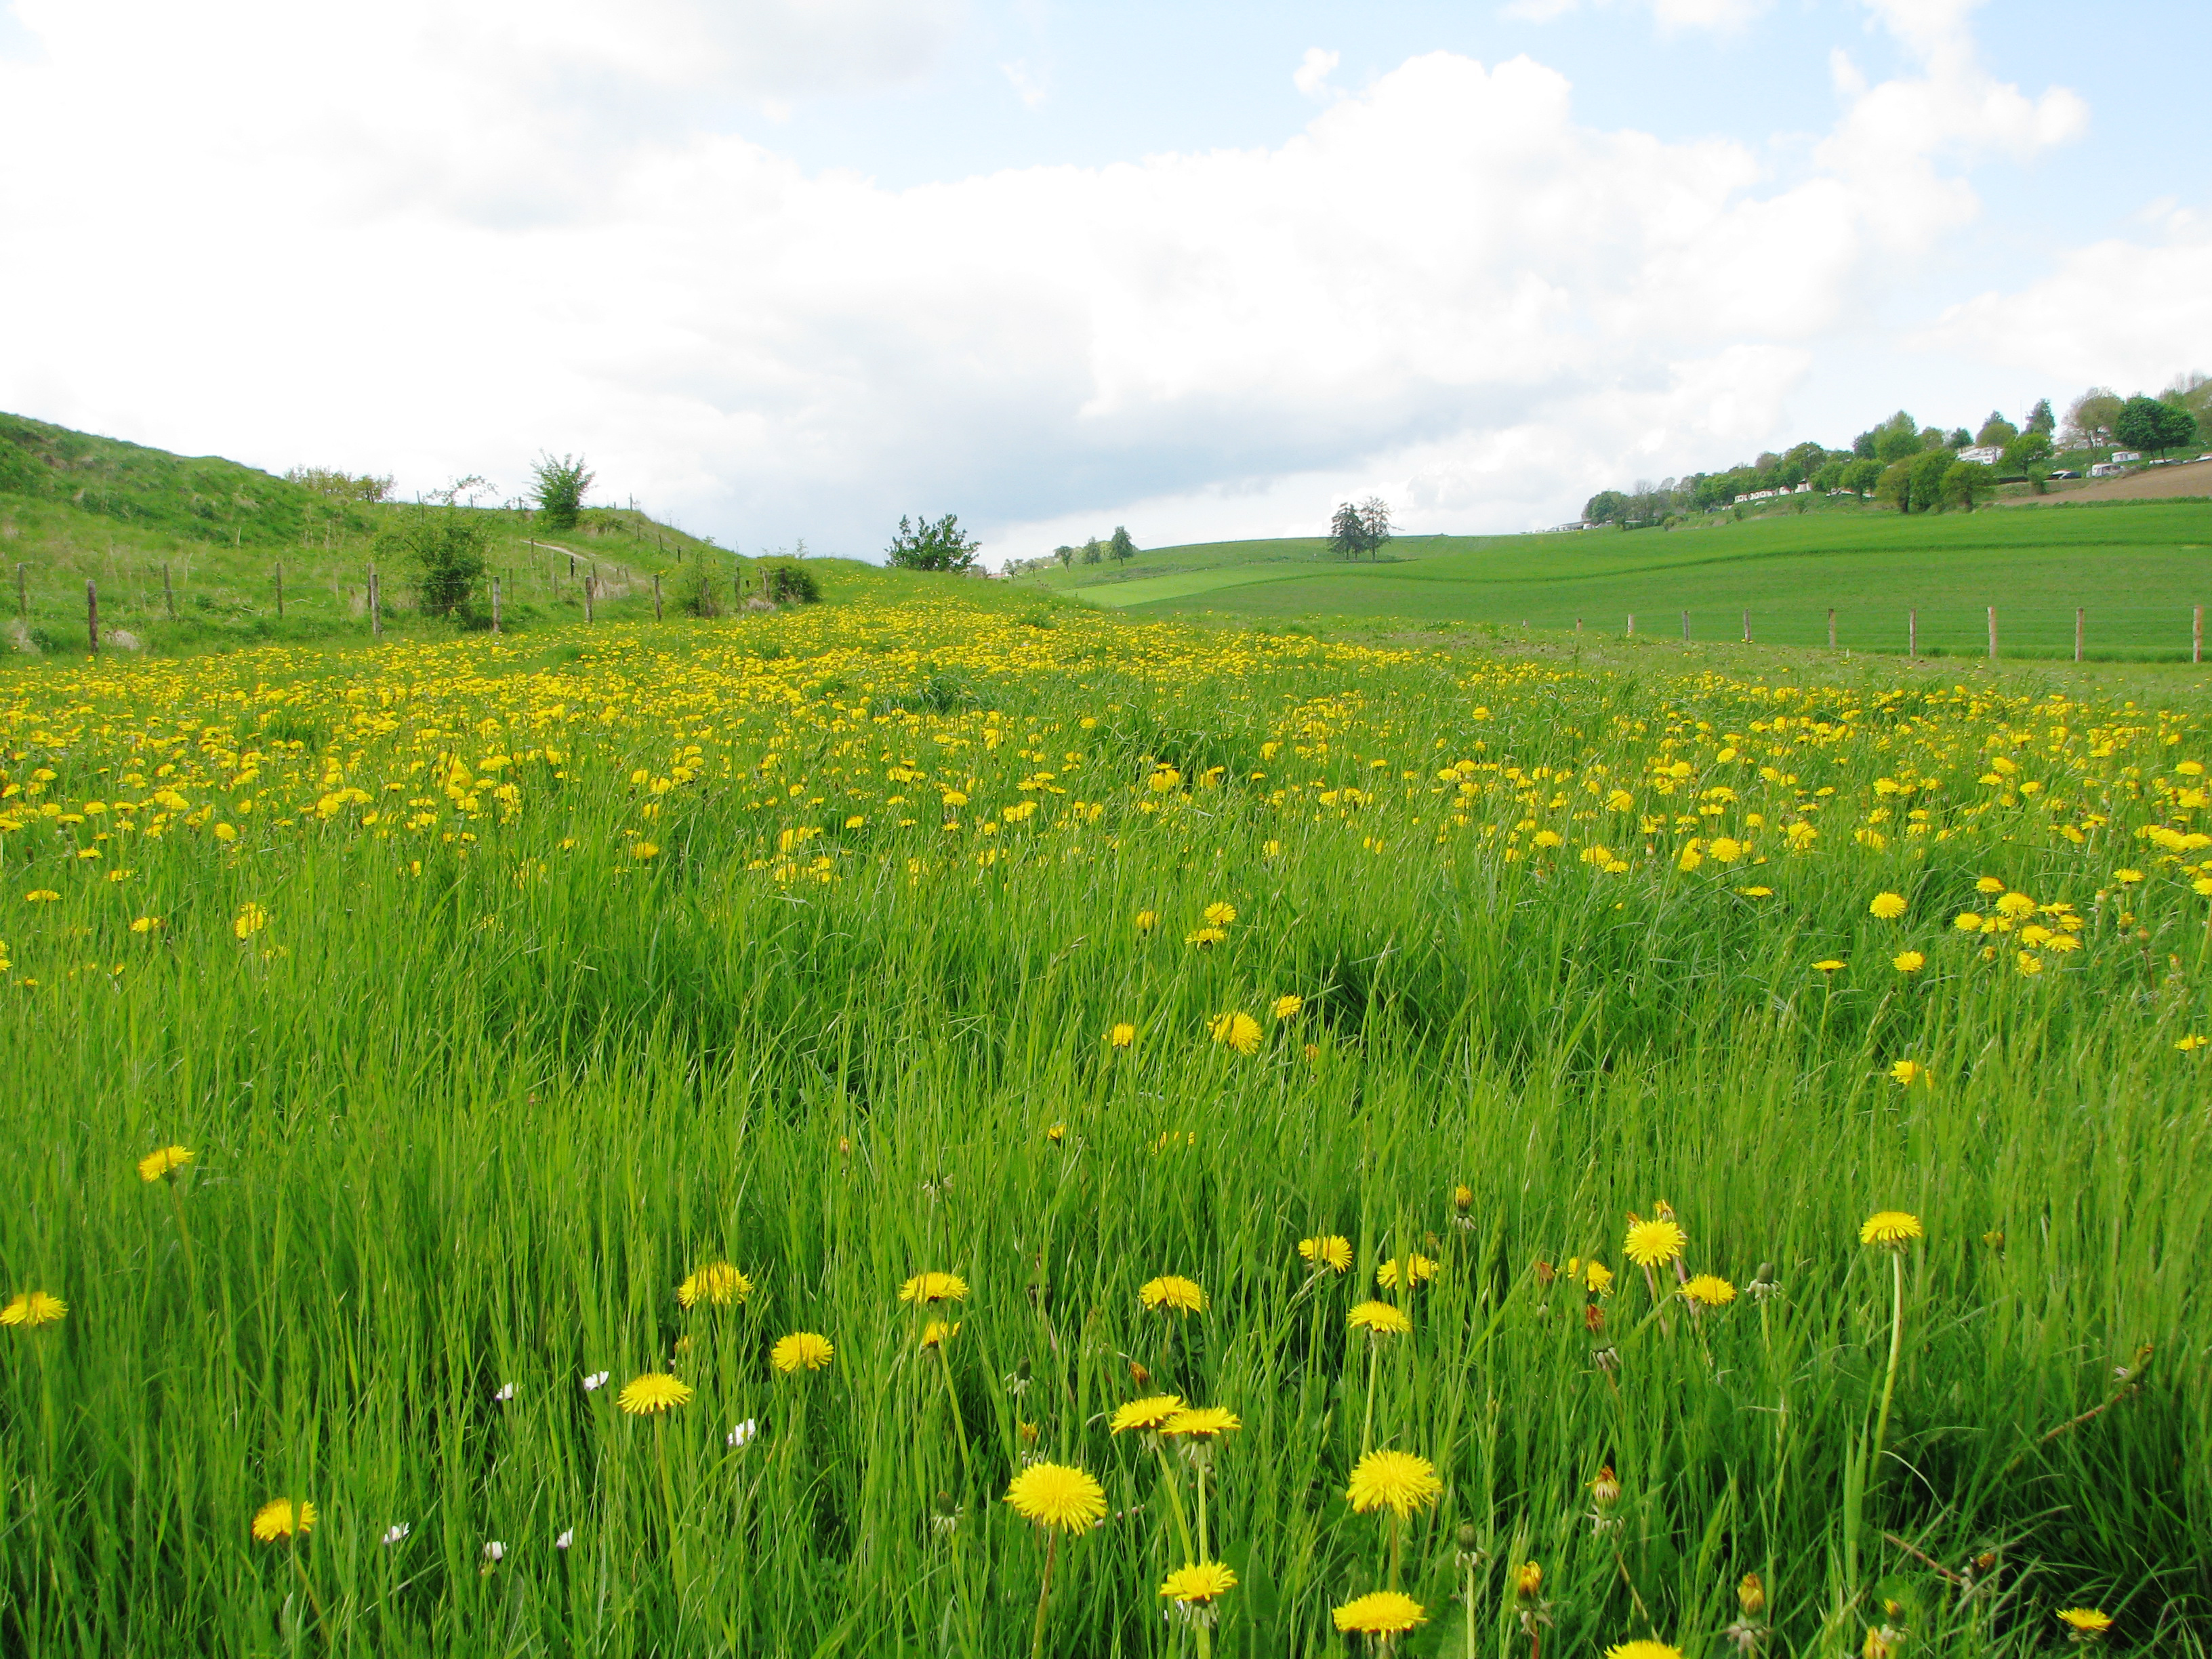
- Yellow Flower Field by 333half-evil-stock (Royalty Free License)
- Field 025 by Julia Starr (Royalty Free License)
- Floor by Photodream stock (Royalty Free License)
- Painter by Michael Vincent Manalo (Royalty Free License)
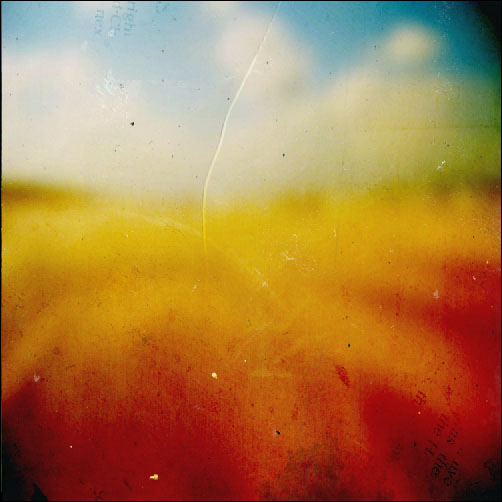
- Paper Texture 1 by Wojciech Sadlej (Royalty Free License)
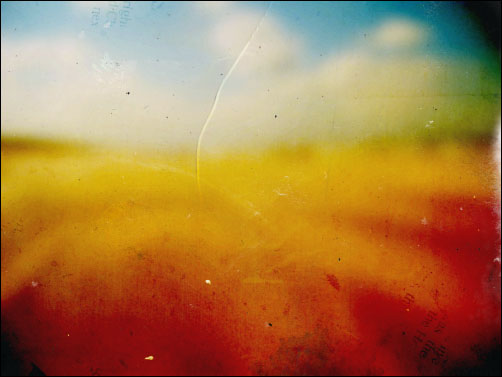
- Textures by yawee (Royalty Free License)
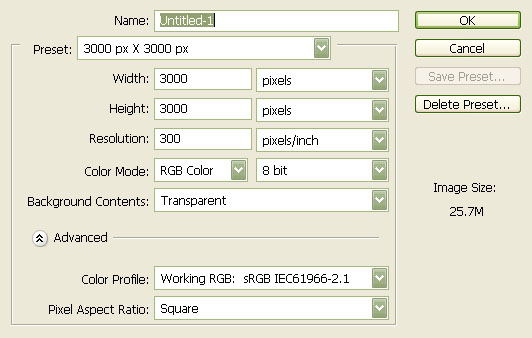
Step 1: Create a new file
Our scene will be large-scale and high-resolution. To start things off, create a new file with these settings:
- Width: 3000px
- Height of 3000px
- Resolution: 300 dpi
- Color Mode: RGB Color – 8 bit
- Background Contents: Transparent
Step 2: Replace the sky of our wallpaper
To begin, let’s open the Yellow Flower Field stock in Photoshop. We will be using this to create the walls of our room, so transfer it to our 3000×3000 canvas. Click our stock image, press V to activate our Move Tool (V), and then drag the image to our canvas.
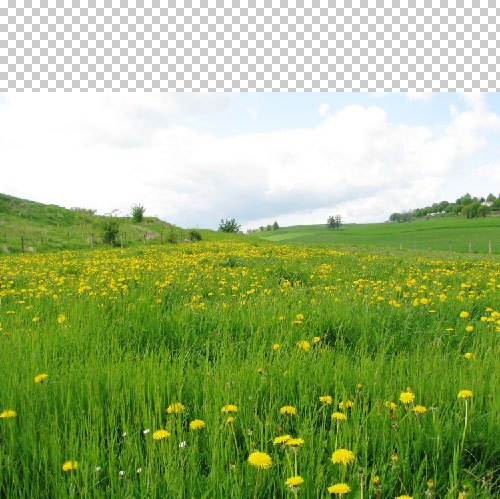
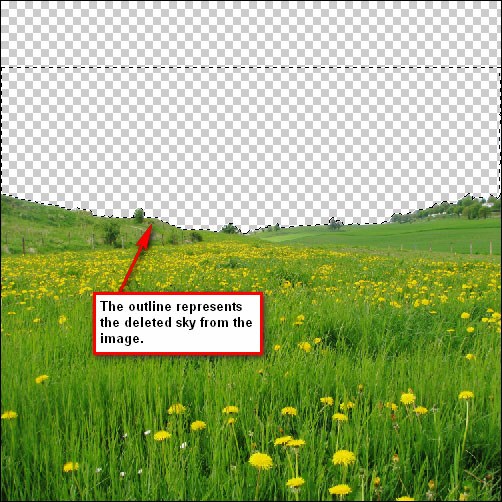
We need to get rid of the sky in this yellow flower field and replace it with something else because it is overcast and so it won’t match the vibrant scene we are intending to produce.
To do this, we will use the Lasso Tool (L).
Hold down the left mouse button on the Lasso Tool icon in the Tools Panel long enough and three Lasso Tool variations will appear on the side. Choose the Magnetic Lasso Tool and left-click on the part where the horizon falls and drag it to the edge. You will notice that the Magnetic Lasso Tool sticks to the foreground and automatically selects the area we want to get rid of.
Now that the selection is created, hit Delete to remove the sky from the stock image.
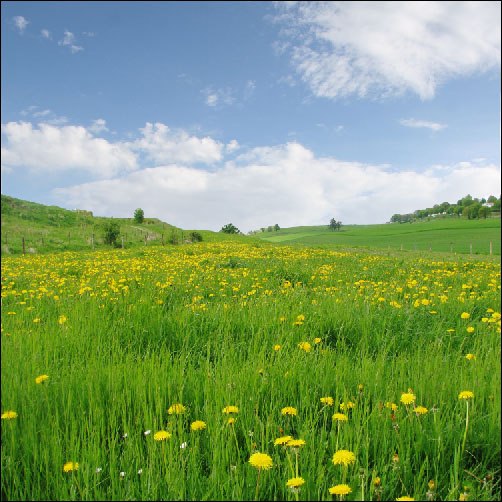
We will replace the deleted sky in the Yellow Flower Field with the sky in the Field 025 stock image.
Open “Field 025” and press C to crop the sky from the image.
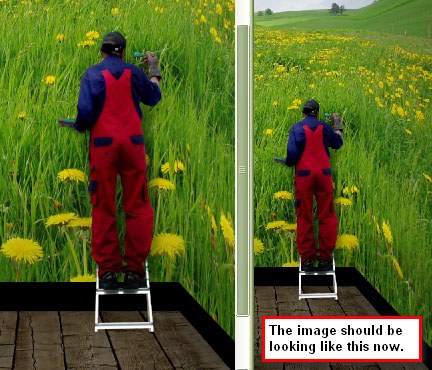
Once you have cropped the sky from the image, press V to activate the Move Tool and transfer the sky to our main canvas. Place our new sky’s layer under the Yellow Flower Field’s layer and position it so that it is filling up the top portion of our first stock image.
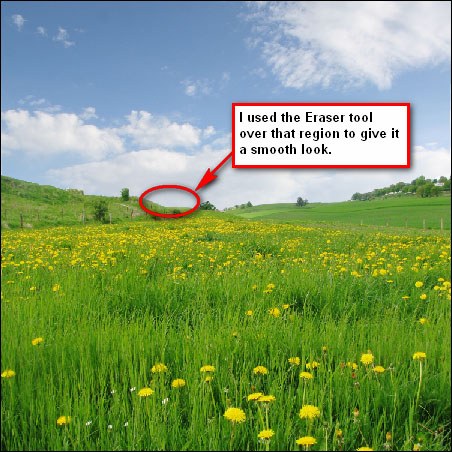
Note that there is a region with jagged and harsh edges on the field that results from deleting the area with the Magnetic Lasso Tool. Let’s try to smoothen up those regions.
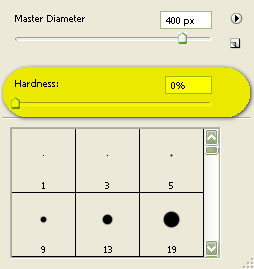
Activate your Eraser Tool (E) and set its option values to the following:
- Brush Master Diameter: 125
- Hardness: 0%
- Opacity: 100%
- Flow: 100%
Note: In case you’re having a hard time finding it, the Hardness option is located in the brush tip drop down menu, beside where you set the Brush Master Diameter option.
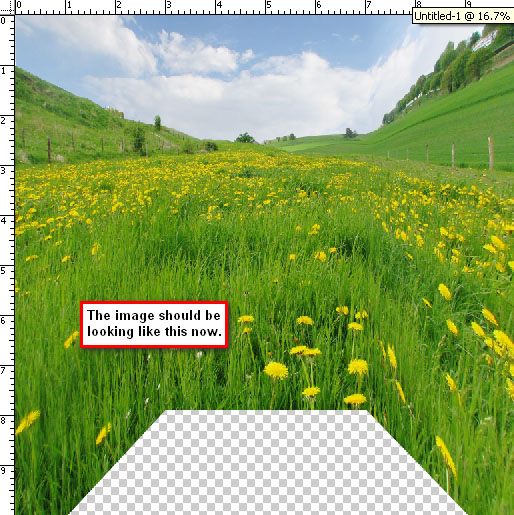
Use the Eraser Tool on the region indicated by the image below.
Now we need to flatten our image and create a new canvas. To flatten the image, right-click on any of the layers and then choose Flatten Image.
Step 3: Set up the workspace for creating the walls
In this step, we will be creating a new canvas for the walls and the floor of our composition. Create a new canvas with the same dimensions as our original canvas (refer to Step 1).
We will move the three sides of the walls of our room piece by piece into the new canvas as separate layers so that we can photo manipulate them individually. To help us accurately position our elements, activate your rulers by pressing Ctrl/Cmd + R or go to View > Rulers and make sure that Rulers is checked.
Also, open the Navigator Panel (Window > Navigator) and set it to 15% to set the ruler’s unit increments to 1.
Step 4: Create the left wall
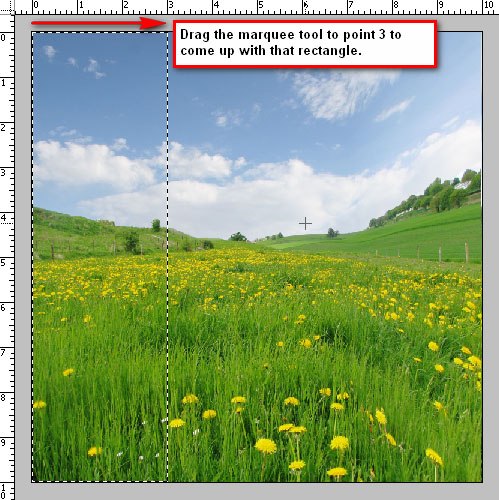
To transfer pieces of the image, we need to select them precisely and copy them from the previous canvas. Activate your Rectangular Marquee Tool (M), position the mouse cursor at 0 on the ruler (top left corner of the canvas) and then drag it to point 3. This will be our left wall.
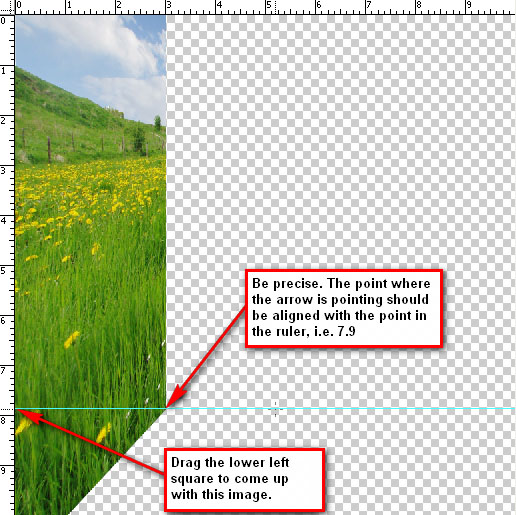
Drag that selected region to our new canvas by using the Move Tool (V).
Next, we need to transform the wall to give it a good perspective from the viewer’s standpoint. Press Ctrl/Cmd + T to activate the Free Transform command. Left-click on the canvas and choose Perspective from the contextual menu that appears.
Transform controls will appear on 6 points around the image—we only need to pull on one of them. Pull the transform control on the lower right corner upwards to adjust the perspective. Once you are done, press Enter to accept the transformation.
Step 5: Create the center wall
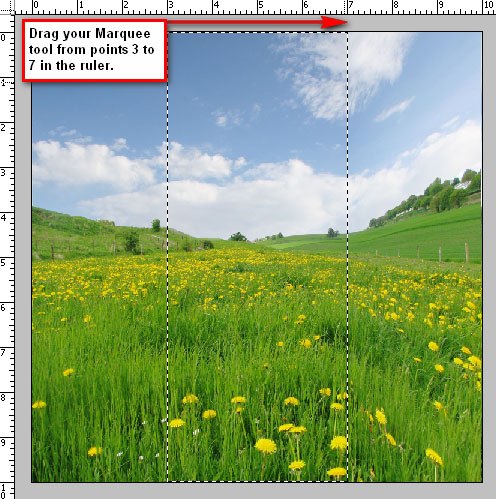
Click on our old canvas and use the Rectangular Marquee Tool to select the region from points 3 to 7 in the ruler.
This will be our center wall.
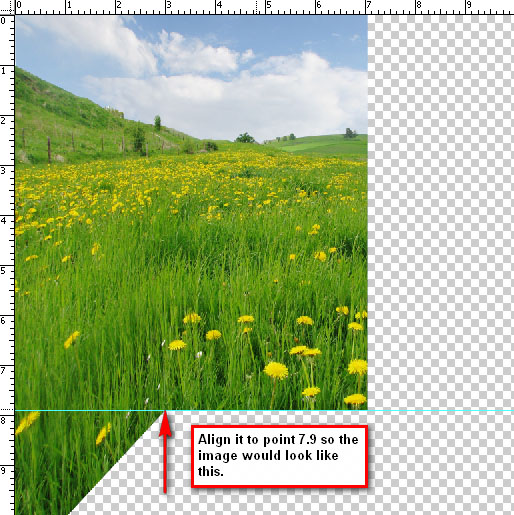
Once that is finished, use the Move Tool (V) to drag that region to our new canvas and to align it with the left wall that is already in the canvas.
Step 6: Create the right wall
To complete the room’s walls, transfer the last piece from the old canvas to the new canvas (the right wall). Use your Rectangular Marquee Tool again, and select the region from point 7 to 10 on the ruler, drag that to our new canvas using the Move Tool and then align it with the rest of the walls, just like in the previous steps.
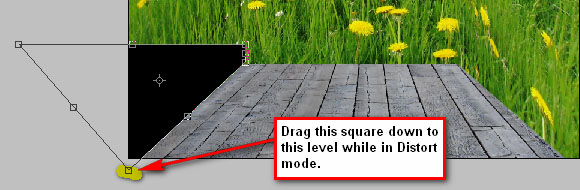
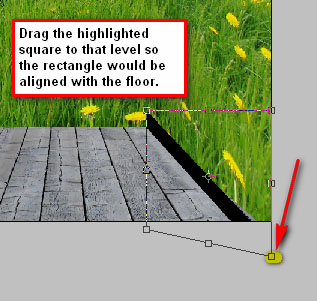
We also need to transform the perspective of this wall, following the same method as with the right wall using the Perspective command. However, this time, click on the box on the lower right and drag it down to the level of the left region.
Now, merge all three of wall layers by right-clicking on one of them in the Layers Panel and then choosing Merge Visible.
Step 7: Scale the walls
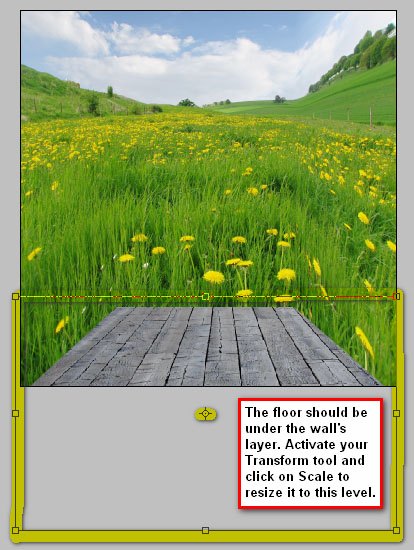
We need to resize the walls of the room to give the floor more room by using the Free Transform command (Ctrl/Cmd + T).

Once you have scaled the walls, just hit Enter to apply the transformation.
Step 8: Add the floor of the room
Now it is time to incorporate the floor in our 3D room.
The first phase of this is to open the Floor stock image in Photoshop. Drag it to the new canvas and put it under the walls. We need to transform it to fit our image and make it look authentic using the Free Transform command.
Step 9: Blend the seams of the floor and the walls with partitions
We need to make the blending of the areas where the walls and the floor meet or else our work won’t look natural.
We will do this by adding a partition on the joining points of the wall, which will help in creating the illusion that the sky and the field is the wallpaper of our three-dimensional room. Start by creating a new layer (Ctrl/Cmd + Shift + N).
Afterwards, we will use the Line Tool (U) to create the partition.
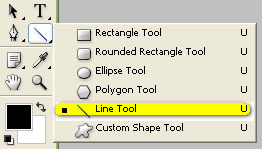
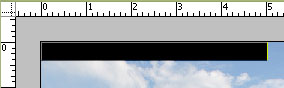
Set the color of our Line Tool to black (#000000) and then make a rectangle shape, using your rulers as a guide. The rectangle should have a width of 5 inches and a height of 0.4 inches.
You can draw this in the top left corner of the canvas to make it easier to draw accurately since we can always use the Move Tool to position our shape to the appropriate location later on. Holding down Shift will help keep your lines at right angles.
With the rectangle created, move it down to where the wall and floor meets.
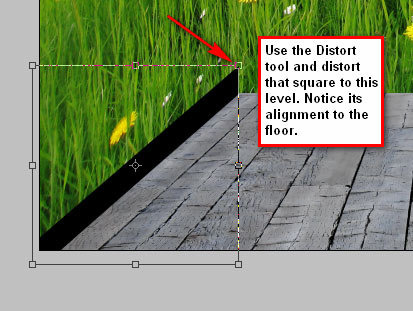
With the rectangle positioned, we will distort it so that the alignment is correct. Activate the Free Transform command (Ctrl/Cmd + T), right-click on the rectangle, and then pick Distort.
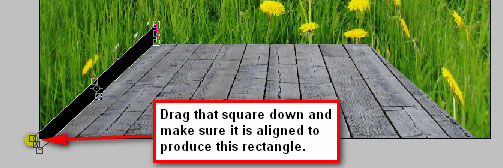
If you notice, the rectangle isn’t well placed, so we need to continue to distort it.
Let’s duplicate that rectangle and put it on the opposite side (the right part) of the 3D room.
Duplicate the distorted rectangle layer by pressing Ctrl/Cmd.
Once duplicated, activate the Free Transform command, right-click on the shape in the canvas, and then go for Flip Horizontal.
Use Move Tool (V) to move the shape to the opposite side of the room. You may Rasterize the two rectangles if you wish—do that by right-clicking on their layer and choose Rasterize Layer.
Note that the floor isn’t aligned with the duplicated rectangle—we need to repair that. Use the Skew transform command by pressing Ctrl/Cmd + T, right-clicking on the distorted rectangle, and then choosing Skew from the contextual menu that appears.
Make sure that it is aligned with the image that it was duplicated from.
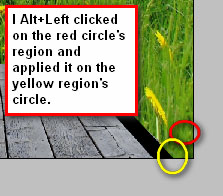
After skewing, you will see that a little bit of the floor is visible between the duplicated rectangle and the field. To take care of that, we will rely on the Clone Stamp Tool (S).
Activate the Clone Stamp Tool by pressing S, afterwards click on our wall image in the Layers Panel to make sure we’re on the correct layer, and then Alt/Option + left-click on the area we intend to clone to set our clone stamp’s reference point.
After targeting the region that you want to clone, apply it on our target areas.
Create another layer for us to put our new rectangle into. The new rectangle should be placed in the middle of our piece, in between the left and right rectangles.
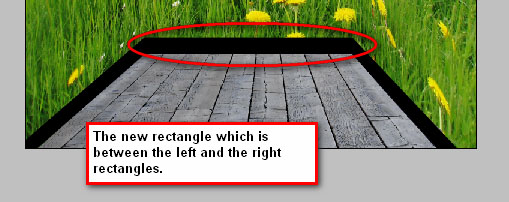
I would recommend rasterizing the center rectangle’s layer.
Step 10: Coloring the floor
The floor is made out of wood, so let’s change its color so that it integrates better with our scene.
Click on the floor’s layer and go to Image > Adjustments > Color Balance. In the Color Balance dialog window, set Tone Balance to Midtones. For the color values use: +14, -17, and -64.
Observe that after the Color Balance correction, the floor has now changed from a pale gray to a brown color.
Let’s continue to improve the color of the floor by lowering its brightness.
Click on the floor’s layer, go to Image > Adjustments > Brightness/Contrast and set the value of the Brightness option to about -60.
Step 11: Manual adjustments to the floor
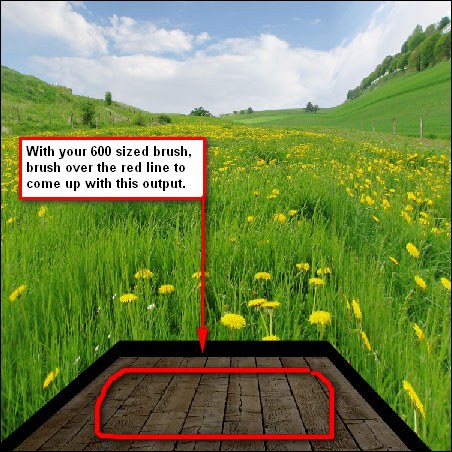
Afterwards, create a new layer on top of the floor’s layer. Use the Brush Tool (B) with the following option values to manually correct portions of the floor:
- Master Diameter: 600
- Mode: Normal
- Opacity: 20%
- Flow: 100%
Use the reference image below to see where you should apply your brush strokes.
Step 12: Adjust the color contrast of the floor
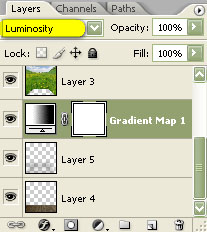
Next, let us adjust the contrast to improve the look of the floor. In the Layers Panel, click on the Create a new fill or adjustment layer button, then select Gradient Map.
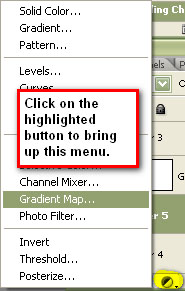
Use the Black, White gradient preset for the Gradient Map. With the Gradient Map created, double-click its layer in the Layers Panel and change its opacity to 100%.
Then change the layer’s blending mode to Luminosity.
Step 13: Create lighting and shadows on the wall and floor
Now we will apply some lights and shadows to give it the illusion of having dimensions. Create a new layer on top of all the layers. We will draw these lights and shadows manually with the Brush Tool.
Activate your Brush Tool by pressing B and set its values to the following:
- Brush Master Diameter: 900
- Hardness: 0%
- Opacity: 20%
- Flow: 100%
Paint the shadows as shown in the reference image below.
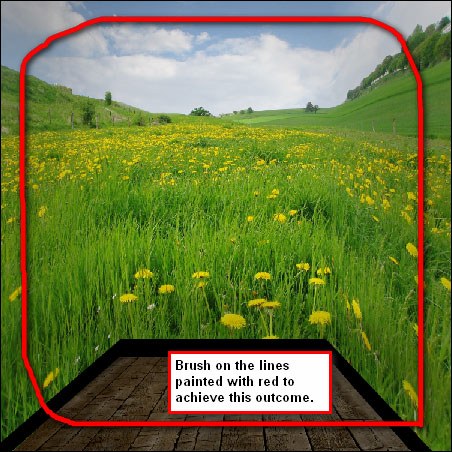
Create another layer and make sure that the brush values are still the same.
Paint more shadows as shown in the reference below:
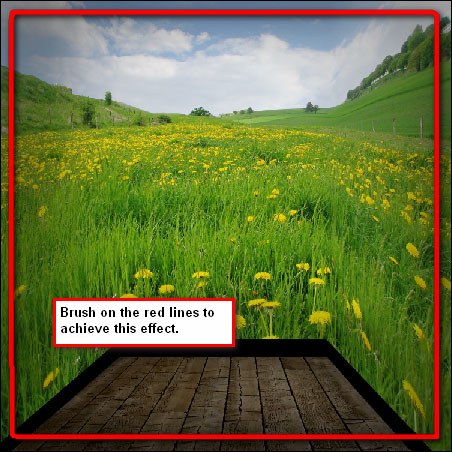
At this point, the shadows may seem too dark and prominent, so reduce the opacity of the layer to about 70%.
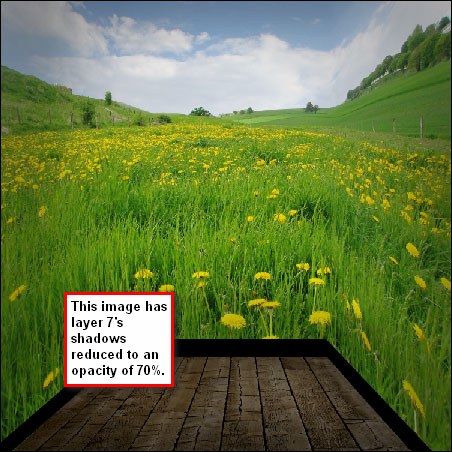
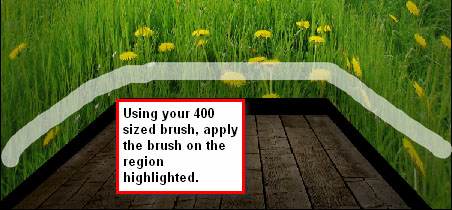
Notice that the regions on top of our partitions are too bright, so let’s decrease the brightness by brushing in some shadows on it.
Create a new layer; activate your Brush Tool again, and change its settings to the following values:
- Brush Master Diameter: 400
- Hardness: 0%
- Opacity: 15%
- Flow: 100%
Brush on the regions indicated by the reference image below.
Now that that’s done, let’s step back for a moment to organize our Photoshop document by creating a group, Layer > New > Group. You can also do this by clicking on the Create new group button in the Layers Panel, which is represented by a folder icon. Name this group as “room” or something intuitive to you.
Choose all the layers under the “room” group and drag them inside the group.
Step 14: Inserting the painter in the picture
It’s time to include our painter into the scene.
Open our Painter photo in Photoshop. Separate him from the background by using the Polygonal Lasso Tool (L) and tracing along the painter’s body. I recommend using the Polygonal Lasso Tool because it is more accurate than the Magnetic Lasso Tool, albeit using it is a bit more labor-intensive.
The Magnetic Lasso Tool sometimes gets confused by certain parts of the image, making the lasso selection imprecise.
After you have isolated the painter, drag it to our main canvas using the Move tool (V), positioning him on a suitable part of our piece.
Switch to Free Transform mode (Ctrl/Cmd + T) and resize the painter.
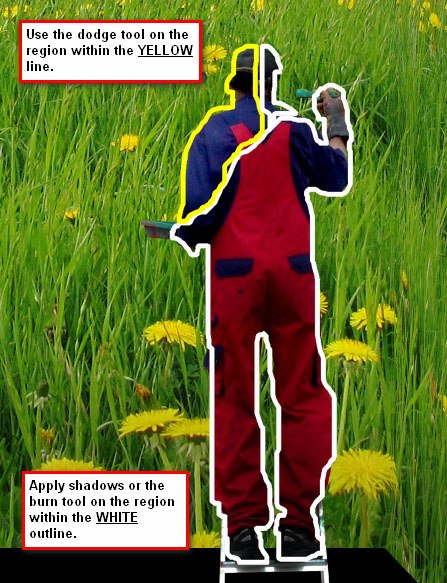
Step 15: Give the painter accurate shadows and highlights
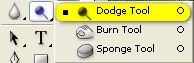
Now let’s add some shadows and lights to the painter to make him look like he’s really inside the room. To do this, we will use the Dodge Tool/Burn Tool (O). On the Options bar, adjust the Tools’ settings to the following values:
- Brush Master Diameter: 125
- Range: Midtones
- Exposure: 15%
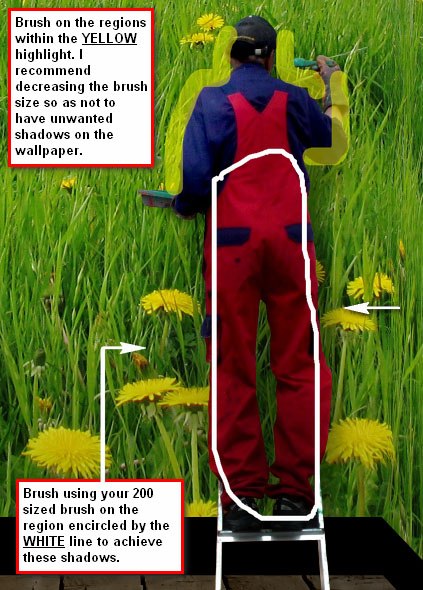
Apply the Dodge Tool and Burn Tool on our painter as presented below.
Now add shadows on the room’s outdoor wallpaper where the painter is working to make it look like he is casting a shadow onto it. Create a new layer and name it “shadow of painter” to keep our work organized.
Place this layer under the painter’s layer.
Activate your Brush Tool (B) and use the following option values:
- Brush Master Diameter: 200
- Hardness: 0%
- Opacity: 25%
- Flow: 100%
See the image below for the area where we need to apply the brush on. Be sure to paint in the newly created layer that is below the painter.
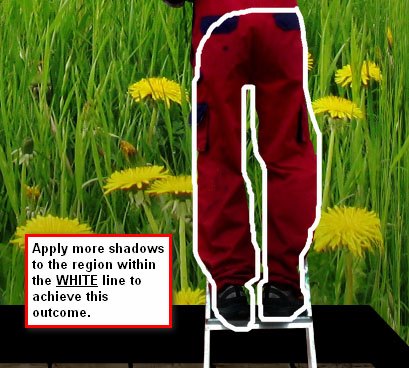
The shadows created by the painter, at present, needs more work. Create a new layer and name it “shadow of painter part two” or something inherently similar.
Put this under the “shadow of painter” layer.
Refer to the image below to visualize where to apply your brush strokes.

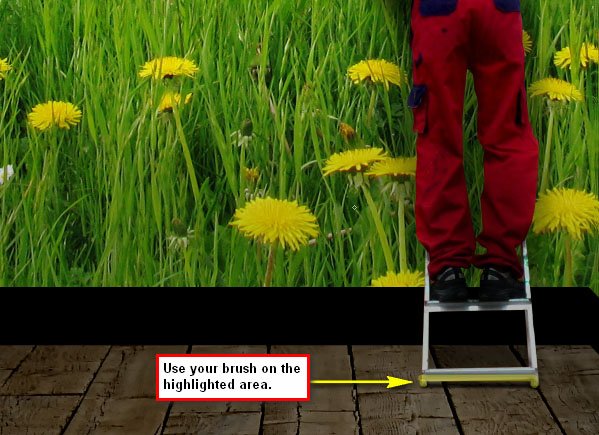
Step 16: Apply shadows to the ladder
To make the ladder that the painter is on look authentic, let’s add some shadows to it. Create a new layer and name it “ladder shadow1”.
Use your Brush Tool (B) to add the shadows to it, using these values for the Brush Tool:
- Brush Master Diameter: 80
- Hardness: 0%
- Opacity: 50%
- Flow: 100%
See image below for the regions to be brushed on:
Step 17: Adjust the ladder’s color
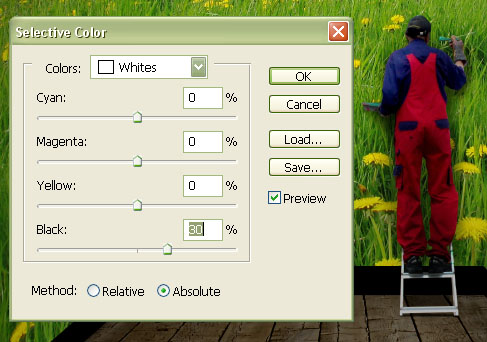
Notice that the ladder is too white. We should decrease its brightness because it is too prominent and will distract the viewer away from the overall scene. Click on the painter’s layer, then from the menu, go to Image > Adjustments > Selective Color.
This will allow us to adjust only the white colors. In the Selective Color dialog window, choose the Whites option and utilize these option values:
- Cyan: 0
- Magenta: 0
- Yellow: 0
- Black: +30
- Method: Absolute
Applying this image adjustment will change the ladder’s color to gray.
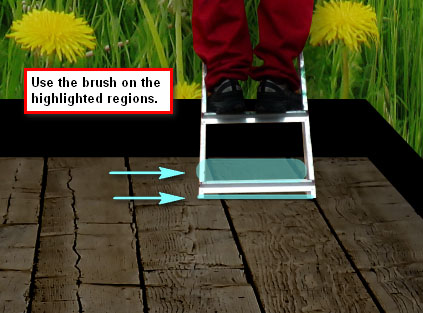
Step 18: Create more shadows on the ladder
Let’s create a new layer and name it “ladder shadow2” to add more shadows to the ladder. Use your Brush Tool (B) with the following values to paint the shadows:
- Brush Master Diameter: 25
- Hardness: 0%
- Opacity: 35%
- Flow: 100%
See reference image below for the areas that brush should be applied to.

Now let’s group all these layers for organization, you can call this group “painter and ladder”.
Step 19: Create the vignette
Let’s create a vignette to further enhance the viewer’s perspective of the image. To do this, we need to create a new canvas (File > New or press Ctrl/Cmd + N). Use the same settings as in Step 1, but make sure that the Background Contents option is set to White.
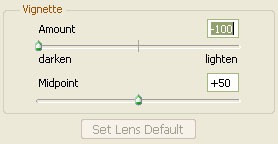
Once the new document has been created, go to Filter > Distort > Lens Correction.
Find the Vignette section and use these settings:
- Vignette amount: -100
- Midpoint: +50
Drag this vignette layer into our main canvas, making sure that it is placed on top of all the layers that we have thus far. Then set this layer’s blending mode to Multiply and layer opacity to 35%. You can adjust the opacity depending on your tastes, but I found 35% to be the sweet spot.
Step 20: Add textures to the image
To give the image a distinct, grainy look and feel, let’s add some textures.
Download and open the Textures stock photo (listed in the Resources section) or any texture that you like (see the Design Instruct Freebies section for an array of free texture files).
Place the texture on our canvas and resize it to fit our canvas using the Free Transform command (Ctrl/Cmd + T).
Change the texture layer’s blending mode to Soft Light and drop the layer opacity down to 20%.
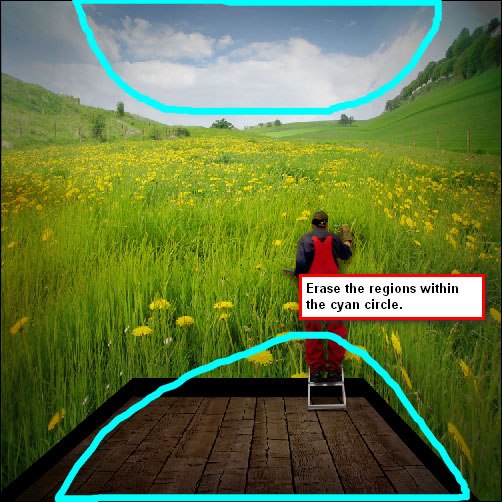
You’ll see that this simple step results in a drastic mood change in our piece, but we’re not done yet. Duplicate the texture layer by pressing Ctrl/Cmd + J and then use the Eraser Tool (E) to remove certain parts of it as seen on the reference below:
Set the duplicated layer’s blending mode to Soft Light and its opacity to 70% or so.

Let’s apply another texture—this time we will be using Paper Texture 1. Again, place this texture into our composition and resize it with the Free Transform command.
Then, with the texture in place, set its blending mode values to Overlay and drop its opacity way down to about 8% (we want this to be very subtle).
Maintain your organization by grouping all the texture layers in a group “textures”.
Step 21: Apply (a ton of) image adjustments
In this step, we’ll retouch our scene to enhance its color and overall appearance.
Solid Color adjustment layer
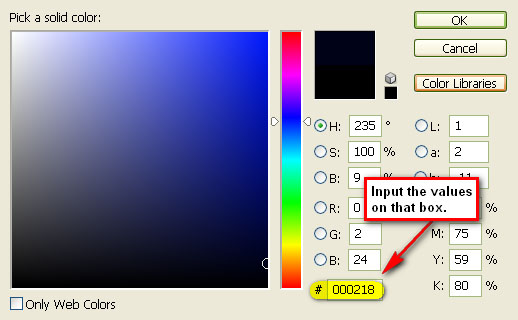
First off, let’s change its color. Click the Create new fill or adjustment layer button in the Layers Panel and select Solid Color. Use a very dark blue color for this fill layer (#000218).
With the fill layer applied, set its blending mode to Exclusion with its layer opacity moved down to 60%.
Gradient Map adjustment layer
Next, create a Gradient Map adjustment layer using the Create new fill or adjustment layer button again.
Set this adjustment layer’s blending mode to Luminosity, and the opacity to 100%.
Curves adjustment layer
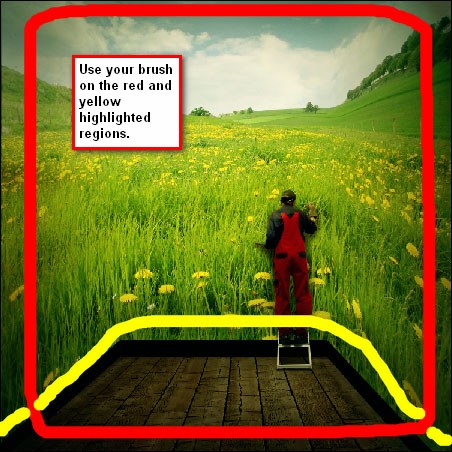
Let’s enhance the image’s white balance now. Click on the Create new fill or adjustment layer button again and select Curves. Click the Gray point eyedropper and sample from a location in our composition as indicated below to set the gray point of the Curves adjustment layer.
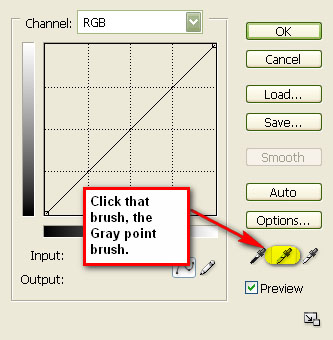

Photo Filter adjustment layer
Click on the Create new fill or adjustment layer button again and select Photo Filter.
We will be reducing the yellowish color of our image. When the Photo Filter dialog window opens, click on the Filter option drop down menu and select the Deep Blue filter. Also, use the default Density value, which is 25%.
Afterwards, reduce the opacity of the Photo Filter adjustment layer to 50%.

Levels adjustment layer
Next up, we’ll use a Levels adjustment layer.
Click on the Create new fill or adjustment layer button again and pick Levels to give the light parts of our piece a slightly darker tone. In the Levels option dialog window, click on the Channel drop down menu to expand your options. The default value is RGB, but change it to Red (Alt/Option + 3), and then input these values for the shadow, midtone, and highlight input levels respectively: 15, 1.00, 255.
Do not close the Levels dialog window just yet because we also need to modify the Blue channel.
Click on the drop down menu once again and select the Blue channel (Alt/Option + 5). Then use these values for the input levels: 15, 1.00, 255.
Brightness/Contrast adjustment layer
Afterwards, we will lessen the scene’s brightness. Click on the Create new fill or adjustment layer button and choose Brightness/Contrast.
Use 1 for both the Brightness and Contrast options.
Next, we need to perform some color balancing to make it a little more pleasing on the eye by reducing its yellow tinge. Click on the Create new fill or adjustment layer button and select Color Balance. Use the following option settings:
- Color Levels: -7, 7, 7
- Tone Balance: Midtones
- Check the Preserve Luminosity box
This should even out the colors of our composition and make them more harmonious.
Brightness/Contrast adjustment layer
Let’s augment the Saturation of the composition a little bit to make the image more vivid. You guessed it: Click on the Create new fill or adjustment layer and select Hue/Saturation. Use these option values:
- Edit: Master
- Hue: 0
- Saturation: 5
- Lightness: 0
This should add more color to our scene.
Another Photo Filter adjustment layer
Create another Photo Filter adjustment layer, selecting the Warm Filter (81) photo filter preset to give the piece a warmer tone. Make sure that the Density is at 25% and that the Preserve Luminosity option is checked.
Reduce the opacity of the new Photo Filter adjustment layer to 70%.
Step 22: Apply more shadows to the wall
For the final (re)touch, let’s add more shadows to the walls. Create a new layer and activate your Brush Tool (B) once again.
Set the brush option values to:
- Brush Master Diameter: 400
- Hardness: 0%
- Opacity: 10
- Flow: 100%
Refer to the image below to see where to apply the brush.
Step 23: Add one final adjustment layer (Curves)
Then add a Curves adjustment layer.
Keep our document organized by grouping all the adjustment layers that we have just done in a group called “adjustments”.
Step 24: Use the Smart Sharpen Filter
This is a good place to save your Photoshop document as a PSD file, if you haven’t already.
Lets sharpen the image. Go to Filter > Sharpen > Smart Sharpen and use these values:
- Amount: 125%
- Radius: 1.0
- Remove: Gaussian Blur
- Check the More Accurate option
Step 25: Saving Your Work
After you’ve finished the sharpening, you may flatten the image by right-clicking on any layer and selecting Flatten Image. Before doing this, you may want to save it as a TIFF (which can be opened by many types of graphics editor) or a PSD file first, which would allow you to make modifications to your work without reducing its quality. In addition, you can view cracks in the image through the Histogram.
As a final product, save your image as a JPG file.
Conclusion
We performed a lot of Photoshop techniques and methods in this photo manipulation tutorial to compose a scene using various stock images.
We leaned on the different free transform commands such as Perspective, Distort, and Skew to create the walls of our outdoor 3D room.
We used some proven expert techniques for incorporating the painter realistically into the scene by using the Dodge Tool and Burn Tool. We created a vignette, added a few textures, and used plenty of layer adjustments to make our scene look more appealing and artful. I hope you discovered some nifty techniques that you can incorporate into your own Photoshop methods.
If you have questions and suggestions, please don’t hesitate to leave a comment.
Don’t forget to showcase your own version of this tutorial through the Design Instruct Flickr group pool.
Download Source Files
- surreal_outdoor_room (ZIP, 98.2 MB)
-
 Trevin serves as the VP of Marketing at WebFX. He has worked on over 450 marketing campaigns and has been building websites for over 25 years. His work has been featured by Search Engine Land, USA Today, Fast Company and Inc.
 -

WebFX is a full-service marketing agency with 1,100+ client reviews and a 4.9-star rating on Clutch! Find out how our expert team and revenue-accelerating tech can drive results for you! Learn more
Make estimating web design costs easy
Website design costs can be tricky to nail down. Get an instant estimate for a custom web design with our free website design cost calculator!
Try Our Free Web Design Cost Calculator
Table of Contents
- Preview
- Resources
- Step 1: Create a New File
- Step 2: Replace the Sky of Our Wallpaper
- Step 3: Set Up the Workspace for Creating the Walls
- Step 4: Create the Left Wall
- Step 5: Create the Center Wall
- Step 6: Create the Right Wall
- Step 7: Scale the Walls
- Step 8: Add the Floor of the Room
- Step 9: Blend the Seams of the Floor and the Walls with Partitions
- Step 10: Coloring the Floor
- Step 11: Manual Adjustments to the Floor
- Step 12: Adjust the Color Contrast of the Floor
- Step 13: Create Lighting and Shadows on the Wall and Floor
- Step 14: Inserting the Painter in the Picture
- Step 15: Give the Painter Accurate Shadows and Highlights
- Step 16: Apply Shadows to the Ladder
- Step 17: Adjust the Ladder’s Color
- Step 18: Create More Shadows on the Ladder
- Step 19: Create the Vignette
- Step 20: Add Textures to the Image
- Step 21: Apply (a Ton Of) Image Adjustments
- Step 22: Apply More Shadows to the Wall
- Step 23: Add One Final Adjustment Layer (Curves)
- Step 24: Use the Smart Sharpen Filter
- Step 25: Saving Your Work
- Conclusion
- Download Source Files
Share this article


Web Design Calculator
Use our free tool to get a free, instant quote in under 60 seconds.
View Web Design CalculatorMake estimating web design costs easy
Website design costs can be tricky to nail down. Get an instant estimate for a custom web design with our free website design cost calculator!
Try Our Free Web Design Cost Calculator


