
Tutorial Preview
Step 1: Set Up the Photoshop Document
In Photoshop, create a new document (Ctrl+N or Cmd+N on Mac OS) with a canvas size of 550x400px. If it’s locked, unlock the default Background layer so we can fill it with a color. Here’s how you do that: Double-click on the Background layer, which will open the New Layer dialog window.
Just press the OK button to unlock the Background layer. Afterwards, fill the Background layer with a very light gray color (#ececec). Double-click on the Background layer to open the Layer Style window.
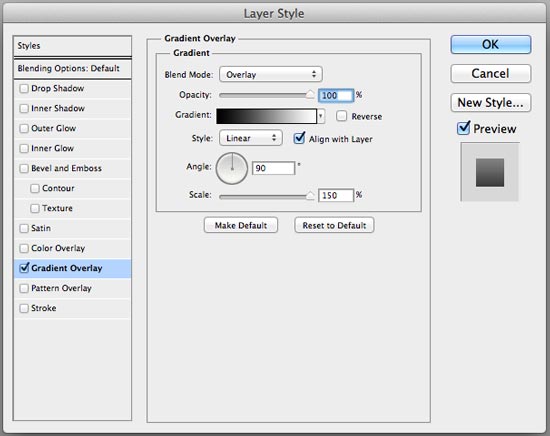
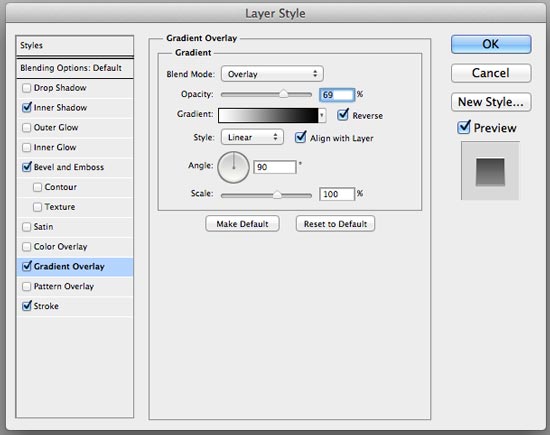
In the Layer Style window, give our Background layer a Gradient Overlay layer effect using the image below as a guide for the effect’s settings.
Gradient Overlay
 Now we have a good, complementary background for our slider:
Step 2: Create the Slider Bar
In this step, we’ll make the slider bar, a horizontal rectangle that will be sort of the “track” of our slider control (which we’ll create later on). To start, use the Rectangle Tool (U) and draw a rectangle like on the image below.
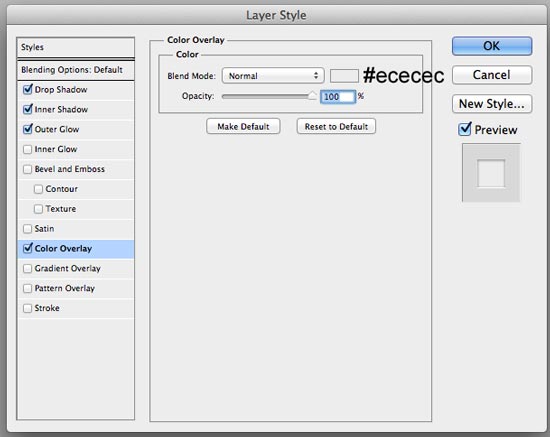
Make sure that the Rectangle Tool is set to Shape layers mode (you can set this at the Options bar at the top). For the Color of the shape, use a gray color (#dddddd) — you can also set the Color of your shape at the Options bar. 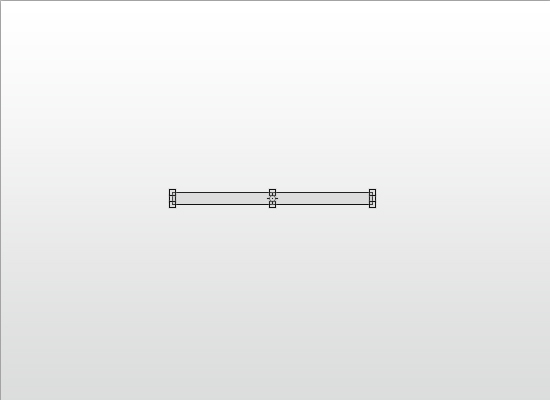 Double-click on the rectangle shape layer to open up the Layer Style window.
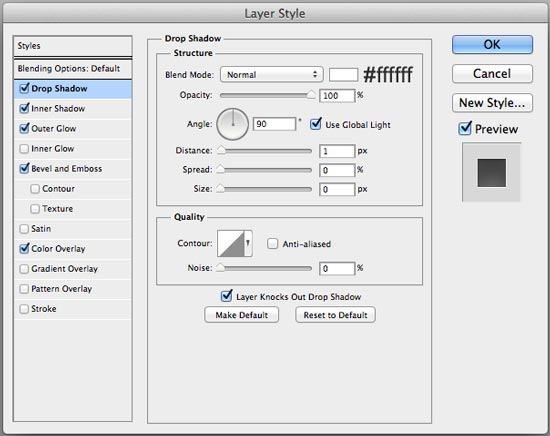
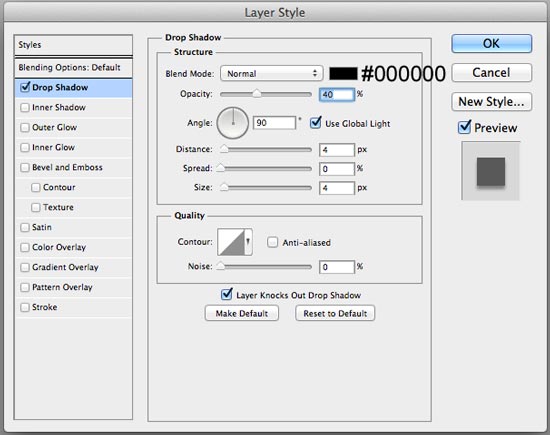
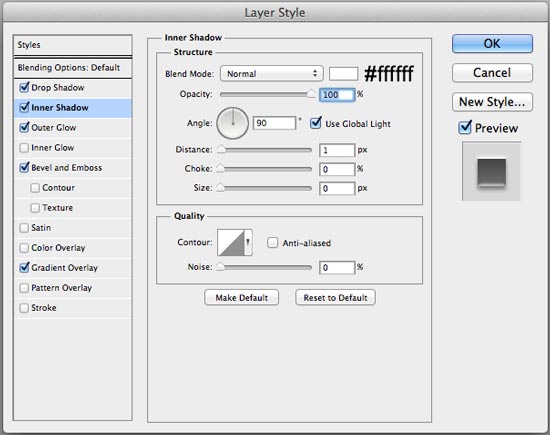
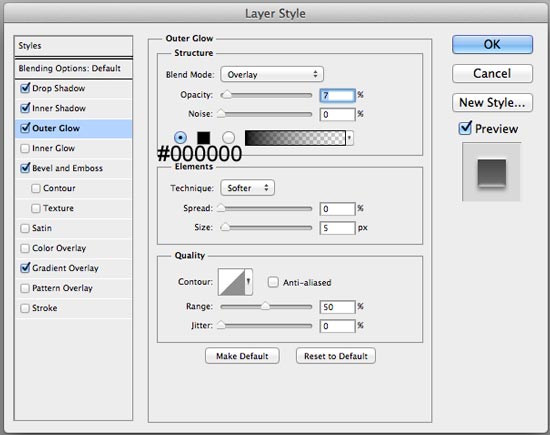
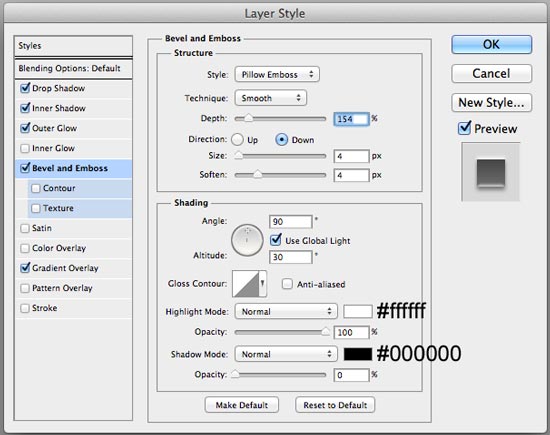
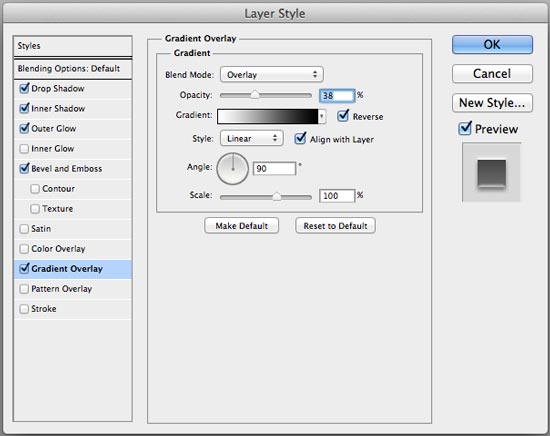
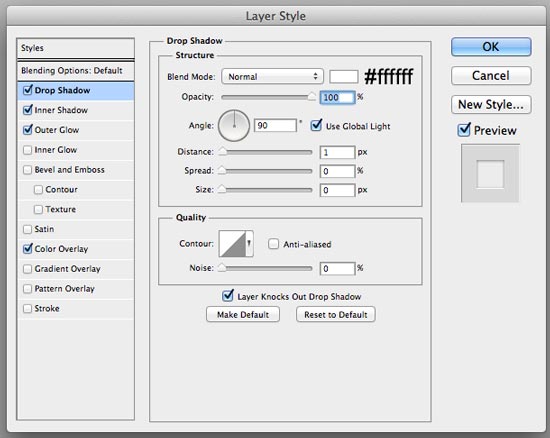
We’ll give our rectangle shape layer 5 layer effects: Drop Shadow, Inner Shadow, Outer Glow, Bevel and Emboss, and Color Overlay. Below are the settings for each of these layer effects.
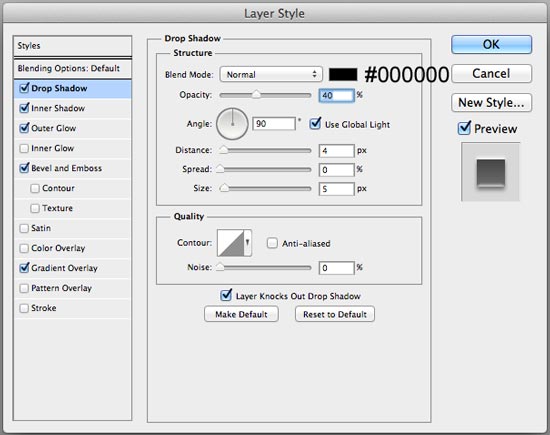
Drop Shadow
Inner Shadow
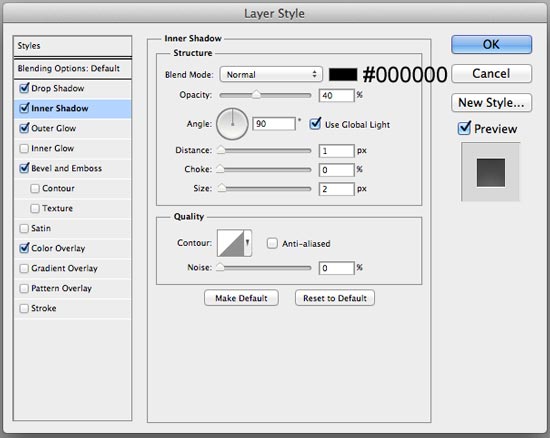
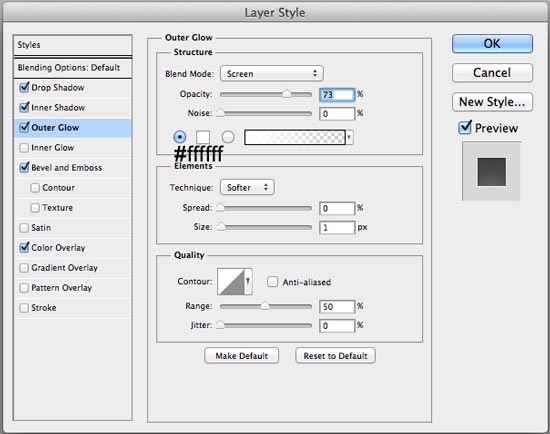
Outer Glow
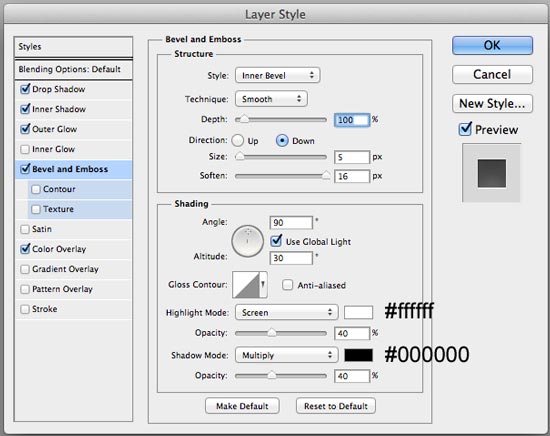
Bevel and Emboss
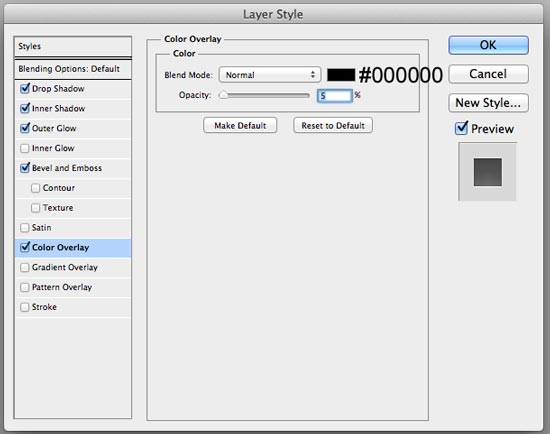
Color Overlay
 Check out what the layer style did to our ordinary rectangle shape:
  Now we’ll place a smaller rectangle inside the rectangle we just created.
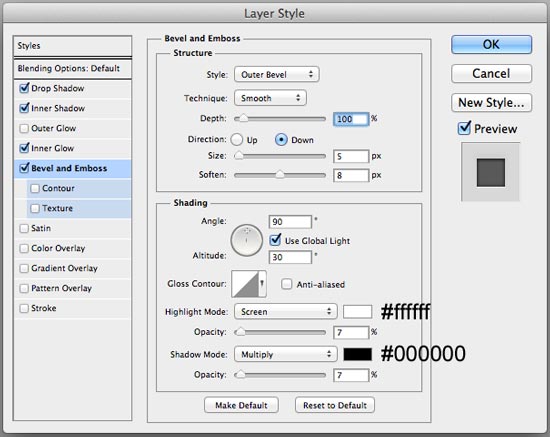
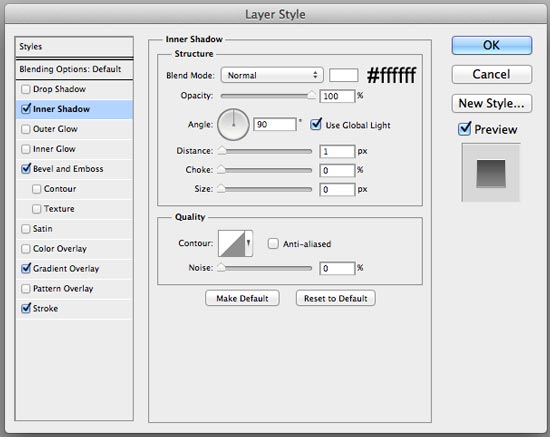
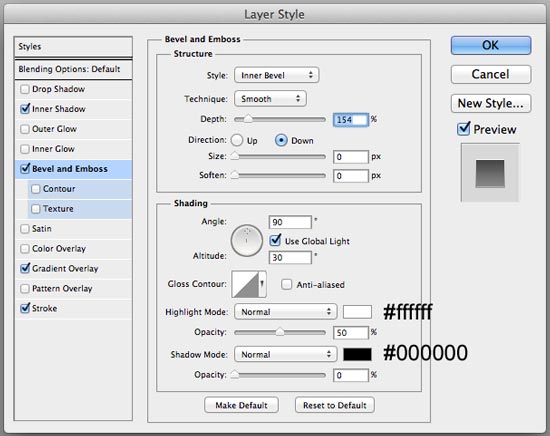
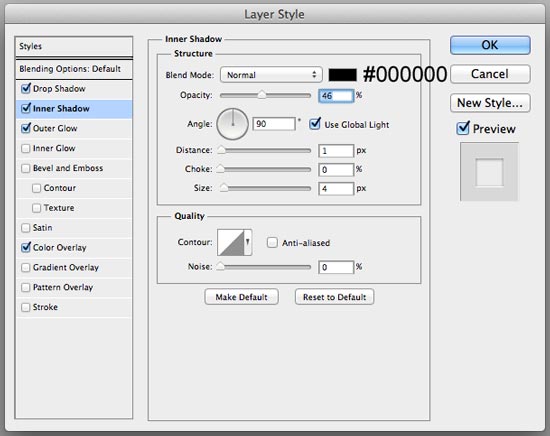
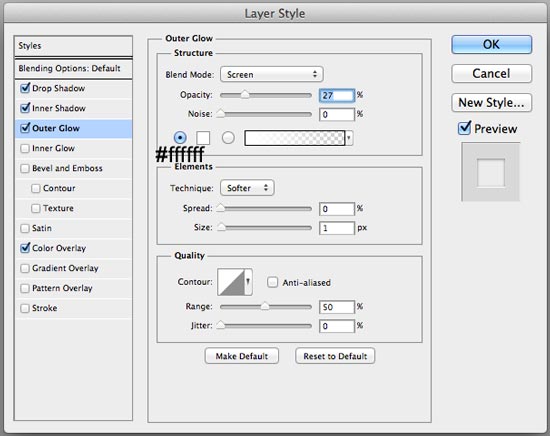
Create another rectangle shape inside our bigger rectangle using the Rectangle Tool (U). For Color, use a darker-toned gray (#8f8f8f).  For this shape layer, we’ll apply 4 layer effects: Drop Shadow, Inner Shadow, Inner Glow, and Bevel and Emboss.
The settings for each of these are below.
Drop Shadow
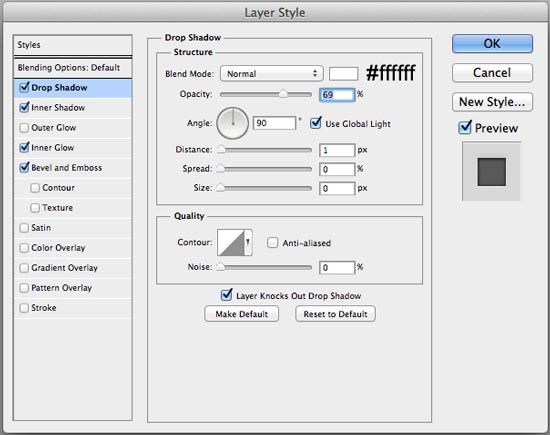
Inner Shadow
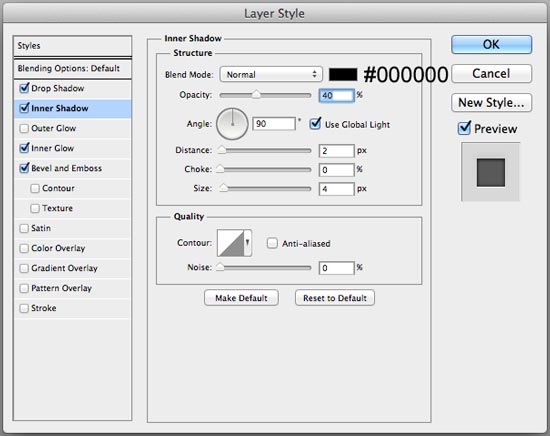
Inner Glow
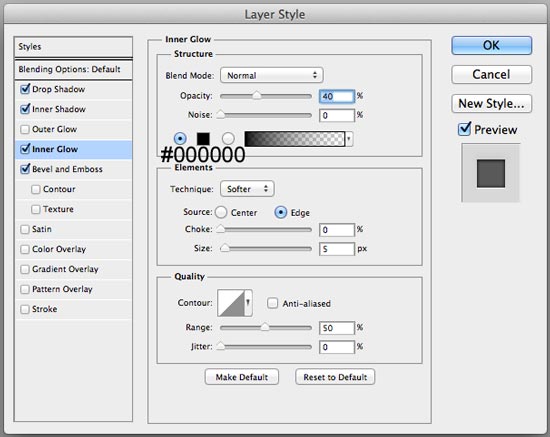
Bevel and Emboss
 Take a look at our finished slider bar now:
  Let’s keep things organized by putting both of these shape layers in a layer group (which we can name “Slider bar”). To place the layers in a layer group, just select both layers in the Layers panel and then go to Layer > Group Layers.
Step 3: Create the Slider Control
Let’s make the slider control, which is what you’d slide left and right when interfacing with our slider user interface. Switch to the Rounded Rectangle Tool (U). In the Options bar, set the Radius to 2px.
Also, set the Color to the gray color we used for the background (#ececec). Use the Rounded Rectangle Tool to draw a square shape somewhere on top of our slider bar. 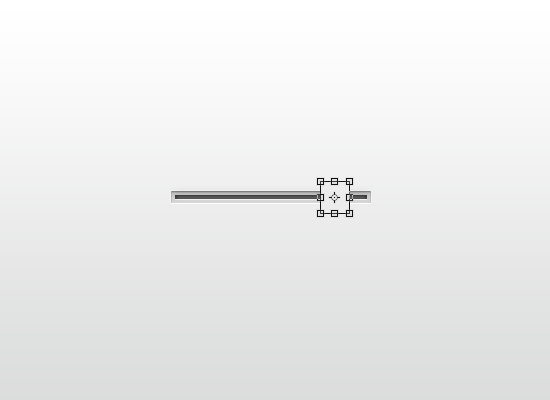 Double-click the shape layer in the Layers panel to reveal the Layer Style window again.
Let’s give this layer a Drop Shadow layer effect to give our slider control a better appearance that it’s on top of the slider bar.
Drop Shadow
 Here’s our slider control with the Drop Shadow layer effect applied:
  Duplicate the layer by going to Layer > Duplicate Layer. Right-click on the duplicated layer, which will reveal a contextual menu where you should choose Clear Layer Style to remove the Drop Shadow layer effect.
Now, double-click on the duplicate layer to open the Layer Style window. For this layer, we will apply 4 layer effects: Inner Shadow, Bevel and Emboss, Gradient Overlay, and Stroke. The settings for these layer effects are shown below.
Inner Shadow
Bevel and Emboss
Gradient Overlay
Stroke
 Below is the result of our layer effects:
 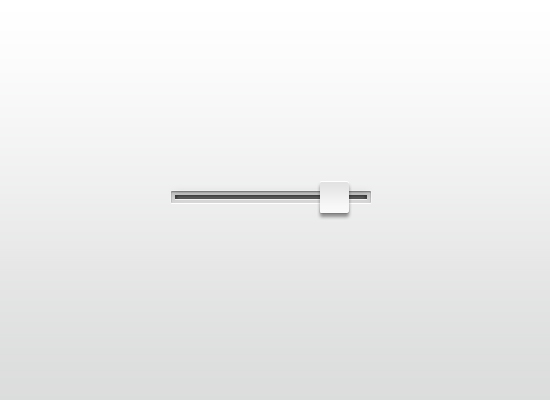 Switch to the Rectangle Tool (U) with the Color still set to #ececec. Draw a vertical rectangle in the middle of our slider control.
  Give the vertical rectangle layer these 5 layer effects: Drop Shadow, Inner Shadow, Outer Glow, Bevel and Emboss, and Gradient Overlay (the settings are all below).
Drop Shadow
Inner Shadow
Outer Glow
Bevel and Emboss
Gradient Overlay
 Looking good so far, right?
 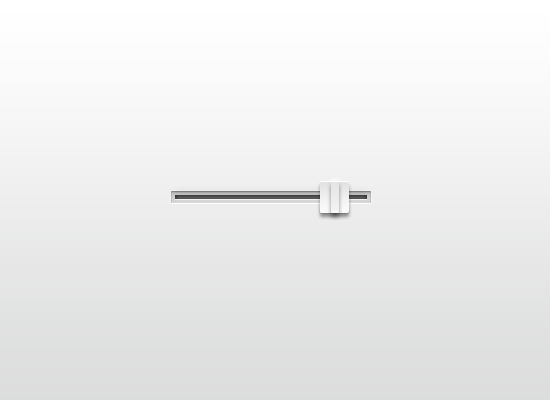 Put all these layers in a layer group, which you can call “Slider control”.
Step 4: Add the Levels Indicator
We’re almost finished! This is the final step of the tutorial. In this step, we’ll add the levels indicator, which are just notches located north and south of the slider bar.
One last time, use the Rectangle Tool (U) to draw a skinny vertical line like in the image below. 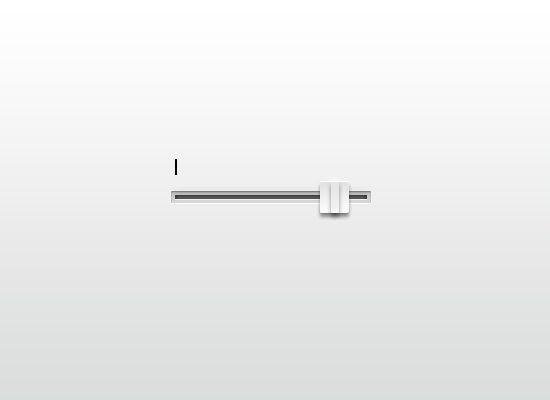 Press Ctrl+Alt+T (or Cmd+Option+T for Mac OS) to duplicate the shape. Use your Arrow key or your mouse to move the duplicate to the right.
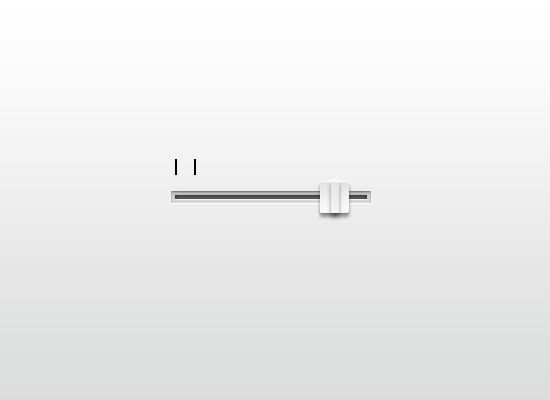 Repeat this process until you have your desired number of lines.
 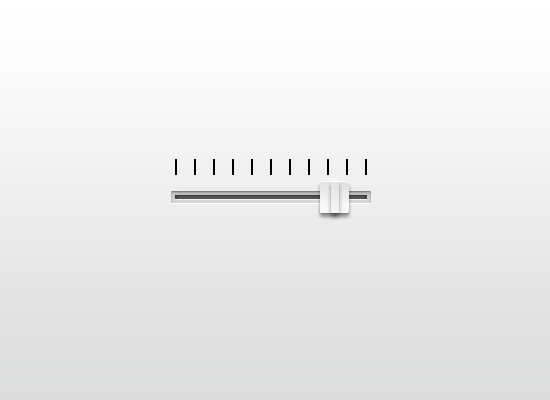 Give just one of the lines these 4 layer effects: Drop Shadow, Inner Shadow, Outer Glow, and Color Overlay.
Drop Shadow
Inner Shadow
Outer Glow
Color Overlay
 Now we’ll just quickly copy-and-paste this layer style to the other lines.
To do this, first right-click on the layer that you gave the layer style to, and then choose Copy Layer Style in the contextual menu that appears. Then select all the other layers, right-click and choose Paste Layer Style. This should apply the same layer effects to the other remaining lines.
Here’s what we have now: 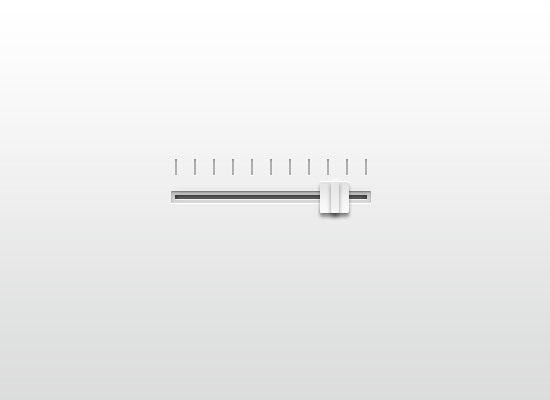 Just duplicate these layers and move the duplicates down below the slider bar.
Tutorial Summary
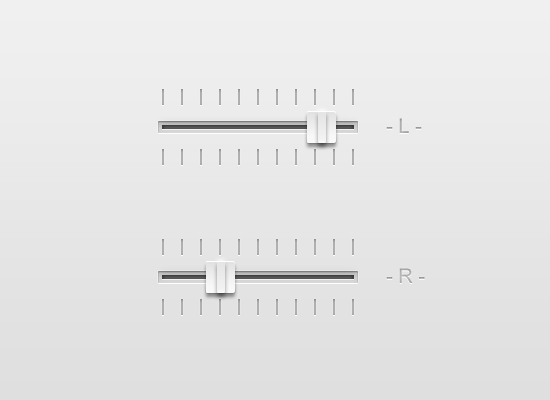
That’s it, we’re done! We can easily create new slider user interfaces just by duplicating the first one.
Below, I copied the slider UI we created and just moved the slider control. I also just put a “- L -” and an “- R -” label (i.e. they stand for “left channel” and “right channel”, like the ones you can find on old amplifiers) using the Horizontal Type Tool and the same layer style I used for the levels indicator.
 Thanks so much for reading my tutorial! I hope this helps you!
More Slider User Interface Resources
- Take a look at Ui Parade’s gallery of sliders if you want to see more slider UI designs.
- Designmodo also has a tutorial on creating a UI sliders set using Photoshop.
- Quora has a thread about examples of good UI sliders (but you have to sign in to view all the answers).
Download Tutorial Source Files
- slider_ui_design_photoshop (0.01 MB)
-
 Trevin serves as the VP of Marketing at WebFX. He has worked on over 450 marketing campaigns and has been building websites for over 25 years. His work has been featured by Search Engine Land, USA Today, Fast Company and Inc.
 -

WebFX is a full-service marketing agency with 1,100+ client reviews and a 4.9-star rating on Clutch! Find out how our expert team and revenue-accelerating tech can drive results for you! Learn more
Make estimating web design costs easy
Website design costs can be tricky to nail down. Get an instant estimate for a custom web design with our free website design cost calculator!
Try Our Free Web Design Cost Calculator
Share this article


Web Design Calculator
Use our free tool to get a free, instant quote in under 60 seconds.
View Web Design CalculatorMake estimating web design costs easy
Website design costs can be tricky to nail down. Get an instant estimate for a custom web design with our free website design cost calculator!
Try Our Free Web Design Cost Calculator