
Resources
- Grunge texture by BittBox
- Business Man by Viorel Sima
- Skull stock pack by Natalie Paquette
- Fire 1 by Alvimann
- Fire 2 by Lisa Solonynko
- Fire 3 by patita_rds
- Smoke brushes by PhotoshopTutorials
- Bill Hicks font by Jason Ramirez
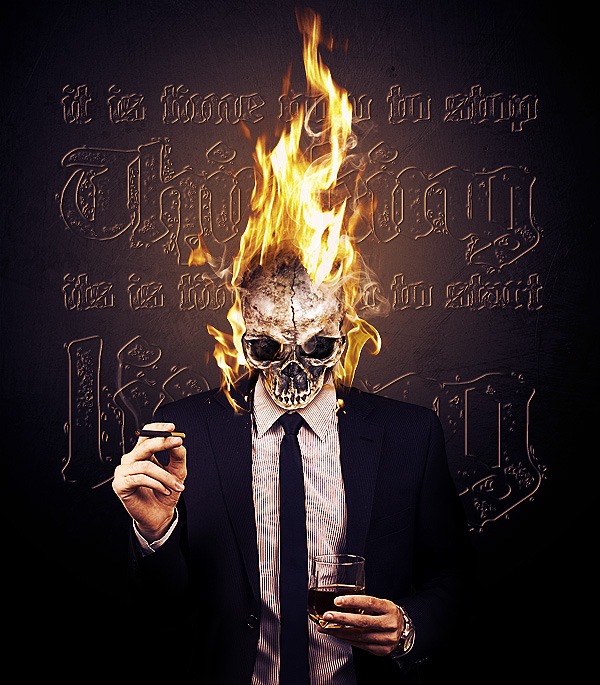
Preview
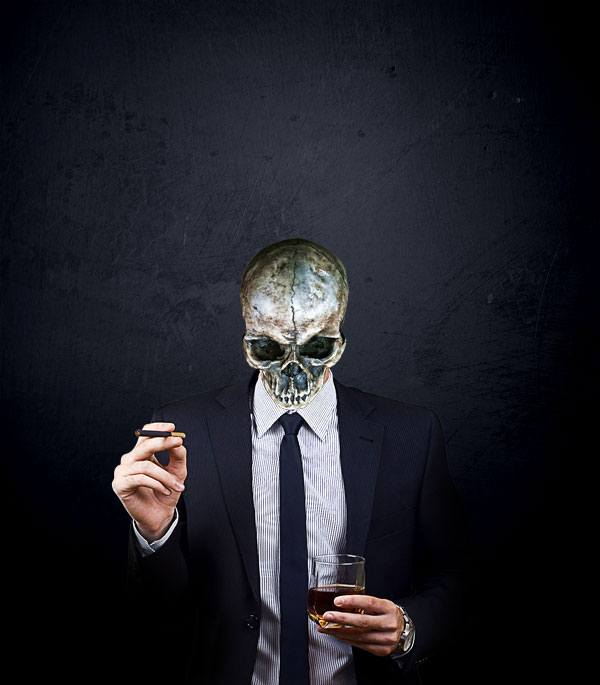
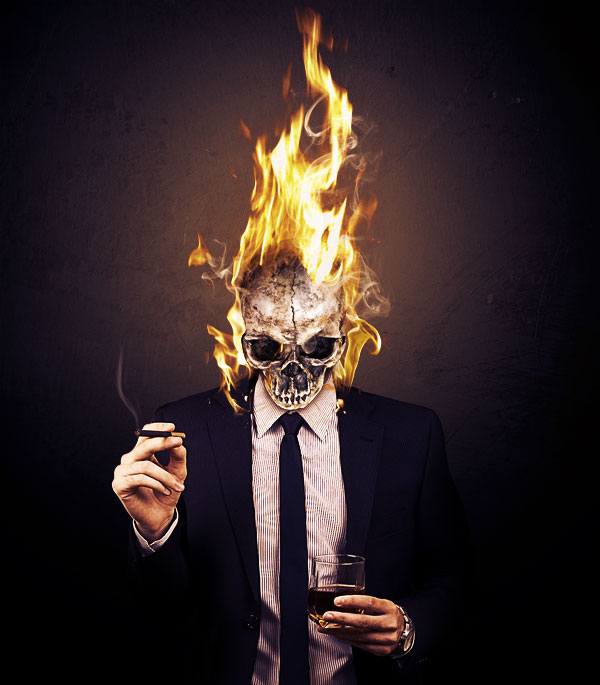
The image below is what we will be creating here. Click on it to see the full scale image.

Introduction
The creative process is something subjective, so at first, I want to specify that I’m not suggesting that you follow exactly how I create my compositions.
However, this teaching approach is the best way to understand what goes into a digital project. After working in the graphic design field for a year, I know only one thing is certain: technique is the tool for conveying a message.
The most important part of any piece is what is behind it—it’s meaning —and the greatest skill of a visual communicator is the ability to show this message throughout his or her work.
This is what I want to share with you in this tutorial.
Step 1: Inspiration
My approach to a new project is not a schematic.
Since I spend lots of hours surfing the web, it’s my habit to bookmark and take screenshots of nice images I’ve found. So if I don’t have a precise idea of what I need to do, I open LittleSnapper and go through my image gallery, or I open my photo library until I find something that captures my attention.
In this case, I came across this wonderful work by Boss Logic called Sin Sisters:

In particular, I liked the idea of a skull on a human body.
So let’s start imagining what we want to create. Assuming that the skull is the symbol of death, what is a concept that can be related to the death?
Business.
From here, the idea spurred the placement of a skull on the body of a businessman.
At this point, I now have an idea of how to begin.
Death + business. Nice!
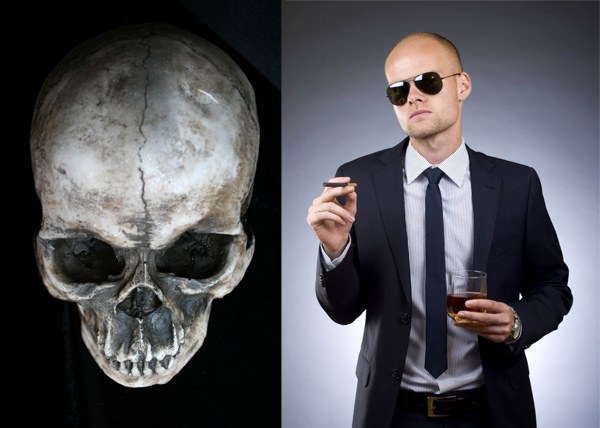
I still don’t know what the direction of the composition will take, but for the moment, I simply start searching suitable images. These are what I found:
Step 2: Preparing the background
I generally start creating the background first.
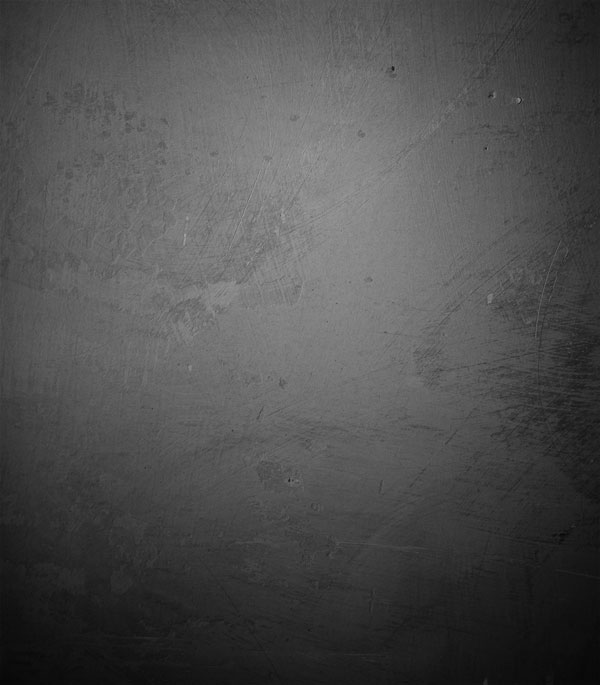
Since we will work with a skull, a grunge background is the best. I want to focus the attention on the center of the canvas where the main character will be placed. Therefore, a subtle grunge background is better than a photo with lots of detail so that we don’t overshadow the subject.
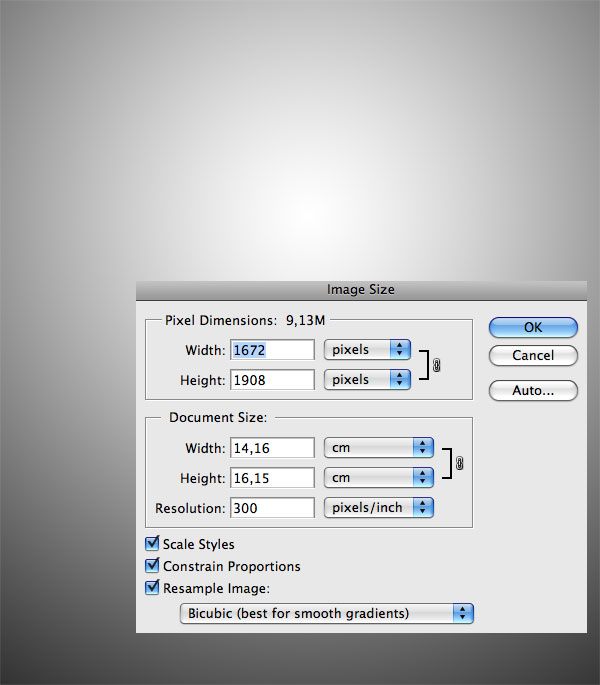
First, create a new document in Photoshop.
We will work with a vertical canvas that’s taller than it is wider (1672px by 1908px is what I used).
Add a radial gradient going from white to black.
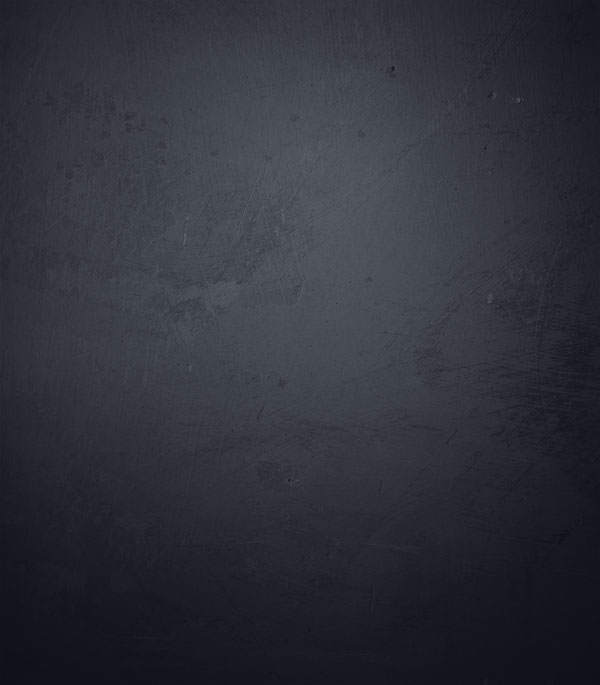
Paste in a grunge texture (I used this one from BittBox), desaturate it (Ctrl/Cmd + Shift +U) and set the layer’s blending mode to Multiply.
Starting with a black and white, desaturated background texture gives me complete color control. All I have to do now is apply different layer adjustments until I am satisfied with the result.
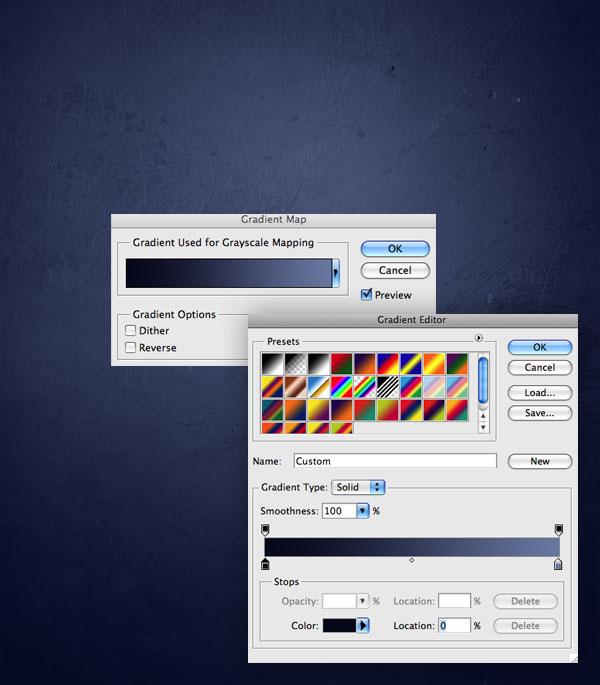
Lets start adding colors with a Gradient Map adjustment layer (Layer > New Adjustment Layer > Gradient Map) going from a desaturated blue (#798bb0) to a dark blue (#030722).
At this point, I decided to desaturate the background (Ctrl/Cmd + Shift +U). The reason is that when I finish a composition, I usually apply final touches that increase color saturation.
Let’s apply a new adjustment layer, but this time, select Hue/Saturation and set Saturation to -70.
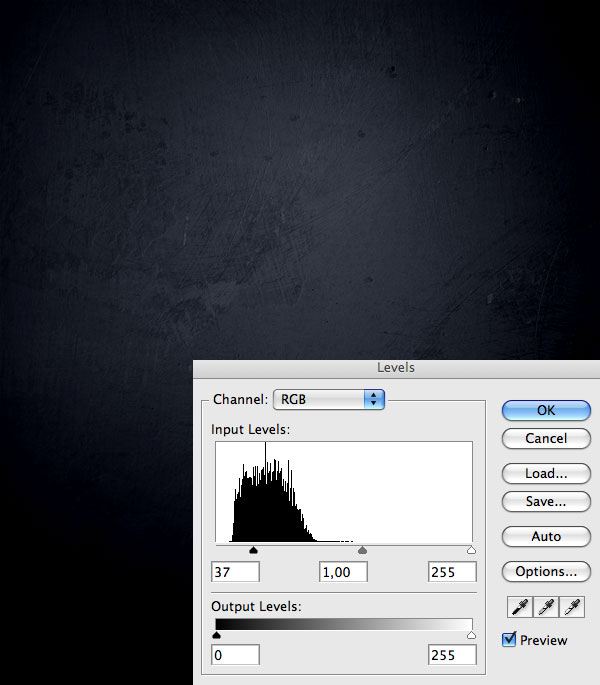
We want the image to be darker so let’s apply a third adjustment layer.
This time, we’ll go for a Levels adjustment layer and move the black arrow just a little to the right.
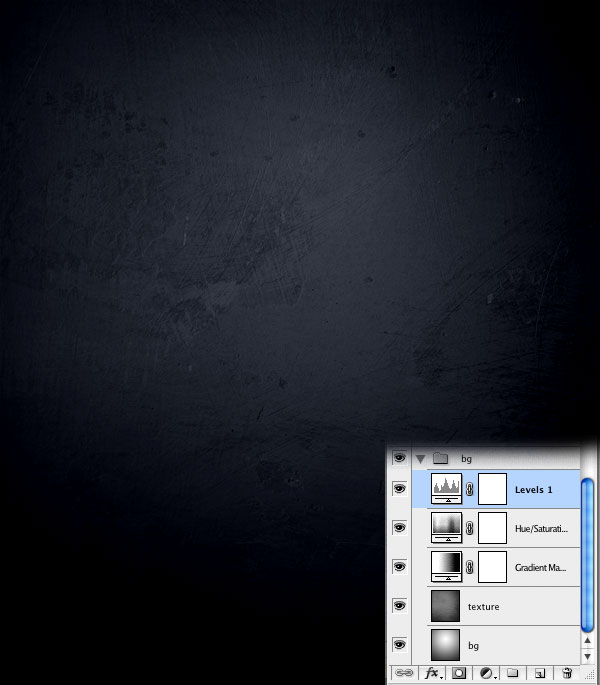
The background is good to go, so select all the layers in the Layers Panel, group them together (Ctrl/Cmd + G) and name the group as “background“—order and organization is fundamental if you work with lots of layers.
Step 3: Add the businessman
Paste in the businessman into our composition. I chose this image because I liked the pose and the idea of the subject smoking and drinking—it goes back to the whole death concept.
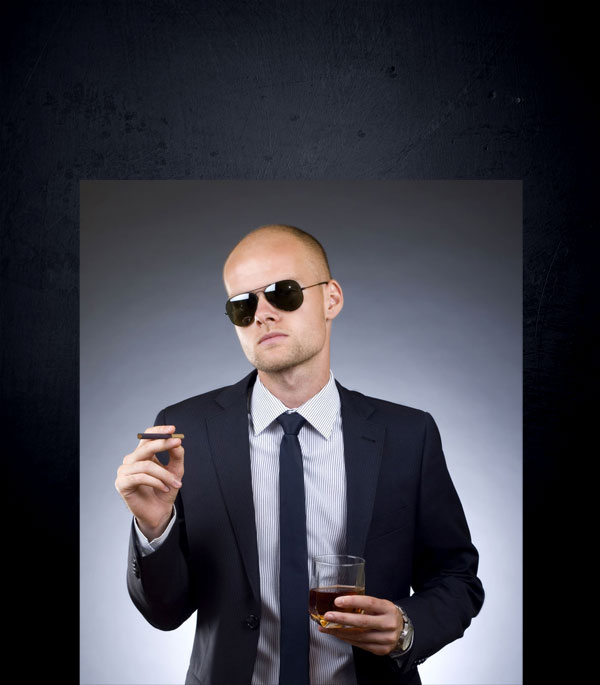
Use the Pen Tool (P) to extract the subject from its background by tracing around his body while making sure to leave out his head because we will replace it with the skull.
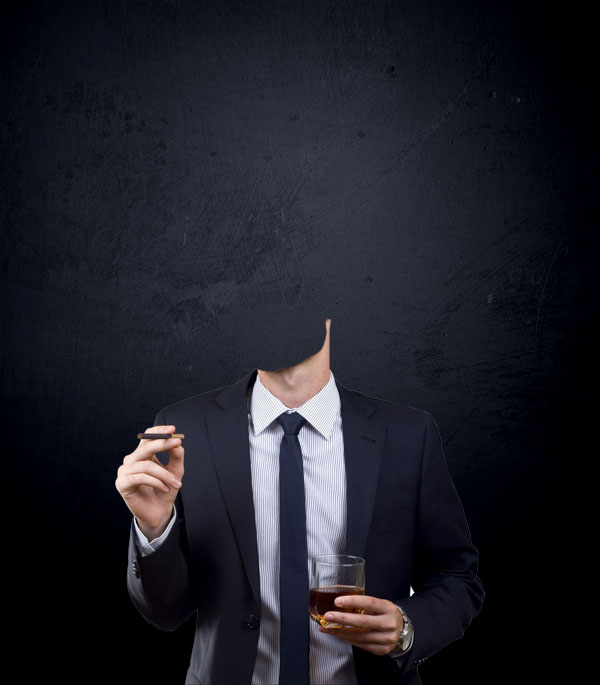
Step 4: Retouch the businessman
Each element inserted into a composition has to match with each other. In this case, we have to create harmony between the body and the grunge background.
I wanted to emphasize an element of the image: the hand with the cigarette.
What I had in mind was to make the hand and the shoulders of the subject bigger. The Liquify filter will help us make this happen. So choose Filter > Liquify and use the Bloat Tool on both the hands and over the shoulders.
This step might seem strange, but keep in mind that our character is surreal.
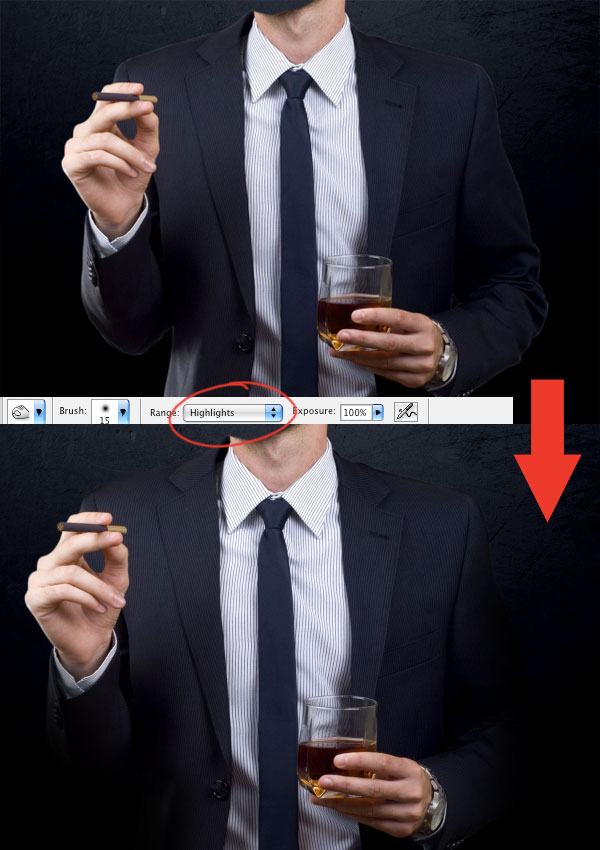
You should notice the light edges around the body. The best way to remove the edge, I’ve found, is to use the Dodge Tool (O) from the Tools Panel. You can use the same tool at the bottom of the body image to blend it into the dark background.
Step 5: Increase details and contrast
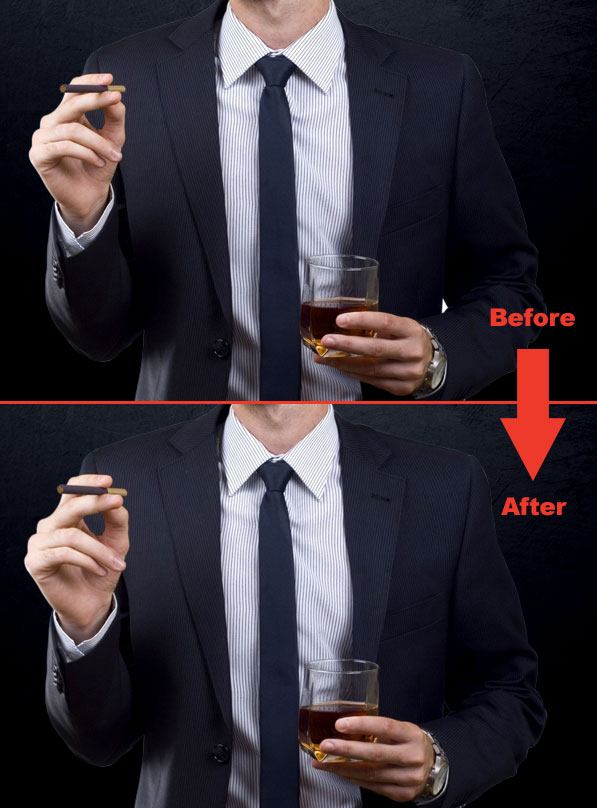
When working with the human body, I like increasing the contrast a bit as well as enhance image details.
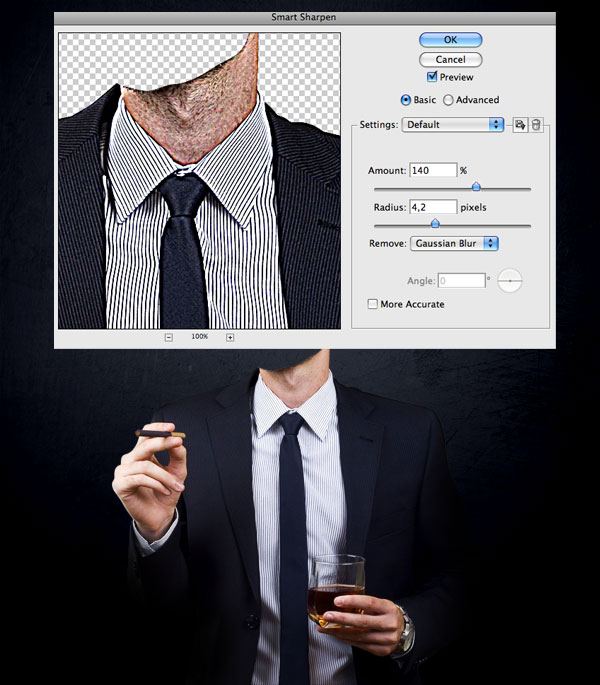
For this composition, I want to achieve a soft HDR effect. Let’s do this by first duplicating the layer that the subject is on (Ctrl/Cmd + J).
Then apply the Smart Sharpen filter (Filter > Sharpen > Smart Sharpen) and set the blending mode of the layer to Overlay and the opacity at 30%. (By the way, if you want to see a master of this effect, take a look at Adam Spizak’s portfolio.)
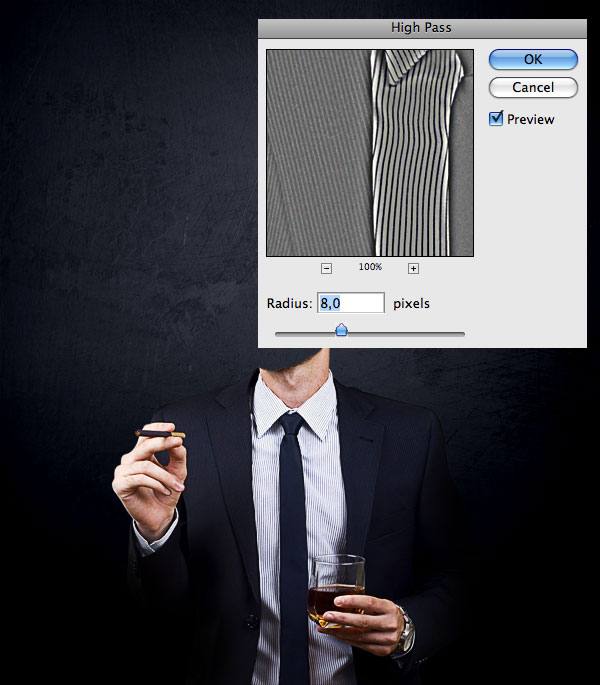
Duplicate the subject’s layer again (Ctrl/Cmd + J).
This time, apply the High Pass filter (Filter > Other > High Pass) with a radius of 8px.
Once that’s done, set the layer’s blending mode to Overlay.
Now select all the layers we’ve created of the subject and press Ctrl/Cmd + Alt + E to merge them into a new layer.
At this point, lets apply the Sharpen Edges filter (Filter > Sharpen > Sharpen Edges) on the new merged layer.
Once you’re happy with the details and contrast, you can select all the body layers and group them together to keep our Layers Panel organized.
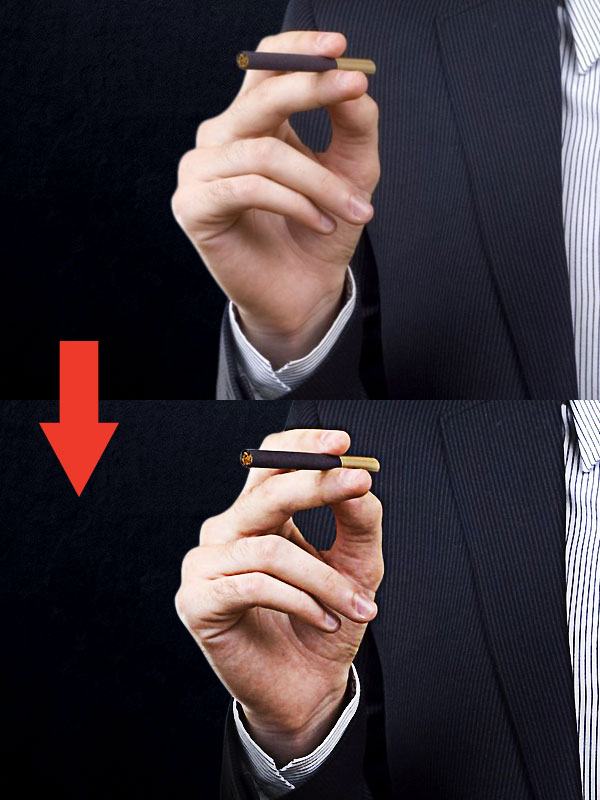
See the image below, which compares the original image with our processed image:
Step 6: Work on the skull
Paste in the image of the skull into our canvas.
Since we increased the contrast of the body, we must do the same with the skull. The reason, again, is harmony between the different elements of our composition.
Begin by extracting the skull from its background, using the Pen Tool (P) just like in the previous step.
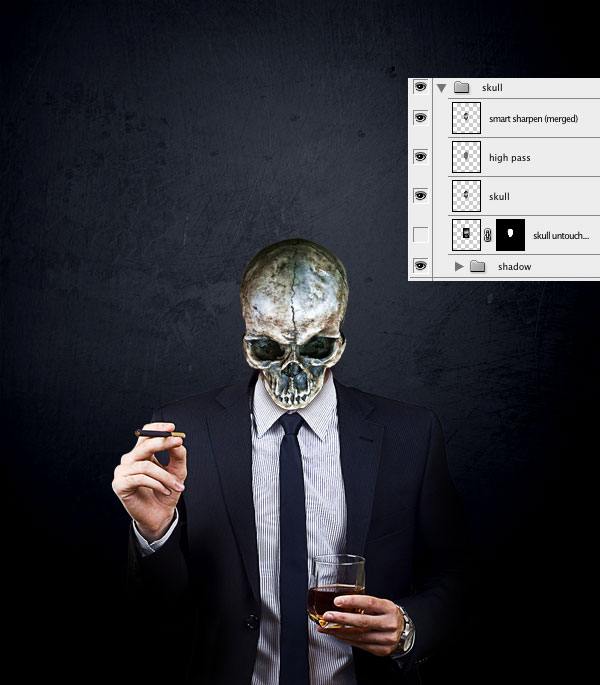
Duplicate the skull’s layer, apply the High Pass filter, and then set the layer’s blending mode to Overlay.
Merge the two layers into a new one (select the layers and press Ctrl/Cmd + Alt + E) and then apply the Smart Sharpen filter.
Zoom in on the skull with the Zoom Tool (Z) to prepare for the next process.
To make the image more realistic, we’ll give our skull a shadow. Begin by creating a new layer below the original skull.
On the new layer, use the Brush Tool (B) equipped with a soft, black brush tip with its Hardness set at 0% to paint the shadow. If the shadow is too dark, reduce the Opacity option of the brush as necessary.
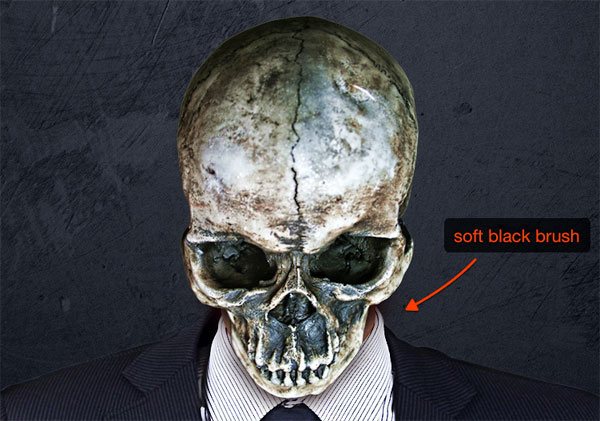
Group all of the skull layers together into a group called “skull” to keep our work organized.
Step 7: Come up with a message for the composition
Our first objective was to create a nice photo manipulation by blending a skull on a human body. Now let’s free our creativity minds.
Observe your work for a few moments and note down what goes through your mind and what ideas you come up with; everyone will see something different—a story behind this figure.
But let me tell you how my mind works, and what came to my mind when I examined the composition.
The skull’s eyes look towards the glass. He has a cigarette and a drink, so it means that he’s relaxing. A moment of reflection.
I begin to think, “Well, he’s in the business world: maybe he’s stressed out—maybe he hasn’t been spending time with his family, because he’s always working. His thoughts are killing him.”
Thoughts. This is the magic word.
Sometimes we spend too much time thinking, while we really should be spending more time living.
This is the message that I want this work to embody.
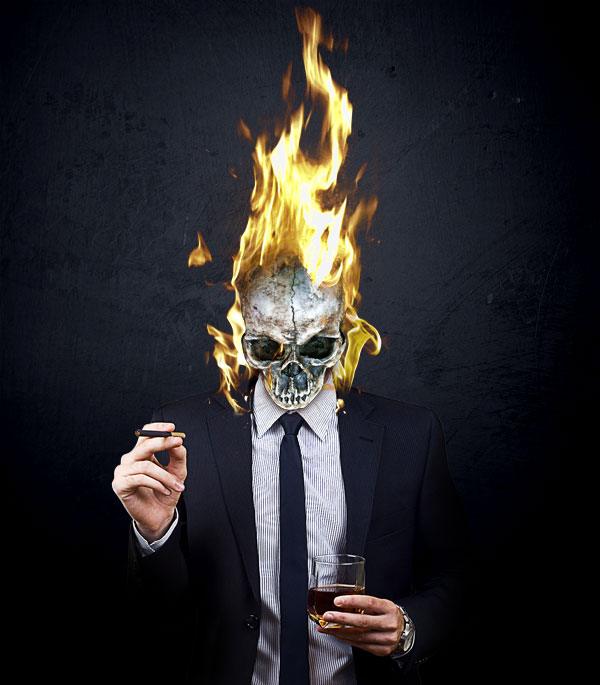
Step 8: Add the flames
In order to infuse the concept of “deleterious, poisonous thinking” into our work, I decided to put flames around the skull.
So much thinking has made our subject’s head (literally) explode into flames!
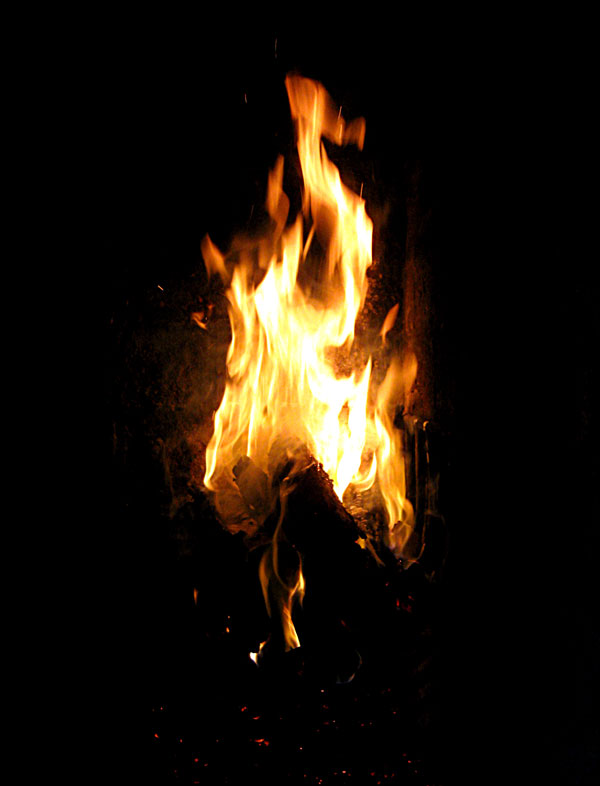
First, download the BBQ Fire (1) stock photo and open it in Photoshop.
In order to extract the flames from the photo, open the Channels Panel (Window > Channels), hold down Ctrl/Cmd, and then click on the Green channel. Doing this will automatically create a marquee selection around the flames.
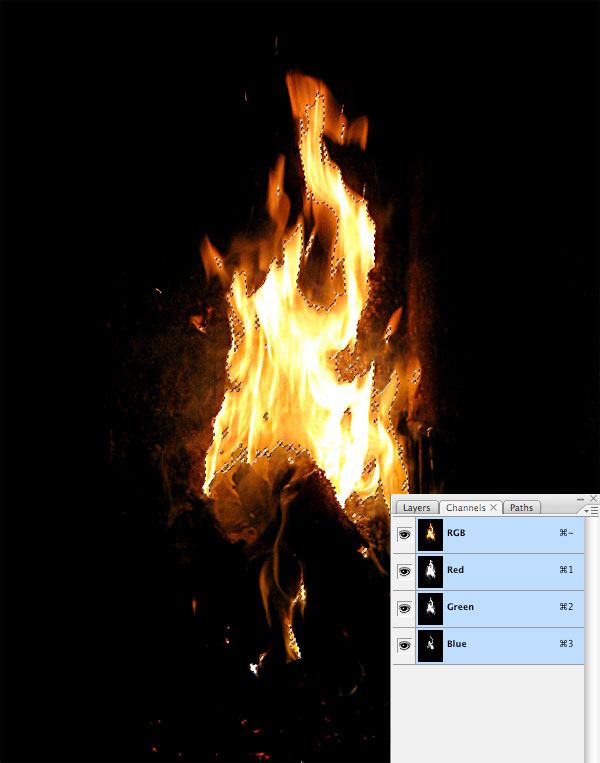
Now, copy the selection (Ctrl/Cmd + C) and paste it (Ctrl/Cmd + P) into our main document.
Use the Move Tool (V) to position the flames on the skull/head.
If you want to modify the shape of fire, use the Warp command (Edit > Transform > Warp).

Repeat the same process with the flames and fire1_l stock images, but this time place the layer below the skull so that it looks like the entire skull (sans the face) is burning.
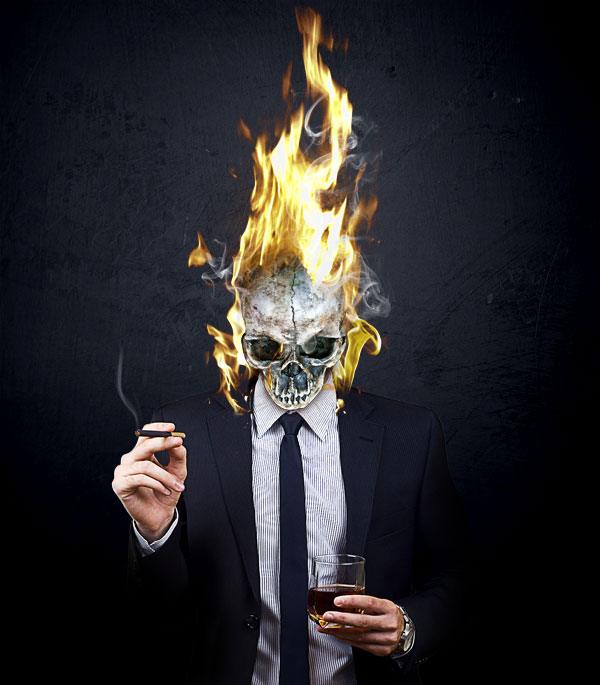
Step 9: Adding smoke
To add smoke, we can use the Real Smoke Photoshop Brushes brush set. Install it and apply it to our composition.
I painted over the head and the cigarette.
Clean up the composition by removing unwanted pixels caused by the smoke brush strokes with the Eraser Tool (E).
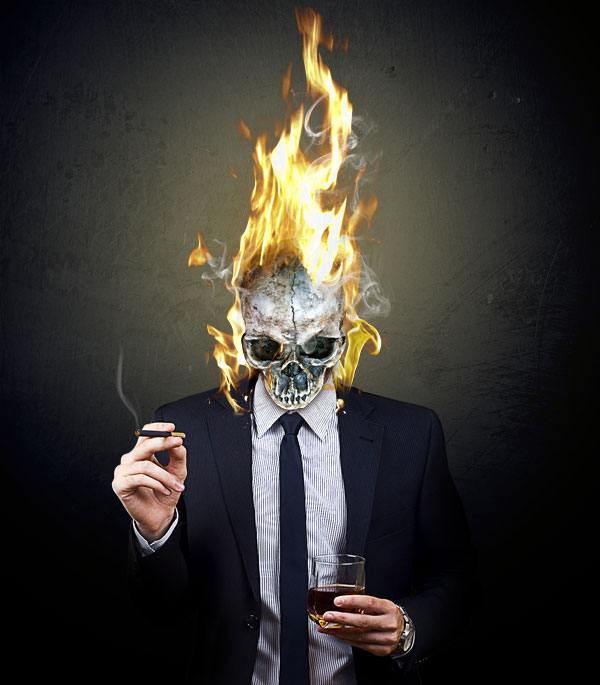
Step 10: Add some lighting
We have to give a glowing effect near flames. So create a new layer below the body, choose a soft, yellow (#feec87) brush and paint below fires.
Reduce the opacity to around 40% so that the lighting isn’t so harsh.
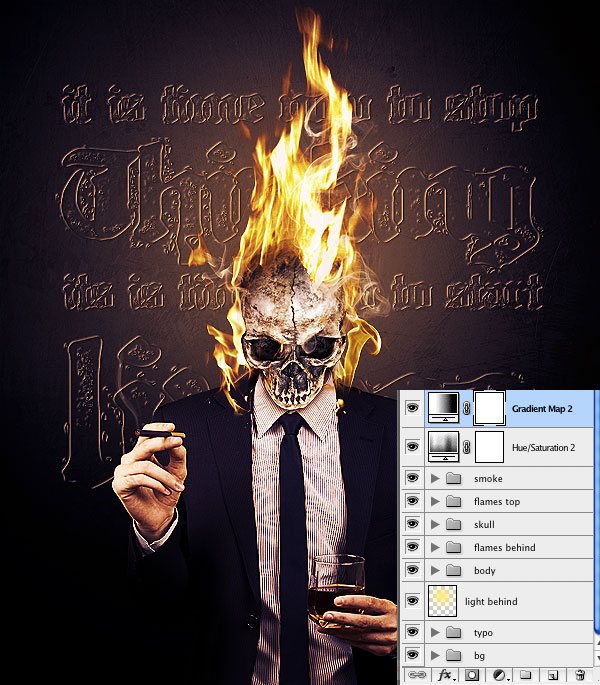
Step 11: Add some more adjustment layers
At this point, the image needs more vividness. Also, I have the impression that the elements’ colors don’t match in a good way.
Let’s try fixing those two issues with a couple of adjustment layers.
First, let’s reduce saturation by choosing Layer > New Adjustment Layer > Hue/Saturation and setting Saturation to -30.
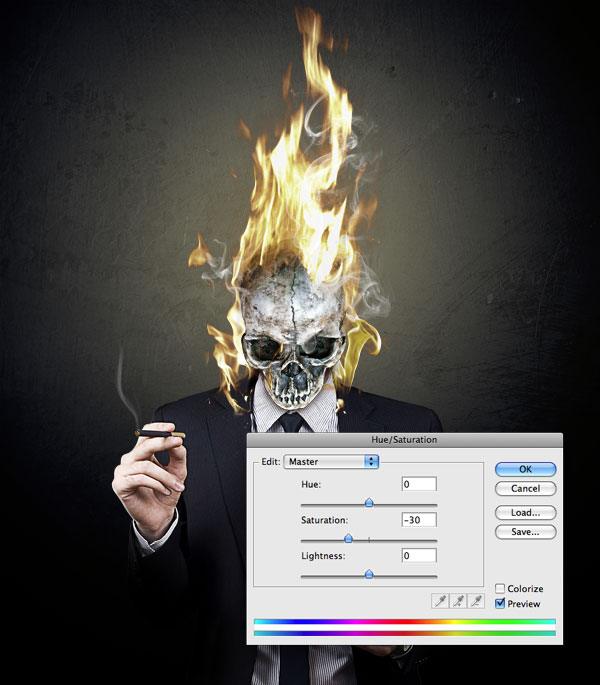
Now add a Gradient Map adjustment layer that goes from purple (#290a59) to orange (#ff7c00). Set the layer’s blending mode to Overlay and reduce the opacity to 60%.
Step 12: Add some type
We could stop here—the illustration is clear and I like the final result. But let’s try to introduce some type to see if we can bring our composition up a notch.
Start writing something using the Bill Hicks font, a nice gothic font that perfectly matches with our image.
I want to explain—in words—the meaning of the composition. So I typed, “It’s time now to stop thinking. It’s time now to start living.” using the Horizontal Type Tool (T).
Place your text between the body and the background groups.
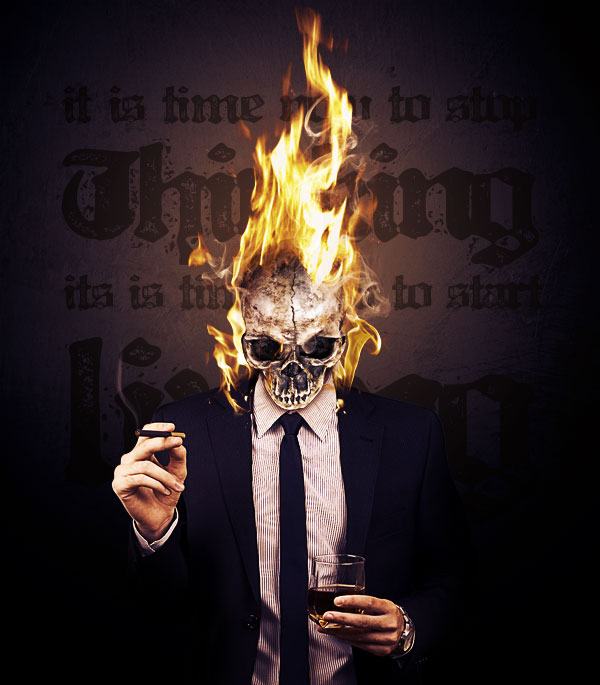
Let’s make some blending mode changes.
First, reducing the type layer’s Fill to 0%.
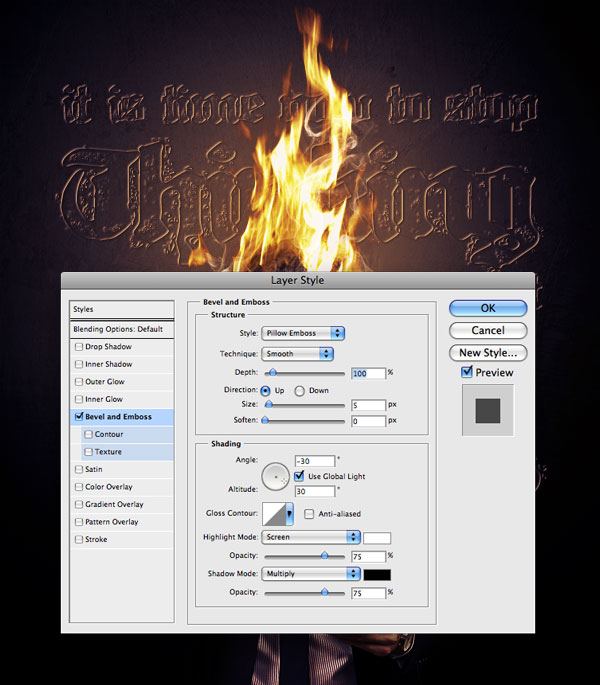
Then, lastly, right-click on the type layer and choose Blending Options. Check the Bevel and Emboss to add that layer style to our type layer (you can use the settings below).
Conclusion
We’ve finished our flaming skull composition! I hope you enjoyed this tutorial and found some inspiration and new techniques.
In the image below, you can see how I organized all the layers.
Download Source Files
- flaming_skull_composition (14.1 MB)
-
 Trevin serves as the VP of Marketing at WebFX. He has worked on over 450 marketing campaigns and has been building websites for over 25 years. His work has been featured by Search Engine Land, USA Today, Fast Company and Inc.
 -

WebFX is a full-service marketing agency with 1,100+ client reviews and a 4.9-star rating on Clutch! Find out how our expert team and revenue-accelerating tech can drive results for you! Learn more
Make estimating web design costs easy
Website design costs can be tricky to nail down. Get an instant estimate for a custom web design with our free website design cost calculator!
Try Our Free Web Design Cost Calculator
Table of Contents
- Resources
- Preview
- Introduction
- Step 1: Inspiration
- Step 2: Preparing the Background
- Step 3: Add the Businessman
- Step 4: Retouch the Businessman
- Step 5: Increase Details and Contrast
- Step 6: Work on the Skull
- Step 7: Come Up with a Message for the Composition
- Step 8: Add the Flames
- Step 9: Adding Smoke
- Step 10: Add Some Lighting
- Step 11: Add Some More Adjustment Layers
- Step 12: Add Some Type
- Conclusion
- Download Source Files
Share this article


Web Design Calculator
Use our free tool to get a free, instant quote in under 60 seconds.
View Web Design CalculatorMake estimating web design costs easy
Website design costs can be tricky to nail down. Get an instant estimate for a custom web design with our free website design cost calculator!
Try Our Free Web Design Cost Calculator


