
Preview
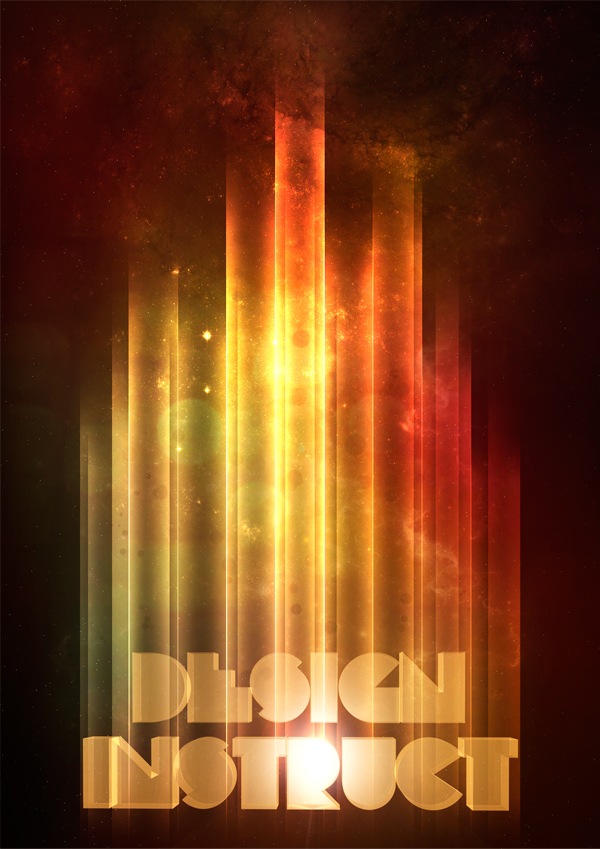
This is the poster that we are going to create. Click on the preview image below to view its full size version.

Resources
- Star Light Texture by blackdelphin
- Cosmos Lightning by Dimitri Castrique
- Universe Texture by razielfromhell
- RNS Bobo Dylan Font
Step 1: Setting up a new document in Photoshop
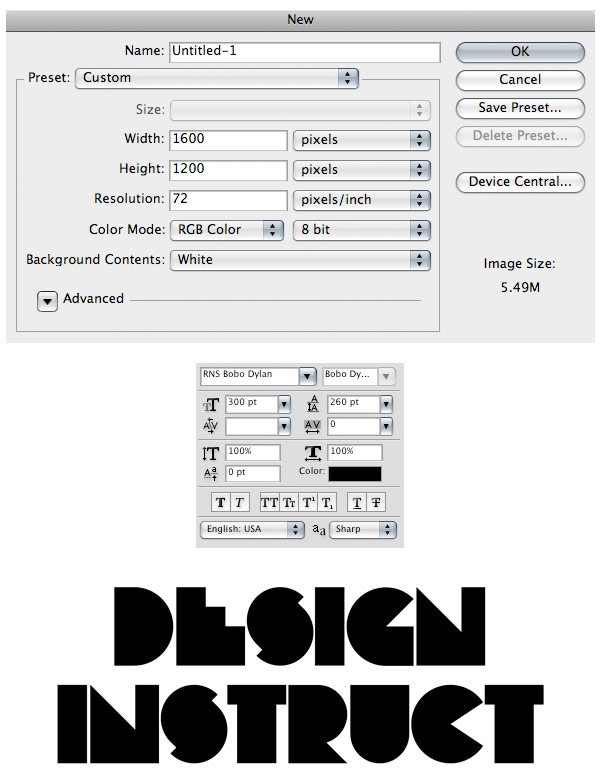
We will start by creating the 3D text using both Photoshop and Cinema 4D. Open a new document in Photoshop (Ctrl/Cmd + N) with the settings from the following image.
Then select the Type Tool (T) and write the text of your typography poster using the RNS Bobo Dylan font (or a font of your preference). For this tutorial, I used the text: “Design Instruct“.
As you can see in the following image, I have two lines of text and I have decreased the distance between them using the Character panel.
Step 2: Converting the text into shapes
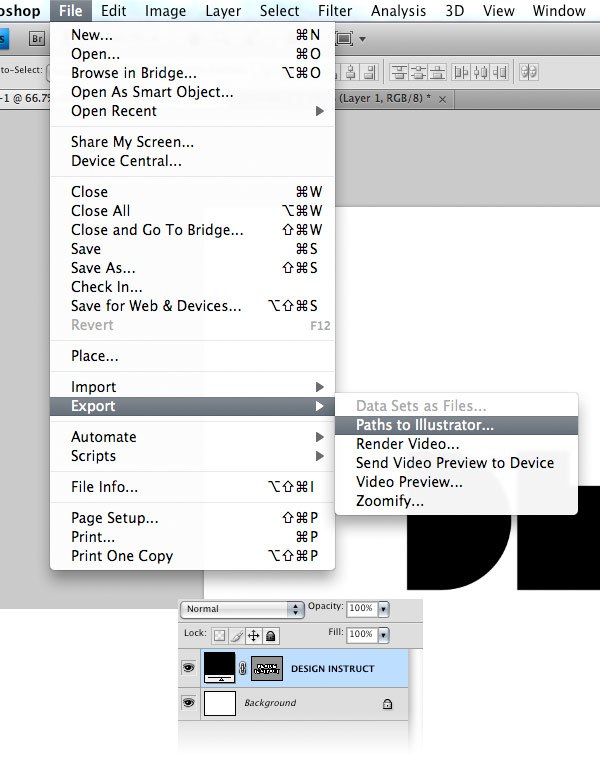
Right-click on the text layer in the Layers panel and select Convert to Shape.
Then go to Export > Paths to Illustrator and save the file somewhere on your computer.
We won’t actually be using Adobe Illustrator, we just need a vector file format to work with in Cinema 4D.
Step 3: Opening the .AI file in Cinema 4D
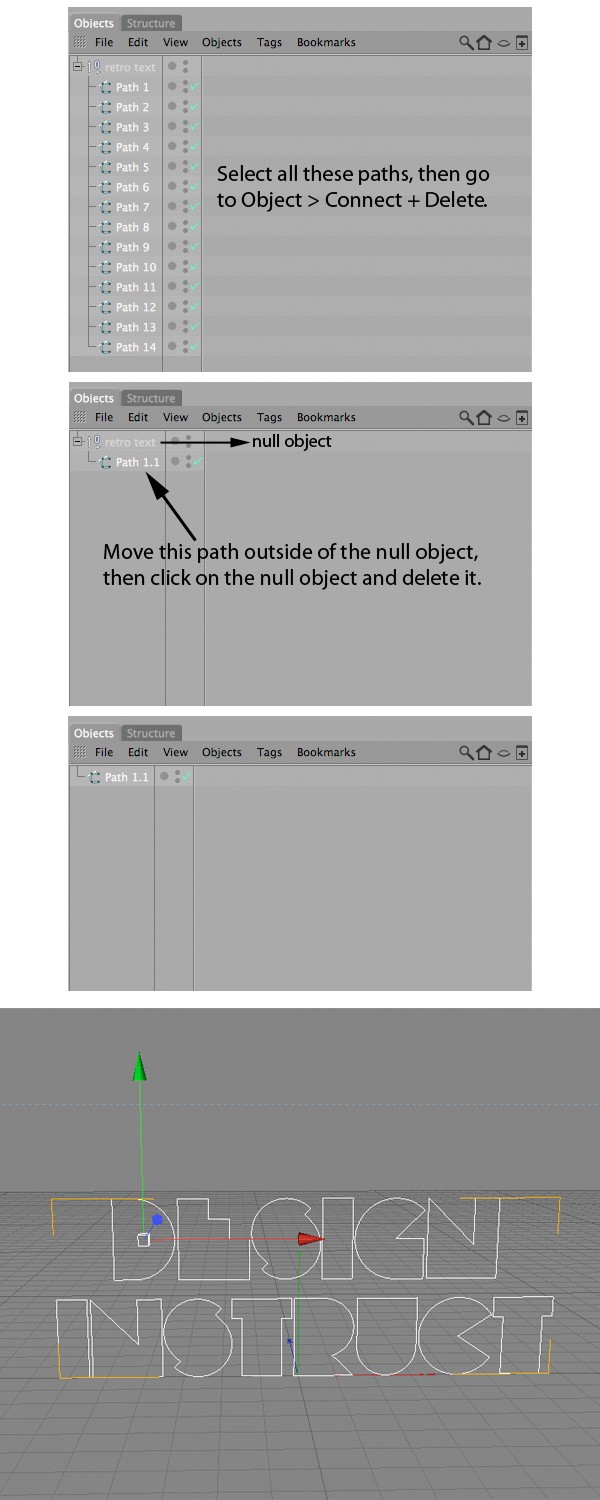
Go to Cinema 4D and open the file that you have saved in the previous step.
Select all the paths from the null object and connect them by going to Object > Connect + Delete.
Move the connected path outside of the null object and then delete the null object.
Step 4: Create the 3D text
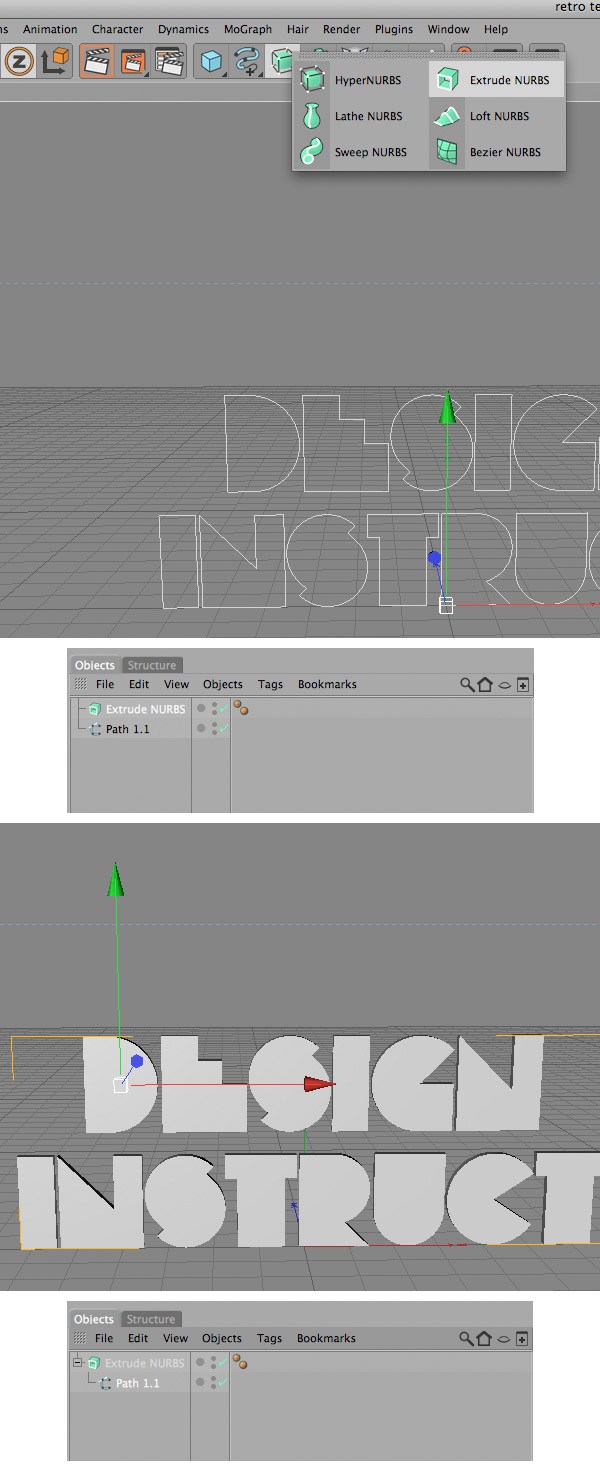
Click and hold on the HyperNURBS button and select ExtrudeNURBS.
Then drag the path into the ExtrudeNURBS object. As you can see, now you have your 3D text.
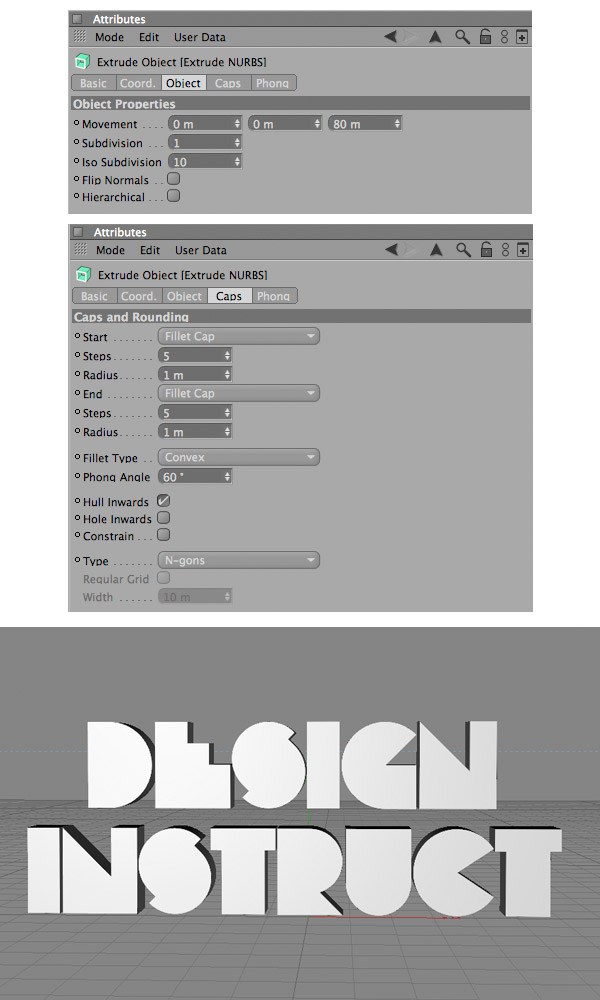
Step 5: Assign the Extrude Object settings
Click on the ExtrudeNURBS object and change the following settings from the Attributes panel.
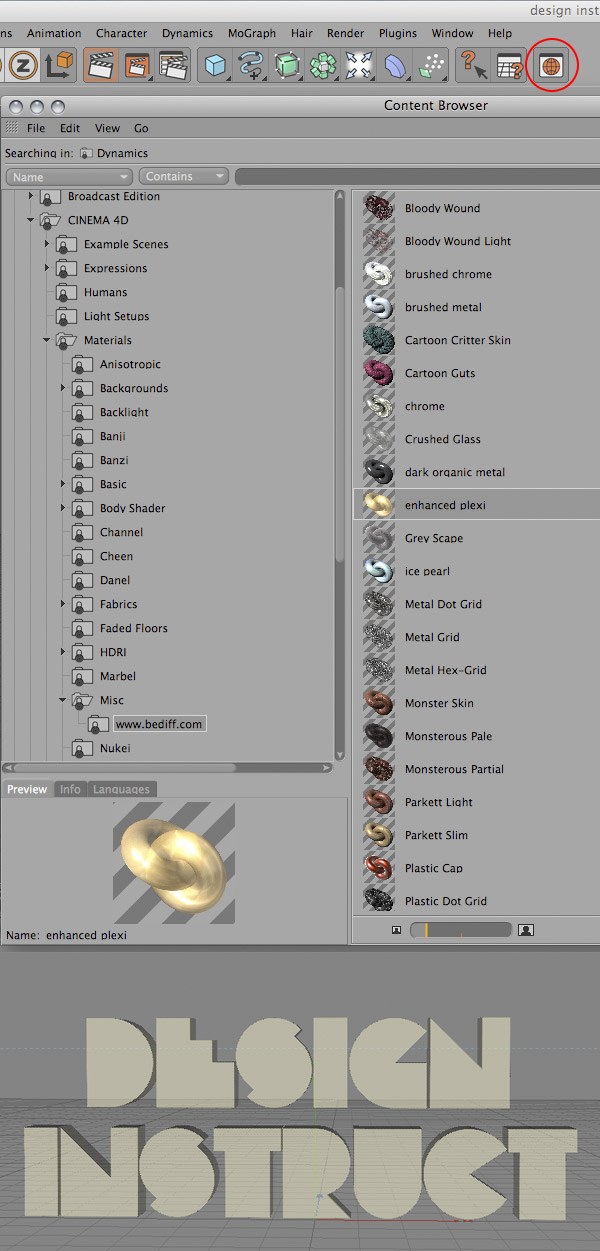
Step 6: Add a material to the 3D text
Click on the Content Browser button, search for the enhanced plexi material, double-click on it to move it in the Materials panel, and close the Content Browser window.
Then drag the material onto the text.
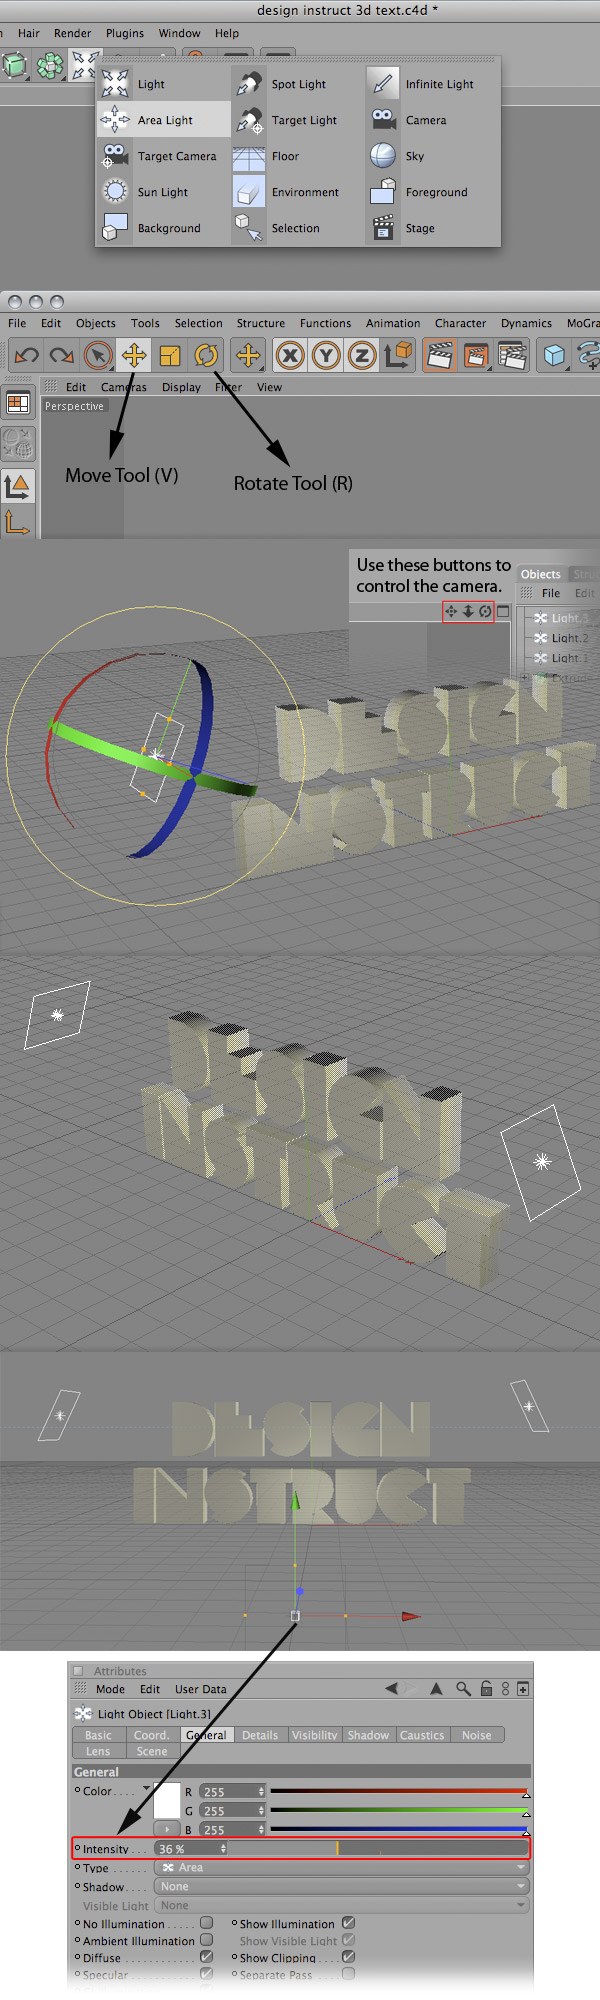
Step 7: Add light sources to the 3D text
Now we are going to create some lights for the 3D text. Click and hold on the Light button, then select Area Light. I have created three light sources: one on the left side of the text, one on the right side, and the other one in front of the text.
Use the Move Tool (E) and the Rotate Tool (R) to move and rotate these lights to your preference.
Note: I have decreased the intensity of the light from the front of the text to 36%, as you can see in the following image.
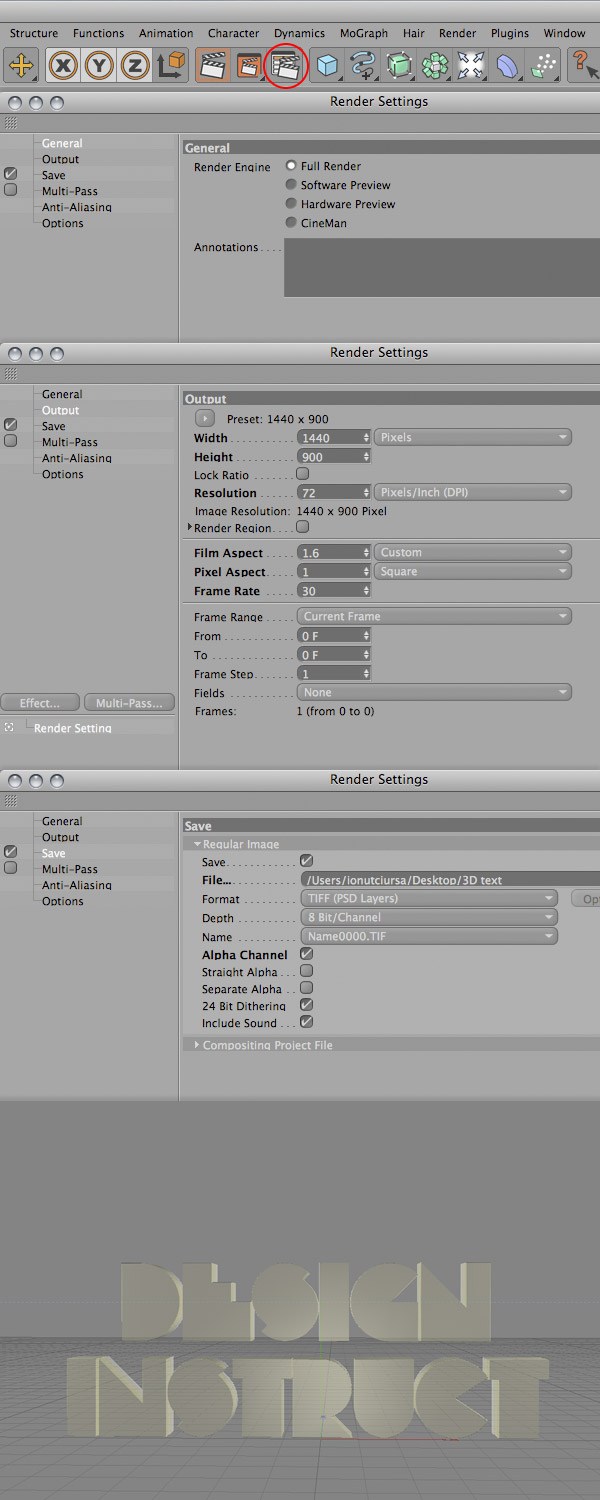
Step 8: Apply the Render settings
Move the camera in front of the text using the buttons from the top right corner of the window.
Then click on the Render Settings button and use the settings from the following image. Don’t forget to select where you want to save the file and to tick the Alpha Channel option.
Step 9: Rendering the text
Click on the “Render in Picture Viewer” button and wait until the image is completely rendered.
Then you can close this window.
We’re done with the 3D text for the moment.

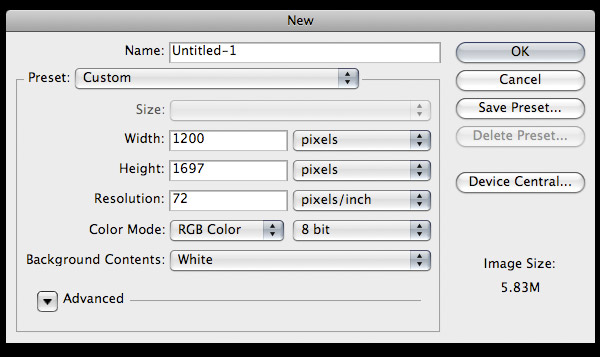
Step 10: Set up a new Photoshop document
We are ready to create our poster. Create a new document in Photoshop (Ctrl/Cmd + N) using the settings from the following image.
Then select the Paint Bucket Tool (G) and fill the background with black (#000000).
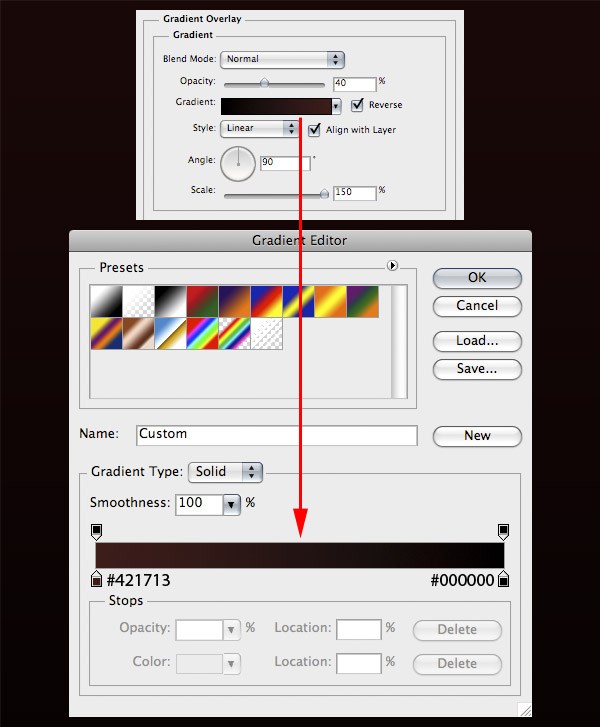
Step 11: Add a color gradient to the background
Double-click on the Background layer to unlock it.
Then double-click on it again to open the Layer Styles window and use the settings from the following image to add a Gradient Overlay.
Step 12: Add more colors to the background
In the previous step, we added a Gradient overlay on our background to give it some color. Now, we’ll add more colors to make the background more interesting.
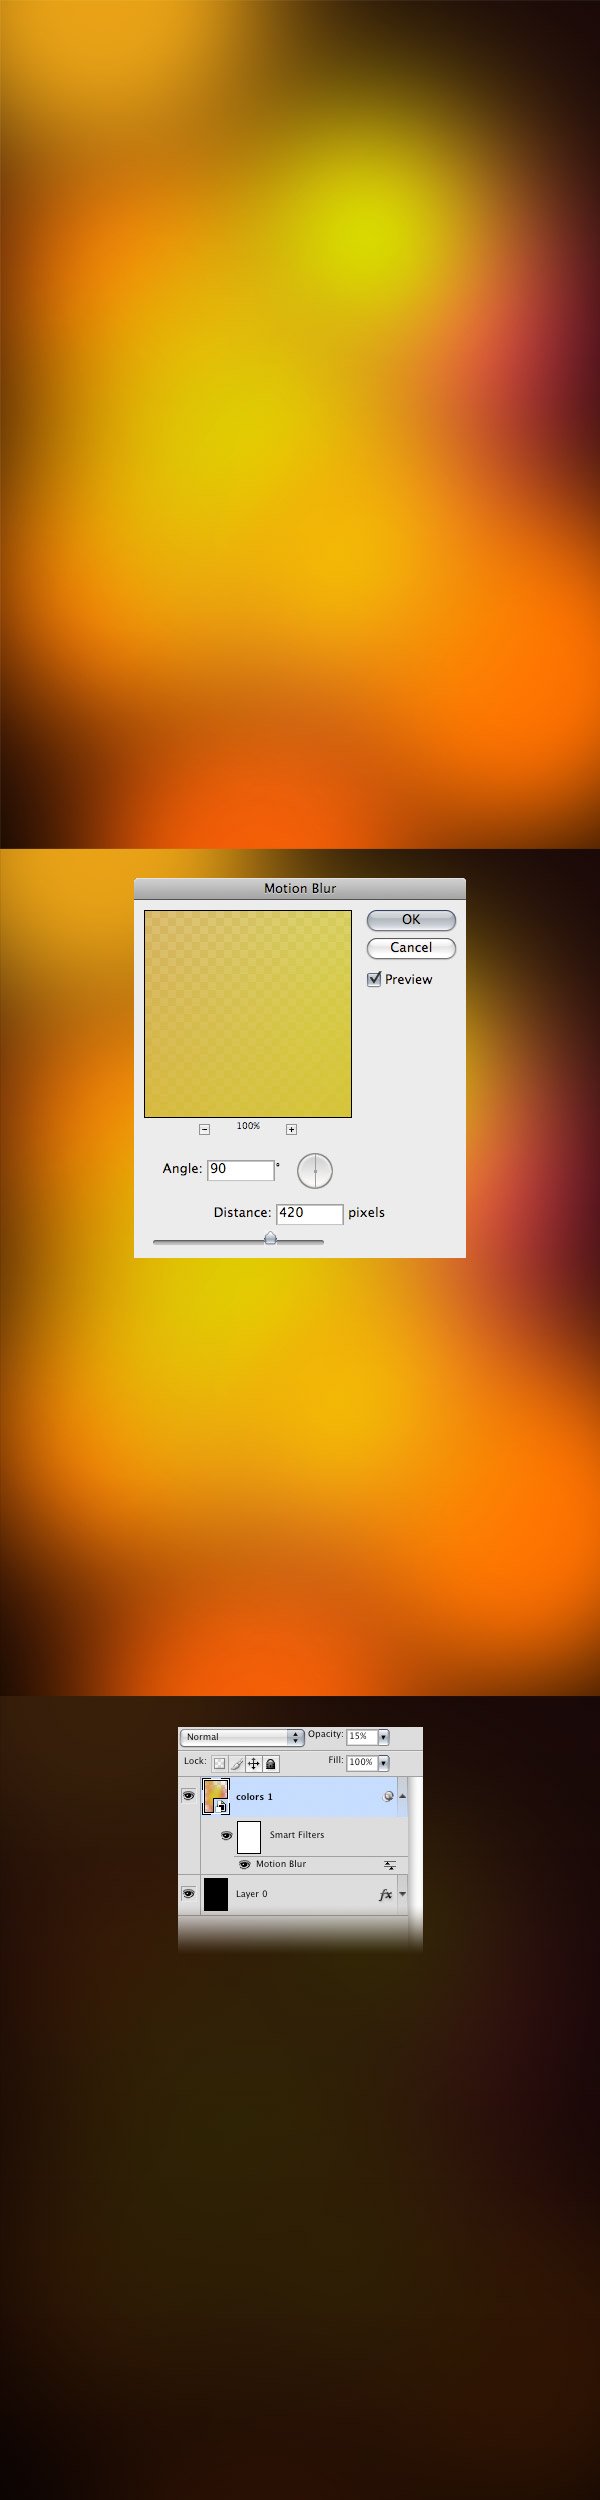
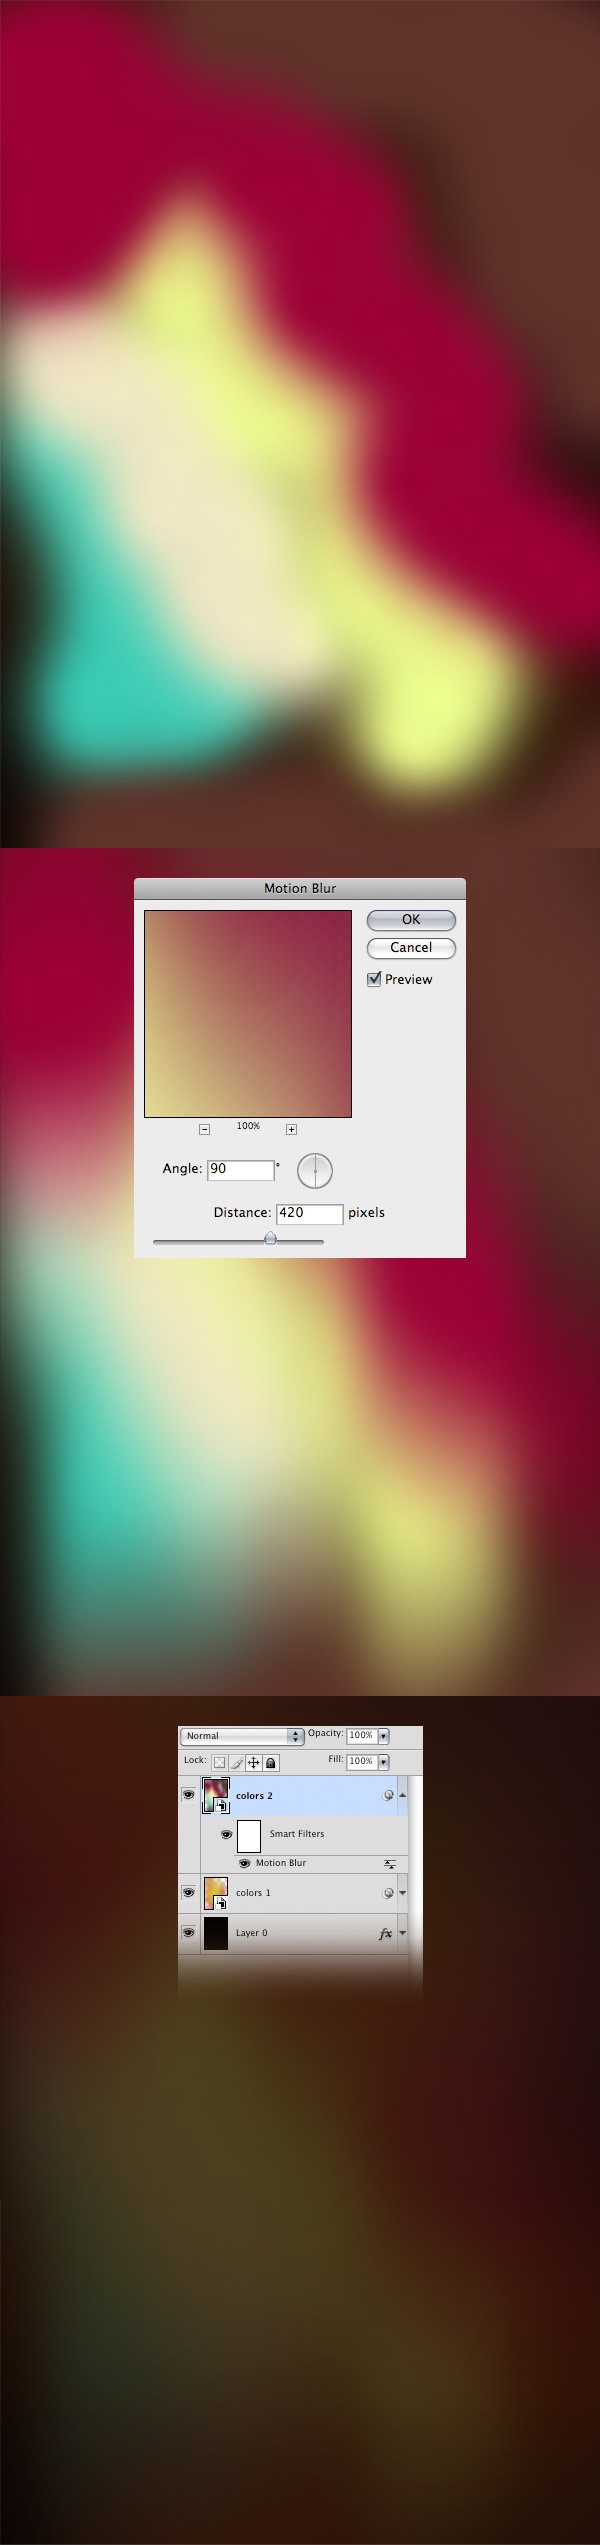
Create a new layer and then choose a big soft brush for the Brush Tool (B) and paint with it on your canvas. Keep it random and try to change brush options until you get something that you like. I have chosen shades of orange and yellow for my brush colors, but you should use any colors that you want your poster to have.
Then convert this layer into a smart object (right-click on it and choose Convert to Smart Object).
Apply a motion blur filter (Filter > Blur > Motion Blur) using the settings from the following image to blend the colors better.
Then, name this layer “colors 1” and set its opacity to 15%.
The background has to be dark because the light effects that we will create later won’t make as much of an impact if the background is bright.
For the moment we only want to add some subtle colors over the black background.
Step 13: Add even more colors to the background
Create a new layer and repeat the previous step using different colors.
Name this layer “colors 2” to keep our work tidy and organized.
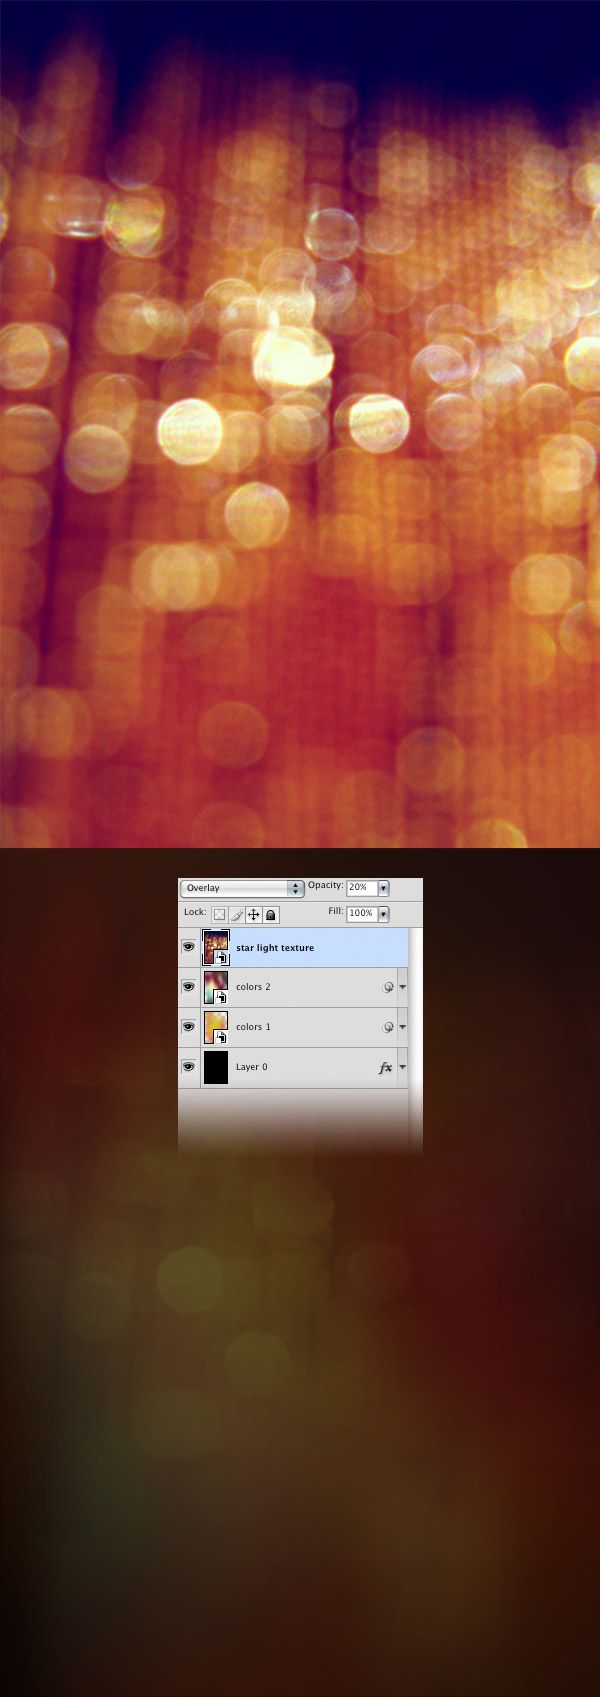
Step 14: Incorporate the star lights texture
Download this texture and open it in Photoshop.
Move the downloaded image into your canvas using the Move Tool (V) and then convert this layer into a smart object.
Then go to Edit > Free Transform (Ctrl/Cmd + T), hold down the Shift key to maintain the proportions, and then make this texture smaller.
Name this layer “star light texture” and set its blending mode to Overlay with an opacity of 20%.
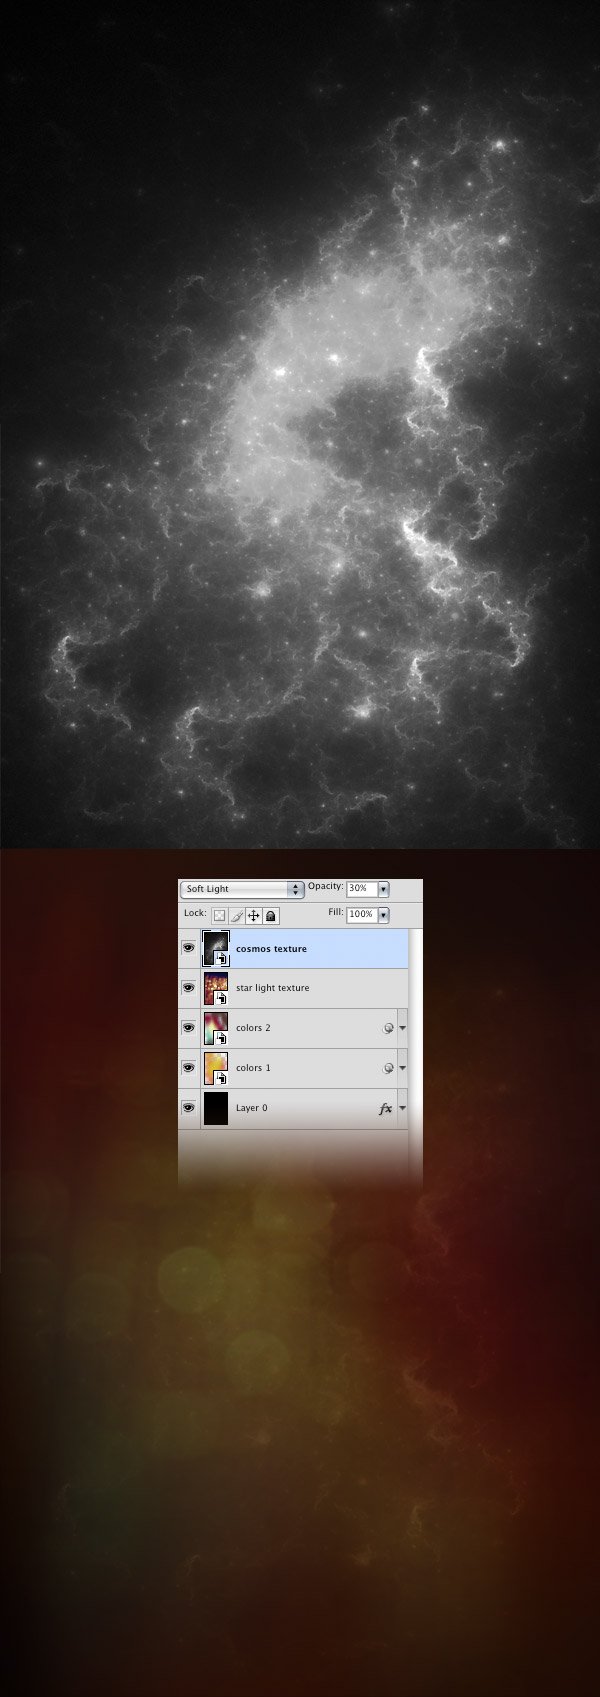
Step 15: Include the Cosmos texture
Download this texture and open it in Photoshop.
Because we only need the texture and not its colors, desaturate the Cosmos stock image by going to Image > Adjustments > Desaturate (Ctrl/Cmd + Shift + U).
Use the Move Tool (V) to move the image into your main canvas and convert its layer into a smart object.
Use the Free Transform command (Ctrl/Cmd + T) to change the size of this image and to rotate it to an angle that you like.
Then name this layer “cosmos texture” and set its blending mode to Soft Light with an opacity of 30%.
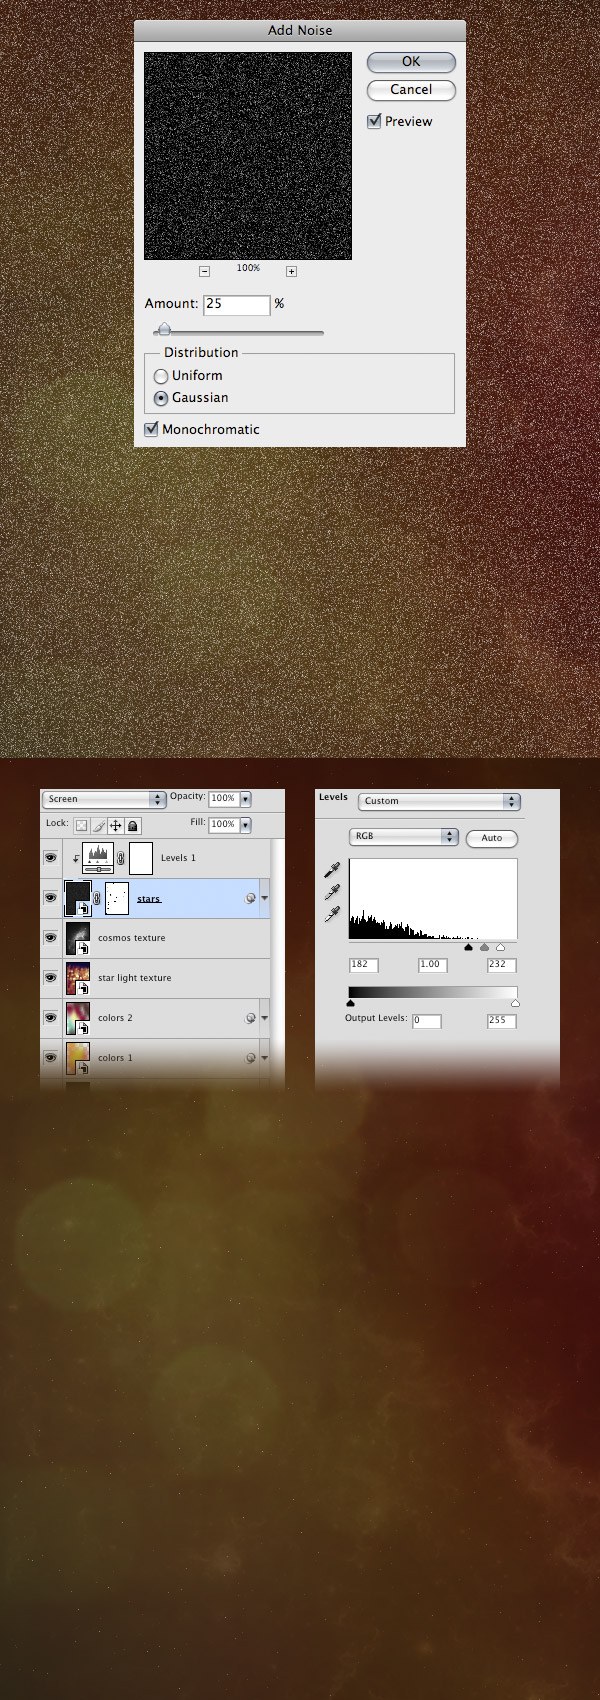
Step 16: Creating the stars
Create a new layer and fill it with black (#000000) using the Paint Bucket Tool (G).
Right-click on this layer and choose Convert to Smart Object.
Then go to Filter > Noise > Add Noise and use the settings from the following image.
Name this layer “stars” and set its blending mode to Screen to eliminate the black color.
You should now have many white dots that don’t look like stars at the moment—but don’t worry, we’re not finished with them yet.
To decrease the number of white dots, we will use a Levels adjustment layer. Go to Layer > New Adjustment Layer > Levels and use the settings from the following image.
To reduce the number of stars even more and make the effect realistic, you can add a mask to the “stars” layer (Layer > Layer Mask > Reveal All) and use a black brush (B) to erase some of stars.
Step 17: Start the creation of the colorful light effects
Create a new layer (Shift + Ctrl/Cmd + N) on top of all the layers thus far.
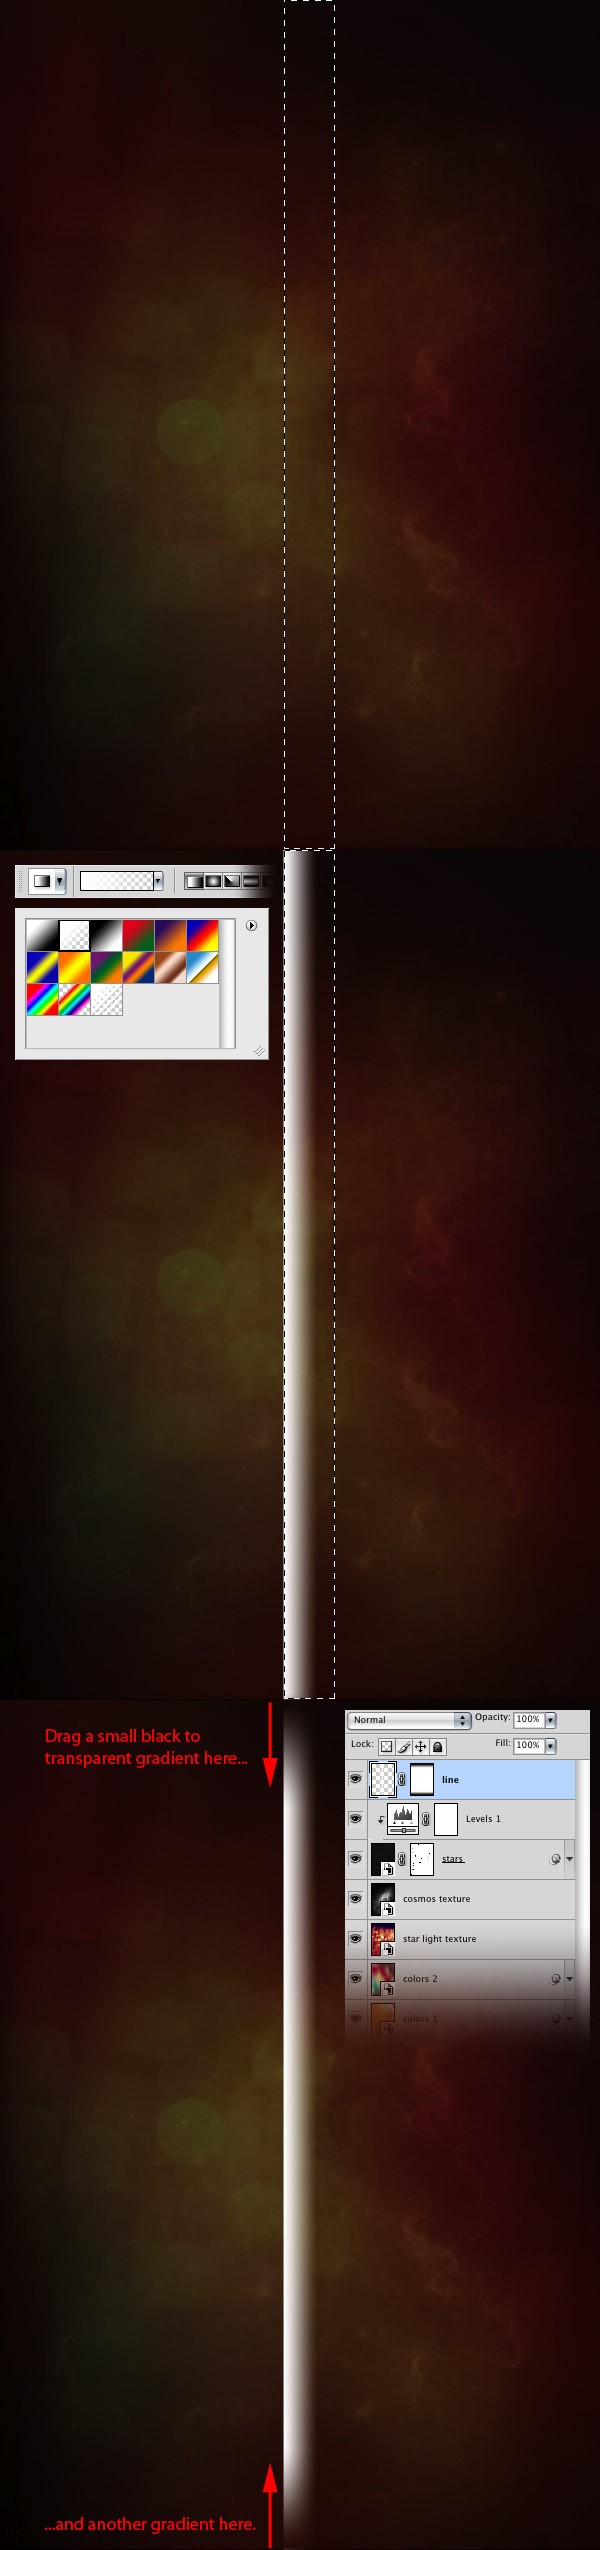
Select the Rectangular Marquee Tool (M) and create a selection like I did in the image below.
Set your foreground color to white (#ffffff), and then choose the Gradient Tool (G), making sure to choose the Foreground to Transparent gradient preset in the options bar.
Hold down the Shift key and drag a horizontal line from the left edge of the selection to the right edge of our marquee selection.
Then go to Select > Deselect (Ctrl/Cmd + D) to unload the marquee selection.
Keep our work tidy by naming this layer, “line“.
Go to Layer > Layer Mask > Reveal All to create a mask for this layer.
Then set your foreground color to black (#000000), select the Gradient Tool (G), make sure that you are still using the Foreground to Transparent gradient preset, and then drag a gradient starting at the top of the white line.
Then drag another gradient at the bottom of this line.
Take a look at the following image for reference.
Step 18: Working on the line
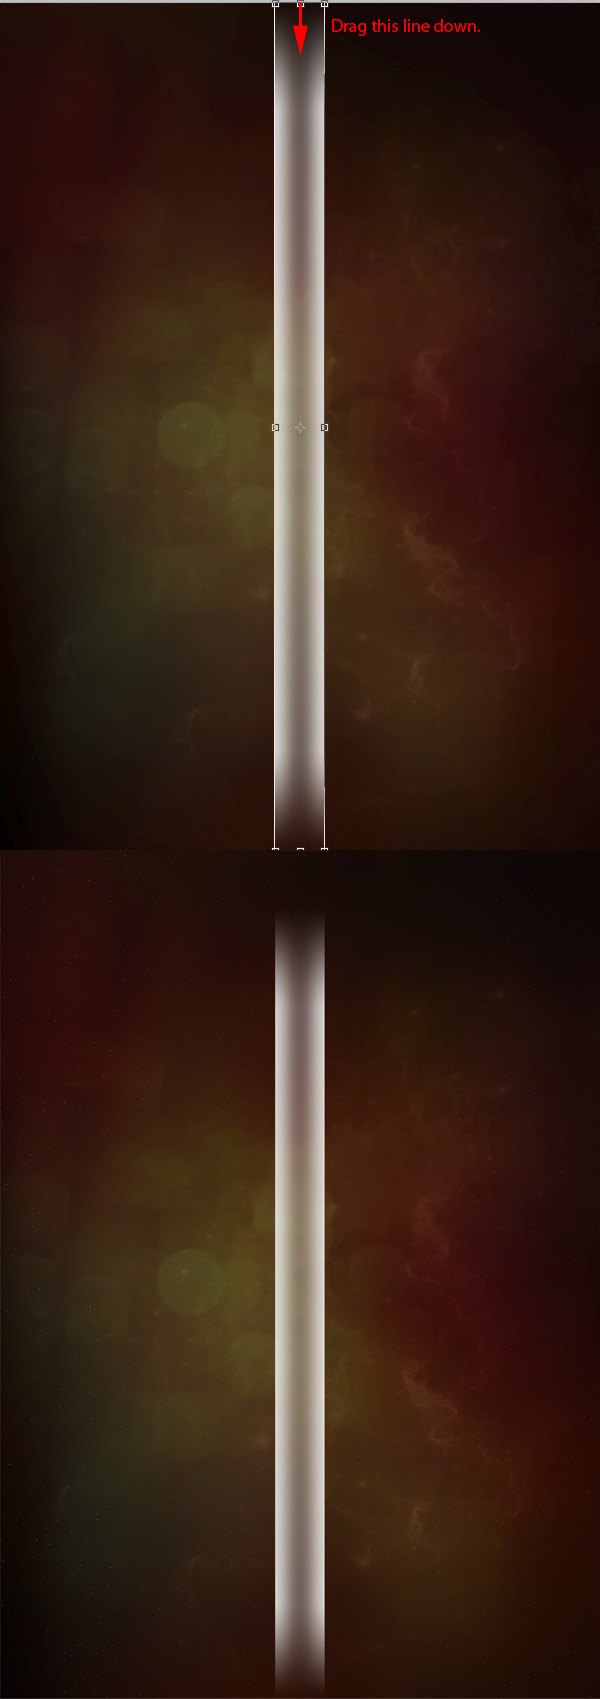
Right-click on the “line” layer that you have created in the previous step, and then pick Convert to Smart Object from the contextual menu that appears.
Duplicate this layer (Ctrl/Cmd + J) and then choose Edit > Transform > Flip Horizontal.
Then choose the two line layers in the Layers Panel by holding down Shift or Ctrl/Cmd and clicking on them.
After having chosen the two line layers, go to Edit > Free Transform (Ctrl/Cmd + T), and then drag the top edge down to reduce their height because we don’t want the lines to reach the top of our canvas. Take a look at the following image for reference.
Step 19: Altering the layer settings
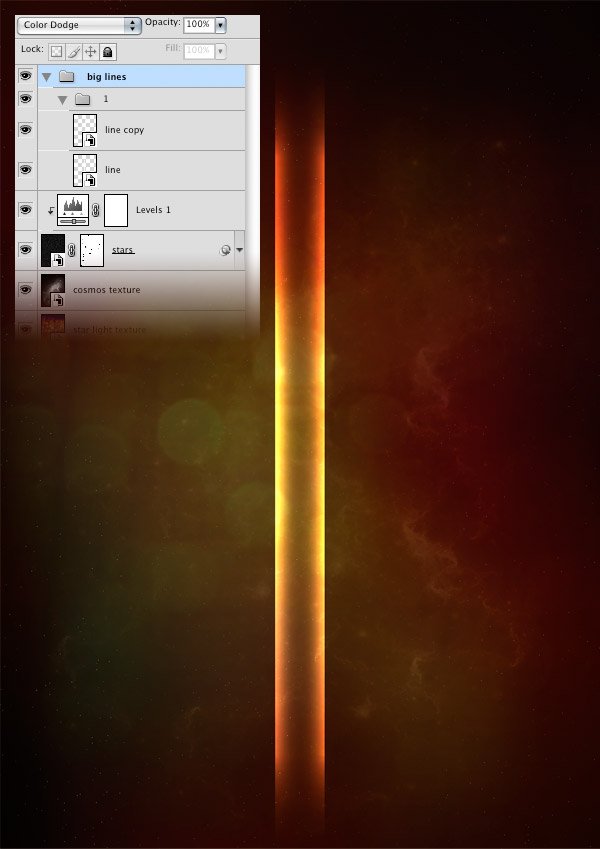
Put the two line layers inside a new group—create a new group using the shortcut combo, Ctrl/Cmd + G—and name the new group simply as “1“.
Set the group’s opacity of the “1” group to to 80%.
To make the light effect, put the “1” group into a new group and name it “lines“.
After placing the group into another group, change the blending mode to Color Dodge.
Now you should have two colorful lines similar to the following image.
Step 20: Duplicate the line
We will use the line we’ve created as the template for the other light streaks.
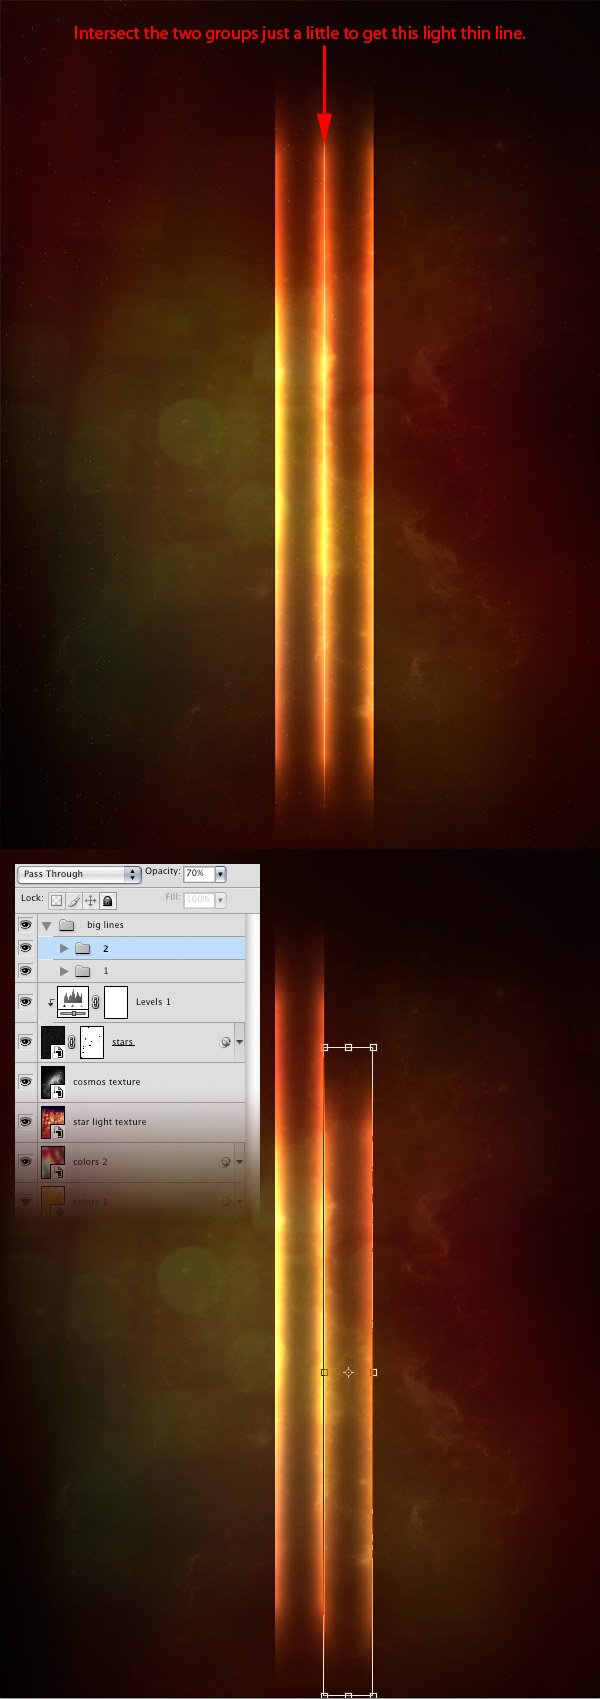
We’ll tweak them in various ways to give them an organic and natural look later on. To start, duplicate the “1” group by dragging it over the Create a new layer button located at the bottom of the Layers panel.
Then move this new group to the right using the Move Tool (V) and intersect the two sets of lines like you see in the following image.
With the second group selected, go to Edit > Free Transform (Ctrl/Cmd + T) and decrease its height by dragging down the top line of the transform box.
And then, set the opacity of this group to 70%.
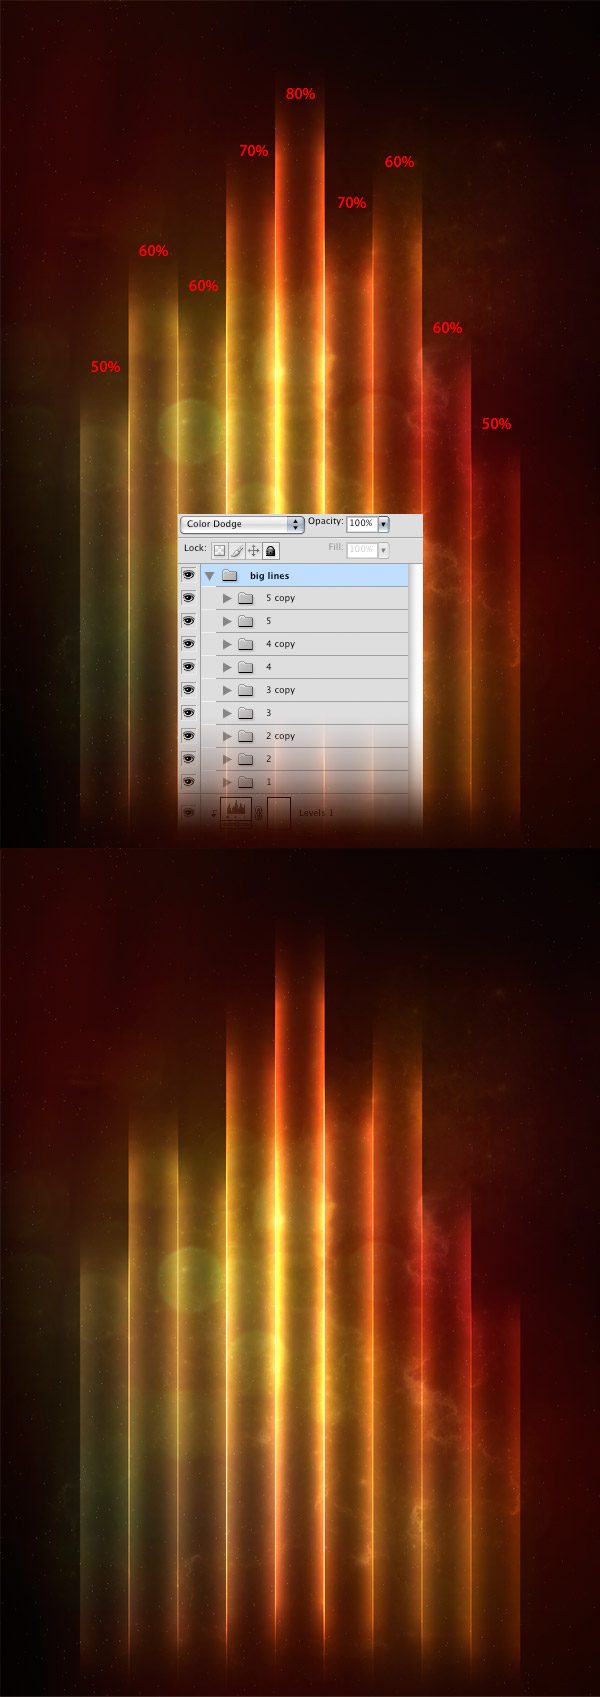
Step 21: Create more lines
Repeat the previous step to create more lines and modify the height of each group of lines using Free Transform (Ctrl/Cmd + T).
Decrease the opacity of each group as it gets closer to the left and right edges of the canvas.
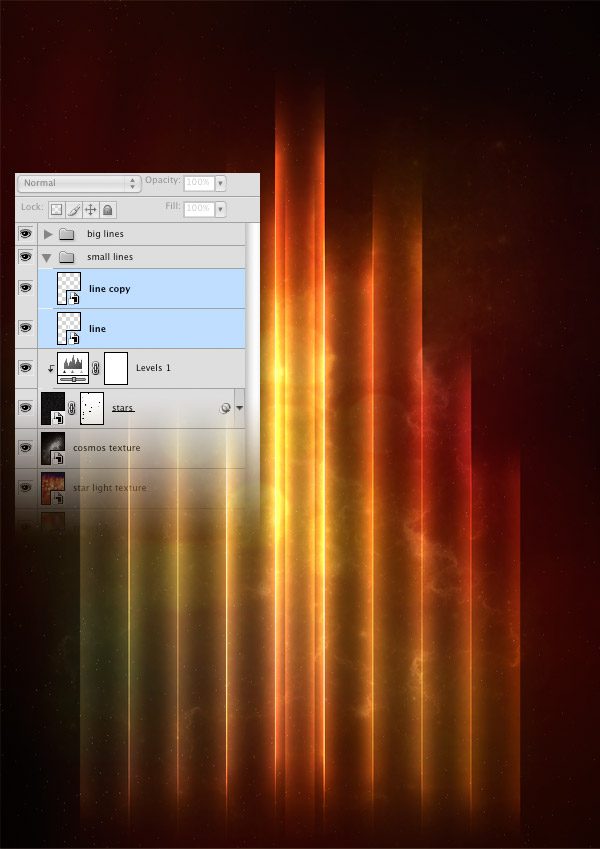
Step 22: Create smaller lines
Create a new group, name it “small lines“, set its blending mode to Color Dodge and put it beneath the “big lines” group.
Duplicate a line layer from the “big lines” group (Ctrl/Cmd + J) and move it into this new group.
Then go to Edit > Free Transform (Ctrl/Cmd + T), hold down the Shift key and make this layer smaller.
Duplicate this layer (Ctrl/Cmd +J) and then go to Edit > Transform > Flip Horizontal.
Put these two lines in the middle of the canvas like you see in the following image.
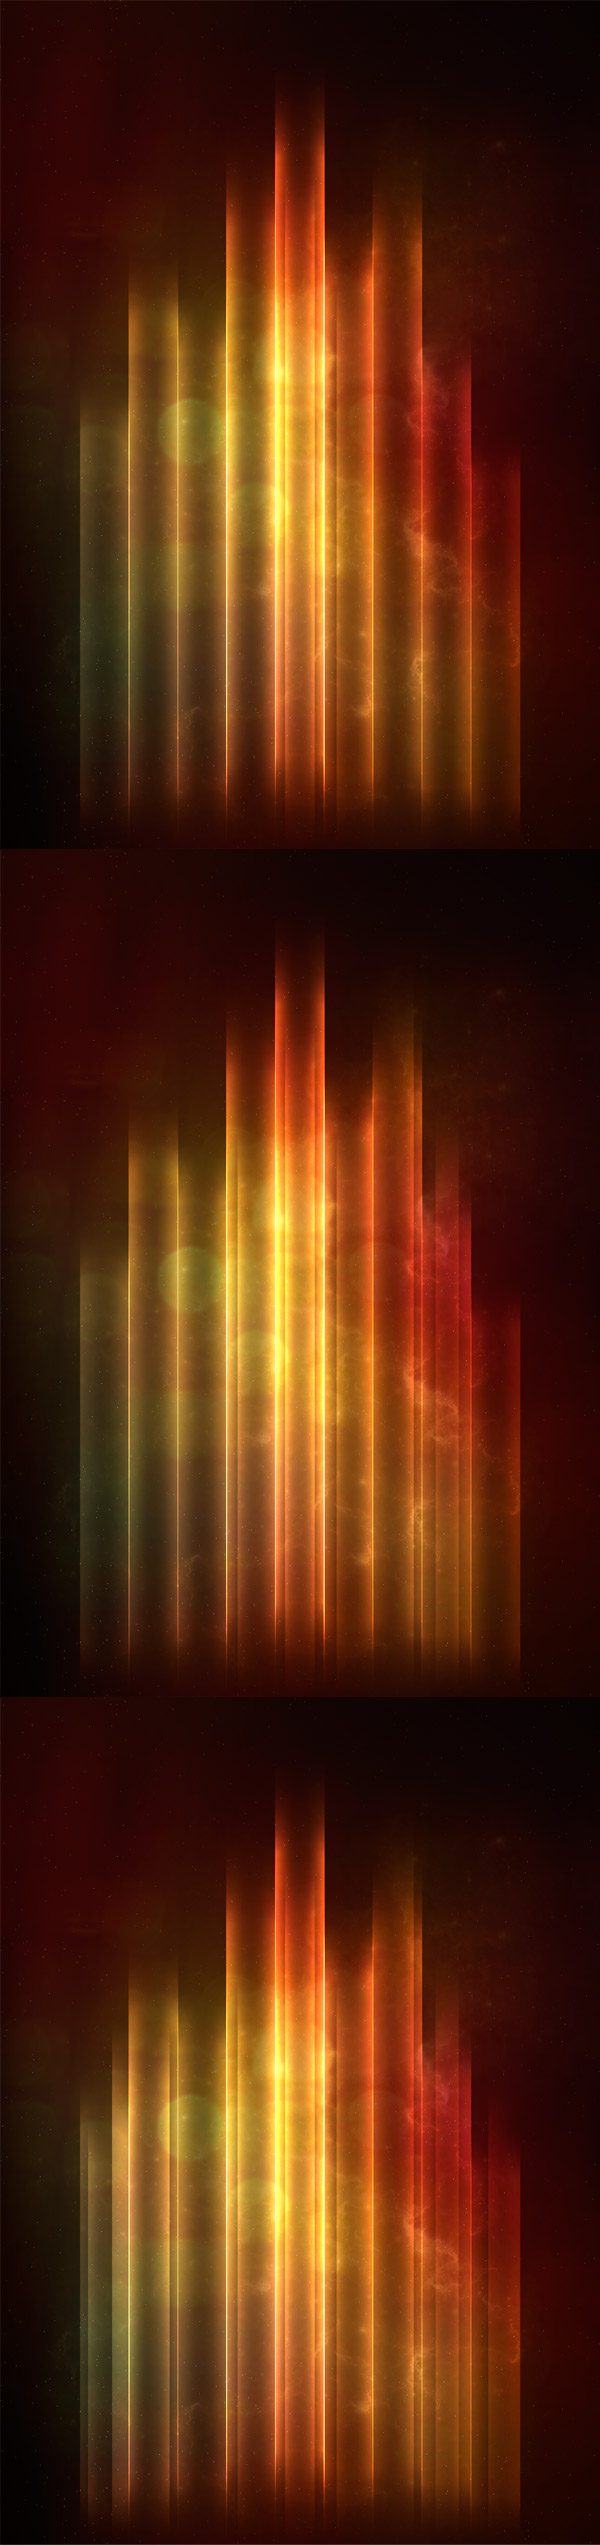
Step 23: Finishing up the lines
Continue to add more small lines between the bigger ones.
Set the opacity of each layer between 40% and 70%. Take a look at the image below for reference.
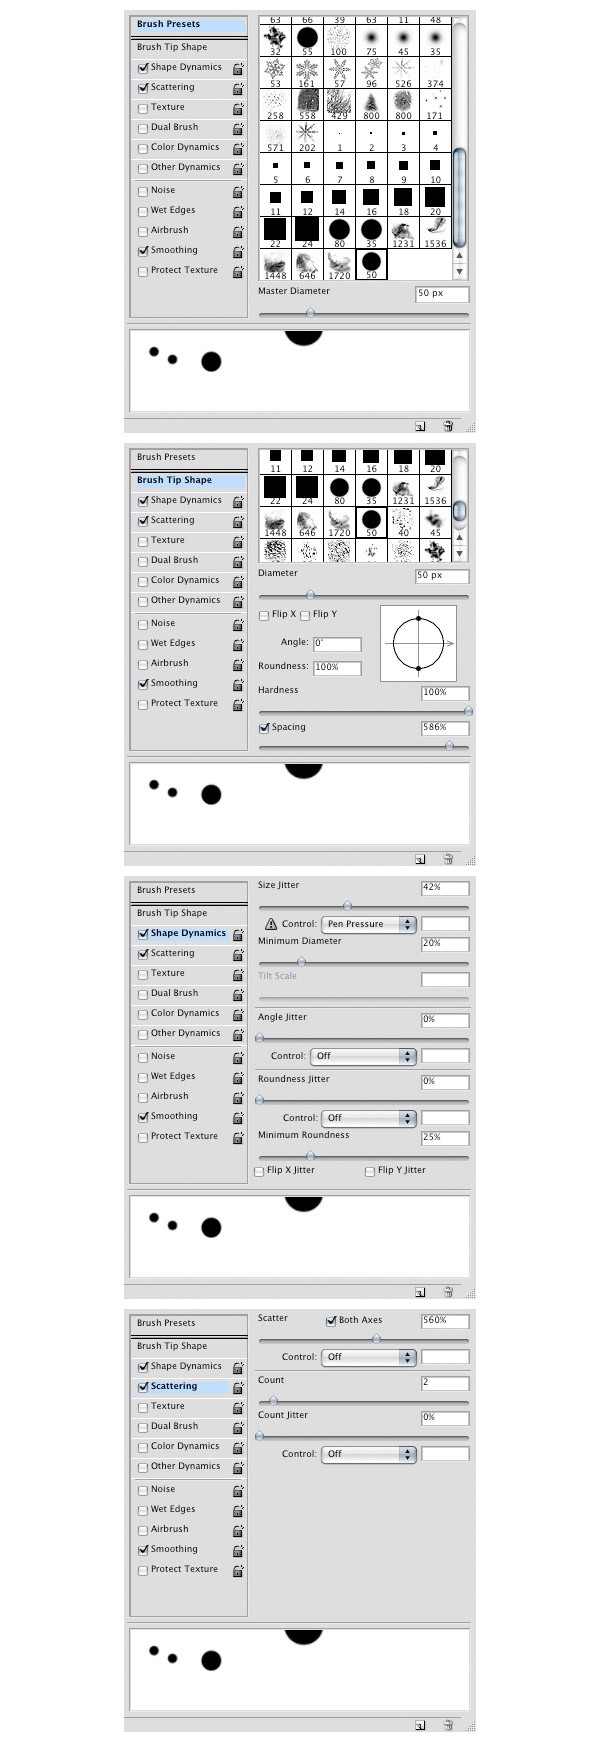
Step 24: Create a new custom brush
Let’s create a custom brush to add some details to our typographic poster.
Select the Brush Tool (B) and choose a hard brush as our starting point for the custom brush that we are about to make.
Open the Brush panel (F5) and use the settings from the following image to create our very own custom brush. Just click on the Create new brush button located at the bottom of this panel to save your brush.
Step 25: Applying the custom brush
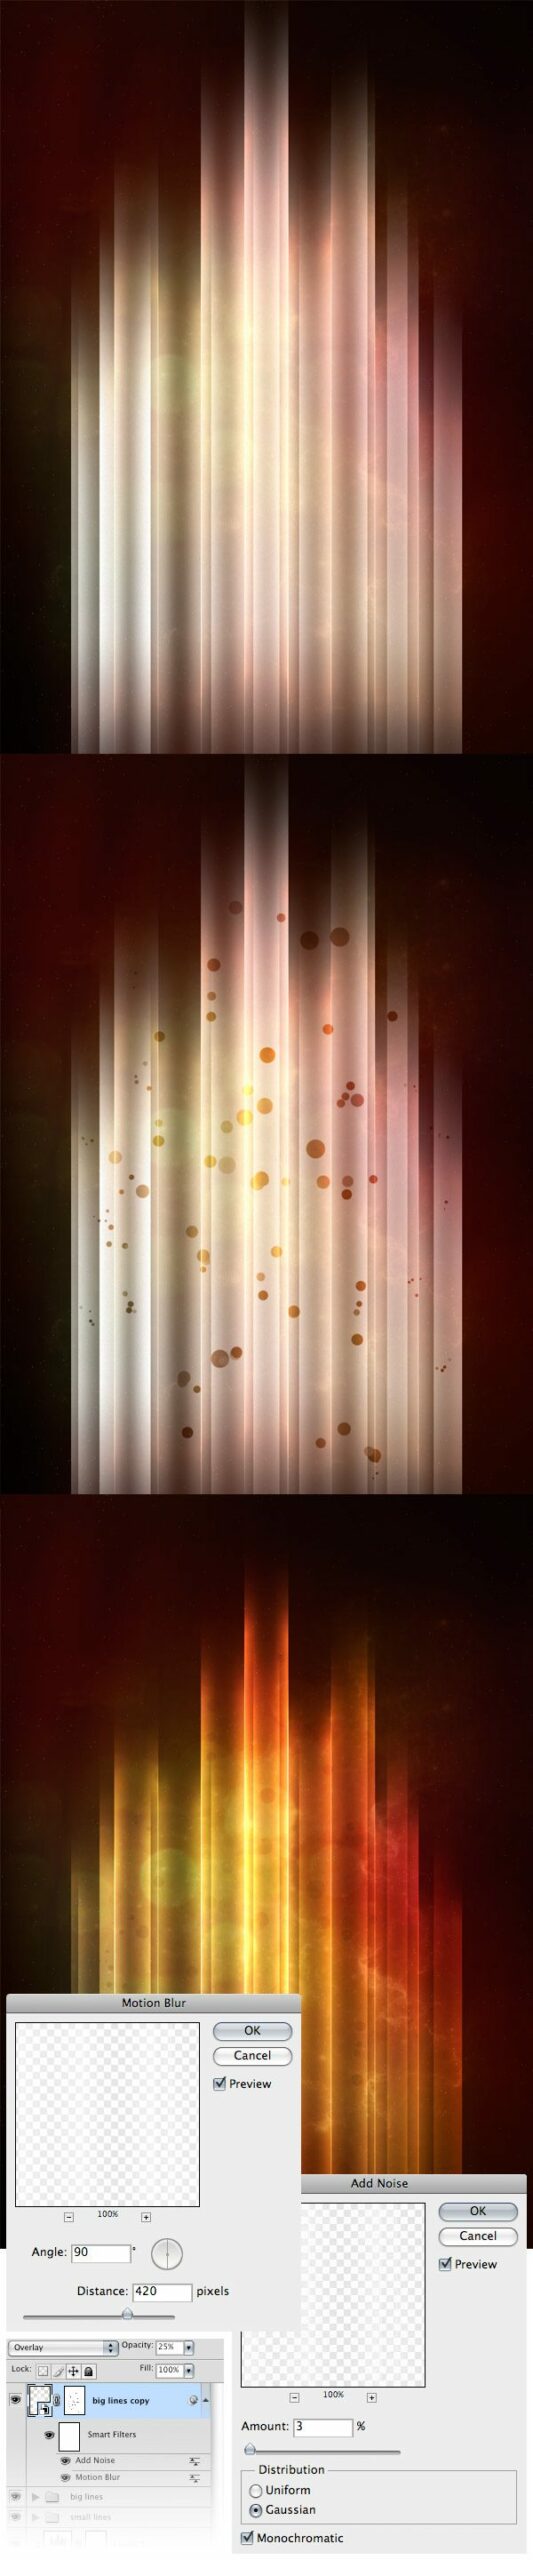
Duplicate the “big lines” group, right-click on the new group, and then choose Convert to Smart Object.
Add a mask to this layer (Layer > Layer Mask > Reveal All), set the foreground color to black (#000000), select the brush which you have just created, and paint with it on the mask to erase parts of this layer. This gives the lighting a nice detail.
For the center of the lines, use the brush with a master diameter of about 50px and decrease it as you get to the edges of the lines.
Then set the blending mode of this layer to Overlay and the opacity to 25%.
Go to Filter > Blur > Motion Blur and use the settings from the following image.
Then add a bit of noise (Filter > Noise > Add Noise).
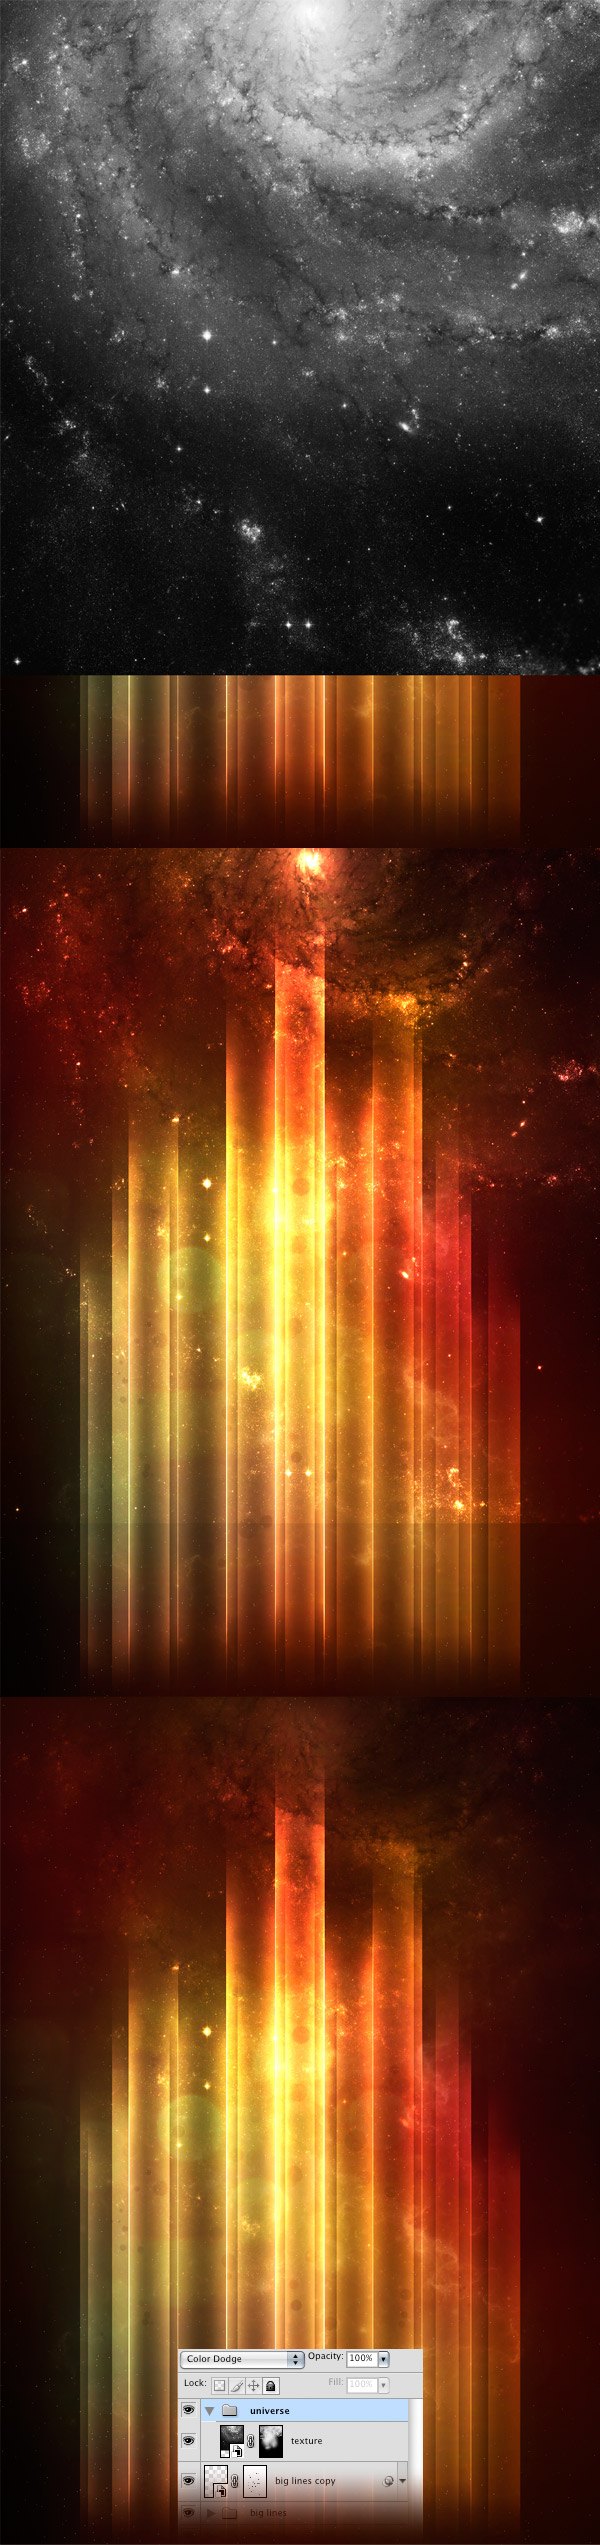
Step 26: Add the Universe stock image
Download this image and open it in Photoshop.
Then desaturate it (Ctrl/Cmd + Shift + U) and move it into our main canvas.
Name this layer “texture“, and then convert it into a smart object.
Then go to Edit > Free Transform (Ctrl/Cmd + T), hold down the Shift key, make this layer smaller, and rotate it.
Put this layer into a group (Ctrl/Cmd + G), name the group as “universe“, and adjust its blending mode to Color Dodge.
Click on the “texture” layer to make it active and add a black-colored mask by going to Layer > Layer Mask > Hide All.
Choose a white soft brush for the Brush Tool (B) with its opacity option at 50% and master diameter at 100px.
Then paint with the Brush Tool over the top area of the image to reveal parts of the texture that you want.
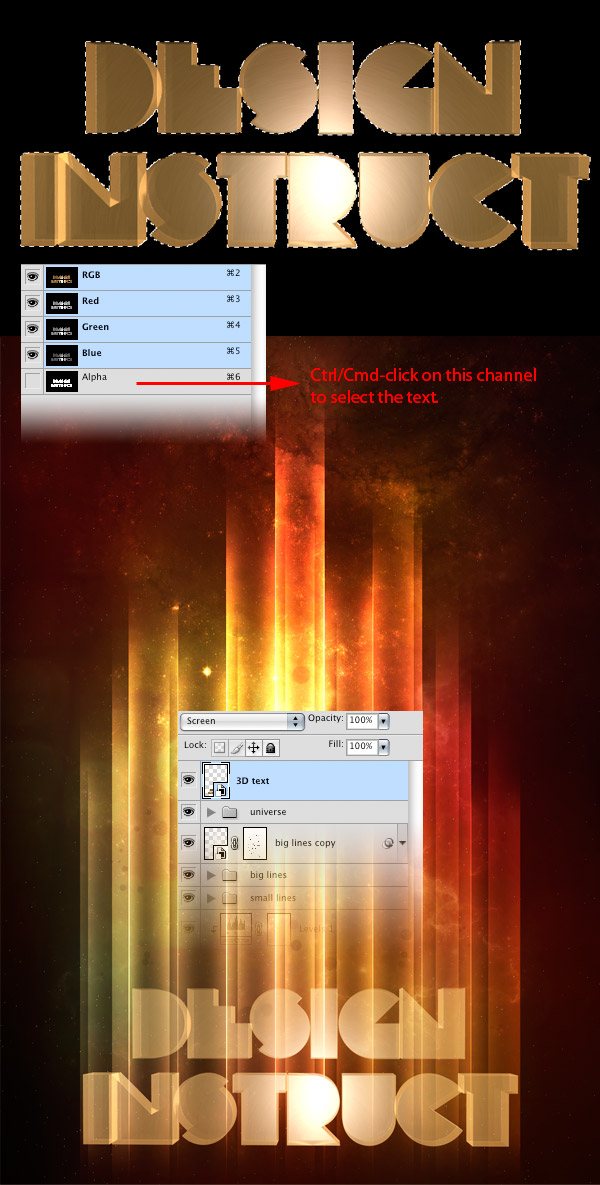
Step 27: Add the 3D text
Open the .TIFF file with the 3D text that we created earlier, in Photoshop.
Then go to the Channels panel where you will see the Alpha channel.
Ctrl-click on the Alpha channel to automatically create a marquee selection around the 3D text.
Copy (Ctrl/Cmd + C) the selected text.
Switch back to our main canvas, create a new layer, and paste the copied 3D text (Ctrl/Cmd + V).
Convert this layer into a smart object, and then go to Edit > Free Transform (Ctrl/Cmd + T), hold down the Shift key, and scale it down to a good size.
Name this layer “3D text” and set its blending mode to Screen.
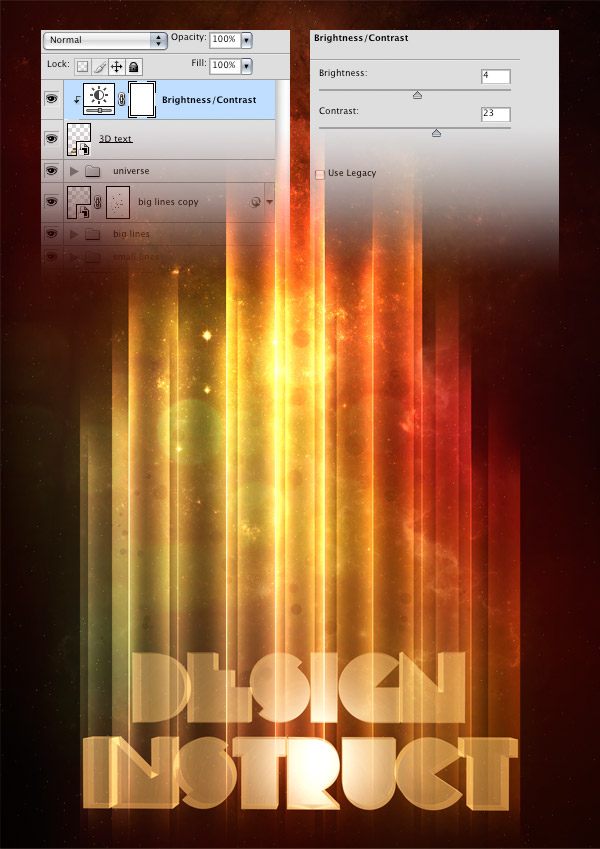
Step 28: Add a Brightness/Contrast adjustment layer to the text
Go to Layer > New Adjustment Layer > Brightness/Contrast, tick the Use Previous Layer to Create Clipping Mask option, and then use the settings from the following image for your Brightness/Contrast adjustment layer.
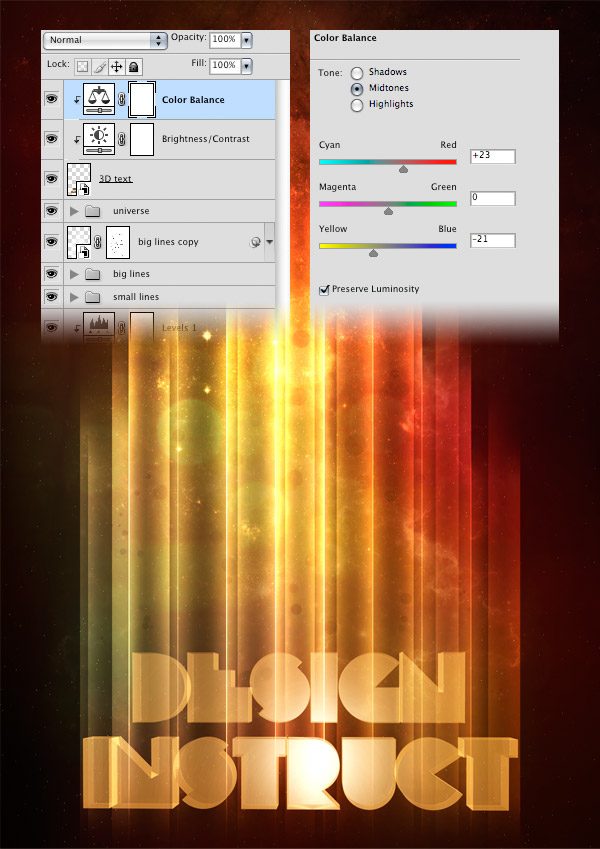
Step 29: Add a Color Balance adjustment layer to the text
Go to Layer > New Adjustment Layer > Color Balance, tick the Use Previous Layer to Create Clipping Mask option, and then use the settings from the following image for your Color Balance adjustment layer.
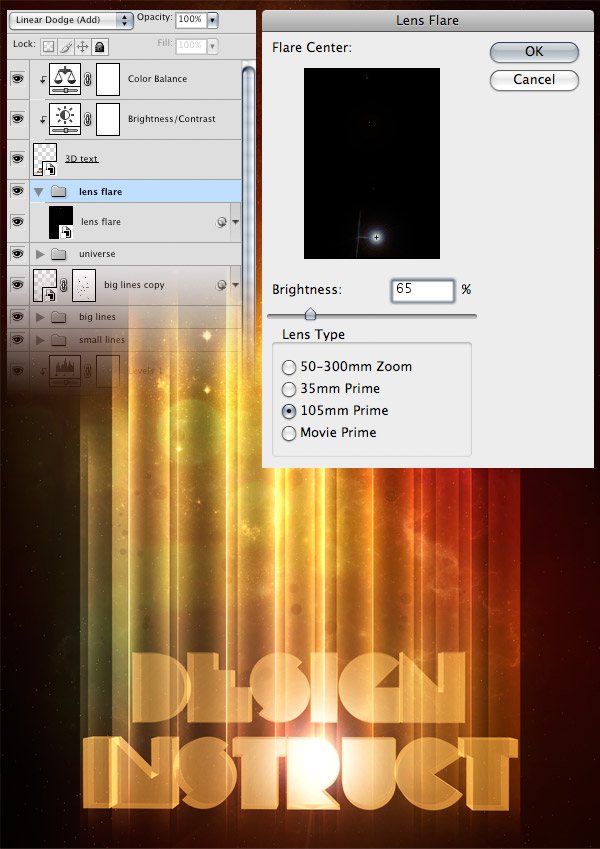
Step 30: Create a lens flare effect
Create a new group beneath the 3D text layer, name it “lens flare” and set its blending mode to Linear Dodge (Add).
Create a new layer inside this “lens flare” group and fill it with black (#000000) using the Paint Bucket Tool (G).
Convert this layer into a smart object.
Then go to Filter > Render > Lens Flare and use the settings from the following image.
Name this layer “lens flare” to keep our work nice and tidy.
Conclusion
Our retro-space typography poster is now finished. I hope you enjoyed this tutorial and learned some new and helpful design techniques.
We did a lot in this tutorial! We used Cinema 4D to create a nice, retro-styled text. We developed a unique lighting effect using Photoshop.
We created some heavenly stars using the Noise filter and a Levels adjustment layer. We even created a custom brush to add details to our light effect.
If you adored this tutorial and if I inspired you in your own work, why don’t you join your work in the Design Instruct Flickr group pool?
Looking forward to your comments!
Download Source Files
- colorful_retro_poster (ZIP, 6.9 MB)
-
 Trevin serves as the VP of Marketing at WebFX. He has worked on over 450 marketing campaigns and has been building websites for over 25 years. His work has been featured by Search Engine Land, USA Today, Fast Company and Inc.
 -

WebFX is a full-service marketing agency with 1,100+ client reviews and a 4.9-star rating on Clutch! Find out how our expert team and revenue-accelerating tech can drive results for you! Learn more
Make estimating web design costs easy
Website design costs can be tricky to nail down. Get an instant estimate for a custom web design with our free website design cost calculator!
Try Our Free Web Design Cost Calculator
Table of Contents
- Preview
- Resources
- Step 1: Setting Up a New Document in Photoshop
- Step 2: Converting the Text into Shapes
- Step 3: Opening the .AI File in Cinema 4D
- Step 4: Create the 3D Text
- Step 5: Assign the Extrude Object Settings
- Step 6: Add a Material to the 3D Text
- Step 7: Add Light Sources to the 3D Text
- Step 8: Apply the Render Settings
- Step 9: Rendering the Text
- Step 10: Set Up a New Photoshop Document
- Step 11: Add a Color Gradient to the Background
- Step 12: Add More Colors to the Background
- Step 13: Add Even More Colors to the Background
- Step 14: Incorporate the Star Lights Texture
- Step 15: Include the Cosmos Texture
- Step 16: Creating the Stars
- Step 17: Start the Creation of the Colorful Light Effects
- Step 18: Working on the Line
- Step 19: Altering the Layer Settings
- Step 20: Duplicate the Line
- Step 21: Create More Lines
- Step 22: Create Smaller Lines
- Step 23: Finishing Up the Lines
- Step 24: Create a New Custom Brush
- Step 25: Applying the Custom Brush
- Step 26: Add the Universe Stock Image
- Step 27: Add the 3D Text
- Step 28: Add a Brightness/Contrast Adjustment Layer to the Text
- Step 29: Add a Color Balance Adjustment Layer to the Text
- Step 30: Create a Lens Flare Effect
- Conclusion
- Download Source Files
Share this article


Web Design Calculator
Use our free tool to get a free, instant quote in under 60 seconds.
View Web Design CalculatorMake estimating web design costs easy
Website design costs can be tricky to nail down. Get an instant estimate for a custom web design with our free website design cost calculator!
Try Our Free Web Design Cost Calculator


