

Preview
Click on the image to see the full-size version.
Tutorial Resources
Below are the resources that we are going to use in this tutorial. I want to thank the artists who created them for their hard work. When using these resources, please make sure that you read and respect the artists’ terms of use.
They put a lot of work into creating these wonderful resources.
- Statue (XElectra)
- Forest photo (InKi-Stock)
- Cracks Texture (MadamGrief-Stock)
- Concrete texture (FantasyStock)
- Planet texture (ShockBeam)
Part 1: Cinema 4D
We will start by creating the 3D tentacles in Cinema 4D. In this part, I will show you how to use the Bezier Tool to create splines, how to add depth to those splines with Sweep Nurbs, how to manipulate the Scale and Rotation graphs of the Sweep Nurbs to get the outcome we want and how to render the 3D shapes so that we can use them in Photoshop.
If you feel overwhelmed by all the tools I mentioned, don’t worry. I’ll explain everything in detail as we progress.
Note: If you don’t have a copy of Cinema 4D, you can still do this tutorial.
Download the 3D tentacles that we will create in this part of the tutorial and then continue on to Part 2: Photoshop below.
Step 1: Creating a Spline
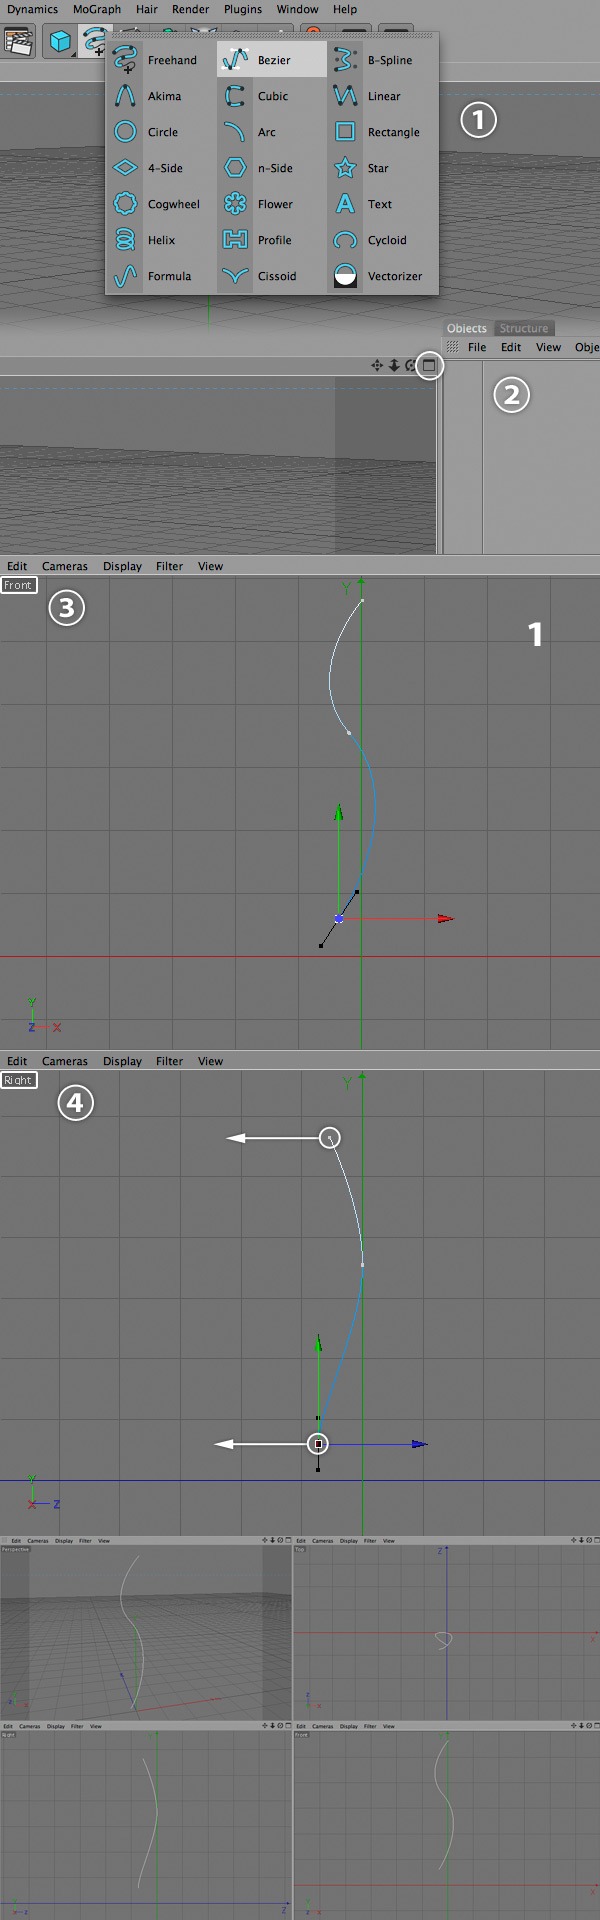
In Cinema 4D, select the Bezier Tool (1). We’ll use this tool to create the splines of the abstract shapes. If you haven’t used the Bezier Tool before, think of it like the Pen Tool from Photoshop.
Click on the View button from the top-right corner of the active area to open the other views of the scene (2).
Then use the Bezier Tool to create a spline in the Front view like the one you see below (3).
Create this spline just like you create a path in Photoshop using the Pen Tool.
Now we’ll work in the Right view. Select the Move Tool (E), select some of the anchor points of the spline and move them to the left (4). You can manipulate the anchor points from any view (Top, Right, Front) to get the result you want.
Step 2: Creating More Splines
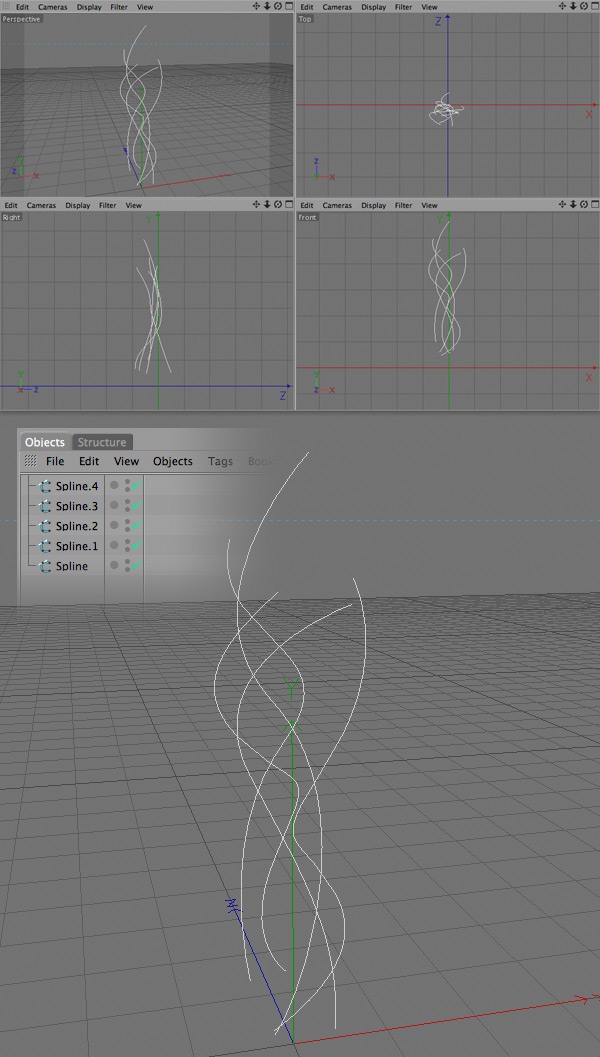
Create a few more splines using the Bezier Tool and then use the Move Tool (E) to move some of the anchor points around to make the splines intersect.
Below, you can see what the splines I created look like in different views. All the splines that you create will appear in the Objects panel.
When you’re finished, you can go back to the Perspective view by clicking on the View button.
Step 3: Giving Depth to the Splines
If we render the scene now, we will only see a black canvas. That’s because the splines don’t exist yet in 3D space.
To give them depth, we will use Sweep Nurbs.
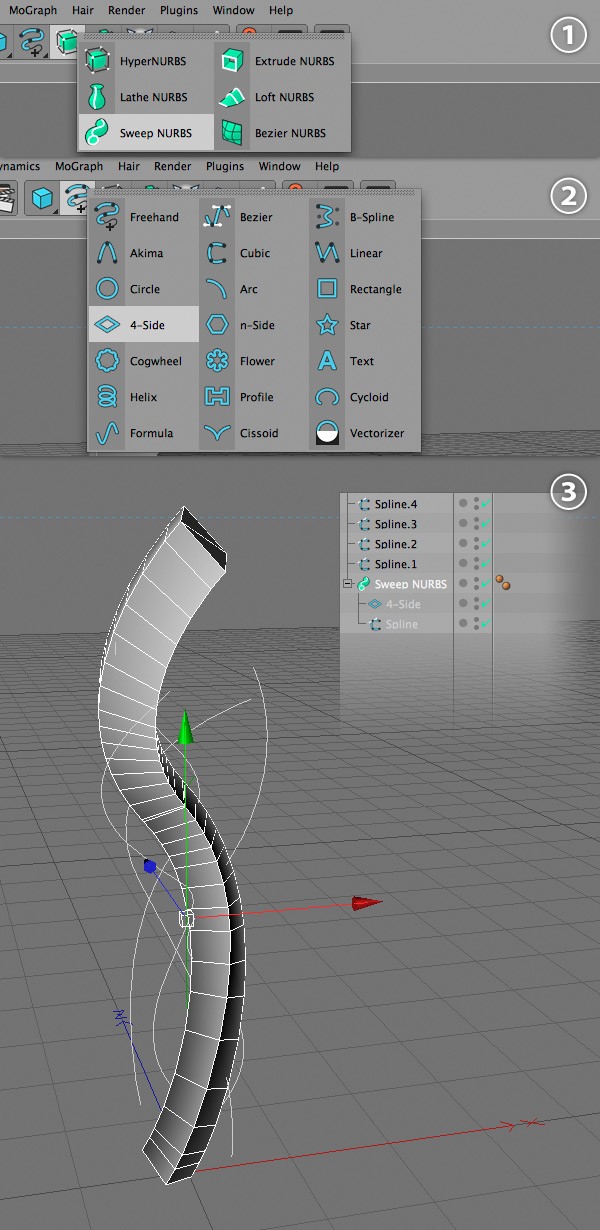
Click on one of the splines from the Objects panel to select it. Hold down Alt/Option, click on the Hyper Nurbs button and select Sweep Nurbs (1). This will create a Sweep Nurbs object and it will put the selected spline inside it.
Now we need to add a shape inside the Sweep Nurbs that will follow the shape of the spline.
I chose to use the 4-Side shape (or the diamond shape). Click on the Freehand Tool button and select 4-Side (2). Then drag this object inside the Sweep Nurbs object, but put it above the spline.
Now we have two objects inside the Sweep Nurbs — the spline (which is the skeleton of our shape) and the 4-Side shape (which follows the shape of the spline) (3).
Step 4: Making the Shape Thinner
Now we want the shape to be thinner.
To do this, we have to change the size of the 4-slide object.
Click on the 4-slide object from the Objects panel. Then select the Scale Tool (T). In the perspective view of your 3D scene, you will see a representation of the X, Y and Z axis (the red, green and blue lines).
Click on the center of these axes and move your cursor to the left. This will decrease the size of the selected object (in our case, the 4-slide object). Take a look a the following image for reference.
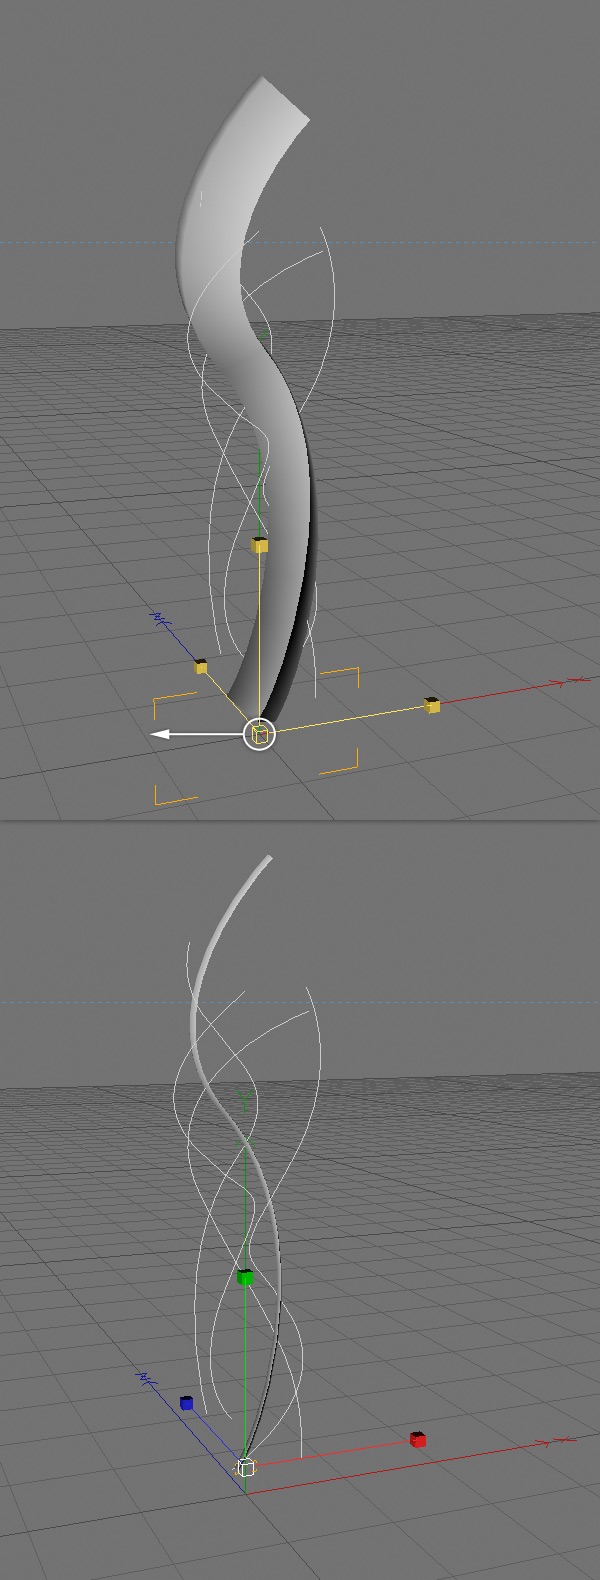
Step 5: Adjusting the Scale and the Rotation
Click on the Sweep Nurbs object to select it.
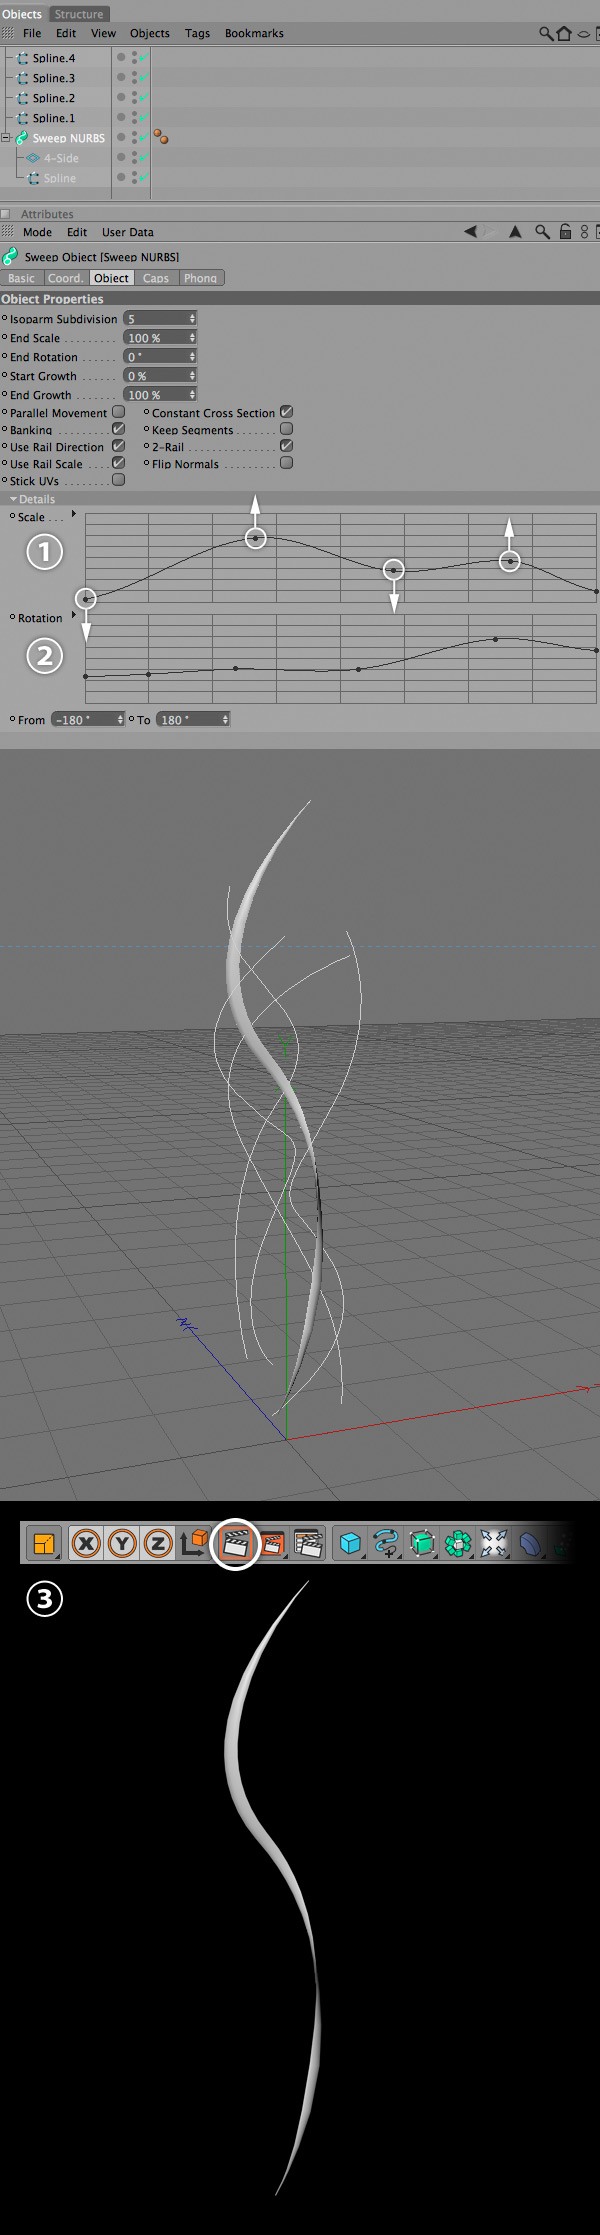
Then go to the Attributes panel (underneath the Objects panel), click on the Object tab and then click on the Details option. You’ll see two graphs. The first one represents the scale and the second one the rotation.
We want our tentacle shape to start very thin and then increase its thickness and end up very thin again.
In order to do this, we have to modify the Scale graph (1). Start by moving the first point from the graph down. Then add a few more points on the line and move them to create a curve like you see in the following image.
To make the end point of our tentacle shape thin, move the last point from the Scale graph down. This step is about experimenting until you get a result that you’re satisfied with.
Now we’ll adjust the rotation of our shape. Add some points on the Rotation graph (2) to create a curve and look at the 3D shape to see the changes.
Again, this is about experimenting and finding out what you like.
Click on the Render Active View button to see how the 3D scene looks so far (3).
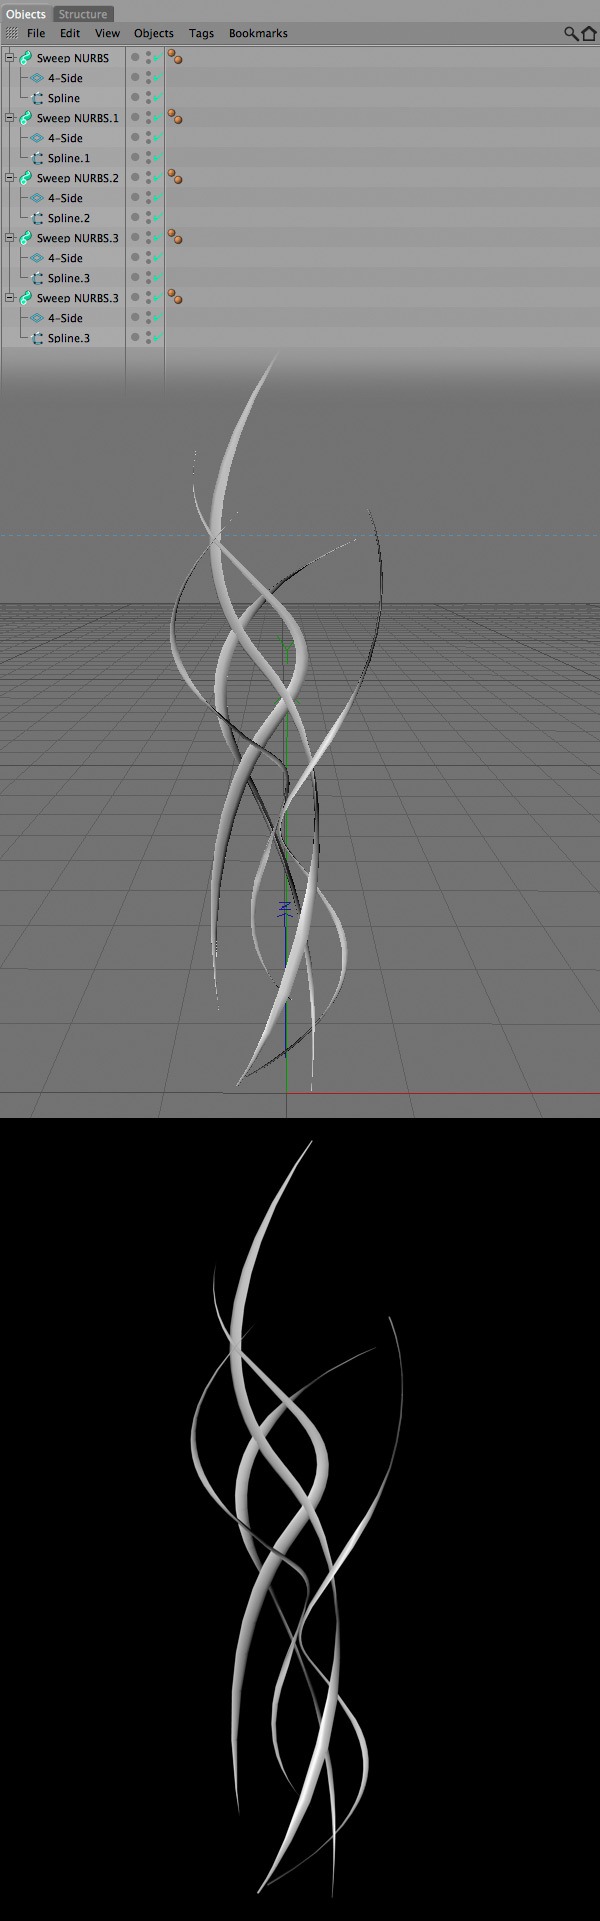
Step 6: Repeat
Repeat the previous three steps for the other splines that you created. To summarize the process:
- Create a Sweep Nurbs object and drag your spline object inside it
- Create a 4-Slide object (or any other shape you want) and drag it inside the Sweep Nurbs, above the spline object
- Use the Scale Tool (T) to decrease the size of the 4-Slide object
- Select the Sweep Nurbs and change its scale and rotation using the graphs from the Attributes panel
Experiment with the scale and rotation to make each tentacle shape different. Then click on the Render Active View button to see how your 3D scene looks so far.
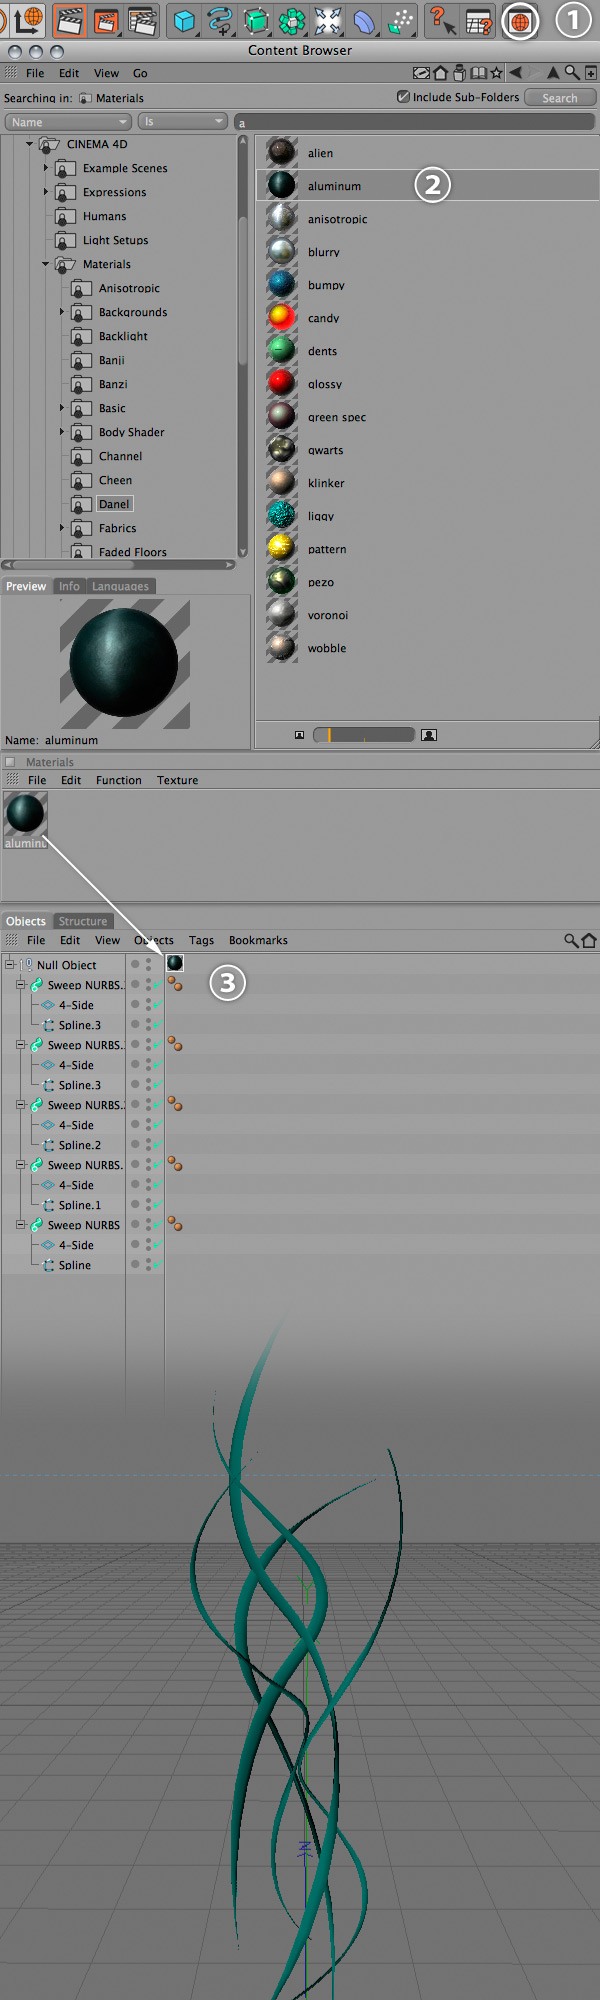
Step 7: Adding a Material to the Tentacles Shapes
Select all the Sweep Nurbs objects and hit Alt/Option + G to put them inside a Null Object.
If you are new to Cinema 4D, think of the Null Object as a Photoshop group. Basically, it does not exist in the 3D space, but we can use it to organize our objects.
Now we’ll add a material to the tentacles. Click on the Content Browser button (1).
A new window will appear. Navigate through the folders to find a material that you like. I used an aluminium material for my 3D shapes.
You can find it in Cinema 4D folder > Materials > Danel > Aluminium (2). Double-click on the material to add it to the Materials panel. Then you can close the Content Browser window.
Now drag the material onto the Null Object to apply it to all the objects from this group (3).
Step 8: Adding Lights
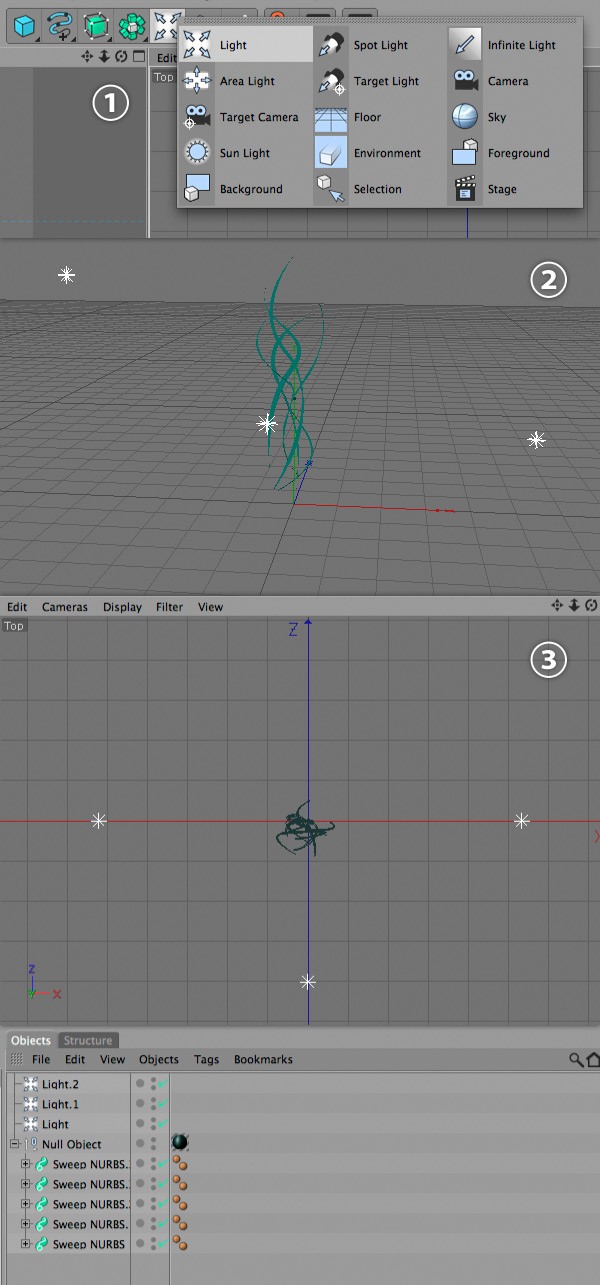
Click on the Add Light Object button and select Light (1).
Then move this light in front of the 3D shapes using the Move Tool (E), as you see in the following image. Add two more lights and put them in the right and left hand sides of the tentacles shapes. Below you can see how my lights are arranged from a perspective view (2) and from the top view (3).
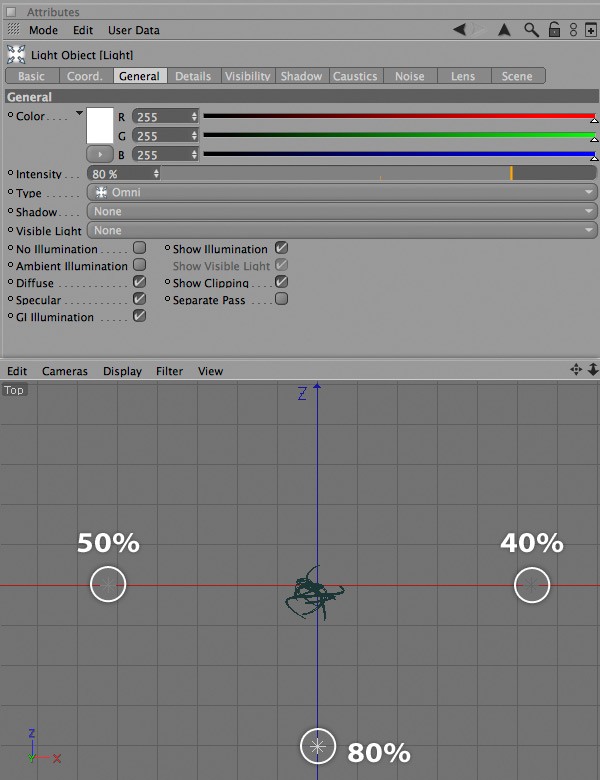
Select each of the light objects from the Objects panel and change their Intensity from the Attributes panel.
Render the scene as you do some changes in order to see how they affect your 3D shapes.
Step 9: Set Up the Render Settings
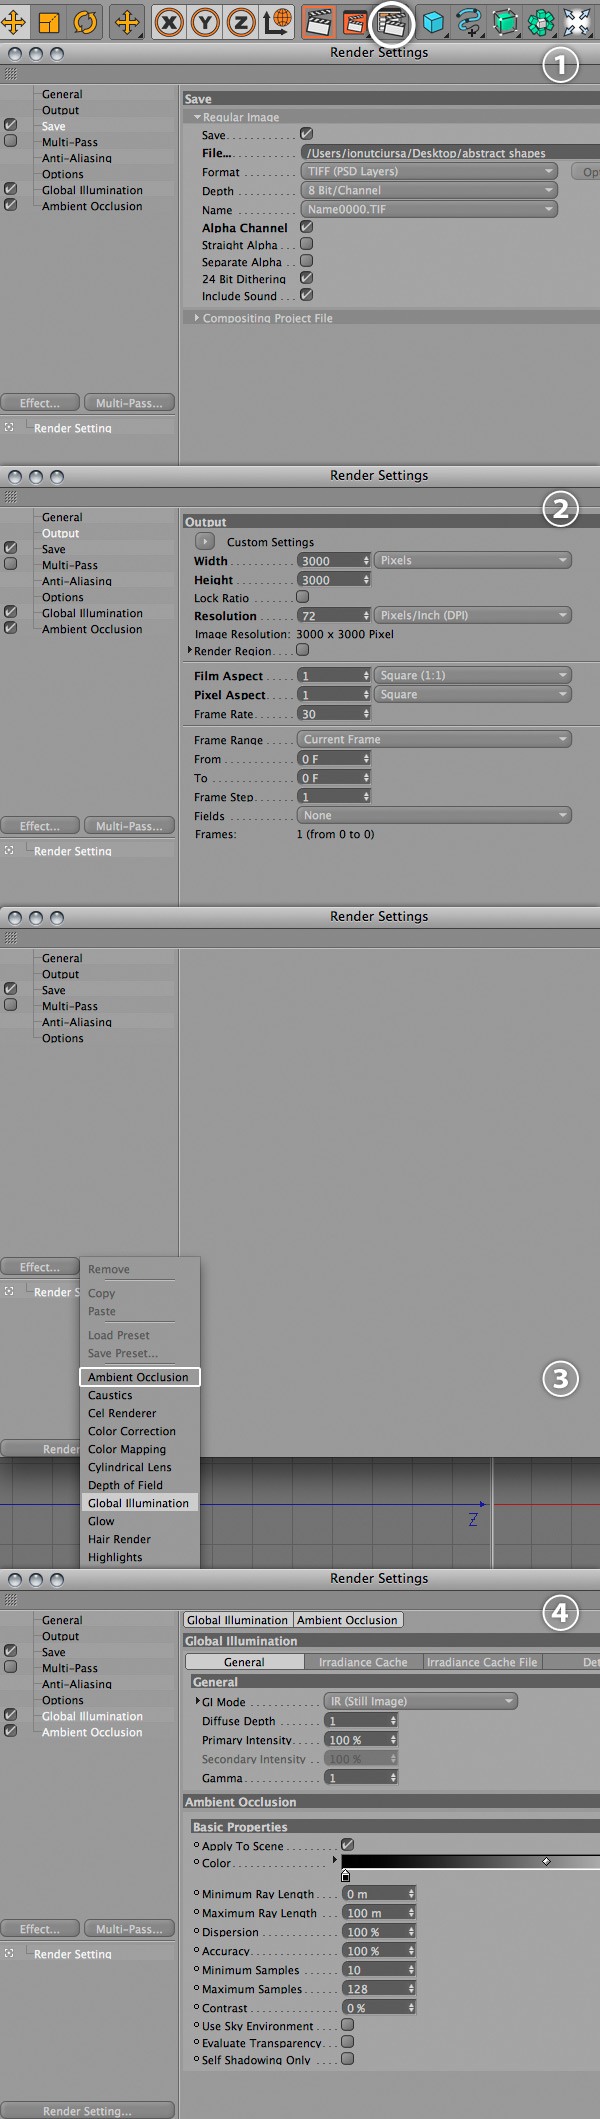
We are finished with the 3D scene. Now we have to render it. Click on the Render Settings button (1).
A new window will appear. Select the Output option and set the width and height to 3000px (2).
Click on Save, select a path where you want the image to be saved and set the Format to TIFF (PSD Layers). Then tick the Alpha Channel option.
Later, when we move on to Photoshop, we will use this Alpha Channel to select the tentacles shapes.
To make the lights of the final render better, we will add two more options to the Render Settings window. Click on the Effect button and select Global Illumination. Then click on this button again and select Ambient Occlusion (3, 4).
Leave these settings to the default. These two lighting options will give us a better result, but the image will take a little bit longer to render.
Now you can close the Render Settings window.
Step 10: Rendering the Scene
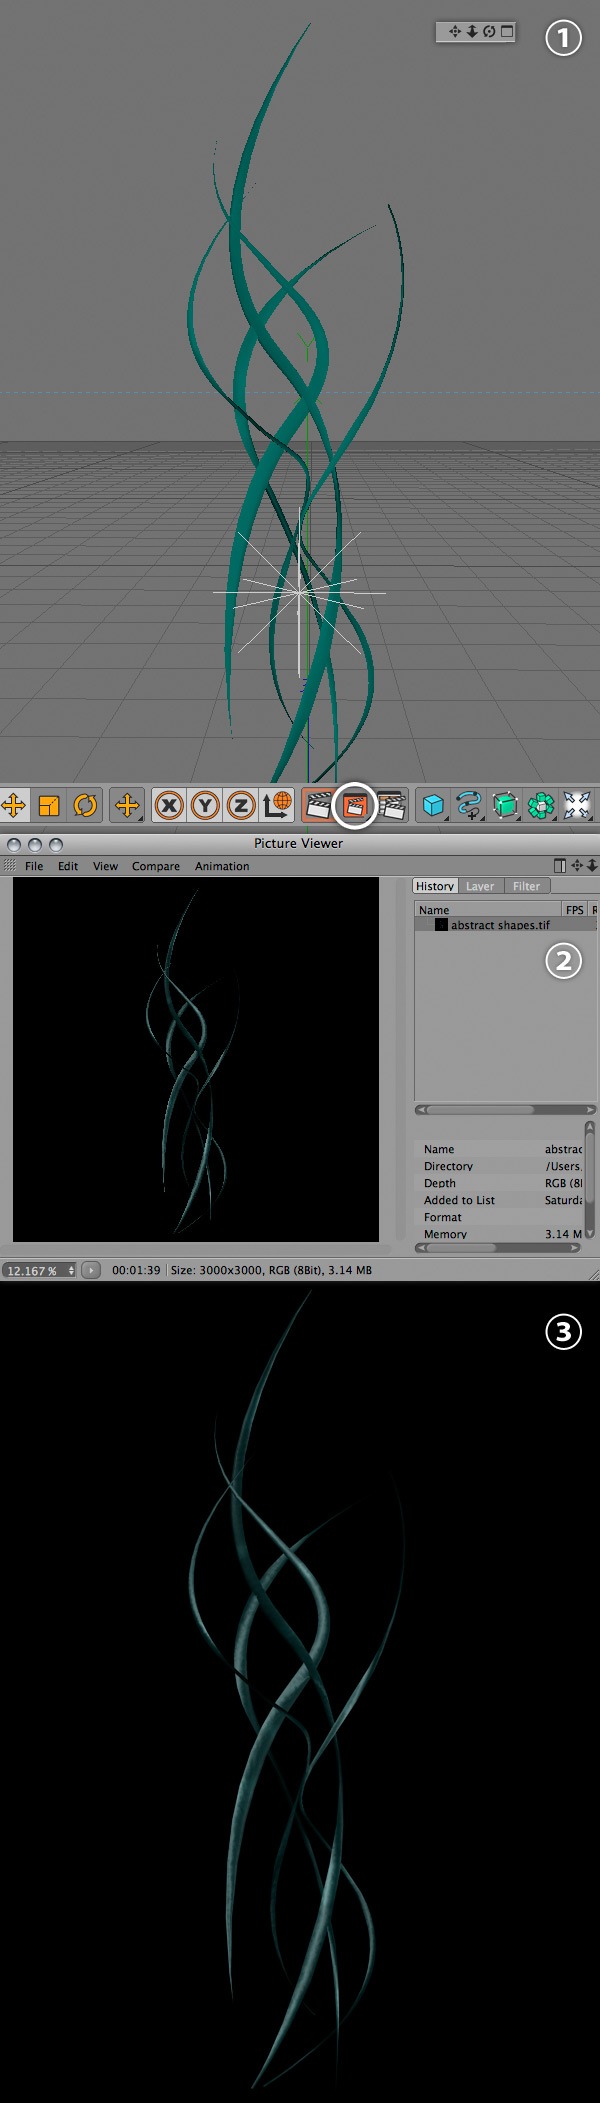
If you’re ready to render your 3D scene, use the navigation button from the upper right corner of the perspective view to rotate the camera to find a good angle for the render. I put my camera in front of the 3D shapes (1).
Click on the Render in Picture Viewer button.
A new window will appear and the image will start to render (2). When it finishes, the outcome will be saved in the location you specified in the Render Settings window. Otherwise, you can go to the File menu of this window, select Save As and save your image.
Below you can see how my rendered scene looks like (3).
We’ve now completed Part 1: Cinema 4D.
Part 2: Photoshop
Now we are going to finish the photo manipulation in Photoshop.
In this part, I will show you how to use textures to convert a photo of a woman into a statue, how to adjust the colors and the shadows to create a realistic outcome and how to use the tentacles that we created in Cinema 4D.
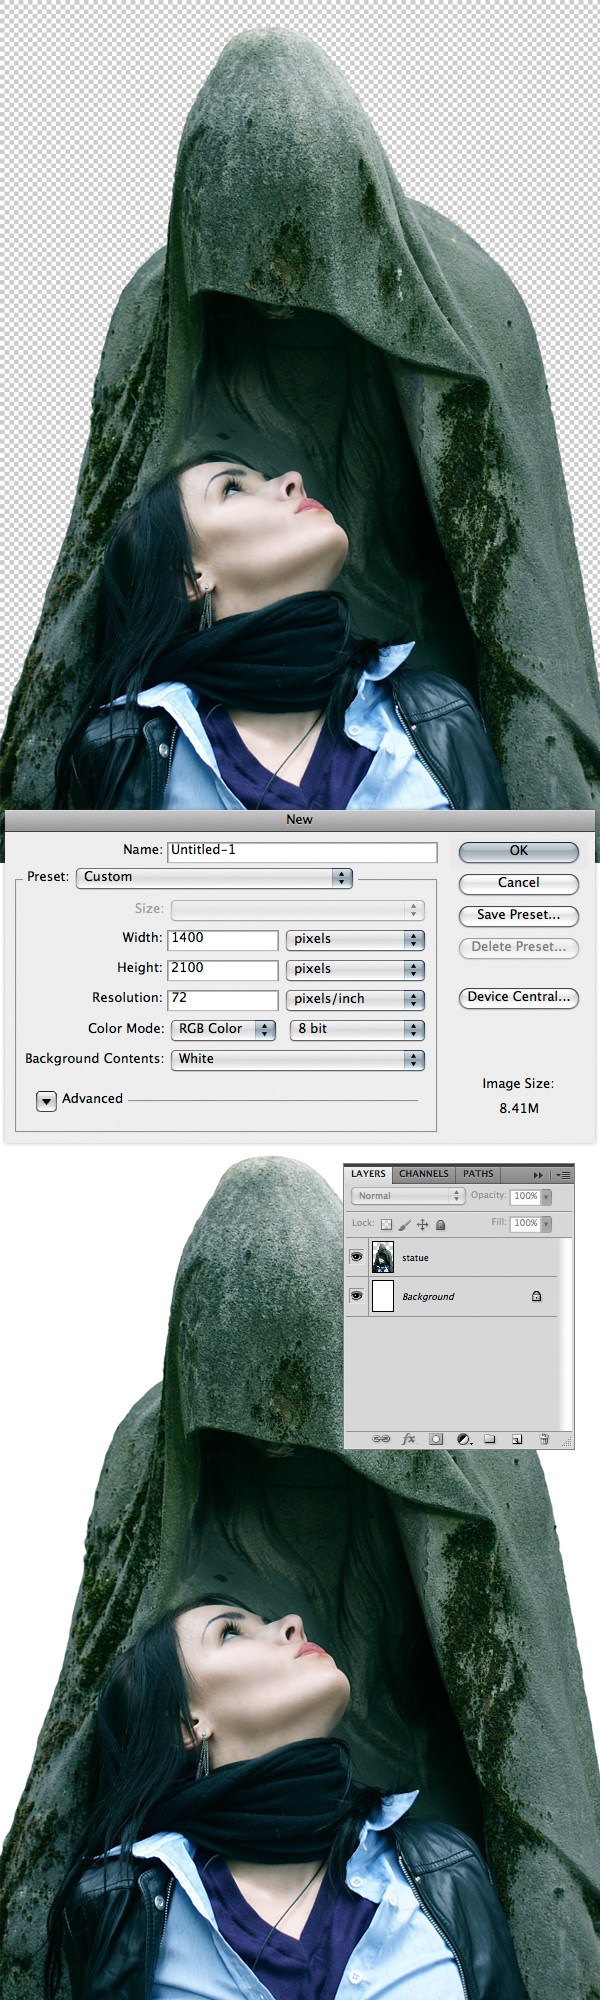
Step 11: Setting Up the Photoshop Document
Download this photo and open it in Photoshop. Use the Pen Tool (P) to separate the statue from the background. Then create a new document (Ctrl/Cmd + N) with the dimensions of 1400x2100px and move the statue image in this new document using the Move Tool (V).
Name this layer “statue”, go to Edit > Free Transform (Ctrl/Cmd + T), hold down the Shift key to maintain the proportions, and then scale the image down.
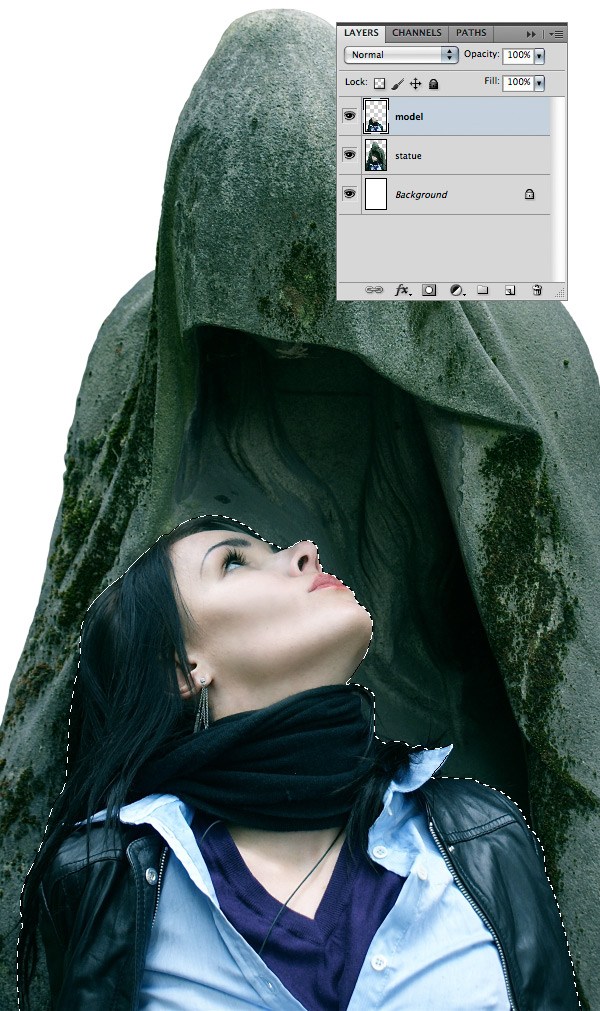
Step 12: Selecting Around the Model
Use the Pen Tool (P) to make a selection of the model. Then hit Ctrl/Cmd + J to create a new layer out of the selected area. Name this layer “model”.
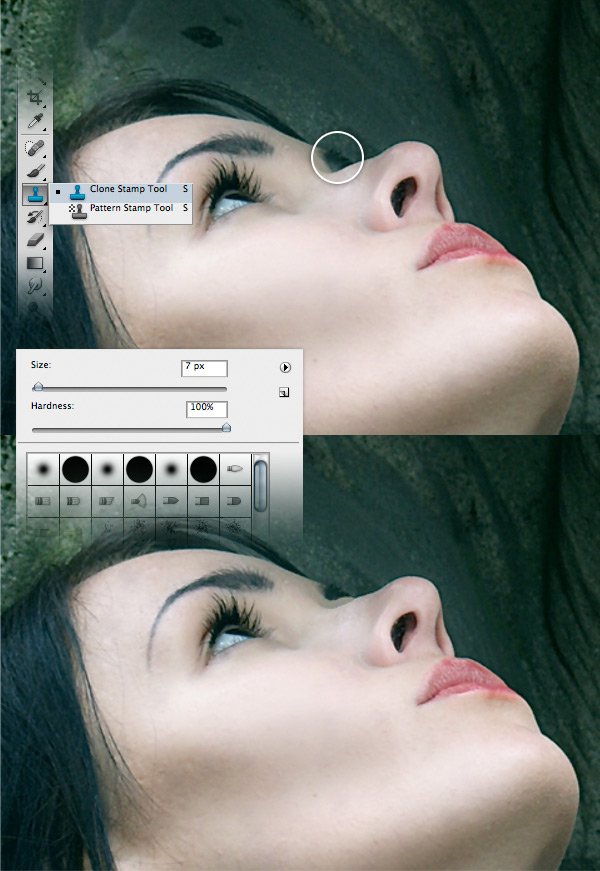
Step 13: Eyebrow Adjustments
Now we are going to do some adjustments to the model.
We’ll start by making her left eyebrow thinner. Select the Clone Stamp Tool (S), right-click on the image and set the size of the brush to 7px and the Hardness to 100%. Then use this brush to copy portions of the model’s skin over the bottom area of her left eyebrow.
Take a look at the following image for reference.
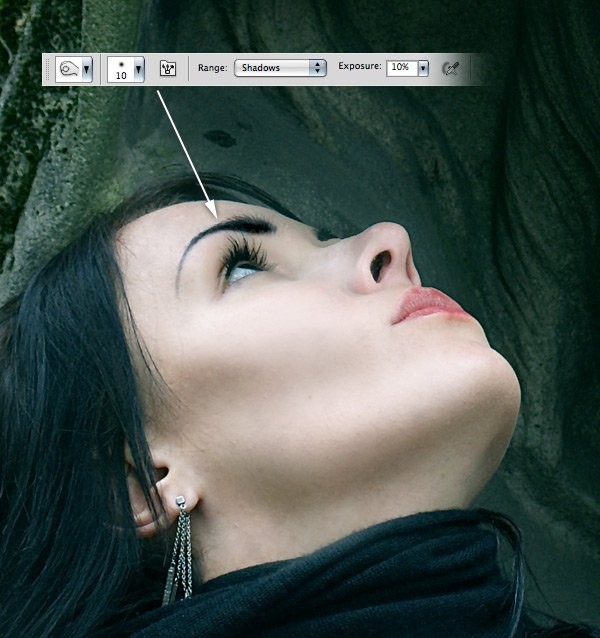
Select the Burn Tool (O), set the Range option to Shadows and the Exposure to 10%. Right-click on your image and select a brush with the size 10px and 0% Hardness. Then use this tool to make the model’s right eyebrow darker.
Step 14: Removing the Iris
To make the model look more like a statue, we will remove her iris using a simple technique.
Use the Lasso Tool (L) to make a selection of the model’s eye.
Then select the Clone Stamp Tool (S) and remove the iris using portions of the eye’s white area (sclera). The eye should now be completely white. When you’re finished, hit Ctrl/Cmd + D to deselect.
Take a look at the following image for reference.
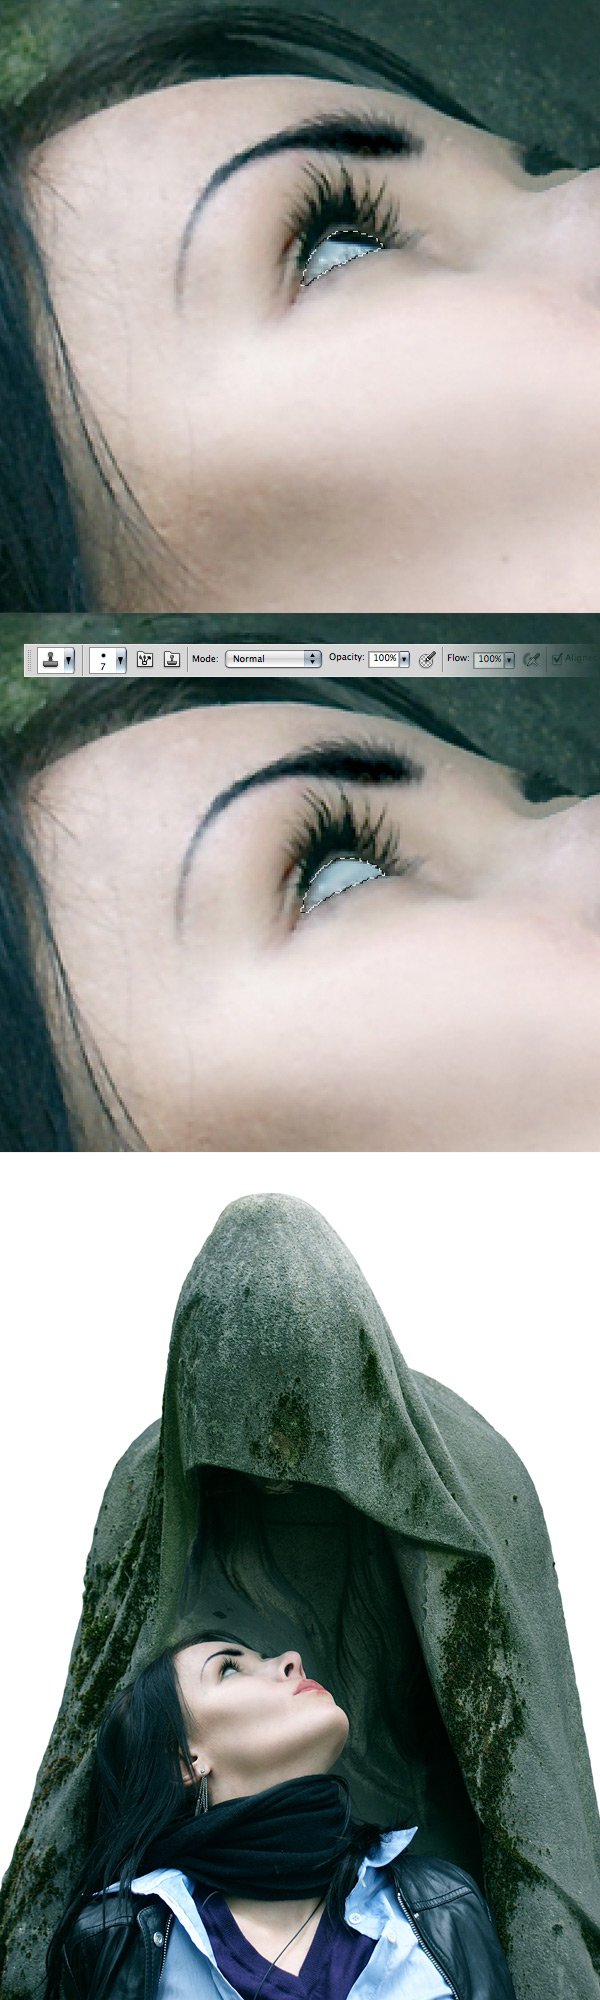
Step 15: Preparation for Turning the Model into a Statue
Duplicate the “model” layer by right-clicking on it in the Layers Panel and selecting Duplicate Layer in the contextual menu that appears. Hit Ctrl/Cmd + G to put this layer inside a layer group and name the layer group “statue model”.
Ctrl-click/Cmd-click on the thumbnail of the “model” layer to make a selection around the model. Then make sure that the “statue model” group is selected and go to Layer > Layer Mask > Reveal Selection.
Now everything we put inside this group will affect only the model.
Select the layer from the “statue model” group and use the Burn Tool (O) to make the entire model very dark. Experiment with the Range and Exposure options of the Burn Tool to get a result similar to the one you see below. Basically, we have to get rid of the bright areas, so we can apply some textures over the model later on.
Name this layer “model burn”.
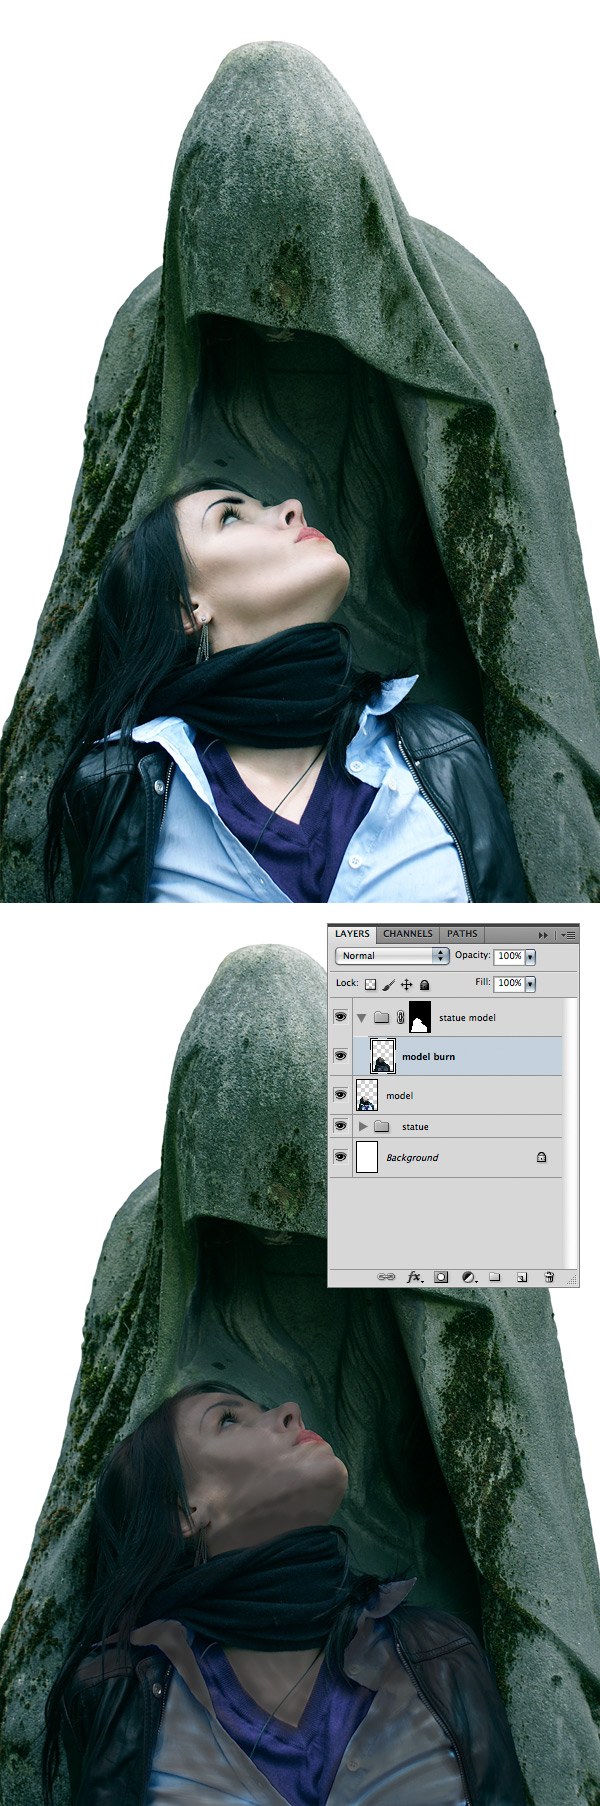
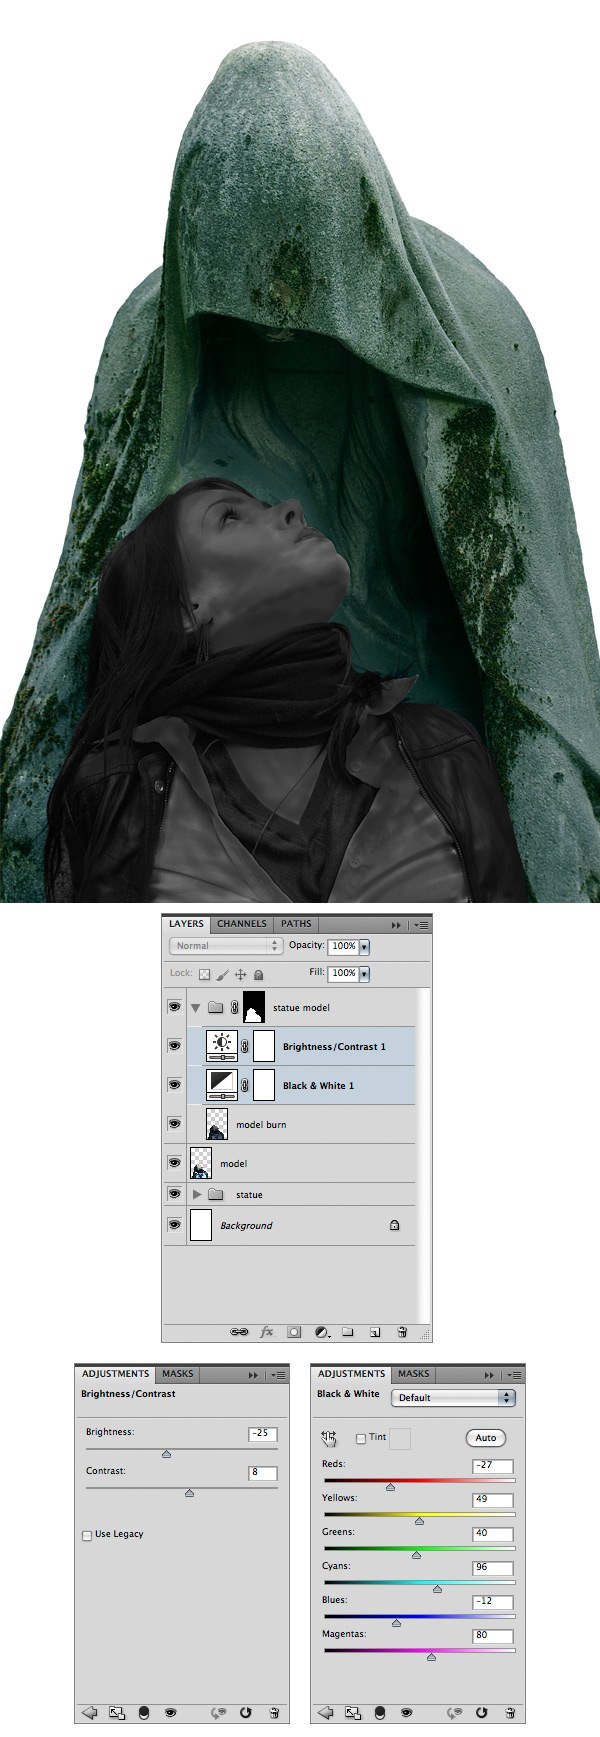
With the “model burn” layer selected, go to Layer > New Adjustment Layer > Black & White and use the settings from the following image. Then go to Layer > New Adjustment Layer >Brightness/Contrast and set the Brightness to -25 and the Contrast to 8.
Step 16: Adding a Texture to the Model
We will use an area of the statue above the model to turn the model into a statue as well.
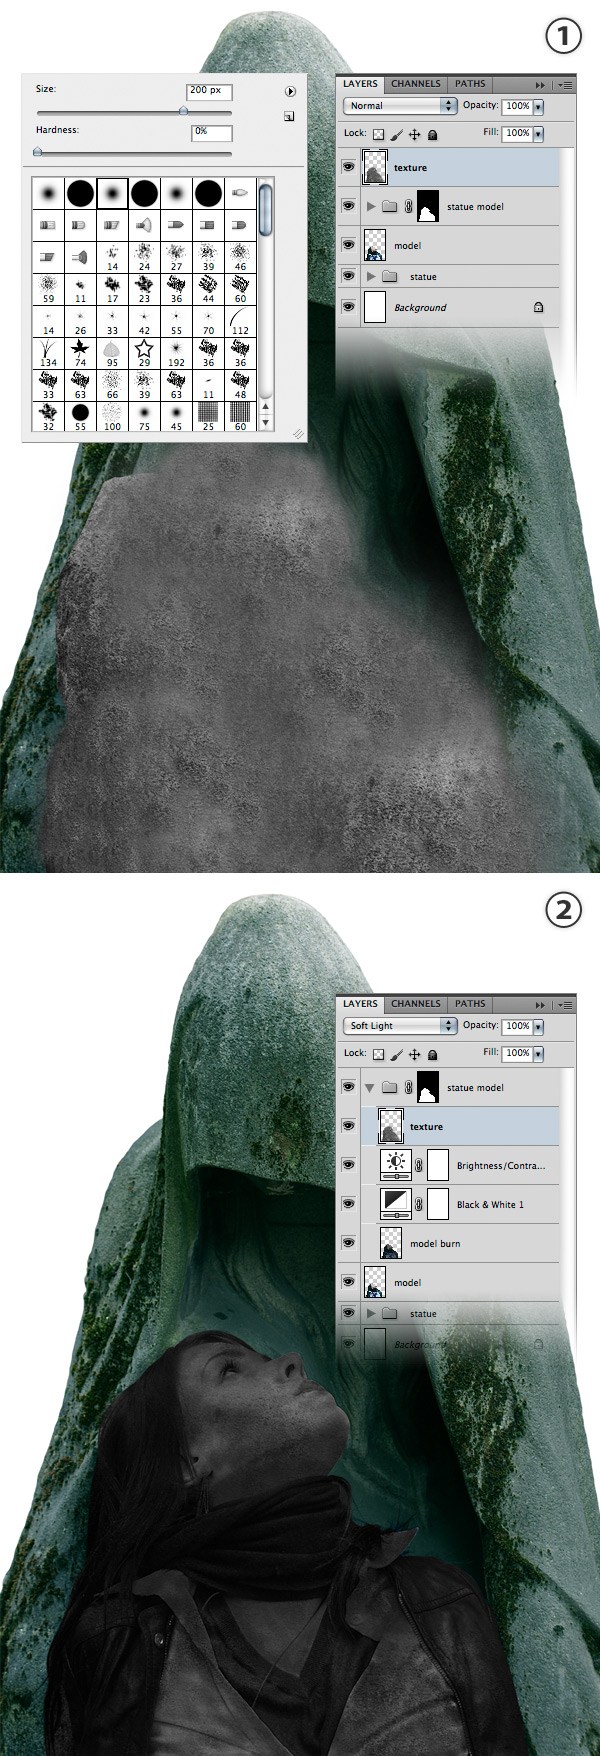
Make sure that the “statue” layer is active. Then use the Lasso Tool (L) to make a selection of the statue’s head, as you see in the image below (1).
Hit Ctrl/Cmd + J to create a new layer using the selected area. Name this layer “texture” and put it above all the other layers. Then use the Move Tool (V) to move the texture over the model (2).
With the “texture” layer selected, go to Image > Adjustments > Desaturate (Ctrl/Cmd + Shift + U) to make this texture black and white (3).
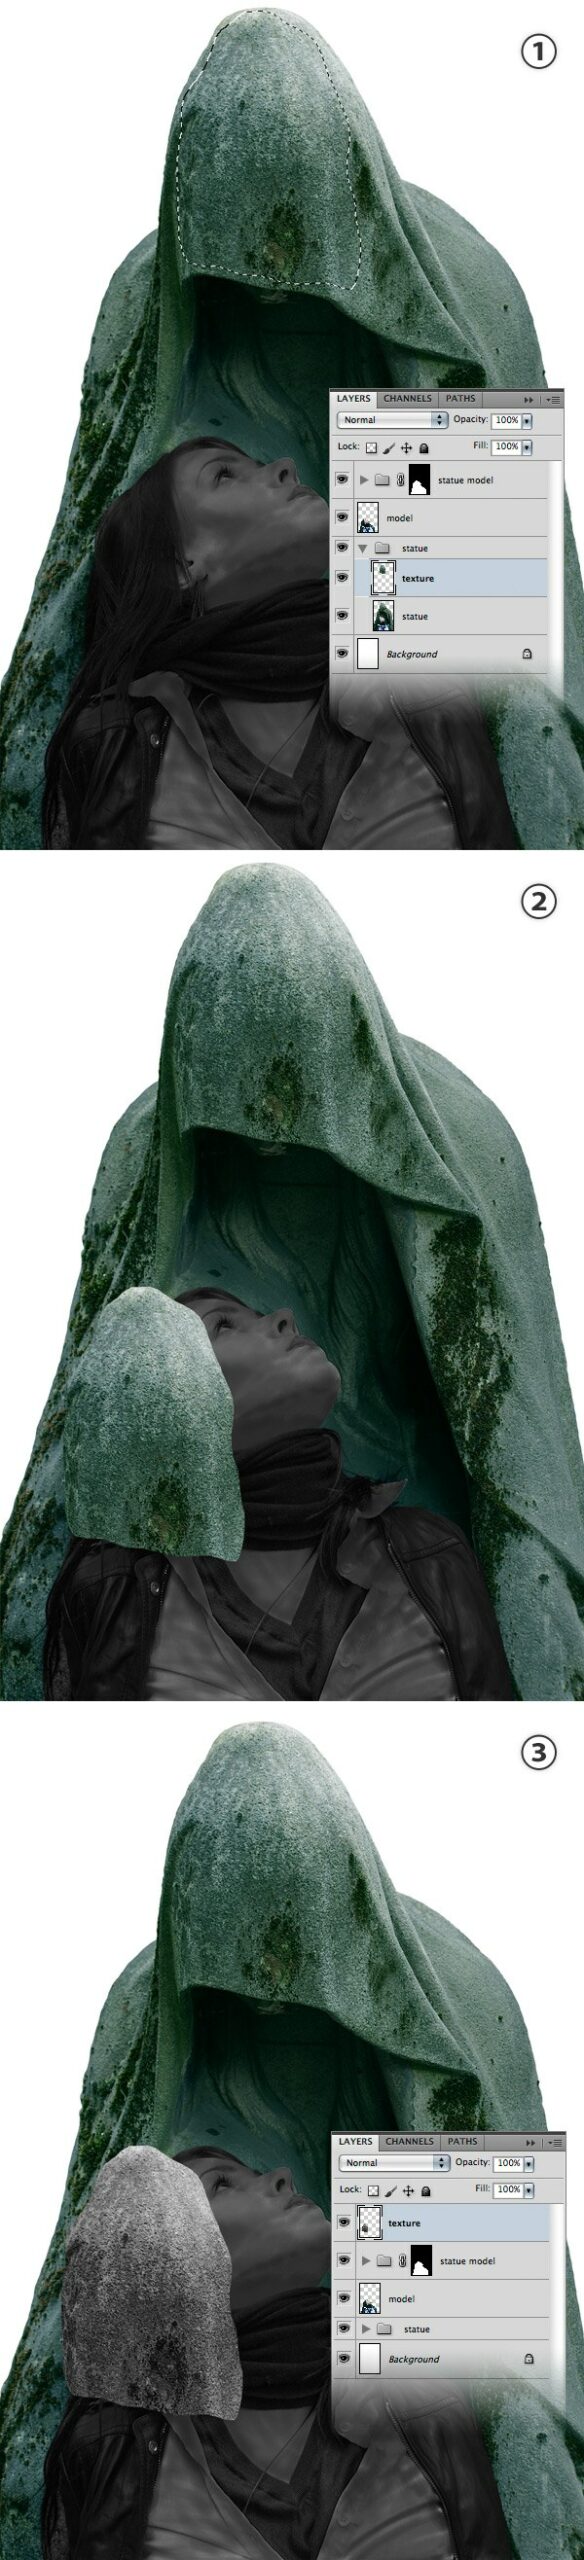
Select the Clone Stamp Tool (S), right-click on your image and set the brush size to 200px and the Hardness to 0%.
Use this tool to expand the texture until it covers the model entirely (1).
Put the “texture” layer inside the “statue model” group and set its Blend Mode to Soft Light (2).
Step 17: Adding Color to the Statue
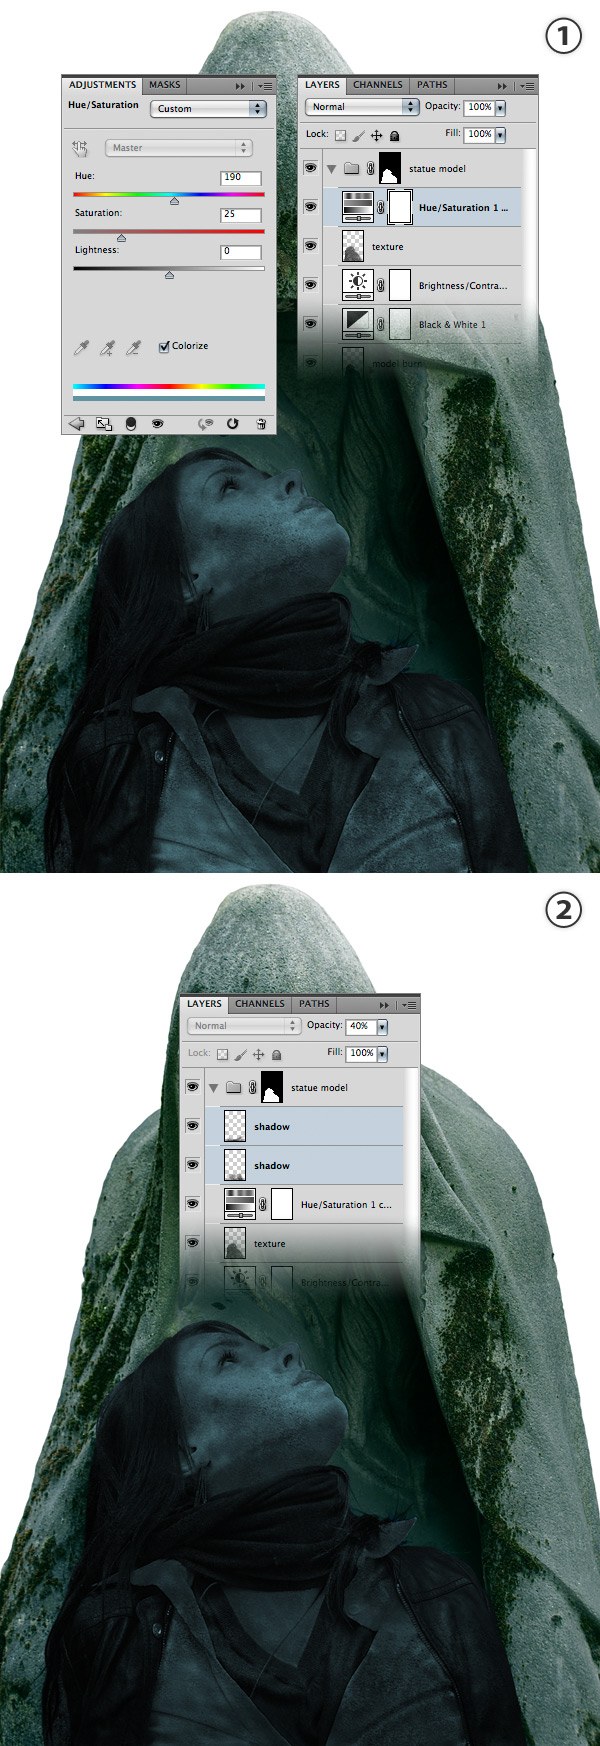
Make sure that you are inside the “statue model” group and go to Layer > New Adjustment Layer > Hue/Saturation. Check the Colorize option, set the Hue to 190 and set the Saturation to 25 (1).
In my image, the bottom area of the model statue is a bit too bright. To make it darker, create a new layer inside the “statue model” group and use a black soft brush (B) to add some shadows.
Set the Opacity of this layer to 30-40% and name it “shadow”. You can add as many shadow layers as you think is necessary for your image (2).
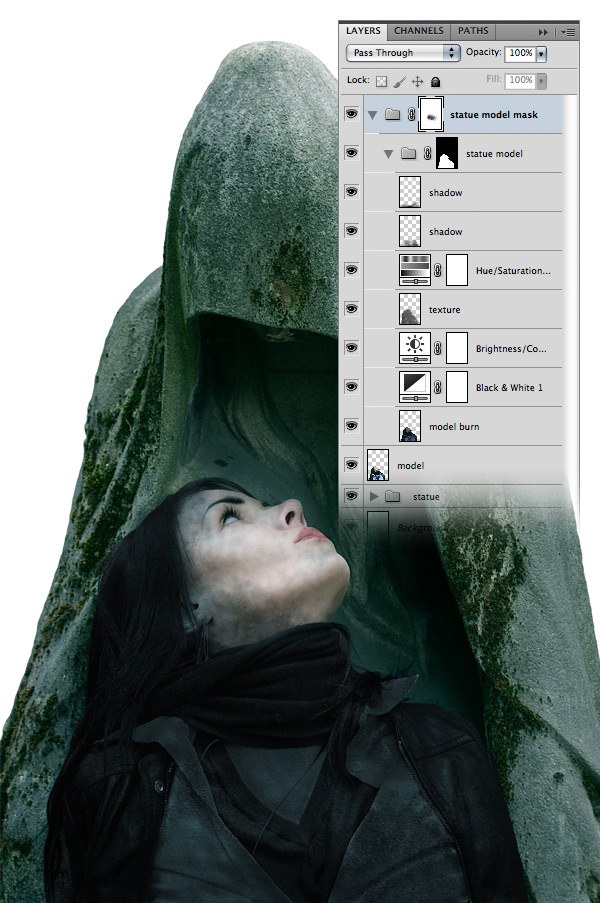
Step 18: Masking an Area of the Statue Model’s Face
Now we will use a mask to erase the top area of the statue in order to reveal the original skin of the model. This will create the transition effect between the petrified area of the model and her skin.
Make sure that the “statue model” group is selected.
Then hit Ctrl/Cmd + G to put it inside a new group and name it “model mask”. Add a mask to this group by going to Layer > Layer Mask > Reveal All.
Select a grunge black brush (B) with a low opacity and paint with this brush over the woman’s face to delete the stone texture.
Step 19: Adding Shadows to the Model
Click on the “model” layer to make it active and hit Ctrl/Cmd + G to put it inside a group. Name the group “model” as well.
Create a new layer and use a black soft brush (B) to add some shadows around the face of the woman.
You can use multiple layers (1, 2). Name these layers “shadow”.
Select all “shadow” layers in the Layers Panel. Right-click on one of them and choose Create Clipping Mask from the contextual menu that appears (3).
Now your “shadow” layers are visible only over the “model” layer. Set the Opacity of these layers to 30-40%.
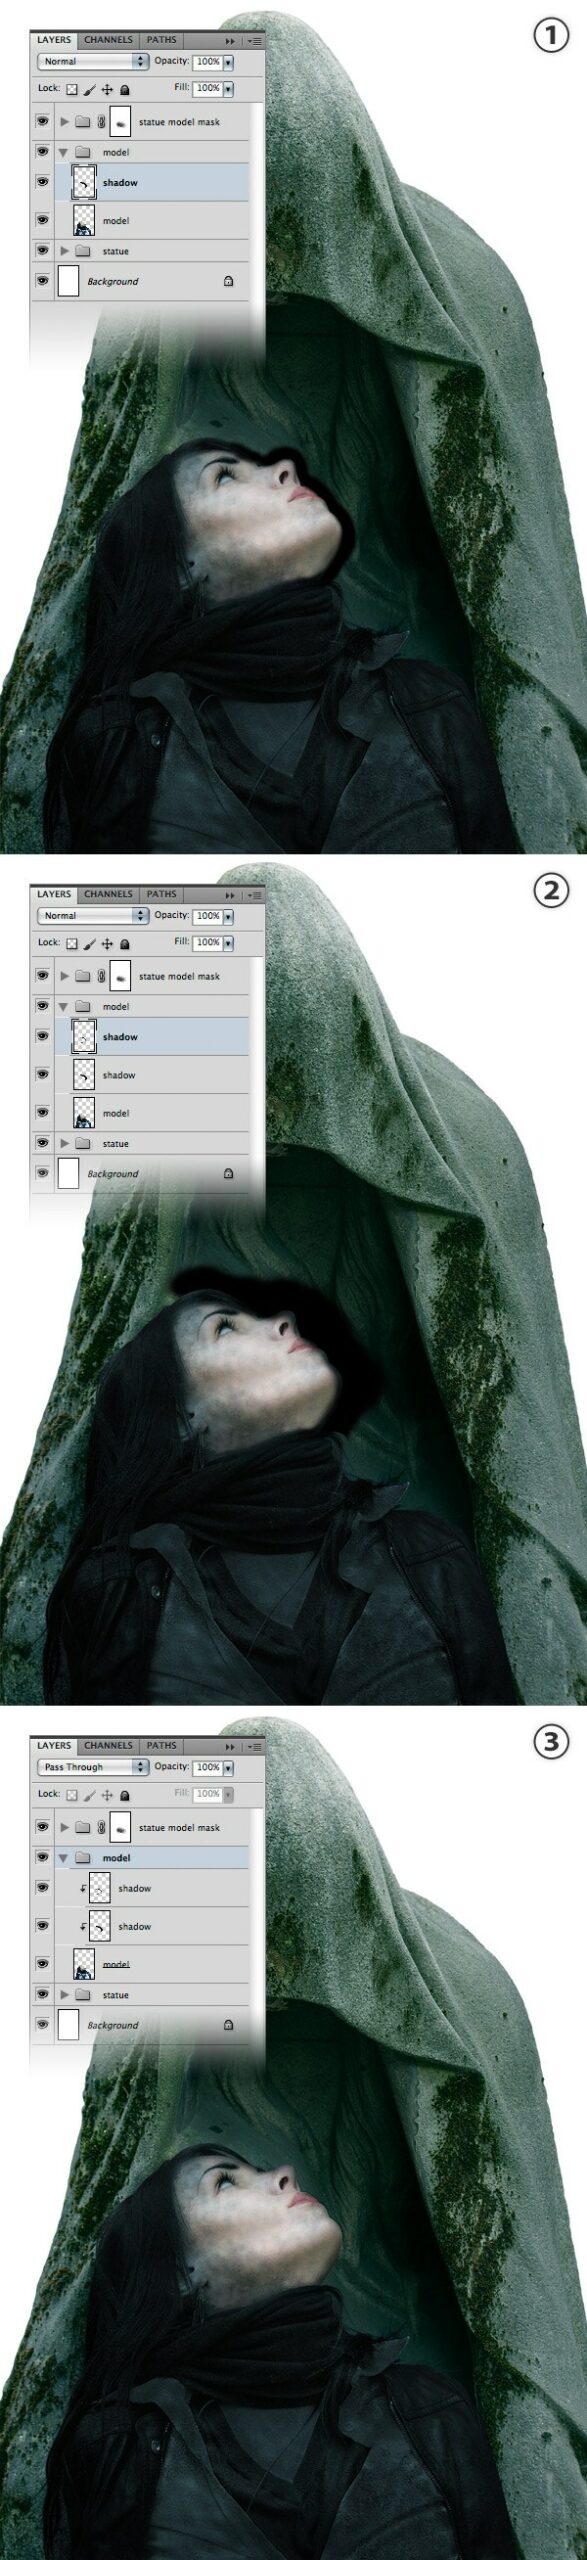
Create a new layer and put it underneath the “model” layer. Use a black soft brush (B) to add some shadow underneath the model.
Name this layer “shadow” and set its Opacity to 30%.
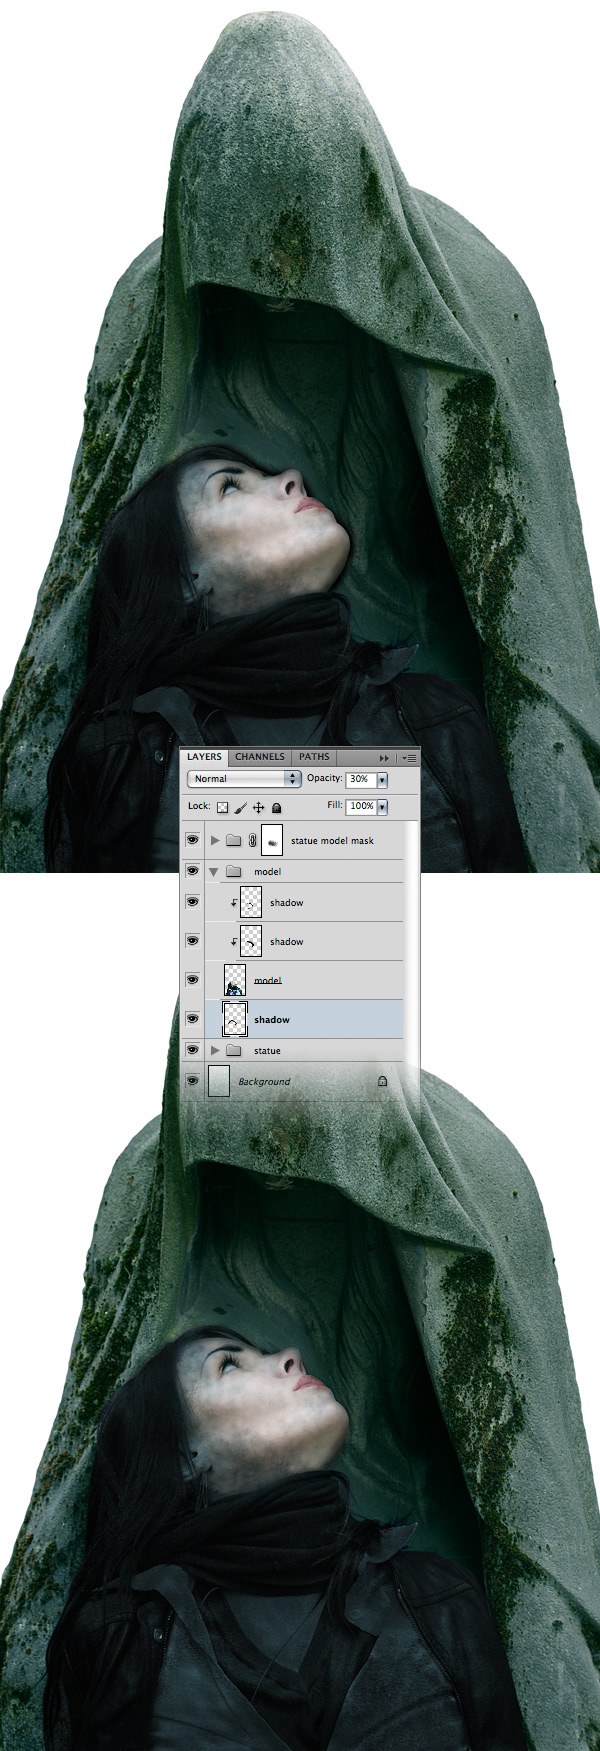
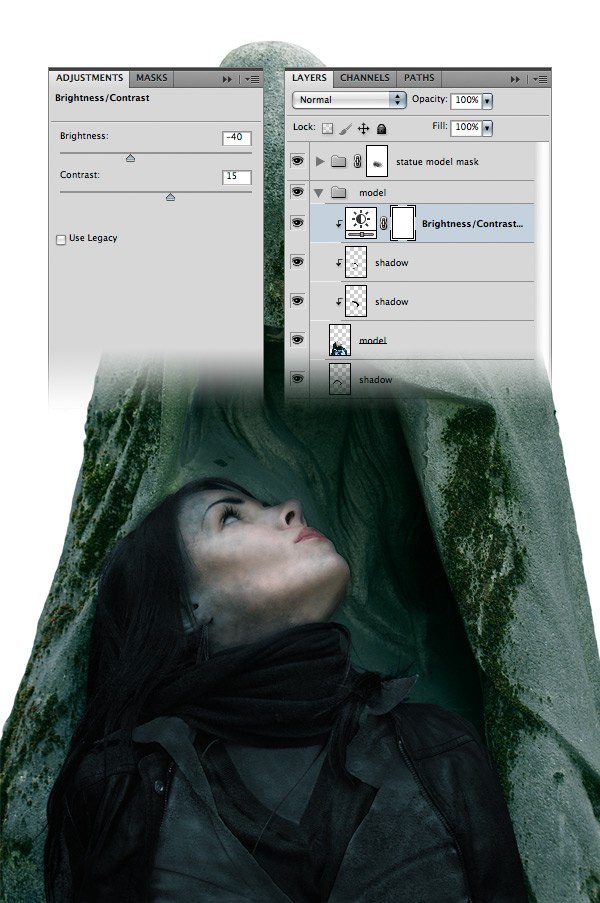
Go to Layer > New Adjustment Layer > Brightness/Contrast. Set the Brightness to -40 and the Contrast to 15. Put this layer above the two “shadow” layers, right-click on it and choose Create Clipping Mask.
Step 20: Adding Cracked Textures to the Statue
Download this texture and open it in Photoshop. Go to Image > Adjustments > Black & White and use the settings from the following image (1).
Move the texture into your main Photoshop document and put it inside the “statue” group. Name this layer “texture” and use Free Transform (Ctrl/Cmd + T) to change its size, rotate it and put it over the top area of the statue (2).
Right-click on the “texture” group and select Create Clipping Mask to make the texture visible only over the area of the statue (3).
Set the Blend Mode of this layer to Darker Color 80%. Then add a mask to this layer (Layer > Layer Mask > Reveal All) and use a black brush (B) to erase some areas of the texture (4).

Step 21: Adjusting the Color of the Statue
Now we are going to change the color of the statue. First, we’ll turn it into black and white.
Go to Layer > New Adjustment Layer > Black & White, check the Use Previous Layer to Create Clipping Mask option and click OK. Then use the settings from the following image (1).
Add a new Brightness/Contrast adjustment layer and set the Brightness to -23 and the Contrast to 26 (2).
Add a new Hue/Saturation adjustment layer, check the Colorize option, set the Hue to 190 and set the Saturation to 25 (3).

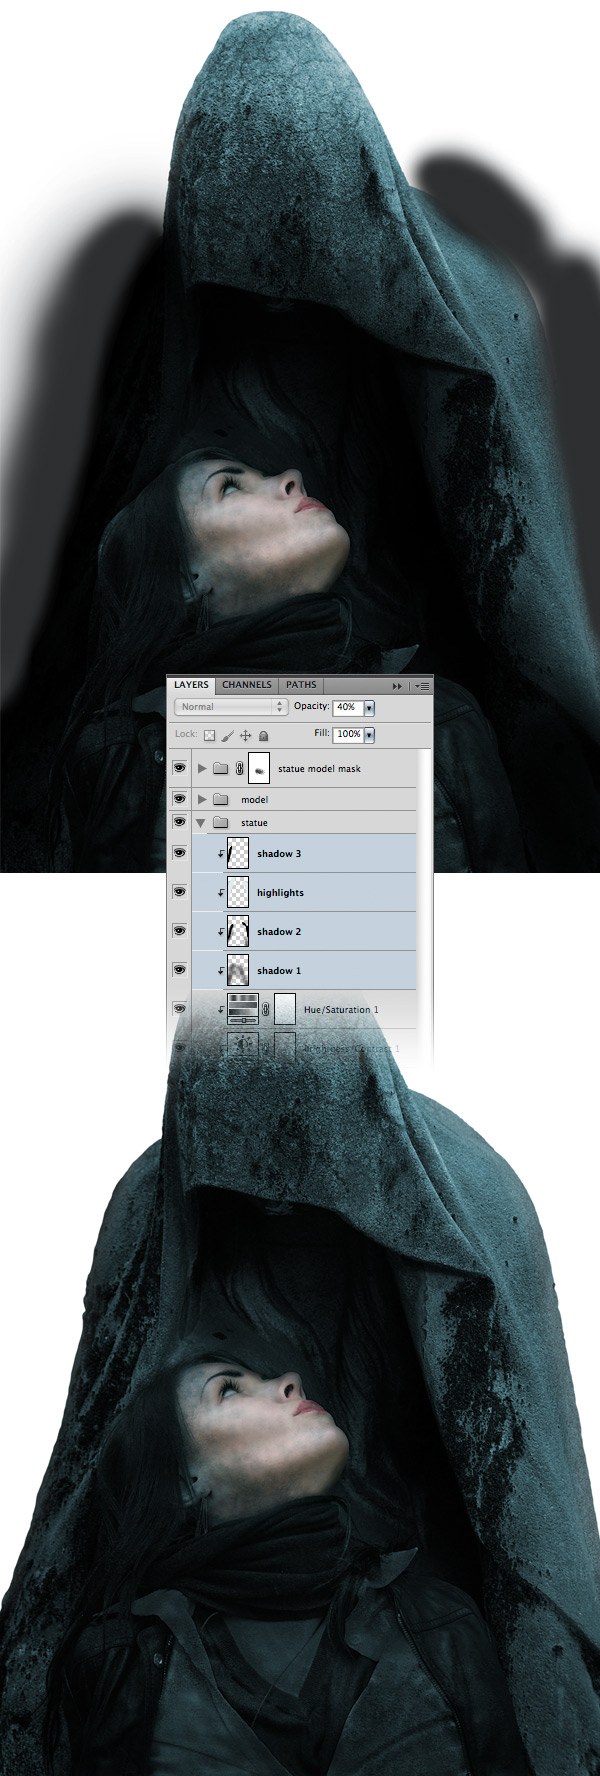
Step 22: Adding Shadows to the Statue
Create a new layer inside the “statue” group. Select a large, black, soft brush (B) and add some shadows to the statue.
Name this layer “shadow”, and lower its Opacity to 30-40%. Right-click on the “shadow” layer and choose Create Clipping Mask.
Use this technique to add more shadows or even highlights (using the Brush Tool with a bright color) to the statue. You can create as many layers as you think is necessary.
Step 23: Adding the 3D Tentacles to the Statue
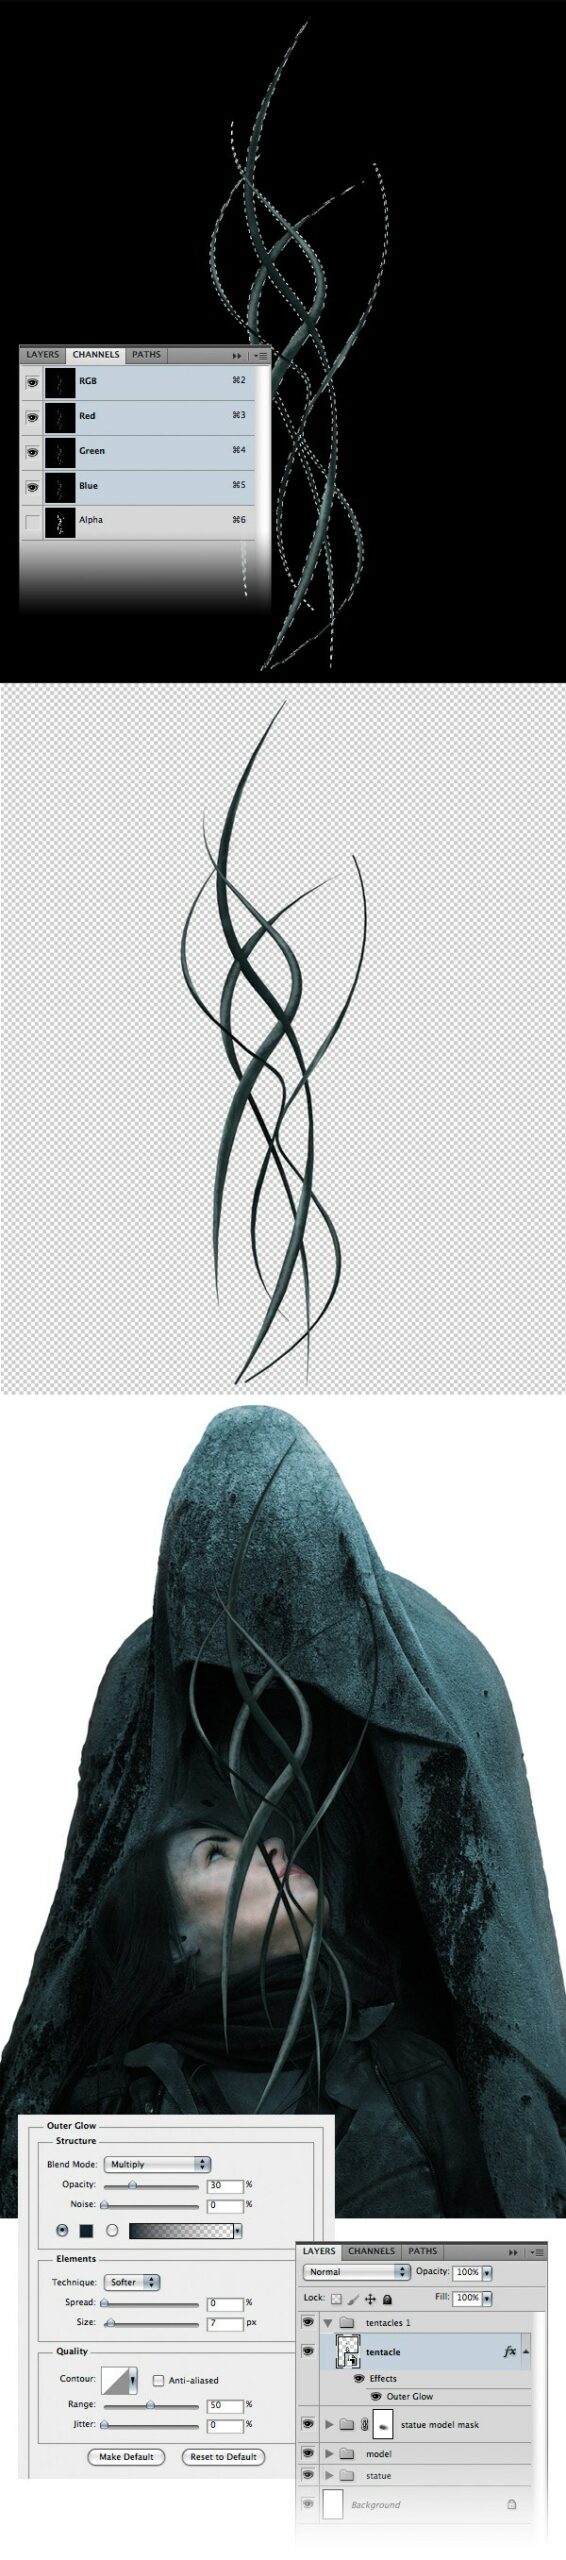
Open the .TIF image that you rendered in Cinema 4D (or download the one I’ve provided for you).
Then go to the Channels Panel (Window > Channels). In this panel, we have an Alpha channel that was created by Cinema 4D and we can use it to quickly extract the tentacles from the image.
Ctrl-click/Cmd-click on the thumbnail of the Alpha channel. This will create a selection of the tentacles.
Go back to the Layers Panel and hit Ctrl/Cmd + J to create a new layer out of the selected area.
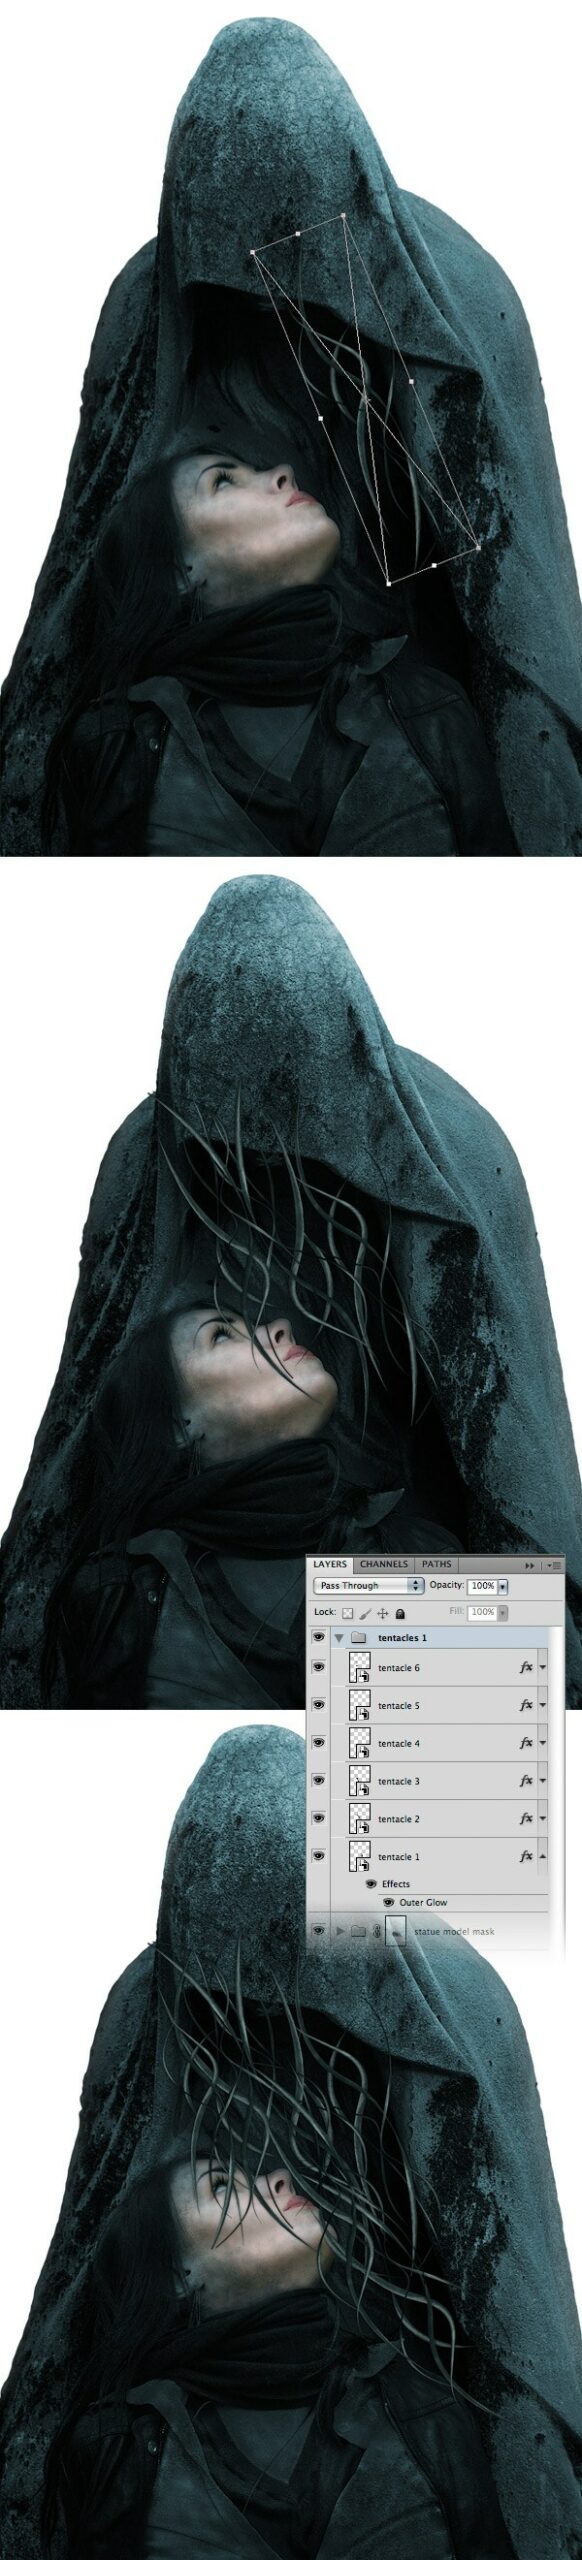
Use the Move Tool (V) to move the tentacles into your first document. Name this layer “tentacle”, right-click on it and choose Convert to Smart Object. Put this layer inside a group (Ctrl/Cmd + G) and name the group “tentacles 1”.
Double-click on the “tentacle” layer to open the Layer Style window and add an Outer Glow using the color #10222c and the settings from the image below.
Step 24: Adding More Tentacles
Now we will create more tentacle layers simply by duplicating the original one and editing the size of each tentacle layer using Free Transform.
With the “tentacle” layer selected go to Edit > Free Transform (Ctrl/Cmd + T), hold down the Shift key, decrease the size of the tentacle and rotate it.
Duplicate the tentacle (Ctrl/Cmd + J) and use Free Transform to rotate it and move it in a different area of the statue.
Continue to duplicate the “tentacle” layer a few more times and edit each layer using Free Transform. Take a look at the following image for reference.
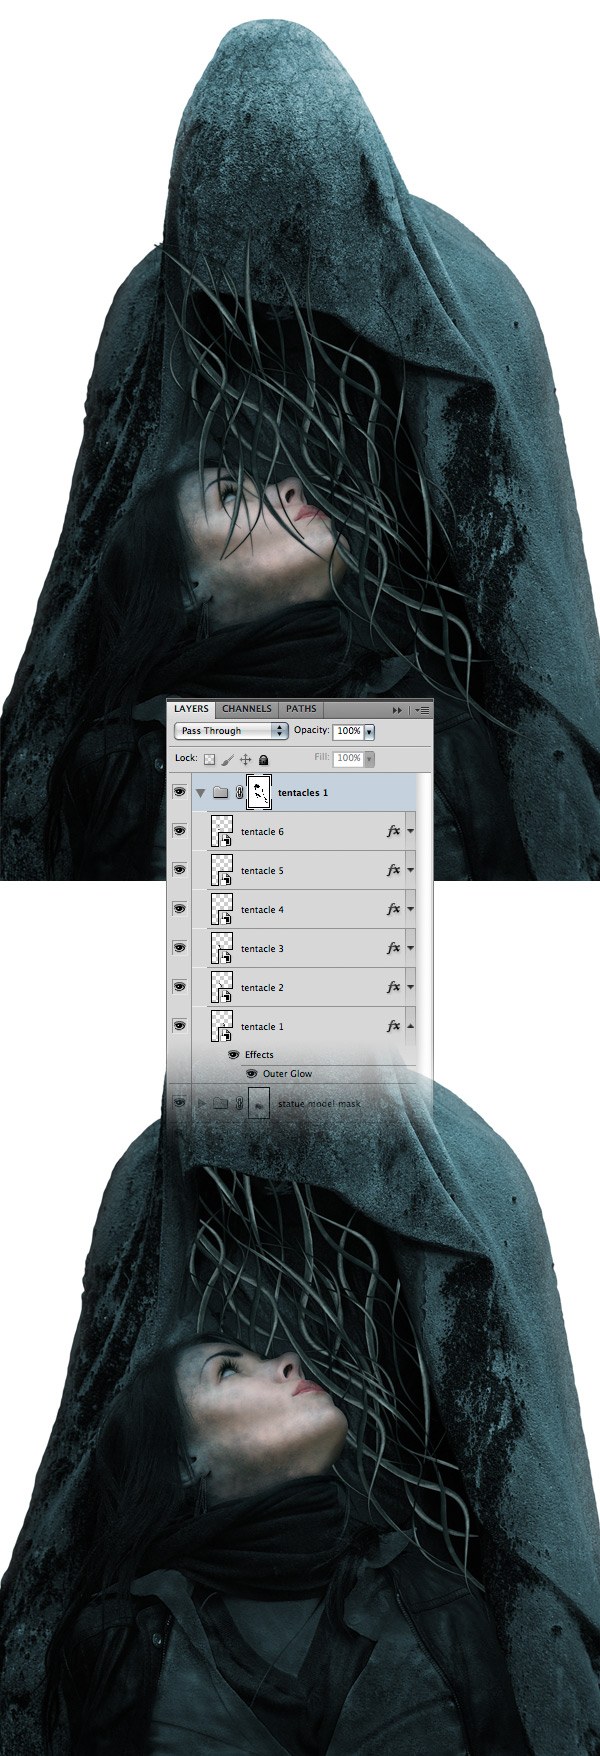
Step 25: Masking the Tentacle Layers
We want the tentacles to be inside the statue’s cloak and behind the woman. To do this we will use a mask.
With the “tentacles 1” group selected go to Layer > Layer Mask > Reveal All.
Then select a black hard brush (B) and use it to erase the parts of the tentacles that cover the statue cloak and the woman’s face.
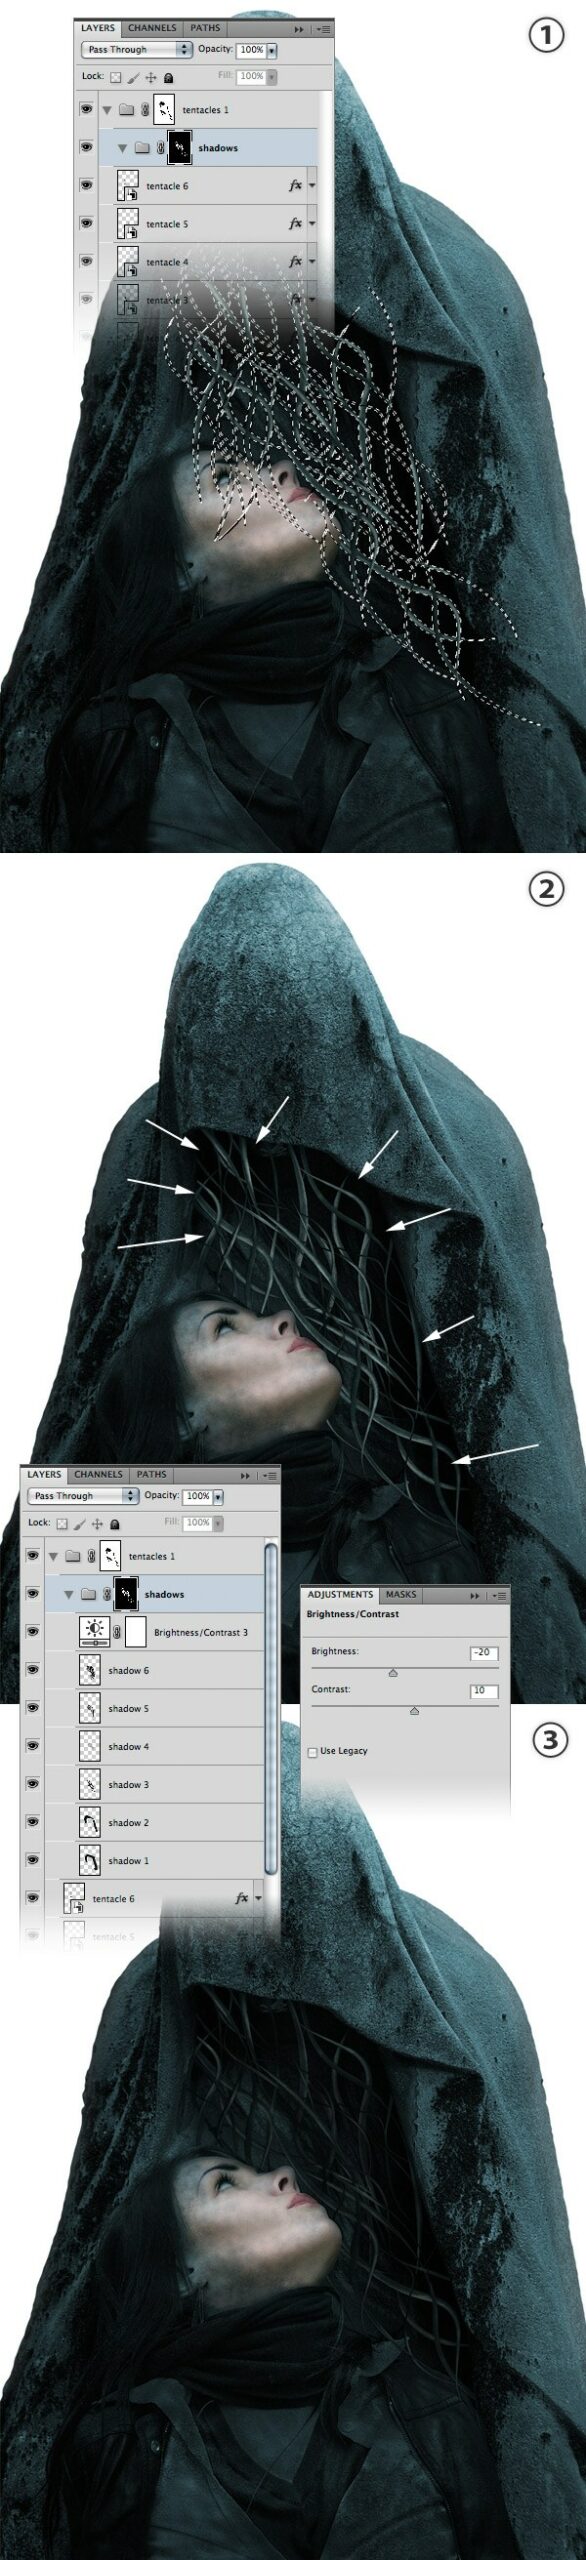
Step 26: Adding Shadows to the Tentacles
Create a new group (Layer > New > Group), name it “shadows” and put it inside the “tentacles 1” group, above all the other tentacle layers.
To create the shadows, we will use the Brush Tool (B). But before that, we have to find a way to add the shadows only onto the tentacles. We can’t use Clipping Mask because we have more than one tentacle layer.
However, here’s a quick solution (1):
- Hold down the Ctrl/Cmd + Shift and click on the thumbnails of every “tentacle” layer; this will create a selection around all the tentacles
- Click on the “shadows” group to make it active
- Go to Layer > Layer Mask > Reveal Selection
Now everything we put inside the “shadows” group will be visible only over the tentacles.
Create a new layer inside the “shadows” group. Select a black soft brush (B) and use it to add some shadows around the tentacles. Set the Opacity of this layer to 70% (2).
Continue to add more shadows, each one in its own layer and lower the opacity of each layer.
You can also make the tentacles darker by using a Brightness/Contrast adjustment layer (3).
Now we will add more tentacles starting from the bottom-left corner of the image. Duplicate one of the “tentacle” layers (Ctrl/Cmd + J) from the “tentacles 1” group and drag this layer outside the group.
Use Free Transform (Ctrl/Cmd + T) to increase the size of this tentacle, rotate it and put it in the lower left corner of the image. Hit Ctrl/Cmd + G to put this layer inside a group and name it “tentacles 2”.
Duplicate the “tentacle” layer a few times (Ctrl/Cmd + J) and use Free Transform to change the size and rotation of each layer (2).
We want these tentacles to create a curve and connect with the first set of tentacles.
Continue to add more tentacles and edit them using Free Transform. For some layers, when the Free Transform box is active, right-click on the image and choose Warp from the menu. Then drag the handles to create a curve as you see in the image below (3).
Continue to use these techniques until you have enough tentacles going around the model’s body (4).

Use the same technique I described earlier to add some shadows to these tentacles.
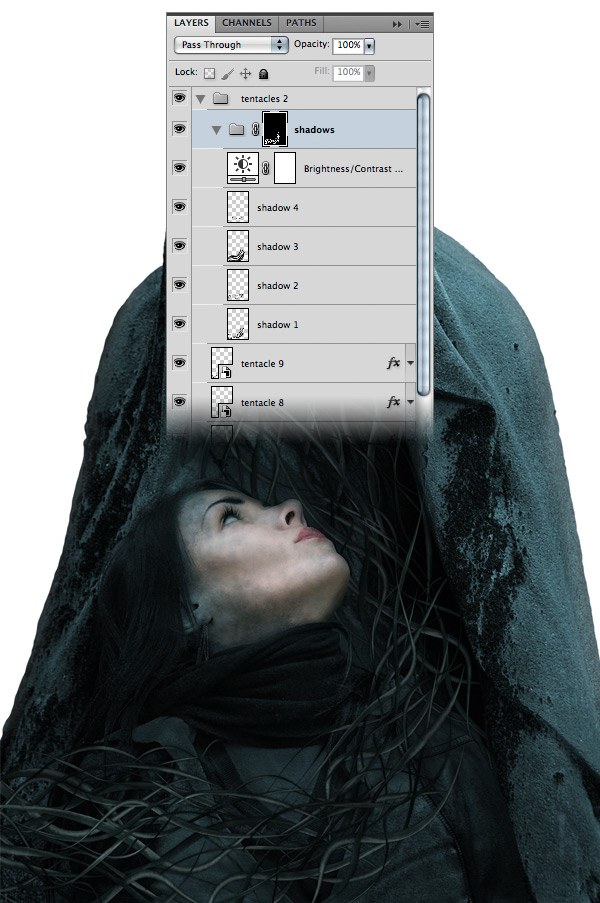
Step 27: Adding Tentacles to the Woman’s Hair
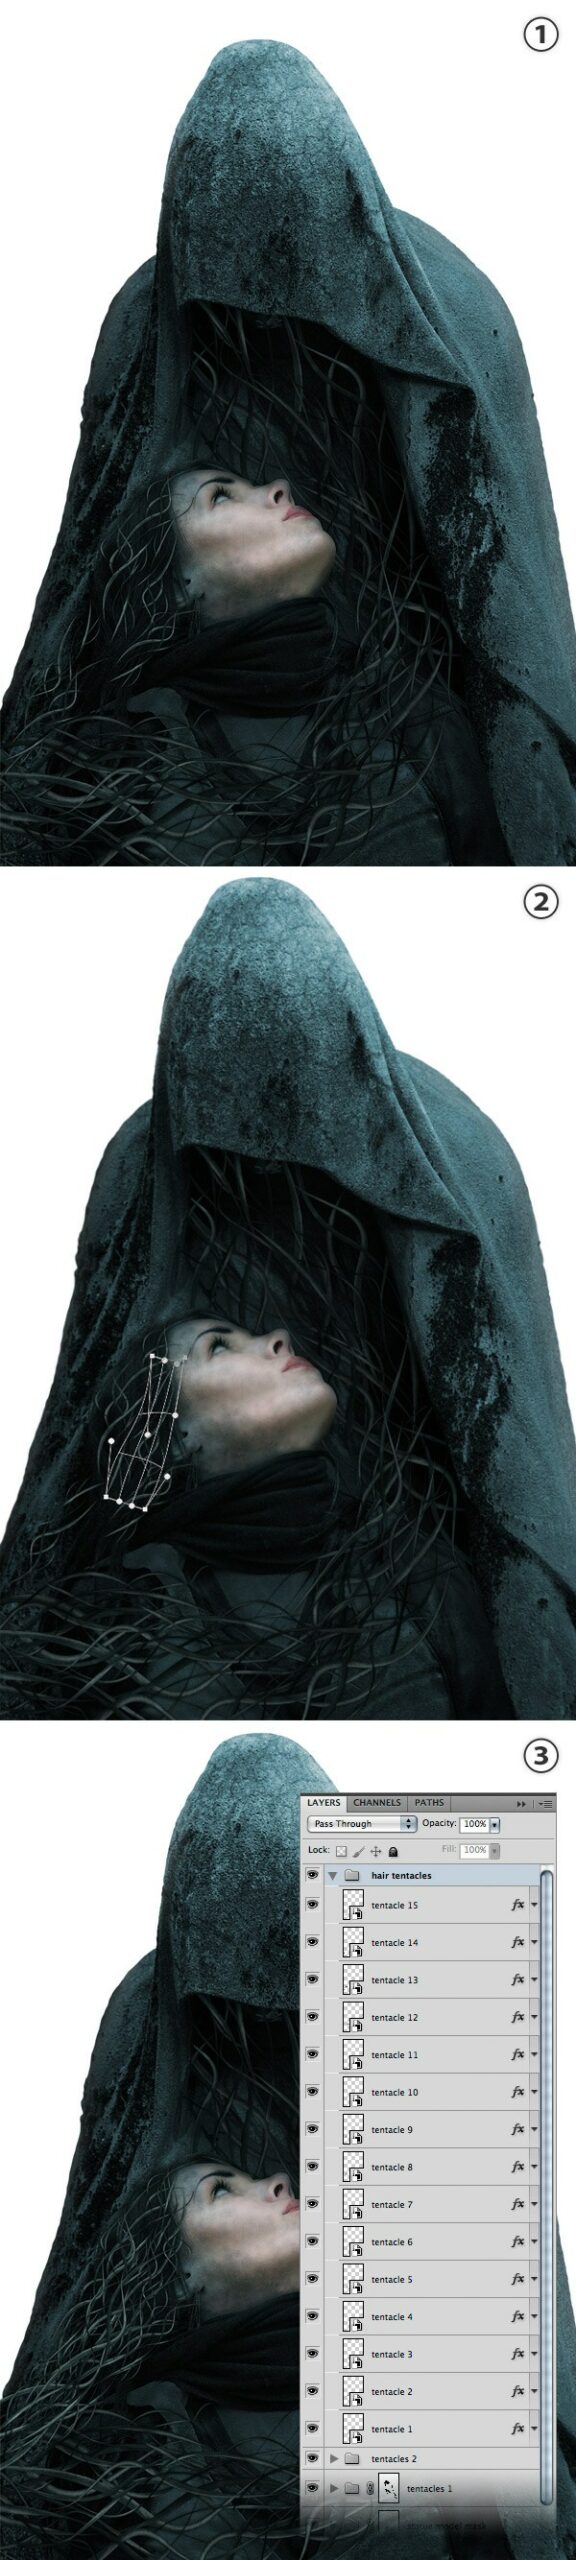
The final set of tentacles is for the woman’s hair.
Create a new group and name it “hair tentacles”. Then duplicate one of the “tentacle” layers and put it inside this group.
Duplicate the “tentacle” layer a few times and use Free Transform to edit each layer (1). You can also use the Warp command to create curved tentacles (2).
Try to follow the orientation of the woman’s hair when editing the tentacles.
Continue to add more tentacle layers and edit each one using Free Transform and Warp (3).
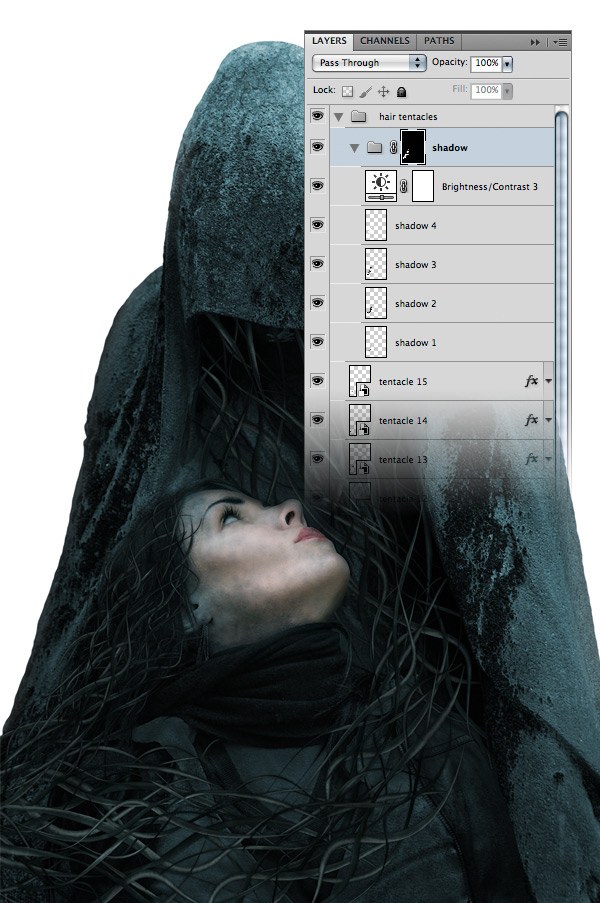
Create a “shadows” group for these hair tentacles, just like you did for the first two sets of tentacles. Use the Brush Tool (B) to add some shadows to these tentacles, each one in its own layer. Then lower the Opacity of each “shadow” layer.
These tentacles should be darker to match the color of the woman’s hair.
To do this, I added a Brightness/Contrast adjustment layer inside the “shadows” group and set the Brightness to -90.
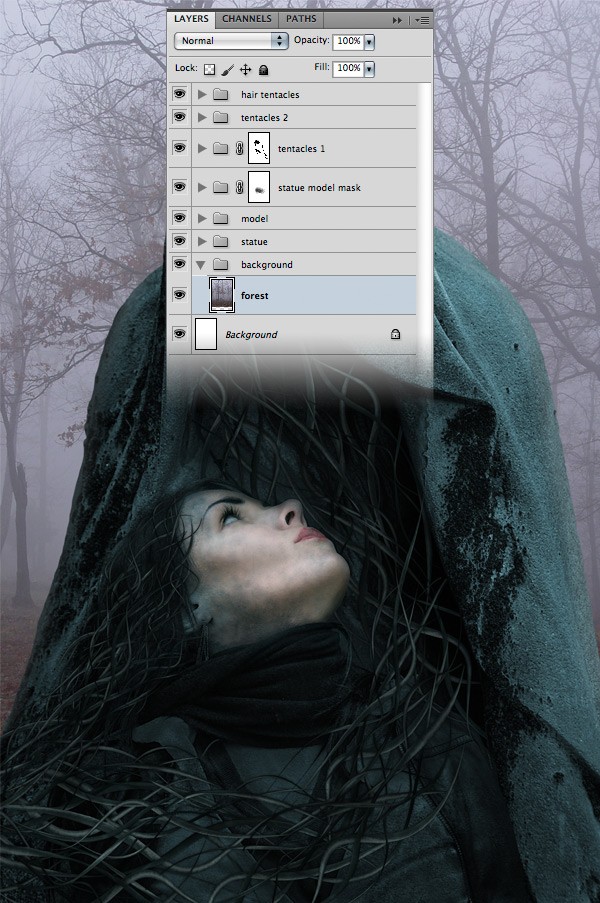
Step 28: Adding a Background
Create a new group (Layer > New > Group) and name it “background”. Put this group right above the Background layer from the Layers Panel.
Download this image and open it in Photoshop. Use the Move Tool (V) to move it into your first document, inside the “background” group.
Name this layer “forest” and use Free Transform (Ctrl/Cmd +T) to decrease its size.
Step 29: Changing the Background’s Color
Now we will use some adjustment layers to change the color of the forest.
Go to Layer > New Adjustment Layer > Black & White and use the settings from the following image to turn the background image into black and white. Set the Opacity of this layer to 90%
Add a Brightness/Contrast adjustment layer and set the Brightness to 21.
Now add a Hue/Saturation adjustment layer, check the Colorize option, set the Hue to 190 and set the Saturation to 20. Set the Opacity of this layer to 50%.

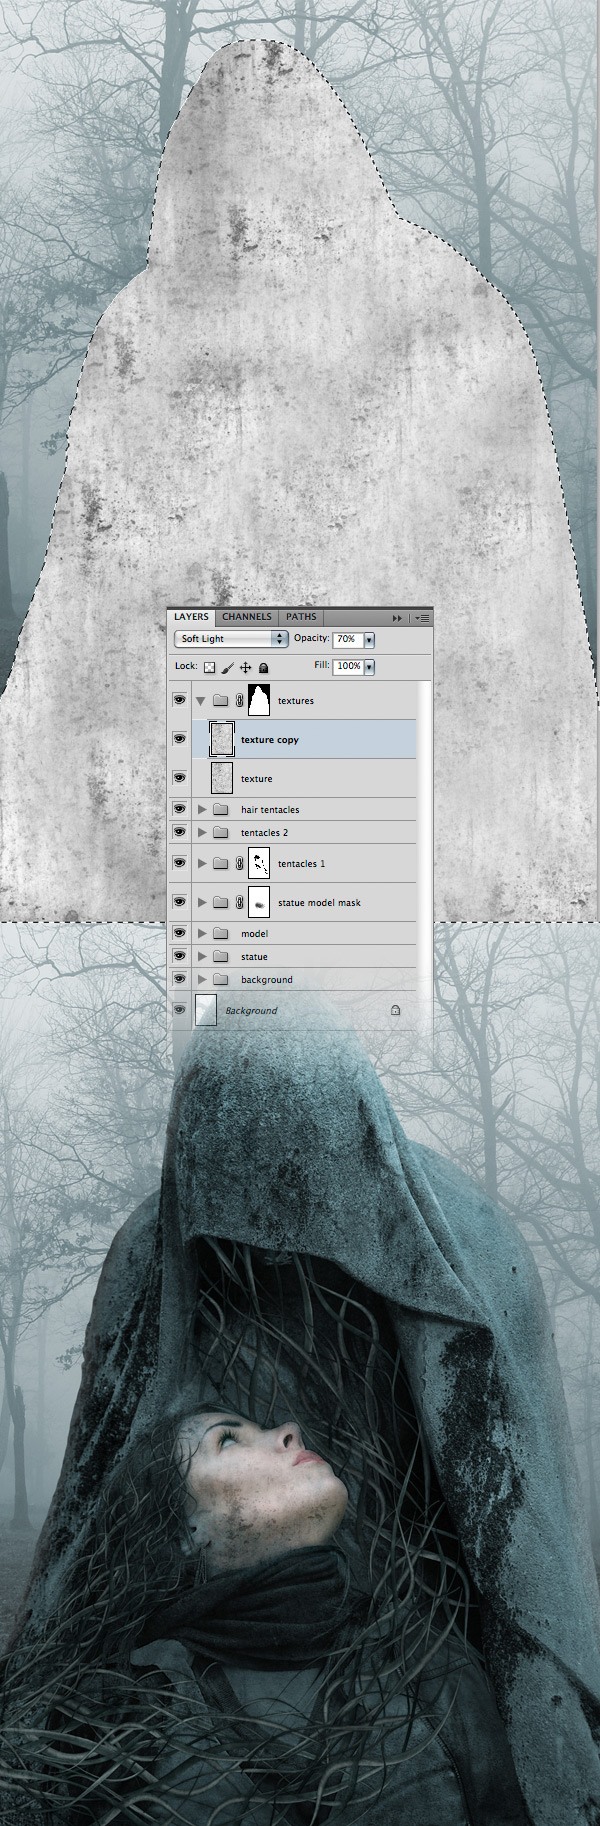
Step 30: Adding Some Textures to the Statue
Create a new group above all the other ones and name it “textures”. Download this image and open it in Photoshop. Go to Image > Adjustments > Black & White to turn this texture into black and white.
Then use the Move Tool (V) to move this image into your first document, inside the “textures” group.
Choose the Clone Stamp Tool (S) and use a big soft brush to clone some areas of this texture until you fill the entire canvas (2). Name this layer “texture”.
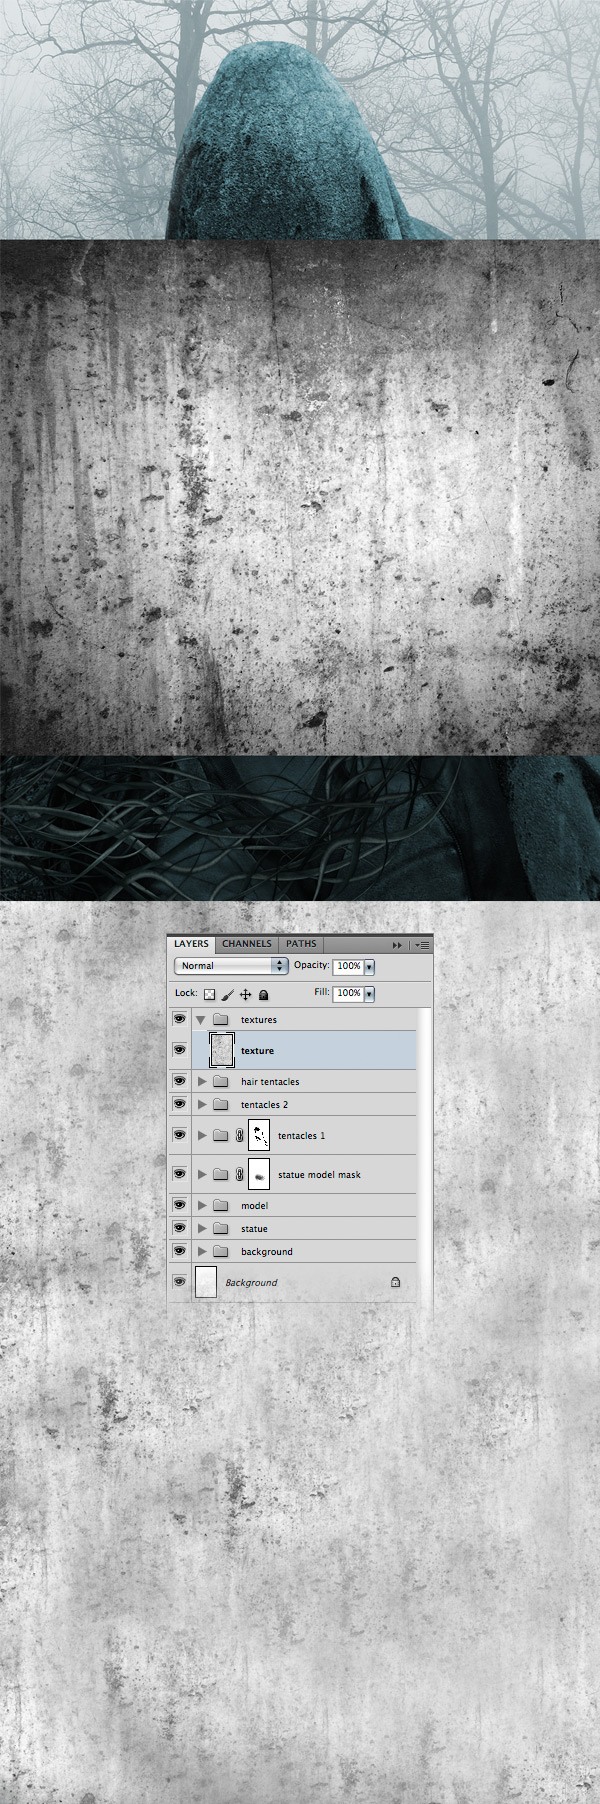
We want the textures to be visible only over the statue. To do this, Ctrl-click/Cmd-click on the thumbnail of the “statue” layer to create a selection of it.
Make sure that the “textures” group is active and go to Layer > Layer Mask > Reveal Selection. Now everything we put inside this group will be visible only over the area of the statue.
Set the Blend Mode of the “texture” layer to Multiply and reduce the layer’s Opacity to 20%. Then duplicate this layer (Ctrl/Cmd + J) and set the Blend Mode of the new texture layer to Soft Light with Opacity at 70%.
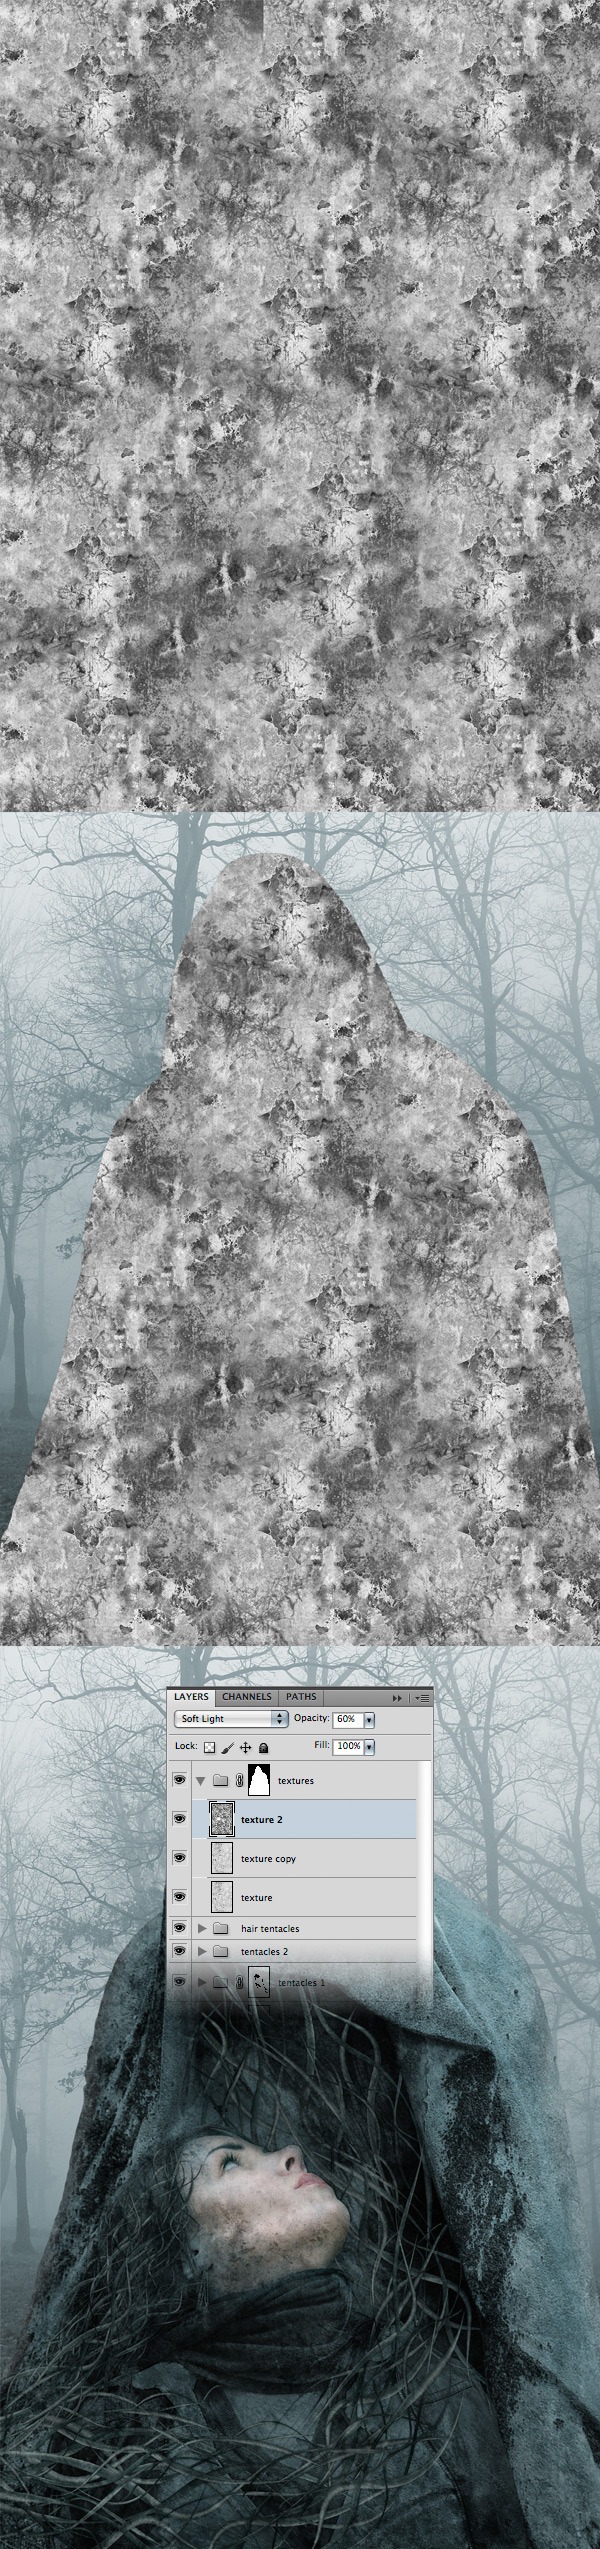
Repeat the process to add another texture to the statue.
Set the Blend Mode of this layer to Soft Light at 60% Opacity.
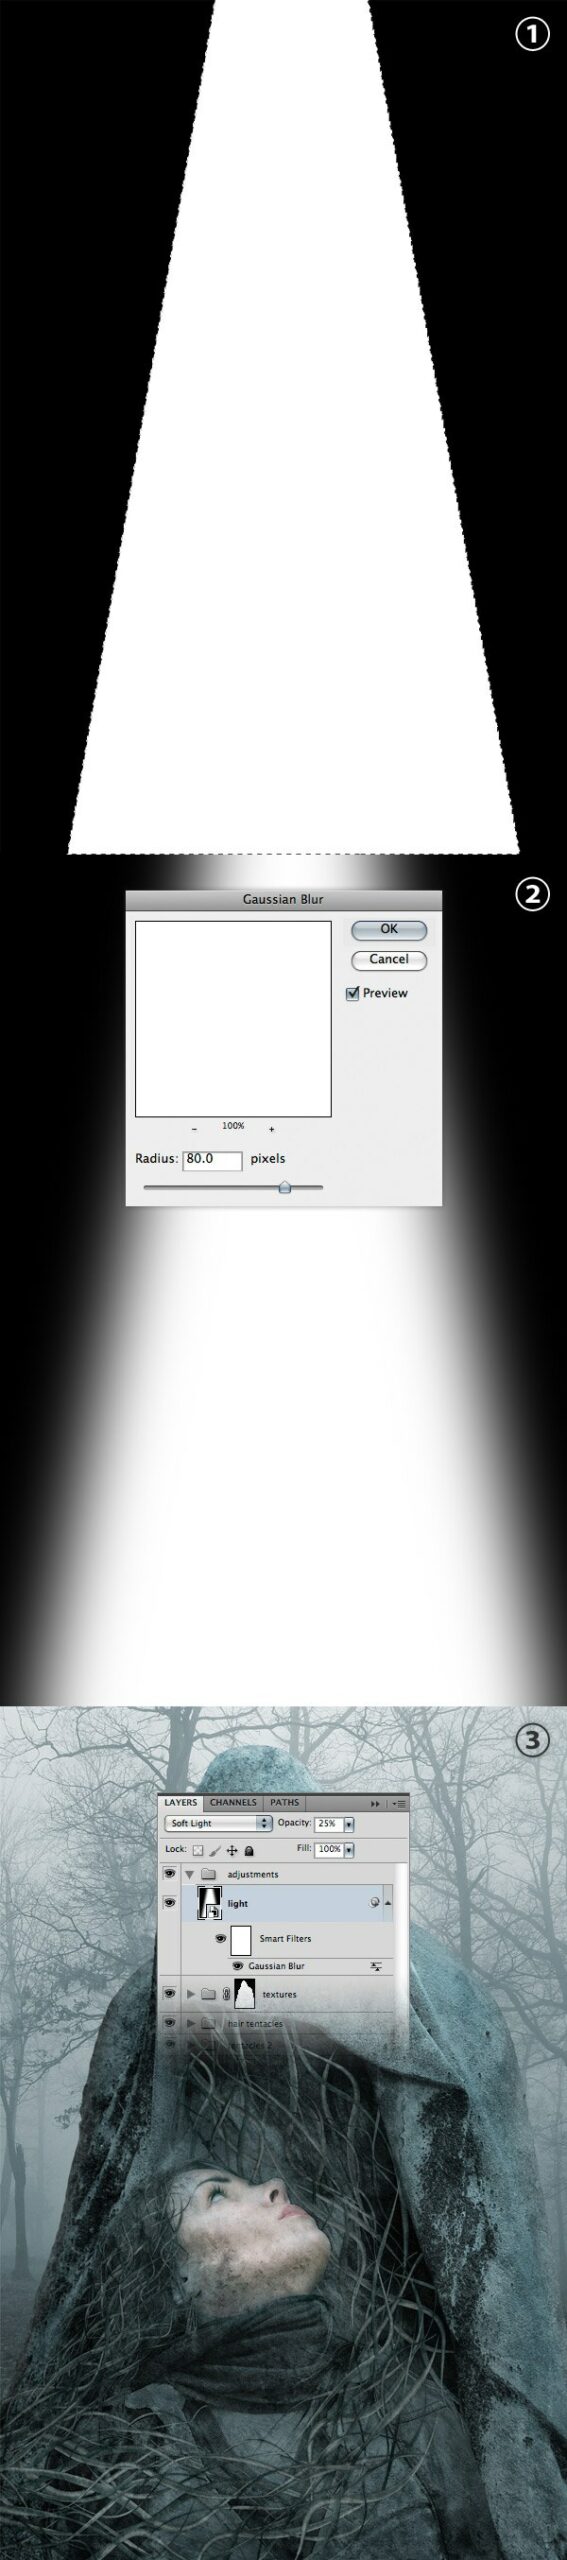
Step 31: Adjust the Lighting
Now we will make the image darker around the edges and brighter in the middle. Create a new group above all the other ones and name it “adjustments”. Create a new layer inside this group and fill it with black.
Use the Polygonal Lasso Tool (L) to create a selection like the one from the following image.
Create a new layer and fill the selection with white (1). Hit Ctrl/Cmd + D to deselect.
Hold down Ctrl-click/Cmd-click and select the two layers you created in this step. Right-click on one of them and choose Convert to Smart Object.
Then go to Filter > Blur > Gaussian Blur and set the Radius to 80px (2).
Name this layer “light” and set its Blend Mode to Soft Light at 25% Opacity (3).
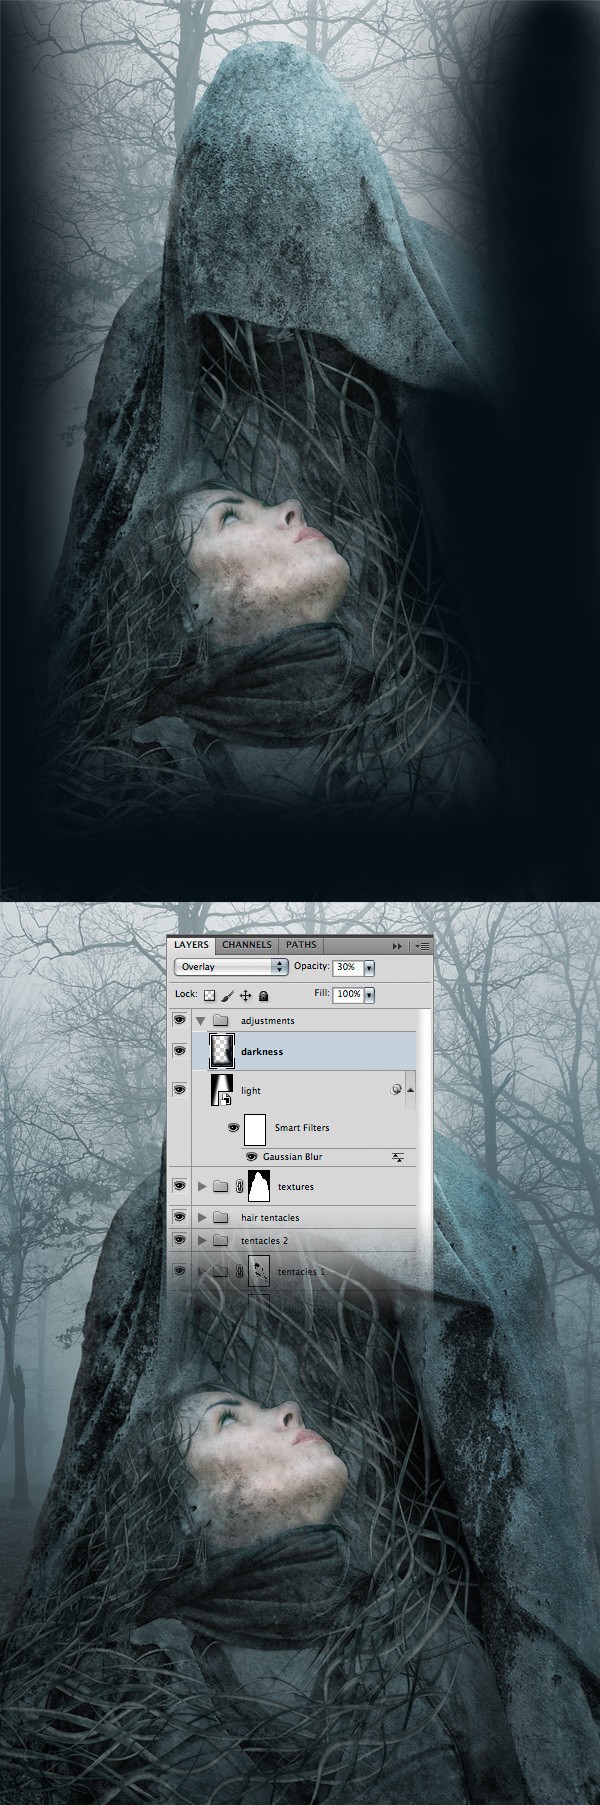
Create a new layer and name it “darkness”. Then select a soft brush (B) with the color #050f16 and paint with it around the edges of the image (1). Take a look at the following image for reference.
Set the Blend Mode of this layer to Overlay at 30% Opacity.
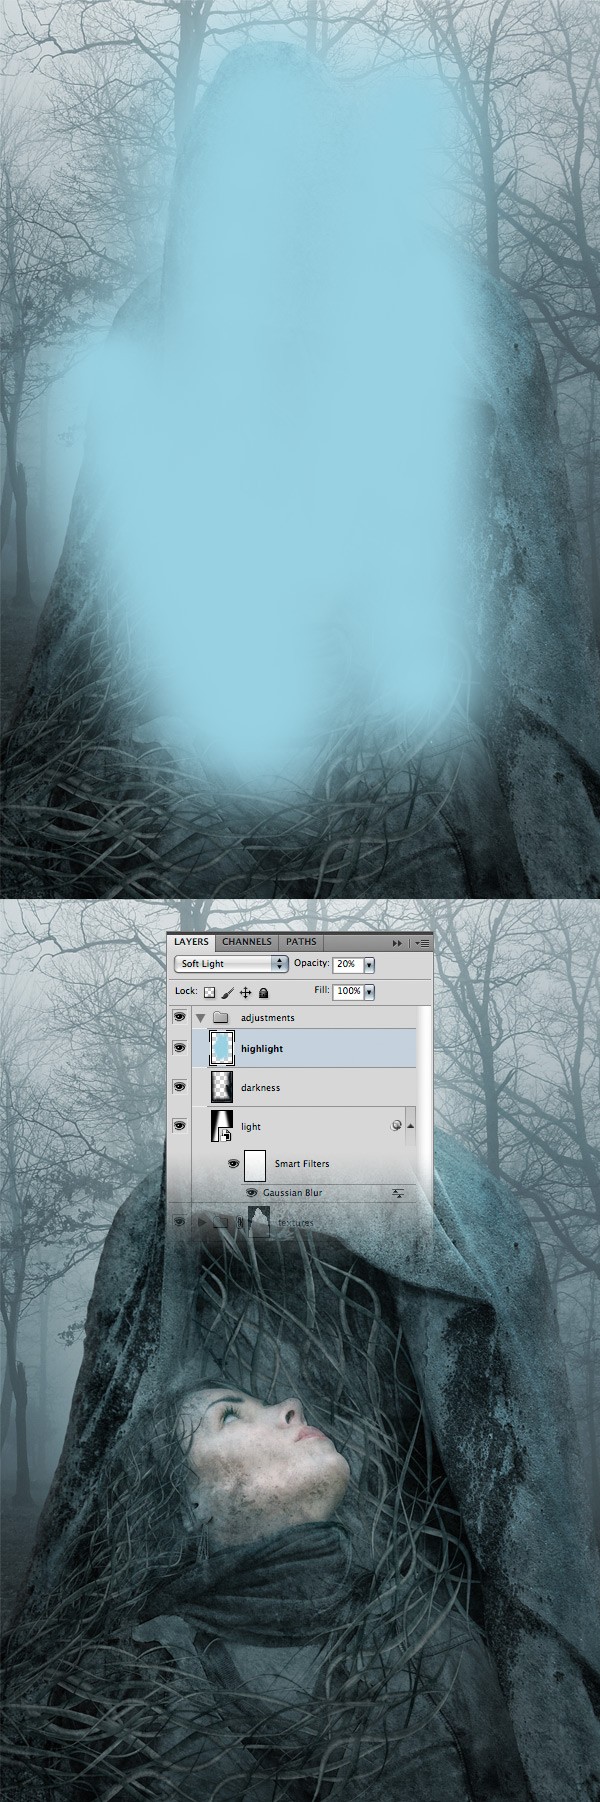
Create a new layer and name it “highlight”. Then select a soft brush (B) with the color #96cedf and paint with it over the statue, as you see in the image below. Set the Blend Mode of this layer to Soft Light at 20% Opacity.
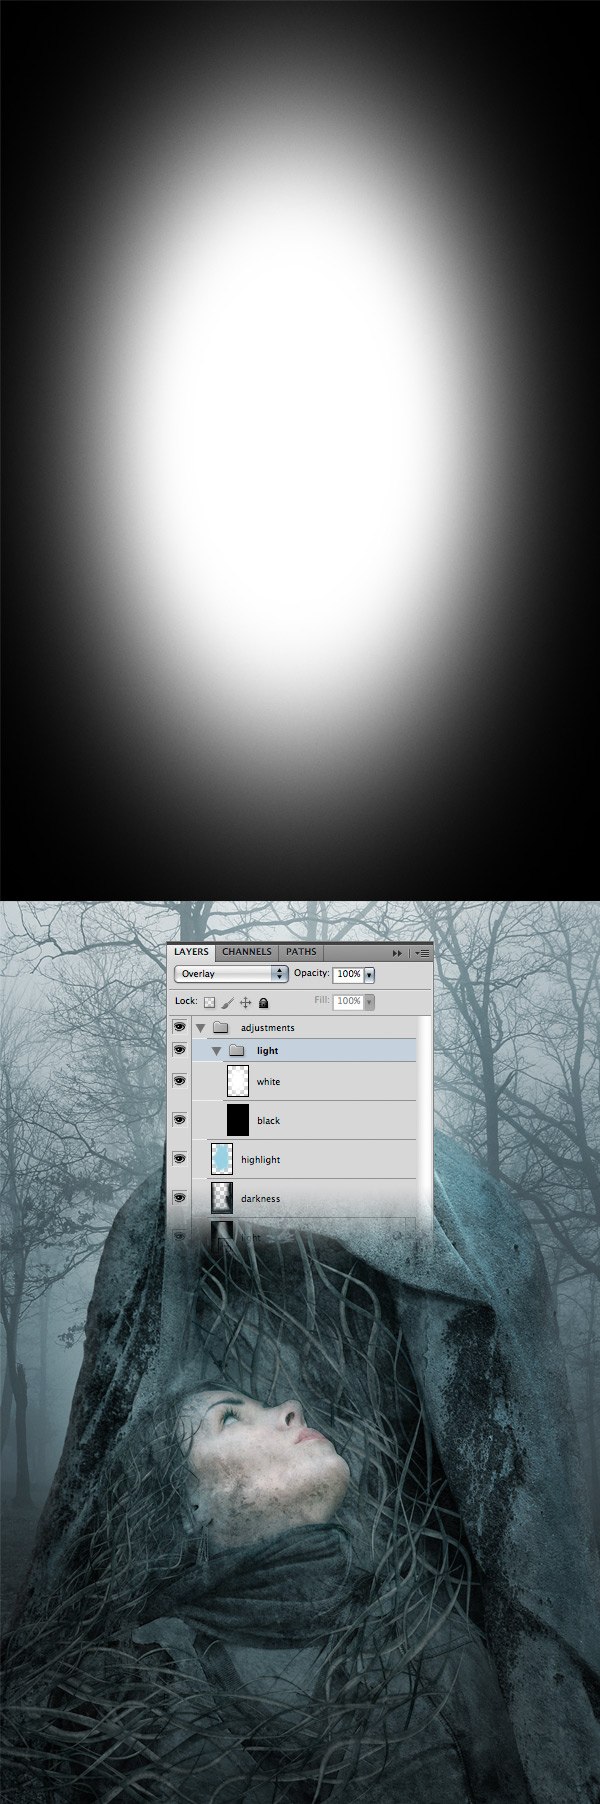
Create a new group inside the “adjustments” group and name it “light”.
Create a new layer inside this group and fill it with black. Create one more layer, select a white soft brush (B) and use it to create a light in the center of the image. Set the Opacity of these layers to 15%.
Then set the Blend Mode of the “light” group to Overlay.
Step 32: Final Color Adjustments
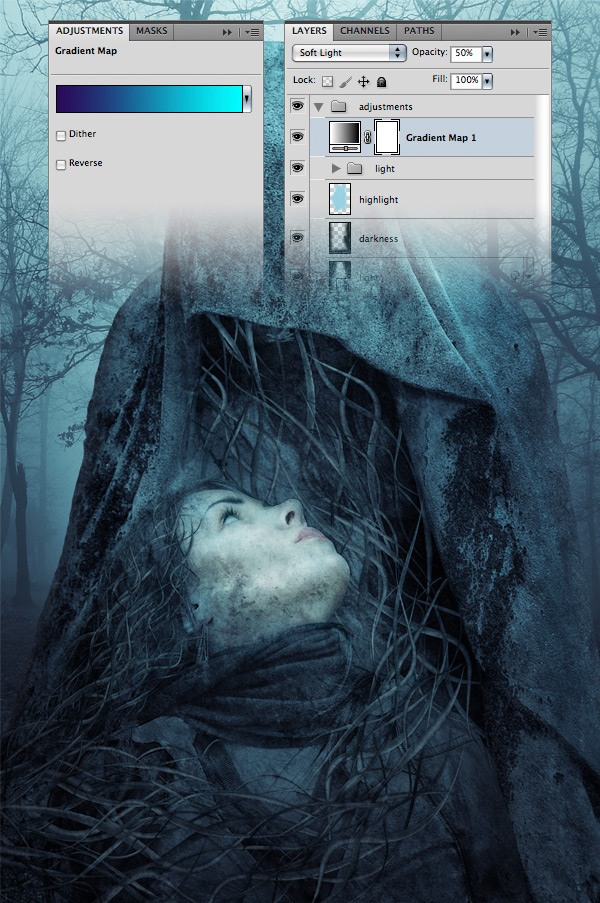
Go to Layer > New Adjustment Layer > Gradient Map and create a gradient from #290a59 to #00fcff. Set the Blend Mode of this layer to Soft Light at 50% Opacity.
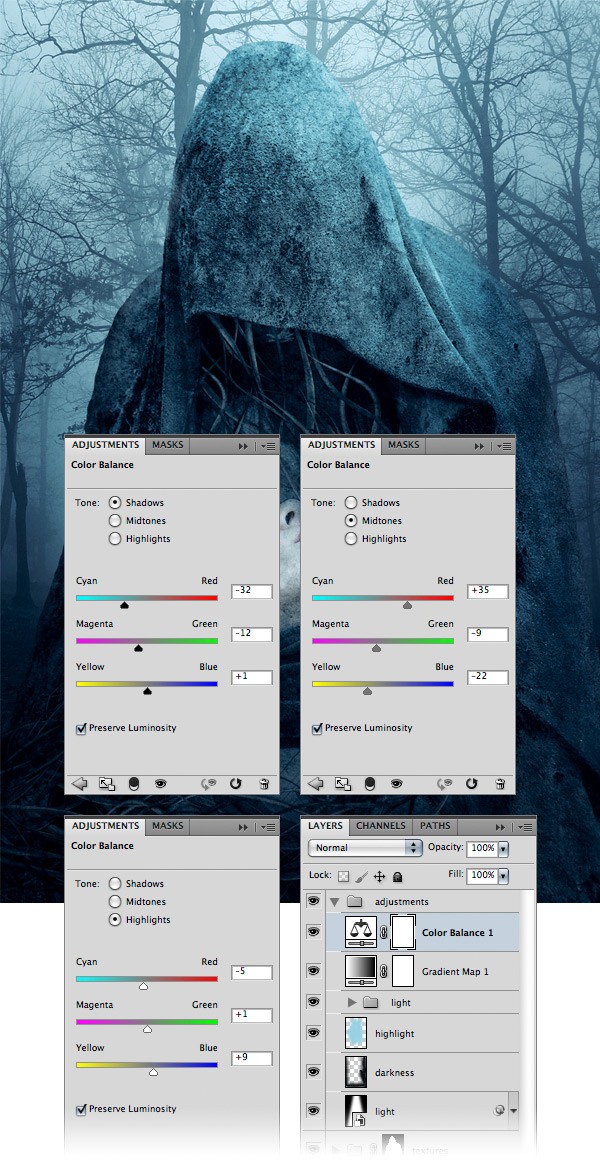
Finally, go to Layer > New Adjustment Layer > Color Balance and use the settings from the following image.
Tutorial Summary
We’re finished! Below you can see the final image of this tutorial.
I hope you enjoyed this tutorial and you learned a some new things in Cinema 4D and Photoshop.
Use the comments section below to share your opinions regarding this photo manipulation tutorial and any problems or suggestions you might have. Thank you for reading!
Download Source Files
- dark_statue_3dtentacles (ZIP, 67.5 MB)
-
 Trevin serves as the VP of Marketing at WebFX. He has worked on over 450 marketing campaigns and has been building websites for over 25 years. His work has been featured by Search Engine Land, USA Today, Fast Company and Inc.
 -

WebFX is a full-service marketing agency with 1,100+ client reviews and a 4.9-star rating on Clutch! Find out how our expert team and revenue-accelerating tech can drive results for you! Learn more
Make estimating web design costs easy
Website design costs can be tricky to nail down. Get an instant estimate for a custom web design with our free website design cost calculator!
Try Our Free Web Design Cost Calculator
Table of Contents
- Preview
- Tutorial Resources
- Part 1: Cinema 4D
- Step 1: Creating a Spline
- Step 2: Creating More Splines
- Step 3: Giving Depth to the Splines
- Step 4: Making the Shape Thinner
- Step 5: Adjusting the Scale and the Rotation
- Step 6: Repeat
- Step 7: Adding a Material to the Tentacles Shapes
- Step 8: Adding Lights
- Step 9: Set Up the Render Settings
- Step 10: Rendering the Scene
- Part 2: Photoshop
- Step 11: Setting Up the Photoshop Document
- Step 12: Selecting Around the Model
- Step 13: Eyebrow Adjustments
- Step 14: Removing the Iris
- Step 15: Preparation for Turning the Model into a Statue
- Step 16: Adding a Texture to the Model
- Step 17: Adding Color to the Statue
- Step 18: Masking an Area of the Statue Model’s Face
- Step 19: Adding Shadows to the Model
- Step 20: Adding Cracked Textures to the Statue
- Step 21: Adjusting the Color of the Statue
- Step 22: Adding Shadows to the Statue
- Step 23: Adding the 3D Tentacles to the Statue
- Step 24: Adding More Tentacles
- Step 25: Masking the Tentacle Layers
- Step 26: Adding Shadows to the Tentacles
- Step 27: Adding Tentacles to the Woman’s Hair
- Step 28: Adding a Background
- Step 29: Changing the Background’s Color
- Step 30: Adding Some Textures to the Statue
- Step 31: Adjust the Lighting
- Step 32: Final Color Adjustments
- Tutorial Summary
- Download Source Files
Share this article


Web Design Calculator
Use our free tool to get a free, instant quote in under 60 seconds.
View Web Design CalculatorMake estimating web design costs easy
Website design costs can be tricky to nail down. Get an instant estimate for a custom web design with our free website design cost calculator!
Try Our Free Web Design Cost Calculator


