
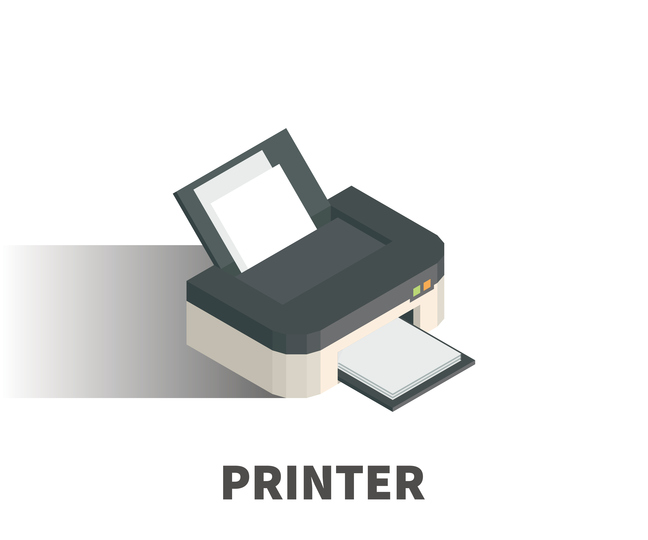
Preview
Step 1: Create a New Document
Because this printer will be an icon, there’s no need to make an extra large artboard. A 272px x 256px artboard is more than enough. Also, remember to leave the document in RGB color mode and 72 ppi so that it’s ready for screen use.

Step 2: Sketch (or Find) Reference Images
Because we are going to make a realistic object, it’s not necessary to sketch before the process. Sketching a rough comp, though, is useful when we are creating logos, website wireframes, and the like. Instead of a sketch, take a look at some reference photos.
If you have your own desktop printer, take a moment to look at it. Notice the various components of your printer. Take note of how the printer is constructed.
Are there logos, screws, bolts, labels, and bar codes stuck on the side? Details are important when developing a realistic-looking icon. Below, you can see two reference images that were used for our printer.
Take note of the curvatures, the shading, the shadows, and so forth. 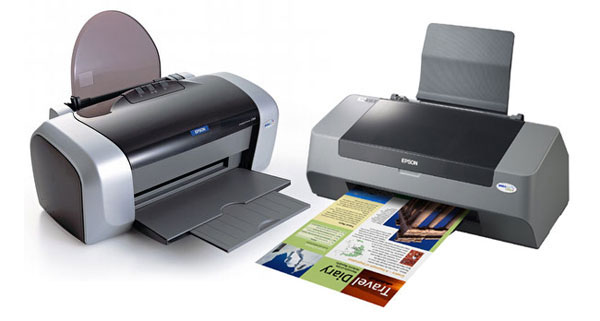
Step 3: Draw the Printer’s Base and Shadow
To start, let’s make the printer’s base and its floor shadow to establish the area where the printer will be standing. All the structural objects for this printer icon will be made initially using the Pen Tool (P) and sometimes with basic shapes like the Ellipse Tool (L) and Rectangle Tool (M).
Using the Pen Tool (P), create a vector shape that is going to be the shadow and the base of the printer. The shape should initially have a black Fill color with 0 % Opacity (which can be set in the Transparency Panel). 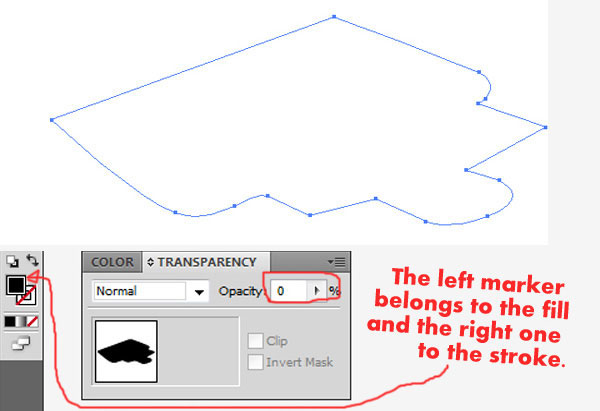 Now, select the shape using your Selection Tool (V), copy it (Ctrl/Cmd + C), then paste it on top of the original (Edit > Paste in Front, shortcut: Ctrl/Cmd + F) and switch its Opacity now to 100 % Opacity (which should be black).
Then reduce its size so it fits inside the previous shape we did. The two shapes should look like this (Fill color was temporarily removed for demonstration purposes): 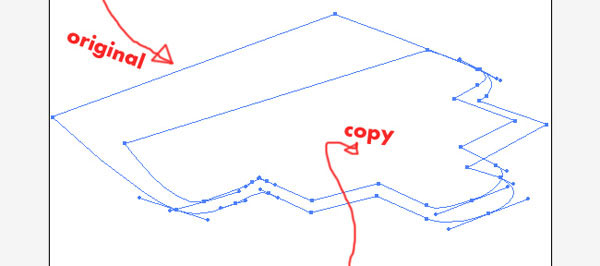
Step 4: Using the Blend Tool to Color the Base
Now it’s time to fill in the color of our base. Click on the Blend Tool (W) in the Tools Panel, click on top of the copy and then click over the original.
This should blend both shapes, and it should fade the color from black to 0% Opacity. 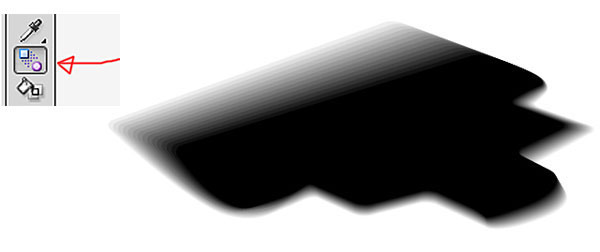
Step 5: Draw the Printer’s Paper Tray
Now that we have a base for the printer icon, it’s time to start making the components of it. The first thing we will make is the paper tray on its front side.
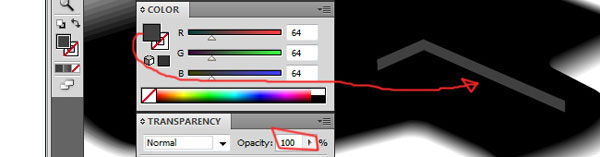
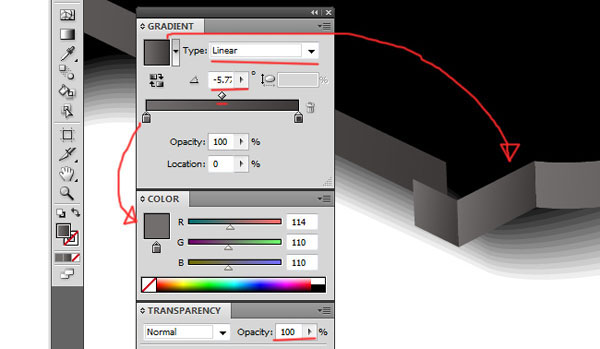
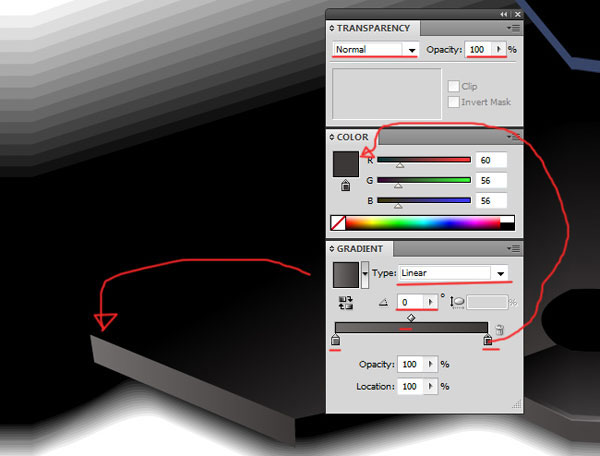
Grab the Pen Tool (P) and draw a small gray shape that represents an edge of the printer tray. Remember that for making straight corners instead of curved corners, you need to press over the last anchor point before continuing to draw. 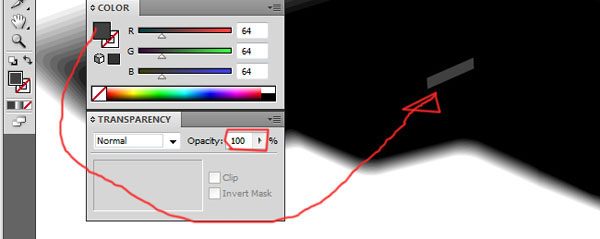 Next is a shape with a color gradient, which simply means instead of filling with a solid color, use the Gradient Panel (Ctrl/Cmd + F9) to fill it in.
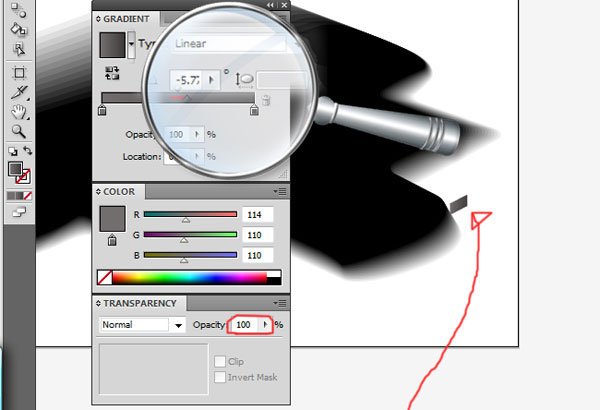
The gradient will have the following option settings:
- Type: Linear
- Angle: -5.7 degrees
- Two gradient sliders (color stops), from gray to black
 Next up: draw a solid color shape that’s connected to the first shape. Very simple. Mixing gradient fills and solid color fills helps generate great things.
 Now draw another gradient-filled shape.
 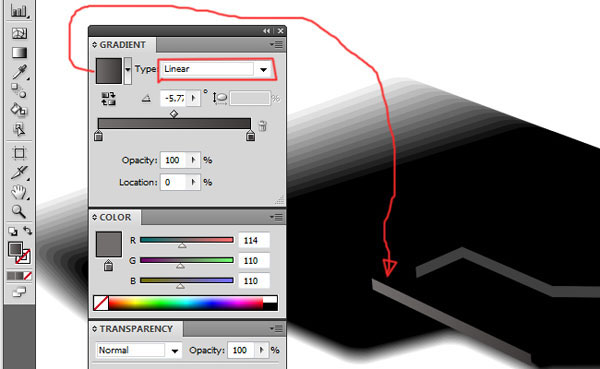 Alright, things are slowly but surely shaping up nicely. Onto more shapes.
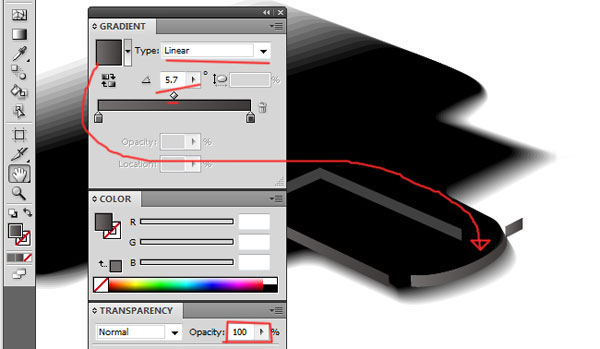 Now we draw a very tiny piece; these tiny details are the ones that really give depth and distinction to any icon design. For this shape, use the same gradient settings, except that you should use a lighter gray color stop.
 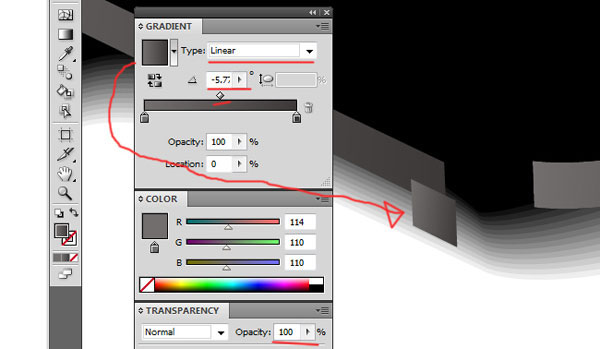 Now close the left edge with another gradient shape.
 The following shape must be created carefully: draw a large shape and then a small rectangle inside of it. Fill both objects with a gradient (Type: Linear, Angle: 118o).
 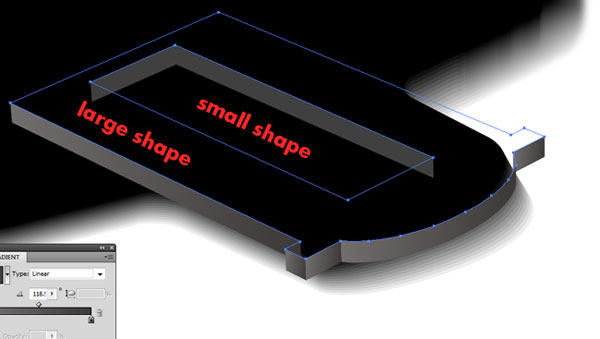 Now open up the Pathfinder Panel (Shift + Ctrl/Cmd + F9).
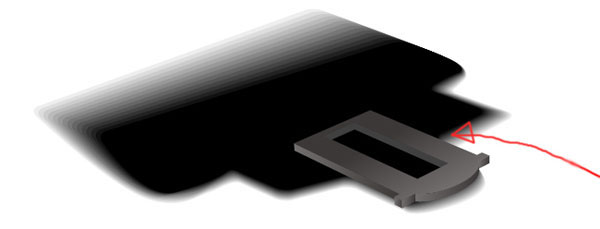
Select both of the shapes we just drew with the Selection Tool (V). Having both shapes selected, click on the Minus Front command in the Pathfinder Panel (it should be the second button on the first row of buttons). 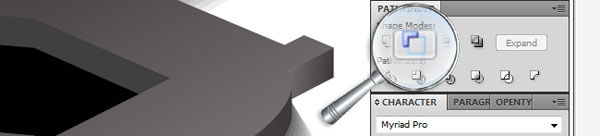 Now we have the basic shape of the paper tray!
 Maybe a few highlights and glows can be placed onto it to help with the realistic look that we are after. Draw a shape on the top surface of the printer tray (as shown below). The fill of this shape will be a color gradient.
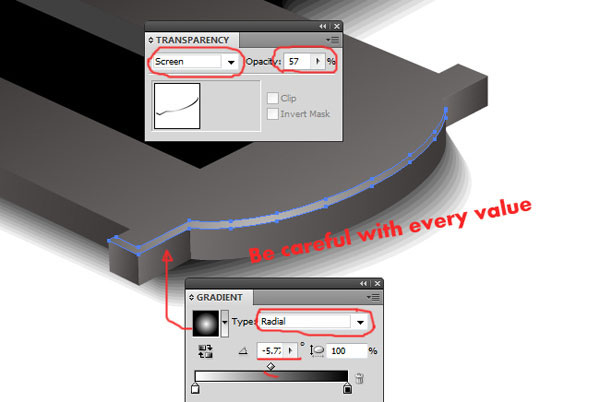 We should also draw a highlight on the top-left surface edge. Same technique as the one above, just different option values for transparency and the gradient.
 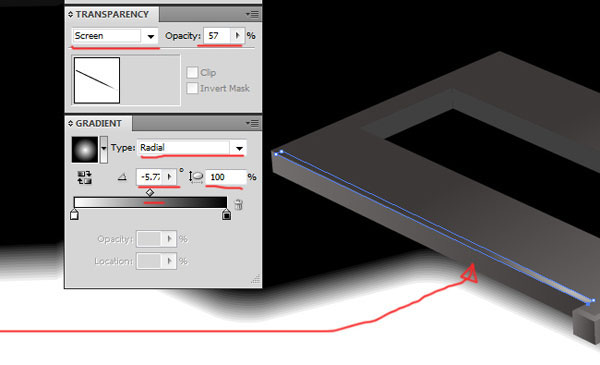 Let’s keep playing with the lights and shadows of the paper tray.
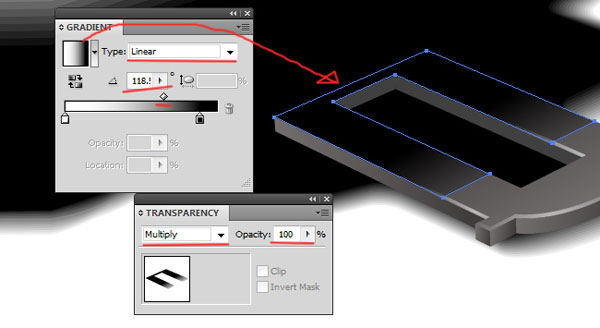
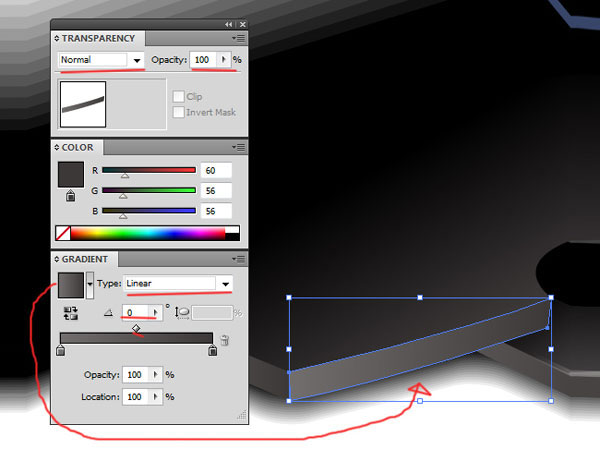
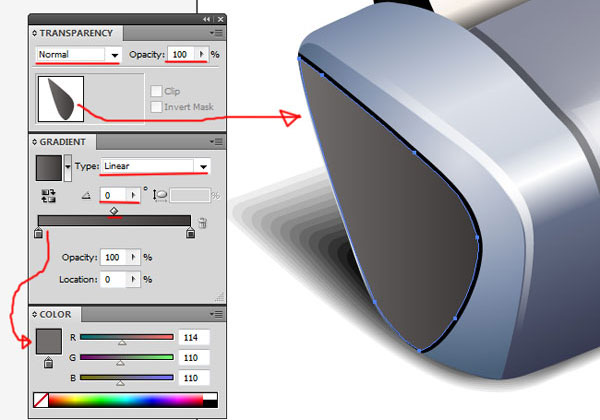
Draw a new shape as shown below using the Pen Tool (P). 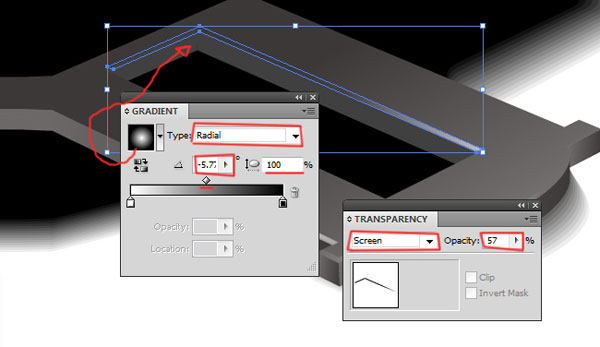 Transparency settings are very useful for things like surface highlights and shadows. For example, on this next shape, we will adjust the blending mode to Multiply via the Transparency Panel after giving it a white-black color gradient fill.
Step 6: Working on the Printer’s Right Side
We are almost done with the paper tray — we will come back to it a little later. Let’s work on the body of our printer next. Grab the Pen Tool (P) once again and draw the shape shown in the image below.
 The next shape needs to be drawn on top of the shape we previously drew. You could duplicate the shape and then adjust the duplicated shape’s size. The following shape should have a 100% black Fill color.
 This next shape will be more complicated. The shape represents the front-facing side of the printer. This shape will be filled with over 7 different color stops for its color gradient.
Leave the gradient Type on Linear and Angle on 113o. 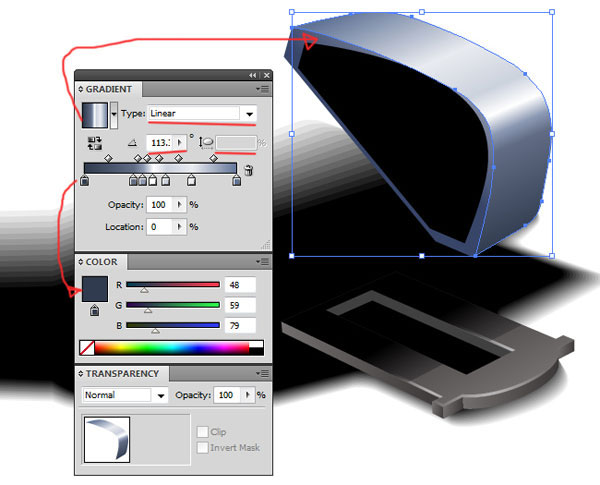 Here are the other color values for the 6 other color stops:
 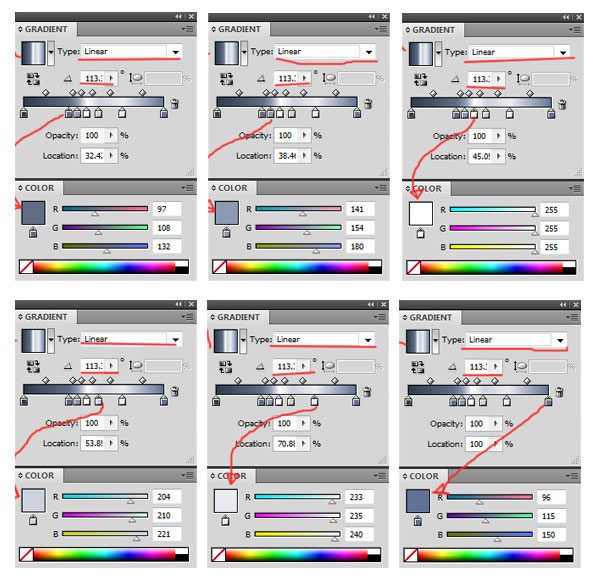 Let’s add a thin highlight along the curvature of the shape to give some extra volume. Grab your Pen Tool (P) and start drawing.
Step 7: Adding a Paper Holder on the Paper Tray
Next we will create the paper holder that goes on top of the paper tray. For this shape, we will use a subtle color gradient that goes from black to dark gray. Even the smallest color variations can provide realistic results.
 Just like the tray, we need edges on the paper holder. Draw the shape shown below and fill it with a gray gradient.
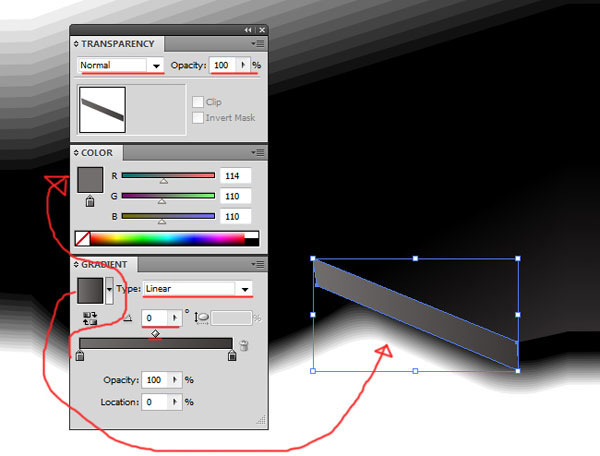
 The next shape has exactly the same color parameters as the last one we just drew; this one is the front-facing edge of the paper holder.
 Next, we draw a curved shape in the middle of the paper holder:
  Continue drawing the edge of the paper holder:
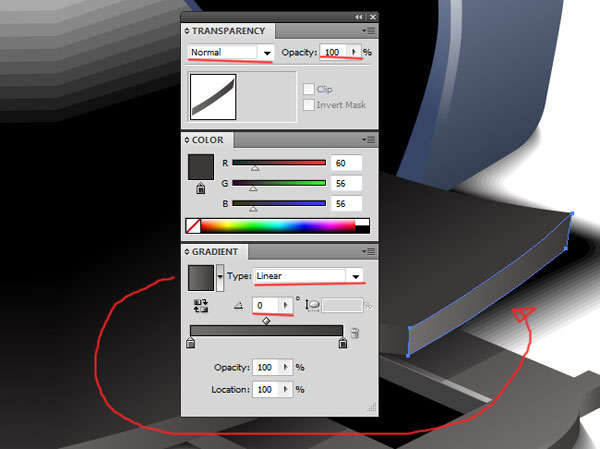
Step 8: Drawing the Paper Feed’s Base Shape
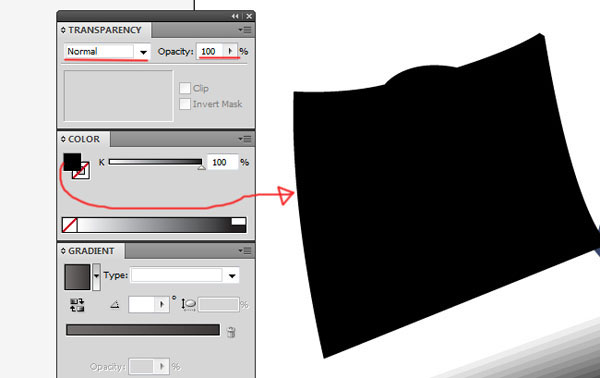
Let’s move to another part of our printer, let’s draw the paper feed that is on top of the printer where the paper will enter. For now, our shape should have a pure black fill. We will come back to this shortly.
Step 9: Adding a Printed Paper
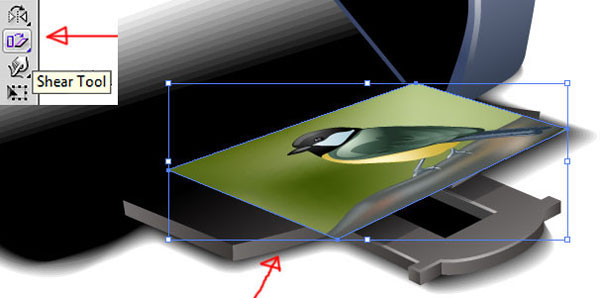
Now we should place an image on top of the paper holder so that it looks like our icon has just printed something. Preferably, you should find a vectorized image so that we can rescale it along with our icon. The following shows the vector image used: 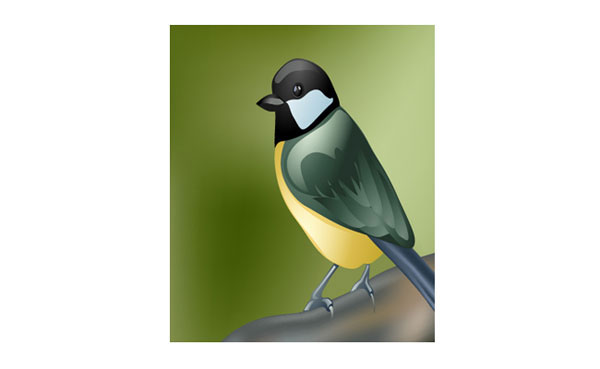 Use the Shear Tool to adjust the perspective of the image so that it matches that of the icon’s.
 Let’s draw a white frame border using the Pen Tool (P) and then place it behind our picture; that way, we can emulate a much better concept of a printed paper.
Step 10: Refining the Paper Feed
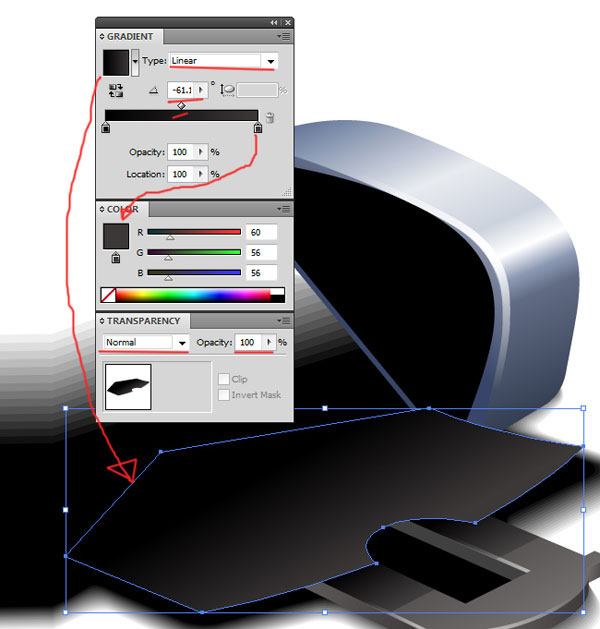
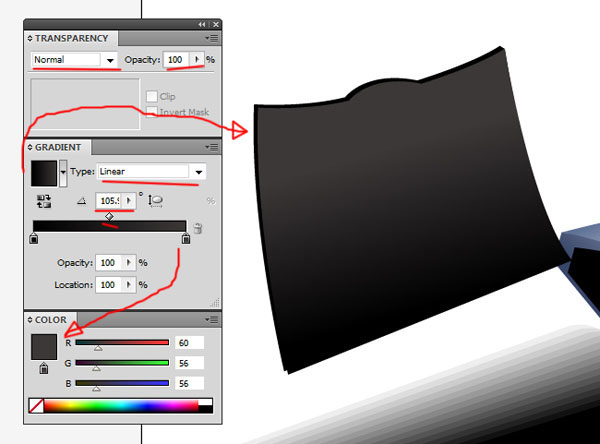
Let’s go back to our unfinished paper feed. Draw the following shape using the Pen Tool (P): 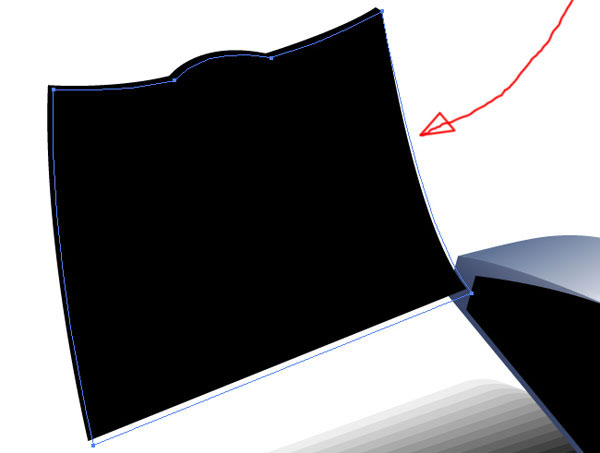 Fill the shape with a black to gray gradient (Type: Linear, Angle: 105o).
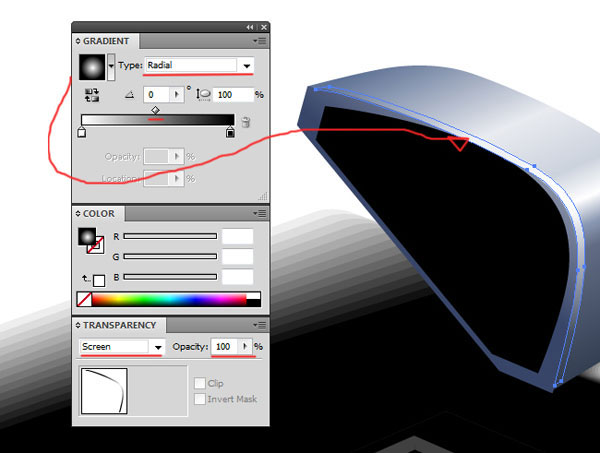
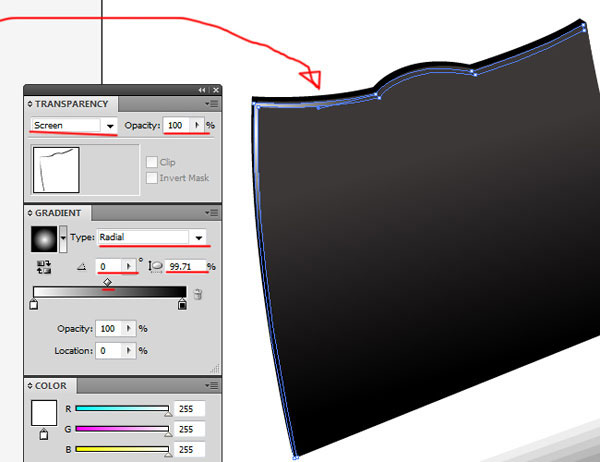
 I think we should place some highlights on the paper feed to reinforce its volume. Grab your Pen Tool (P), draw the following shape, then fill it with a black-white color gradient (Type: Radial, Angle: 0o). In addition, in the Transparency Panel, switch the blending mode of the shape to Screen.
 We can proceed by making a new shape that appears to be beveled. We need to use a gradient that is black and gray (Type: Linear, Angle: -180o).
 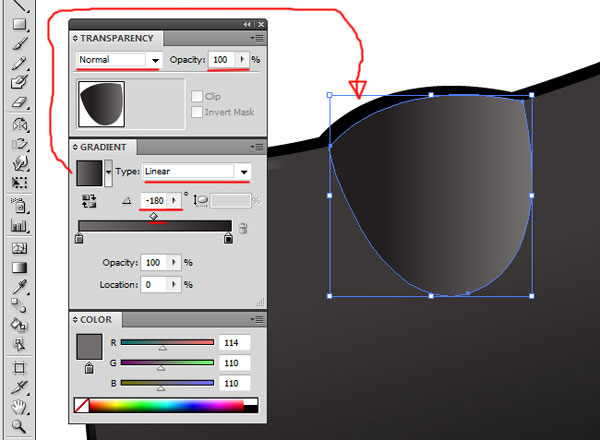 Along the left side of the paper feed, create the shape shown below.
The shape should be filled with a black-white gradient (Type: Linear, Angle: -106o). The blending mode should be Screen. 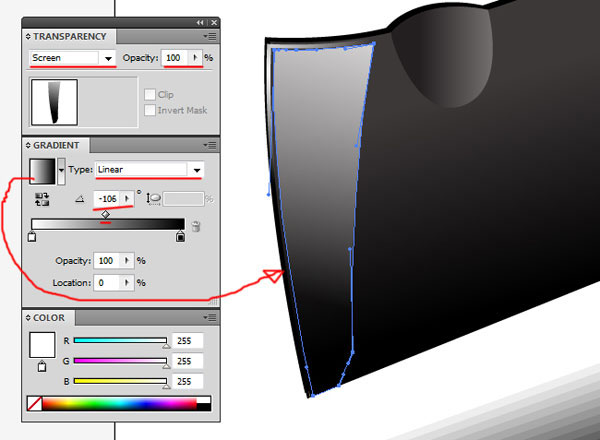
Step 11: Draw the Inner Part of the Printer’s Right Side
We seem to be jumping back and forth on different parts of the icon.
This is because that’s how it truly is when we make something from scratch; we work on an element, leave it alone for a little while and work on something else, and then come back to it later. Let’s move back to the right side of the printer. This time we will draw the inner part of it that is facing to the right.
After drawing the vector, we need to fill it with a subtle color gradient. 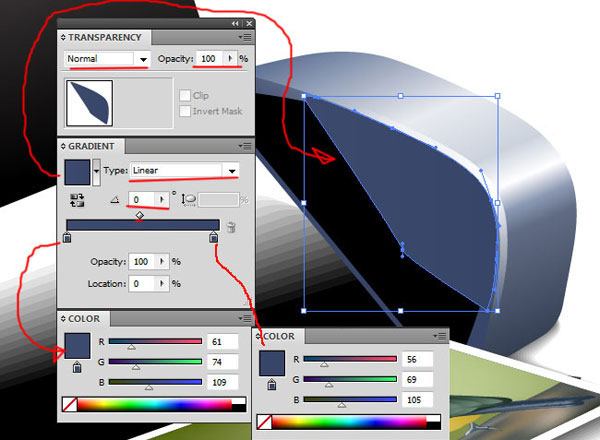 Here is where we are so far with our design:
Step 12: Drawing the Ejection Area Base Shape
OK, the next shape will help us create the paper ejection area (the part on top of the printed paper). Use the Pen Tool (P) to draw it.
Adjust the blending mode to Multiply and use a black-white gradient (Type: Linear, Angle: 113.9o). 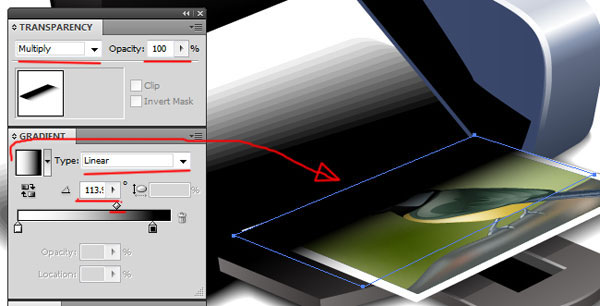
Step 13: Drawing Paper on the Paper Feed
Let’s draw a blank sheet of paper that is nested in the paper feed. First, we draw the base shape/shadow of the piece of paper.
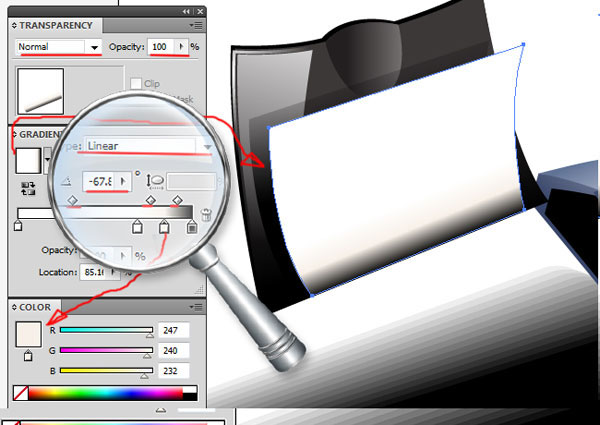
Draw a curved rectangular shape, fill it with a black-white gradient (Type: Linear, Angle: -73o), and change the blending mode to Multiply. 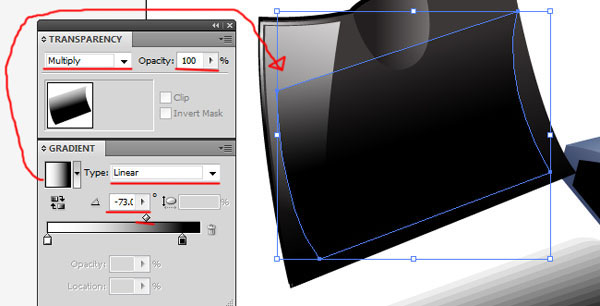 Next we draw the actual paper shape on top of the base shape/shadow. It’s going to be filled with a gradient that has 4 color stops (Type: Linear, Angle: -67o).
Step 14: Using the Mesh Tool for the Cover
We need the Mesh Tool (U) to create the cover of our printer. The Mesh Tool (U) is great for creating awesome 3D-like figures without having to use 3D software like Cinema 4D. First, grab the Pen Tool (P) and draw the contour of the shape.
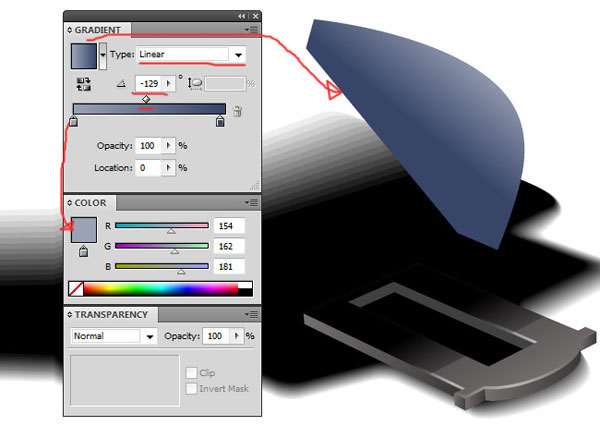
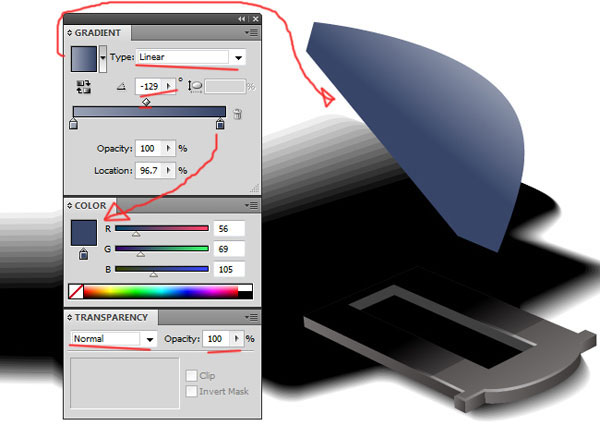
Make this shape carefully; otherwise, you won’t be able to create a nice mesh. 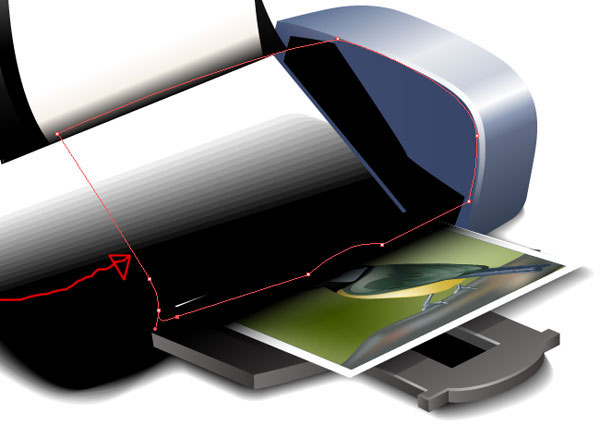 Now, fill this shape with a dirty blue tone, like the one below:
 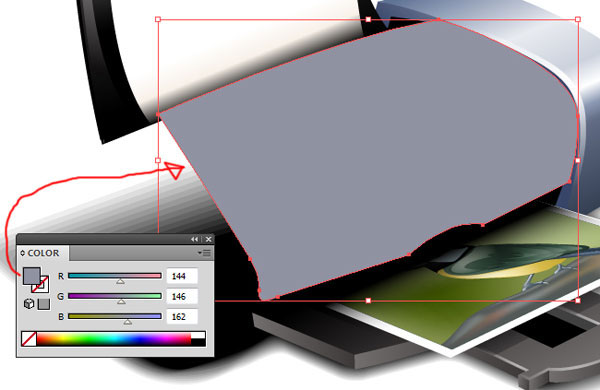 It’s important to pay a lot of attention to the symmetry. You need to make a perfectly symmetrical base shape.
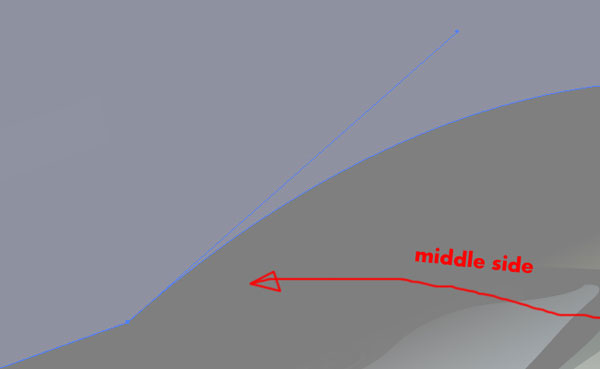
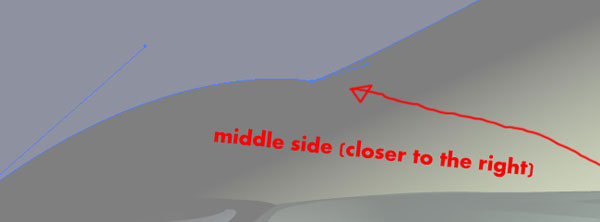
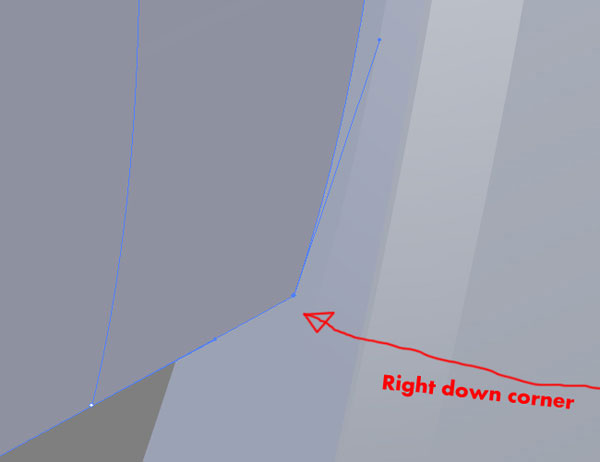
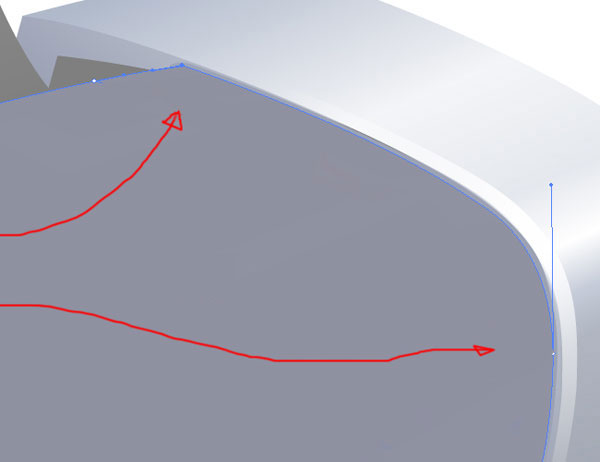
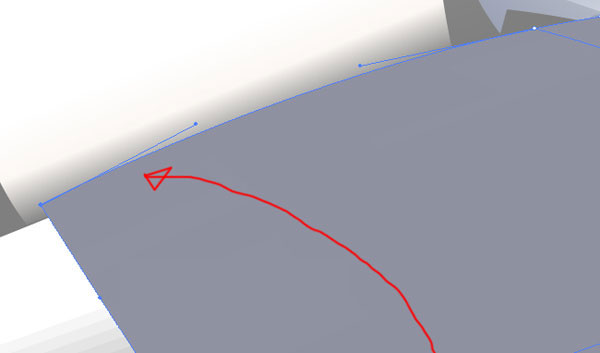
Here are the close-ups of the anchor points of the shape: 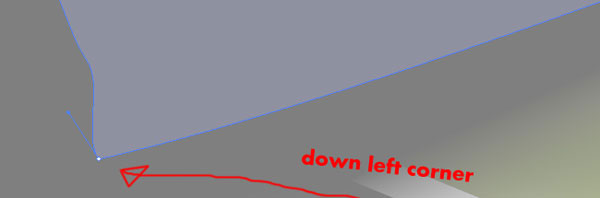
 And now the Mesh Tool (U) comes in. Click close to the bottom-right corner of the shape to generate the initial mesh.
  Adjust the mesh anchor points until you have something like the following:
 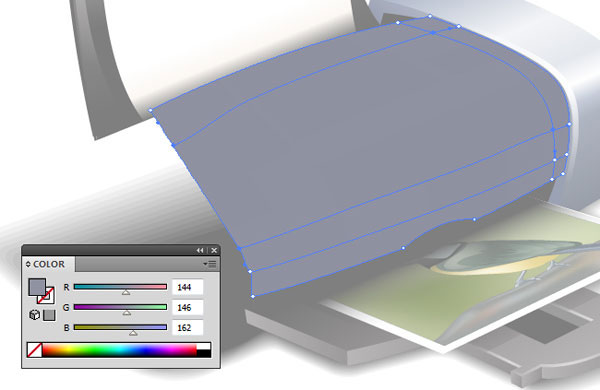 After this, use the Mesh Tool (U) again to create vertical mesh lines.
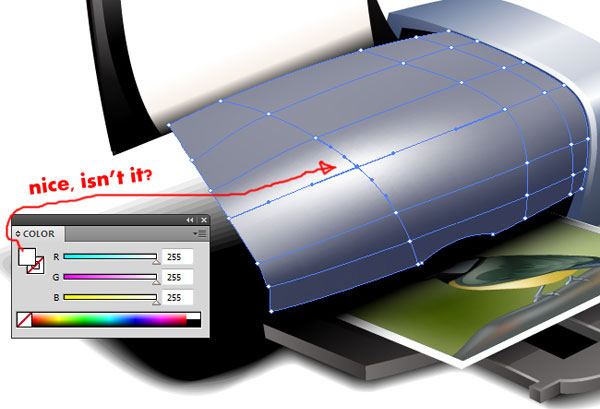
We’re now done with the basic mesh. Now the tricky part: You need to start adjusting the anchor points with the volume and surface contours of our cover. It’s likely that you will make a mistake; and if that happens, you could use the Direct Selection Tool (A) to adjust individual anchor points.
With a little patience, you will achieve a lovely mesh like this one: 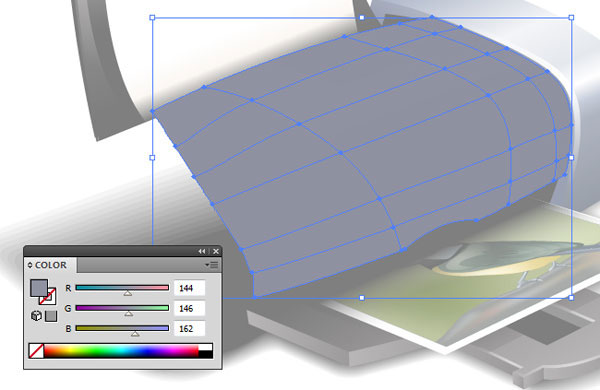 Alright, now we need to start filling the different parts of our mesh. Using the Mesh Tool (U), click on one of the intersections and change the Fill color to white. You will notice the change immediately.
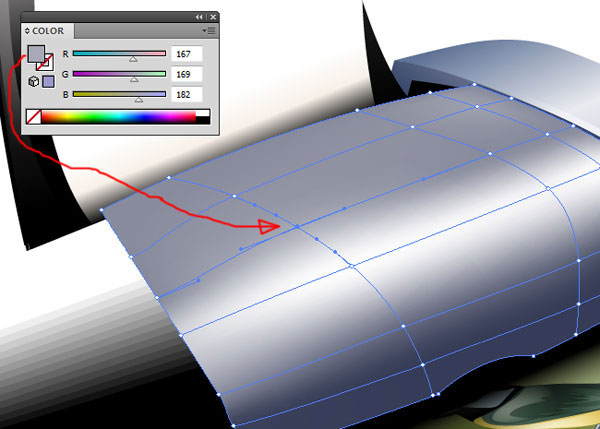
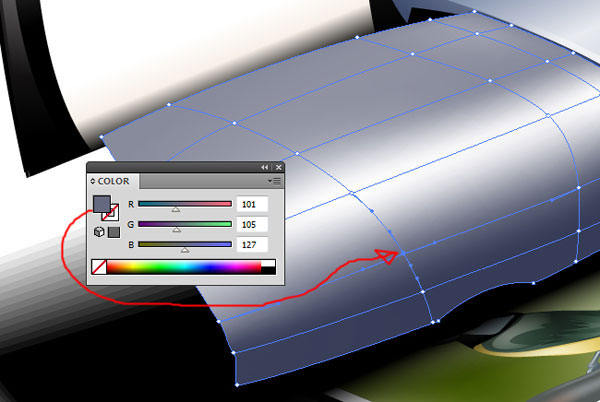
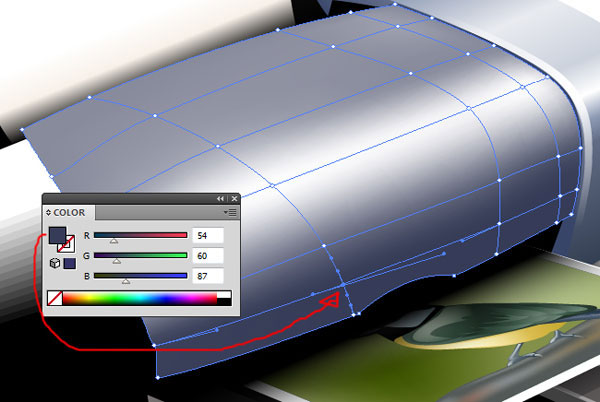
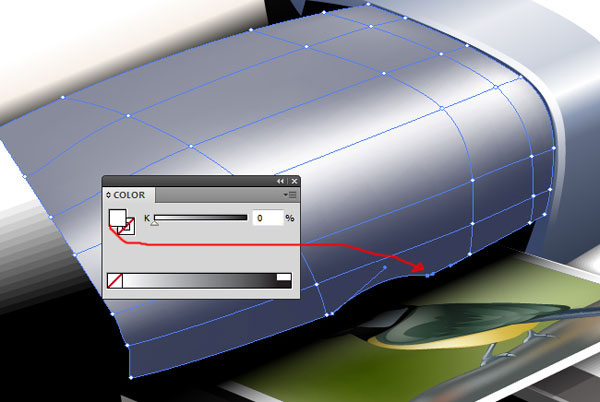
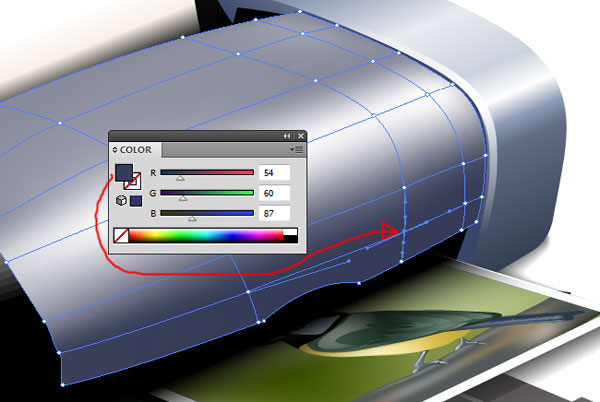
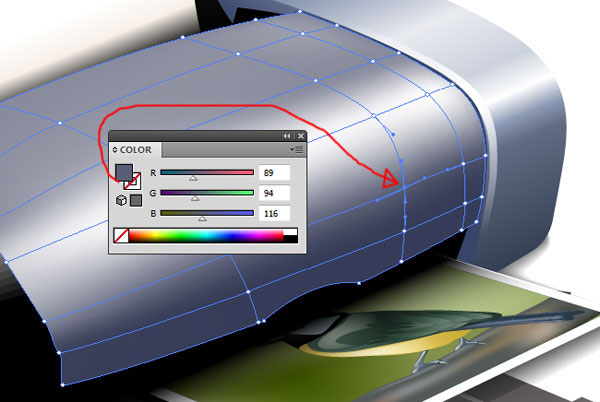
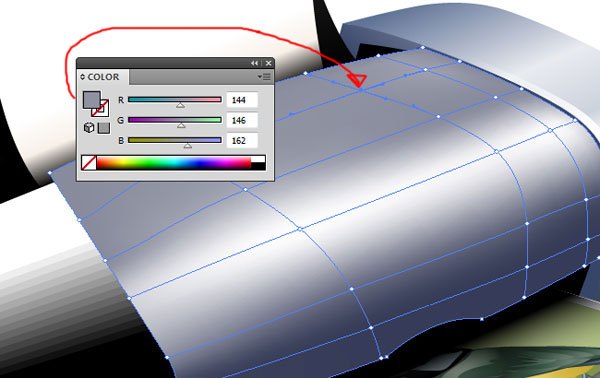
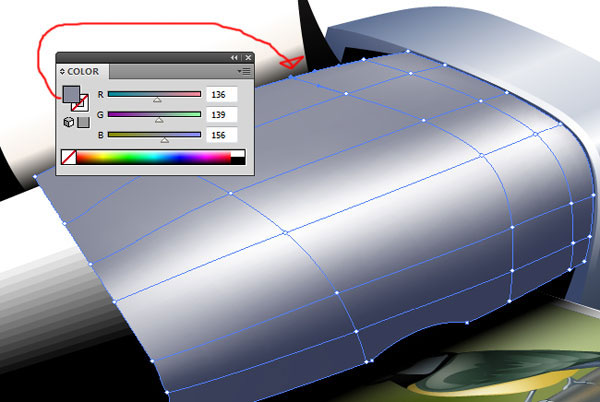
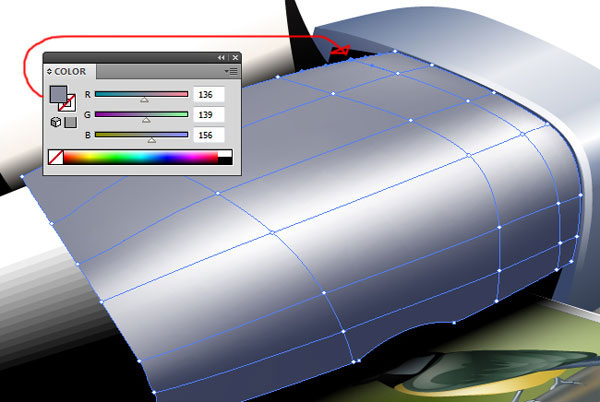
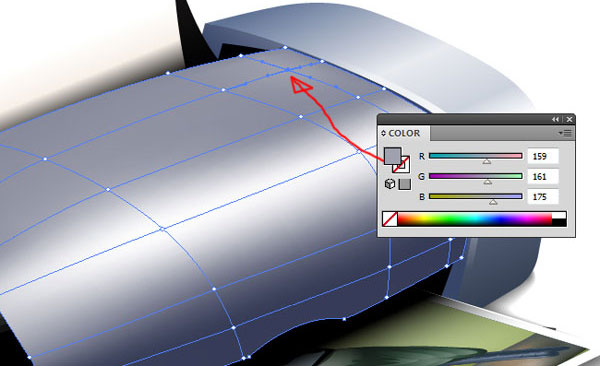
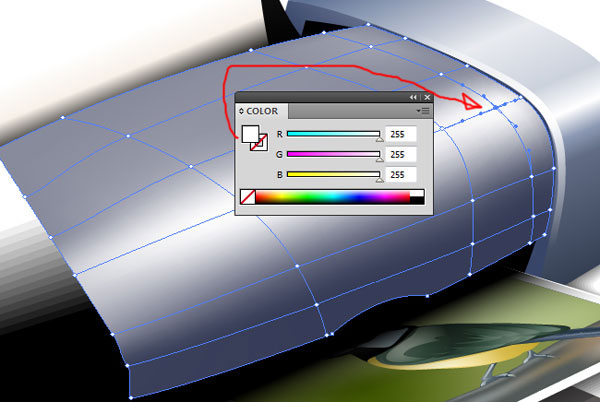
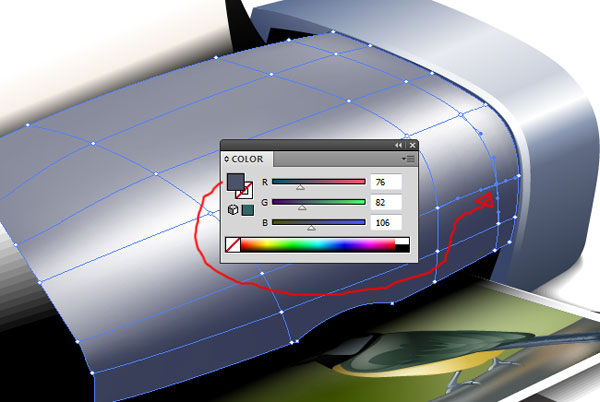
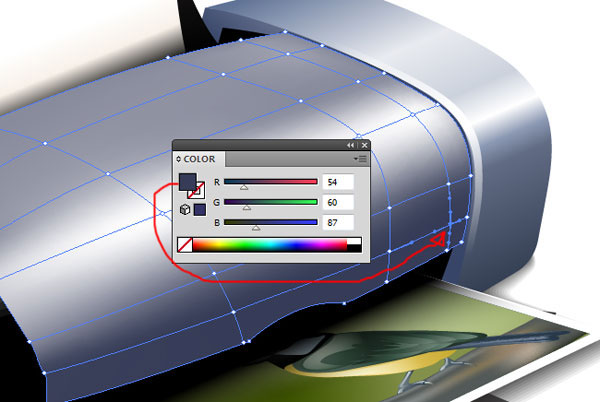
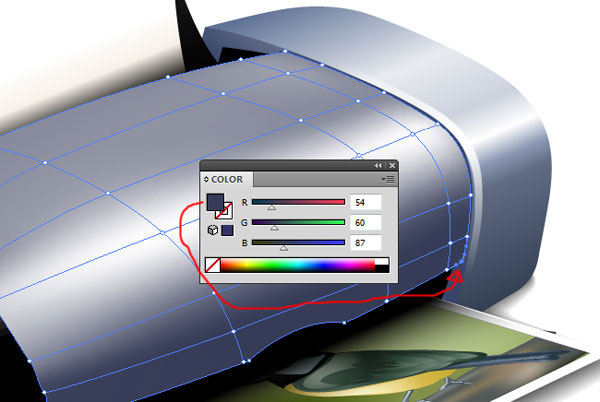
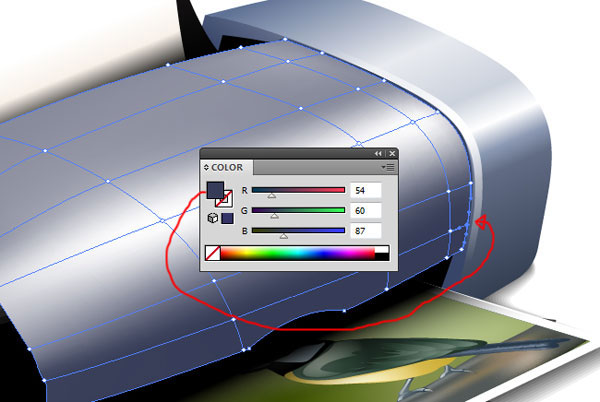
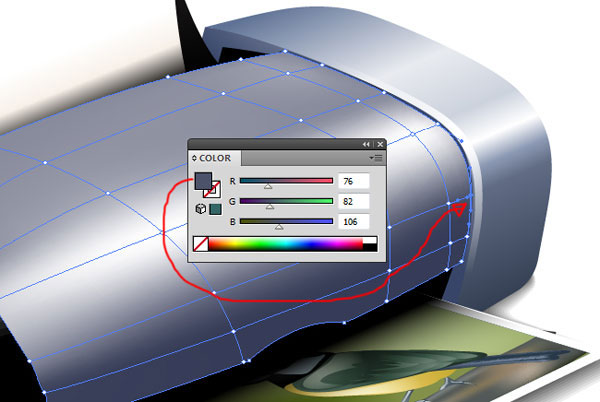
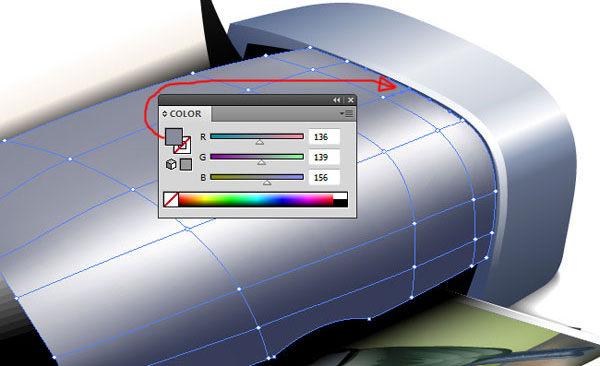
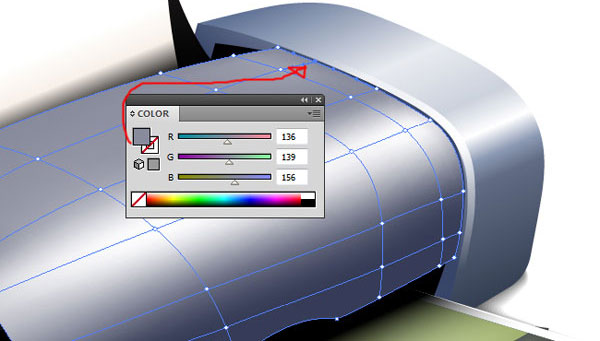
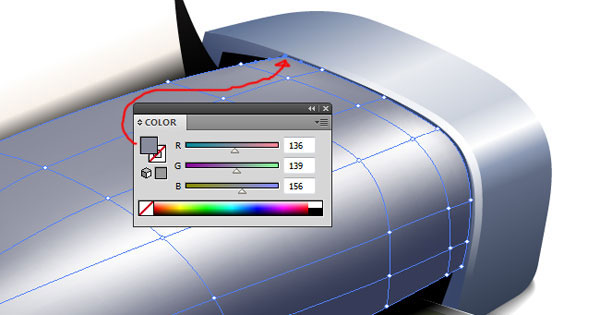
 Now let me show you what color to select in each one of the intersections (there will be 25 images that follows because we have many intersections):
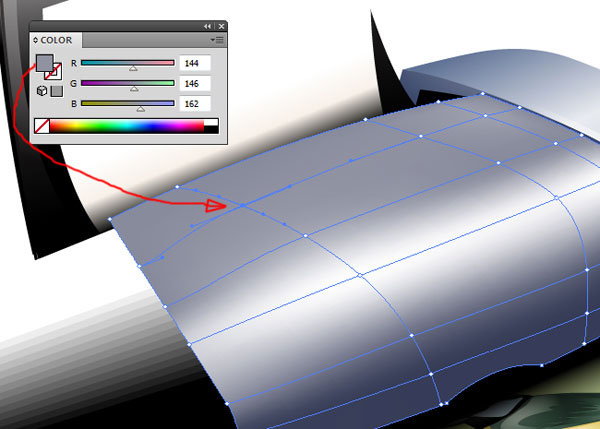
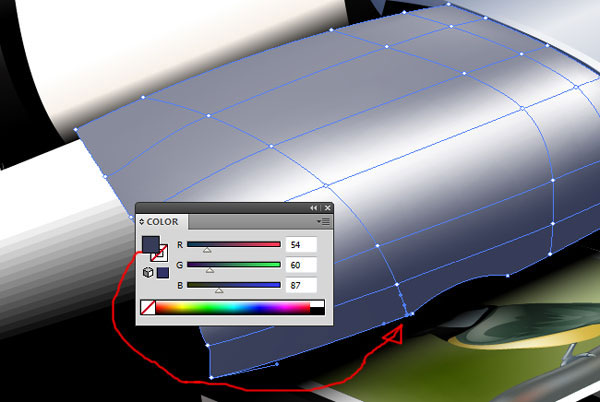

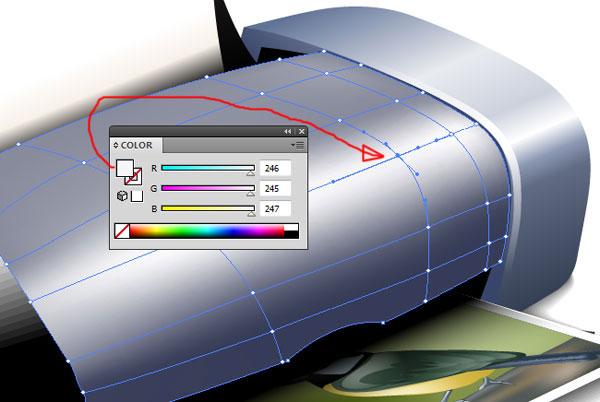
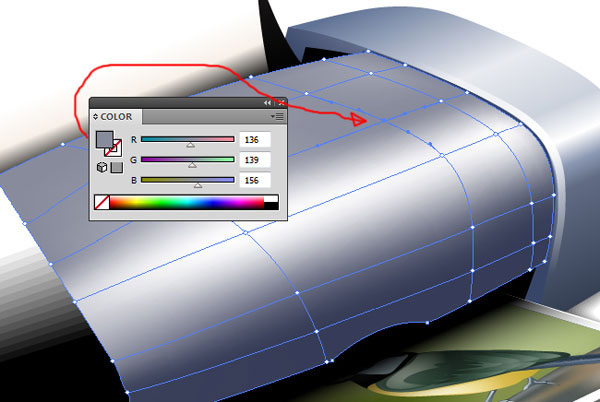

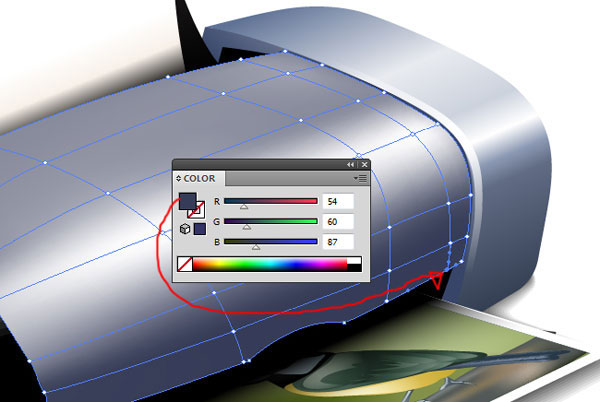
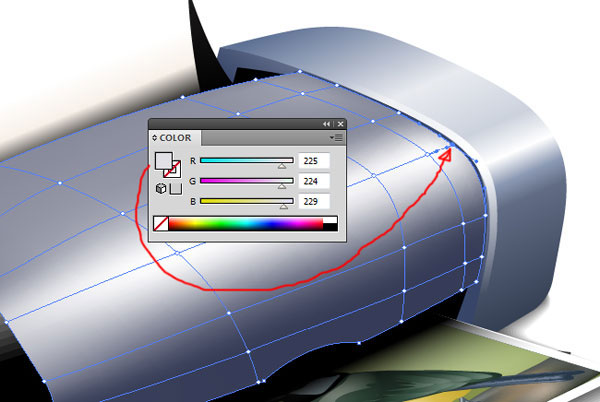
 And there you have it, we have completed our mesh. I know that using meshes is a lot of work, but the final result pays for any time you invest in it.
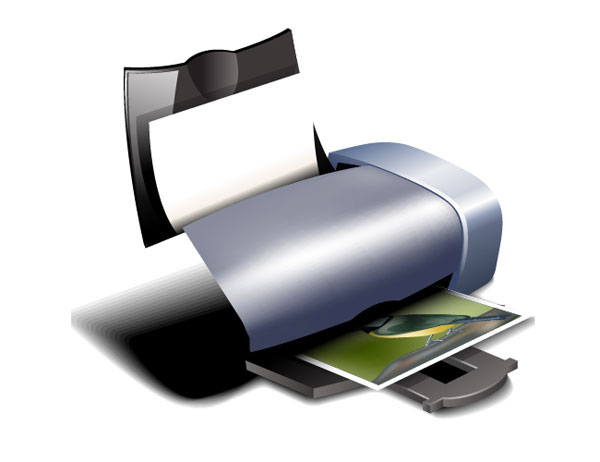
Step 15: Creating a Highlight on the Cover
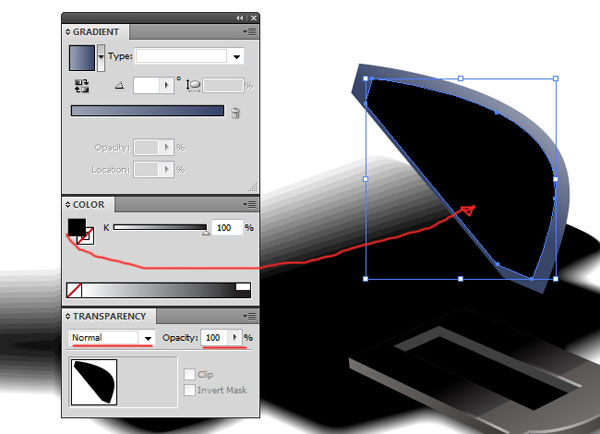
The next thing to do for our cover is to make a subtle highlight.
Create it with the Pen Tool (P) and adjust its blending mode to Screen. Also change the gradient settings such that it’s Type is Radial and its Angle is 0o. 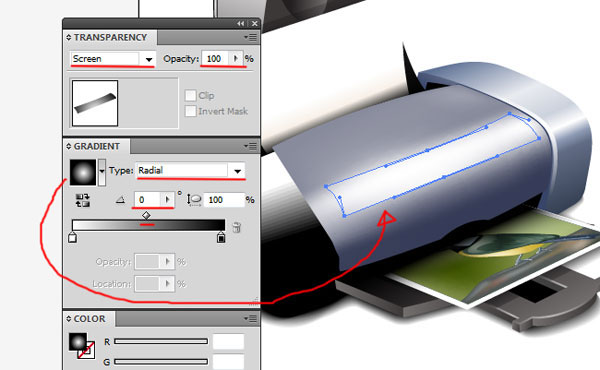
Step 16: Creating the Left Side of the Printer
The next shape is the left end of the printer.
It’s Fill color should be 100% black, but we must reduce the Opacity to 40%. 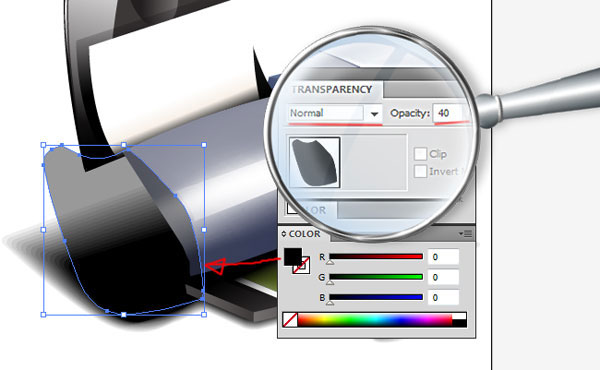 Next, draw the shape shown below. It should be filled with a gradient that has 6 color stops.
 Here are the 4 other color stops (the 3rd color stop — not shown — is 100% white).
 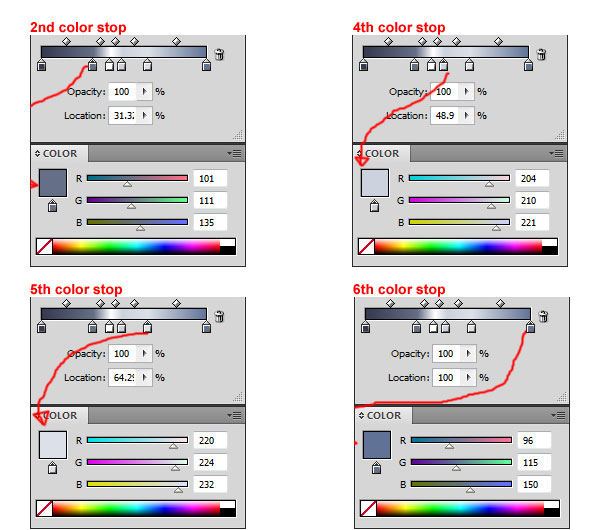 Now we need to create a 3-color gradient-filled shape on the left of the shape we just constructed (Type: Radial, Angle: 0o).
 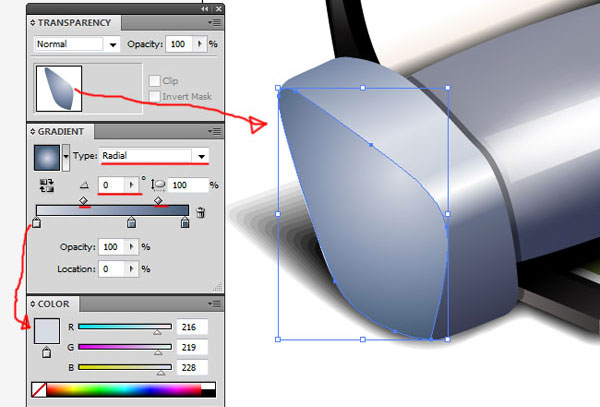 Here are the other two color stop values:
 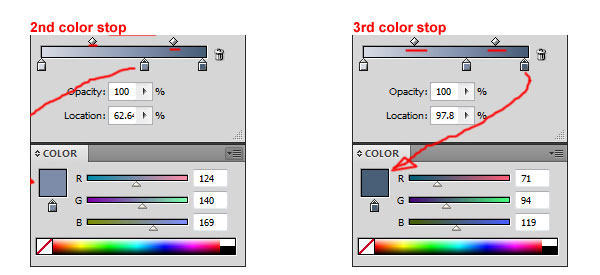 Draw the highlight for the left side of the printer and fill it with a black and white gradient, (Type: Radial, Angle: 0o).
Switch the blending mode to Screen. 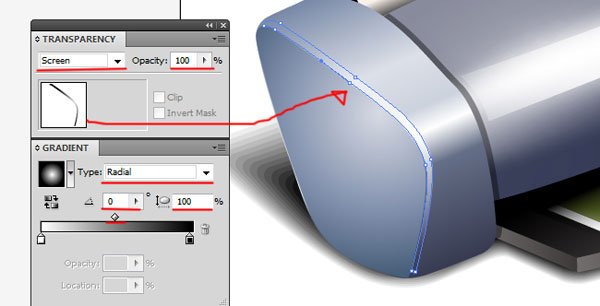 Create a new shape filled with 100 % black.
 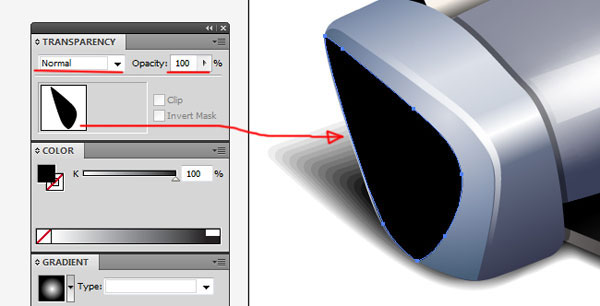 Proceed by making a shape similar to the last one, but fill it with a black-gray gradient (Type: Linear, Angle: 0o).
 Draw one more highlight and fill it with a black-white gradient (Type: Radial, Angle: 0o). Switch the blending mode to Screen.
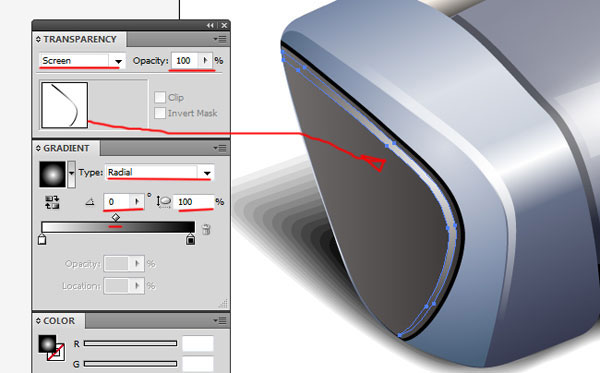
Step 17: Draw Buttons on the Surface
Our final step in this tutorial involves drawing buttons on the surface for detailing purposes.
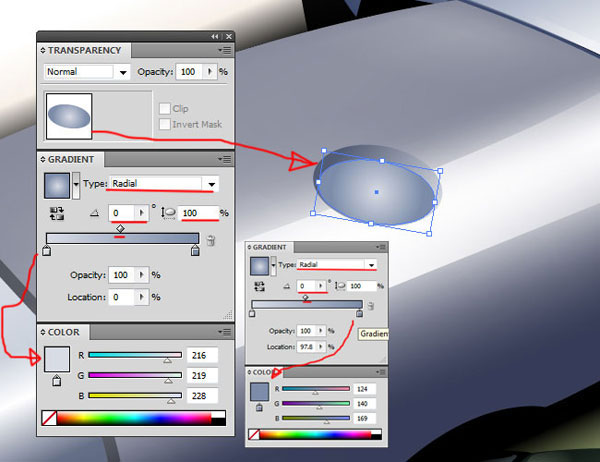
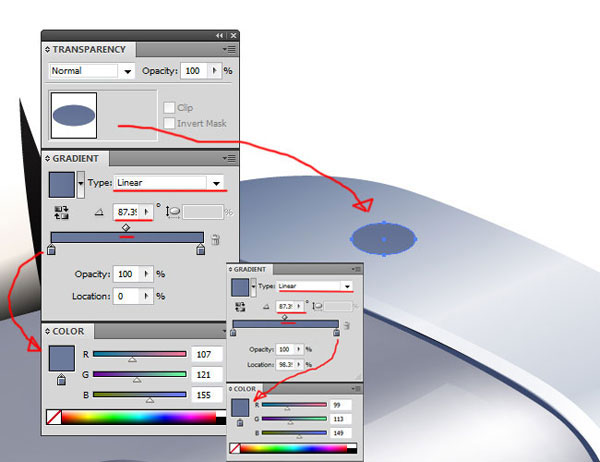
Choose the Ellipse Tool (L) and draw a small ellipse on the printer cover, then rotate it a little bit so it matches the angle of the surface. Fill the ellipse with a 2-color gradient (Type: Linear, Angle: 137o).  Copy and paste the last shape (Ctrl/Cmd + C and then Ctrl/Cmd + F), reduce the duplicate shape’s size a little bit, then give it a 2-color gradient (Type: Radial, Angle: 0o).
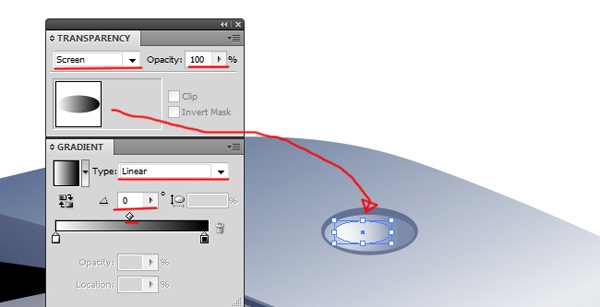
 Copy and paste the previous shape (Ctrl/Cmd + C and then Ctrl/Cmd + F), reduce its size, change the gradient color stops so that it’s black and white, with Type: Linear and Angle: -82o. Also, change the blending mode to Screen.
 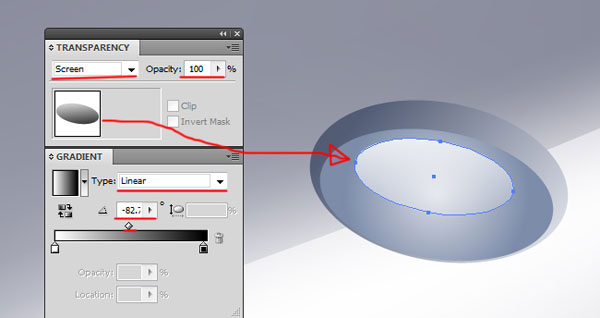 Grab the Ellipse Tool (L) and draw a new shape at the right side of the printer with a linear gradient that has two color stops.
 Copy this shape and paste it on top of the original, reduce its size a little and change the gradient values to Type: Linear and Angle: 0o.
  One more time: Copy the shape and paste it on top of the original, reduce its size a little and change its fill to a black-gray gradient, Type: Linear and Angle: 0o. Then Change the blending mode to Screen.
Tutorial Summary
And yes, we’re done! We have completed our printer icon. In this tutorial we drew a highly-detailed icon using the Pen Tool and shape tools such as the Ellipse Tool and Rectangle Tool.
We relied on the Gradient and Transparency Panel for the coloring of our work. We used the Mesh Tool to make interesting and realistic surfaces on the printer. I hope you enjoyed the tutorial; please leave your questions and thoughts in the comments!
Download Source Files
- printer_icon_illustrator (ZIP, 0.12 MB)
-
 Trevin serves as the VP of Marketing at WebFX. He has worked on over 450 marketing campaigns and has been building websites for over 25 years. His work has been featured by Search Engine Land, USA Today, Fast Company and Inc.
 -

WebFX is a full-service marketing agency with 1,100+ client reviews and a 4.9-star rating on Clutch! Find out how our expert team and revenue-accelerating tech can drive results for you! Learn more
Make estimating web design costs easy
Website design costs can be tricky to nail down. Get an instant estimate for a custom web design with our free website design cost calculator!
Try Our Free Web Design Cost Calculator
Table of Contents
- Preview
- Step 1: Create a New Document
- Step 2: Sketch (or Find) Reference Images
- Step 3: Draw the Printer’s Base and Shadow
- Step 4: Using the Blend Tool to Color the Base
- Step 5: Draw the Printer’s Paper Tray
- Step 6: Working on the Printer’s Right Side
- Step 7: Adding a Paper Holder on the Paper Tray
- Step 8: Drawing the Paper Feed’s Base Shape
- Step 9: Adding a Printed Paper
- Step 10: Refining the Paper Feed
- Step 11: Draw the Inner Part of the Printer’s Right Side
- Step 12: Drawing the Ejection Area Base Shape
- Step 13: Drawing Paper on the Paper Feed
- Step 14: Using the Mesh Tool for the Cover
- Step 15: Creating a Highlight on the Cover
- Step 16: Creating the Left Side of the Printer
- Step 17: Draw Buttons on the Surface
- Tutorial Summary
- Download Source Files
Share this article


Web Design Calculator
Use our free tool to get a free, instant quote in under 60 seconds.
View Web Design CalculatorMake estimating web design costs easy
Website design costs can be tricky to nail down. Get an instant estimate for a custom web design with our free website design cost calculator!
Try Our Free Web Design Cost Calculator


