- Home
- Blog
- Web Design How to Design an LCD Monitor Using Photoshop
How to Design an LCD Monitor Using Photoshop
-
 22 min. read
-
 Trevin Shirey
 VP of Marketing
- Trevin serves as the VP of Marketing at WebFX. He has worked on over 450 marketing campaigns and has been building websites for over 25 years. His work has been featured by Search Engine Land, USA Today, Fast Company and Inc.
Preview
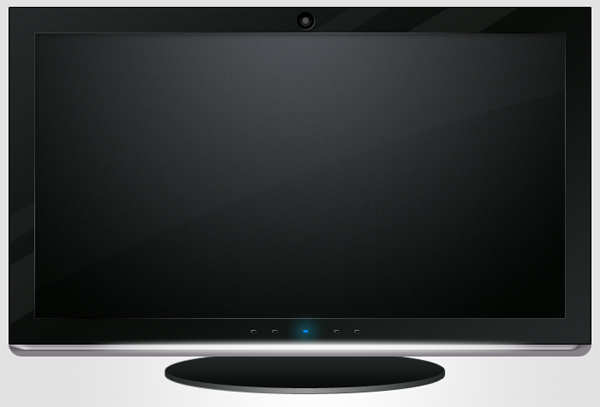
Here is what we will design in this tutorial. Click on the preview image below to see the artwork in full scale. 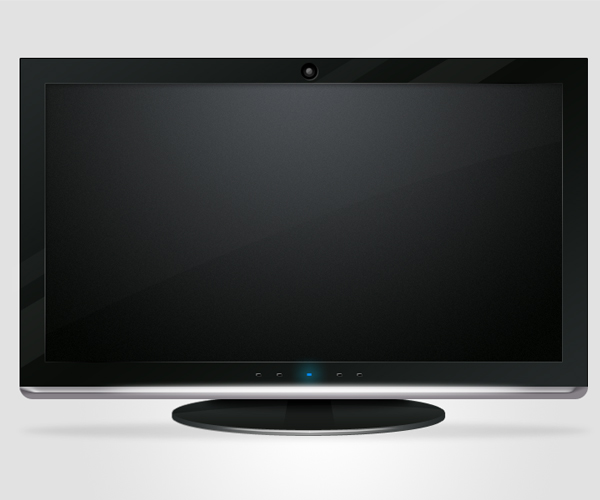
Step 1: Create your document and background
Create a new Photoshop document at 800 x 600px with a white background.
Set your Foreground color to white (#ffffff) and background color to a light grey color (#e2e2e2). Select the Gradient Tool (G) with a radial gradient and then drag the radial gradient from the bottom of the canvas upwards to about halfway up your canvas. 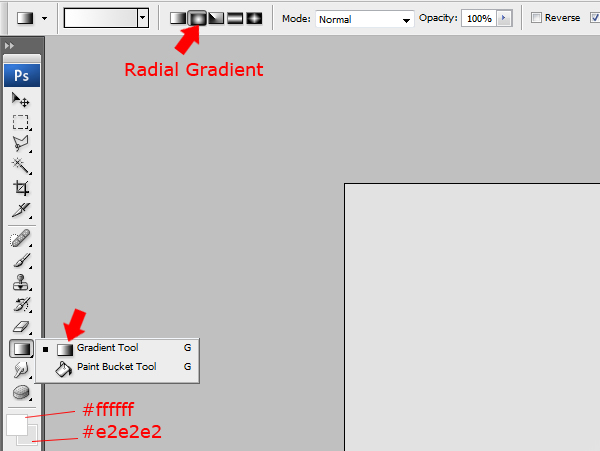
Step 2: Draw the LCD monitor’s bezel
Create a new layer above your background layer called “monitor”. Select the Rounded Rectangle Tool (U) with a Radius of 15px then drag out a rectangular path onto your canvas. 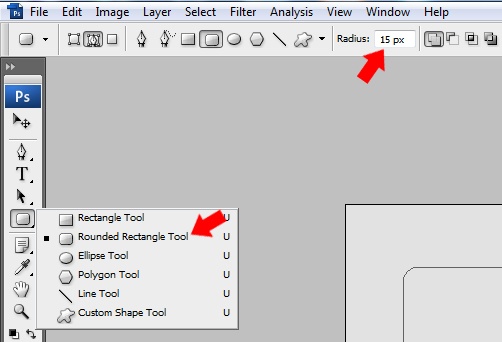 Once you’ve dragged out your path, select the Pen Tool (P) then right-click inside your rectangle and pick Fill Path. The color of your rectangle doesn’t matter, as we will be changing the rectangle’s appearance shortly.
Still with your Pen Tool (P), right-click once more inside your rectangle and select Delete Path. 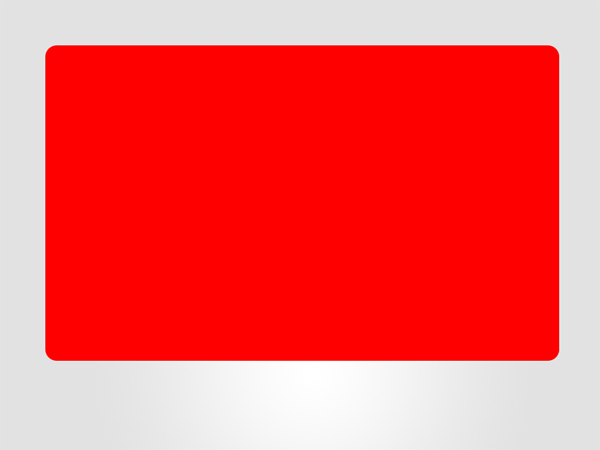 We now need to make the top of the monitor’s bezel square. To do this, pick the Rectangular Marquee Tool (M) from the Tools Panel and make a selection around one of the top corners.
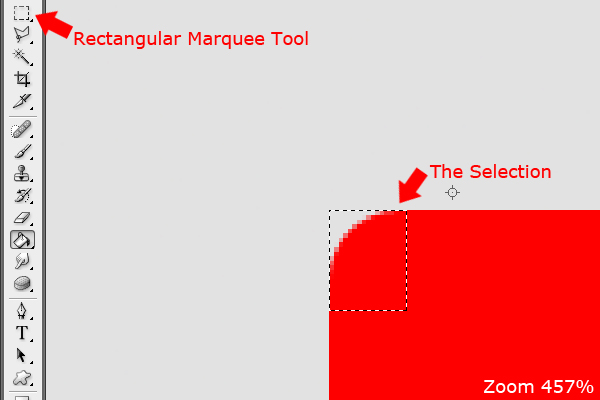 Once you have made the selection, select the Paint Bucket Tool (G) and fill the selection. You may need to fill the same place twice so that all pixels are successfully filled. Do this for the two top corners only.
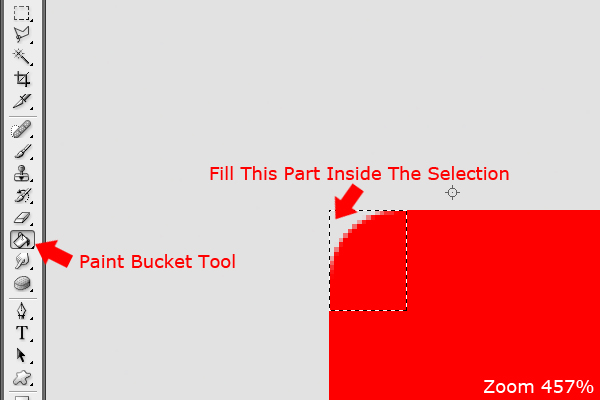 Next, we need to separate the rounded corners at the bottom so that they are on a separate layer. Get the Rectangular Marquee Tool (M) and make a selection around the bottom half of your rectangle.
 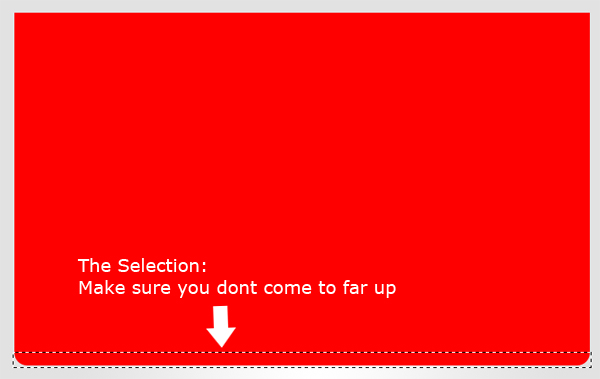 Once you’ve made the selection, cut (Ctrl/Cmd + X) and paste (Ctrl/Cmd + V) onto a new layer.
Drag the bottom rounded corners back to the original position so that they line up with the monitor’s bezel. Once lined back up, hide the layer in the Layers Panel. Don’t forget to label the new layer as “chrome bottom” so that we can keep our work organised.
Step 3: Add the monitor bezel layer styles
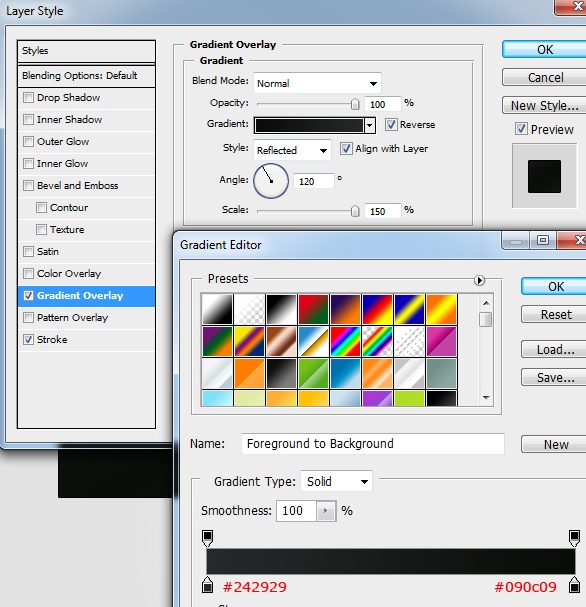
We’ll now stylize our bezel. Double-click your “monitor” layer to access the Layer Styles Panel and then add the following layer styles.
Gradient Overlay Layer Style
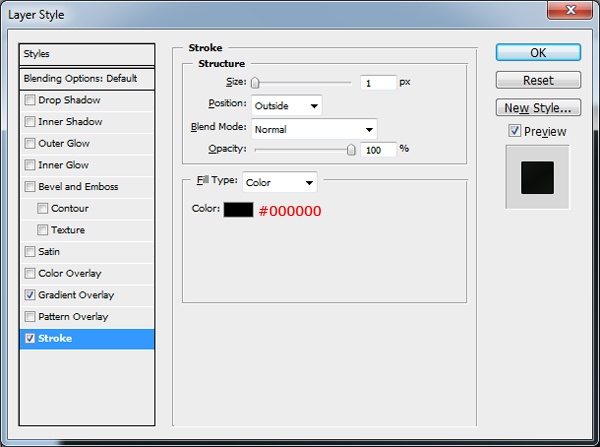
Stroke Layer Style
Step 4: Add the bottom chrome layer styles
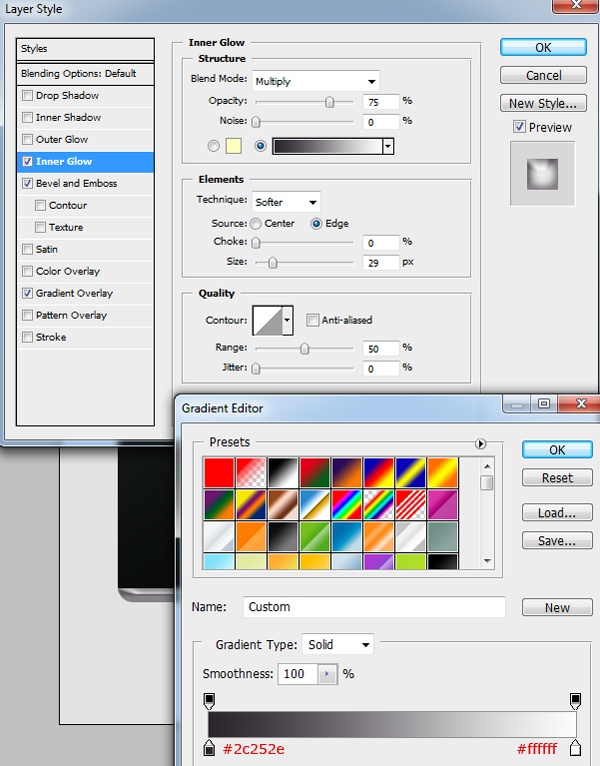
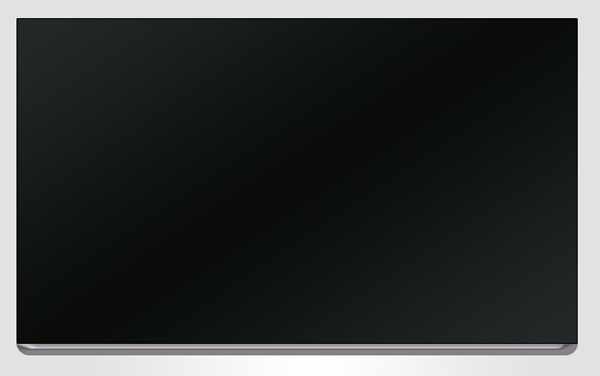
Unhide your “chrome bottom” layer then add the following layer styles to give it a 3D look and feel.
Inner Glow
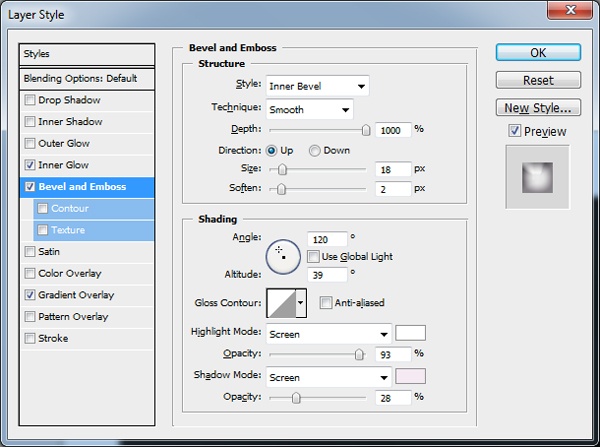
Bevel and Emboss
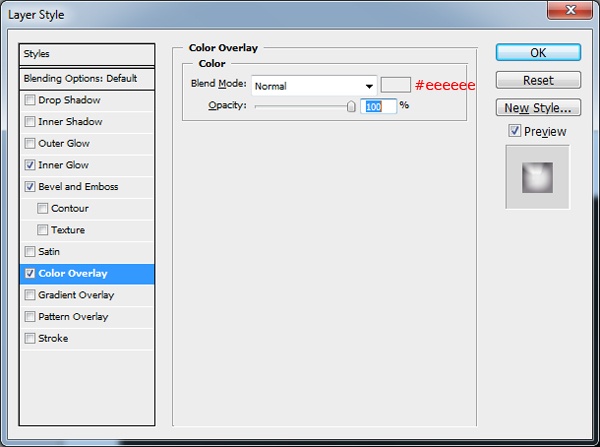
Color Overlay
Step 5: Create the monitor’s shine effects
Create a new layer labeled “shine1”. Afterwards, select the Polygonal Lasso Tool (L) then make a selection across the monitor. 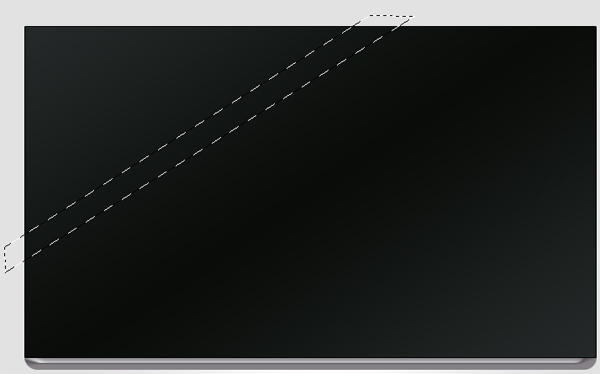 Fill the selection with white (#ffffff) then set the layer’s Opacity to 3%. We now need to remove the excess shine that exceeds past the monitor.
To do this, click the little thumbnail image in your Layers Panel on the “monitor” layer whilst holding down the Ctrl/Cmd key on the keyboard. Make sure the “shine1” layer is highlighted, then go to Select > Inverse. After inverting the selection, hit the Delete key and the excess parts should now be removed.
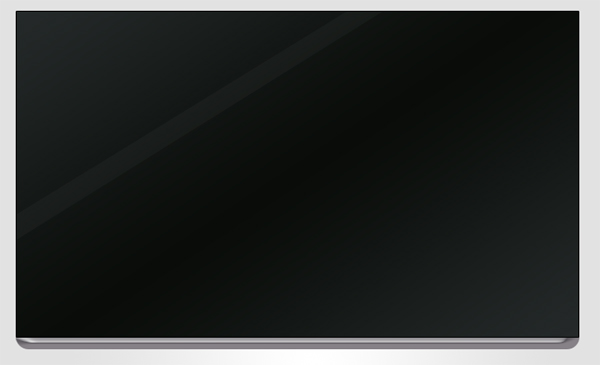 Create a new layer labeled “shine2”, then repeat the process—only this time make the selection slightly bigger and set the layer’s Opacity to 5%.
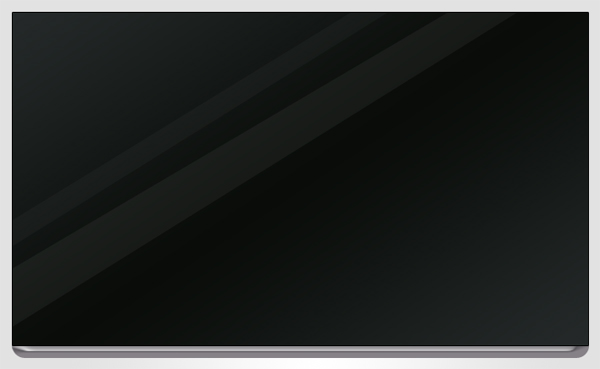
Step 6: Draw the black screen
Load a selection around your monitor layer by selecting your “monitor” layer and then going to Select > Load Selection. Create a new layer above your two shine layers (“shine1” and “shine2”).
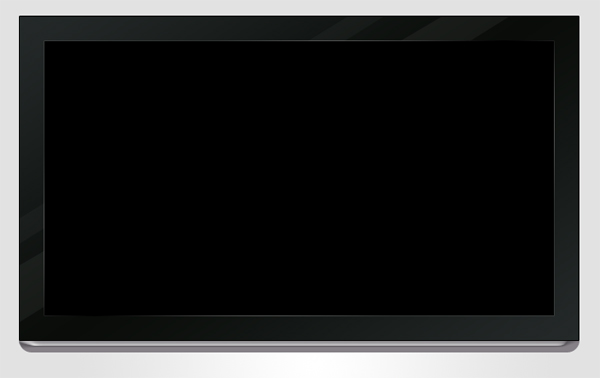
Label your new layer “black screen”, then go to Select > Modify > Contract and contract the selection by 30px. 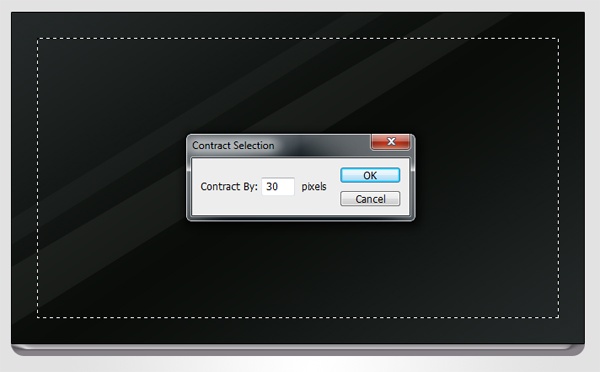 Make sure the “black screen” layer is selected and then fill the selection with black (#000000).
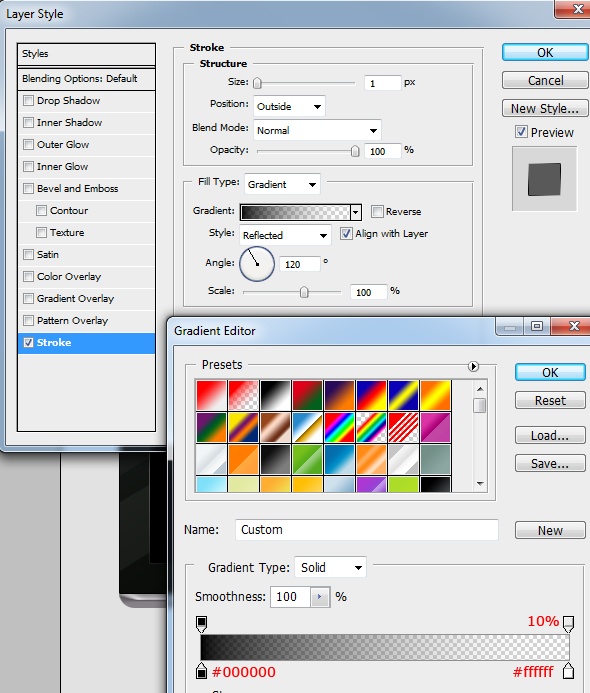
 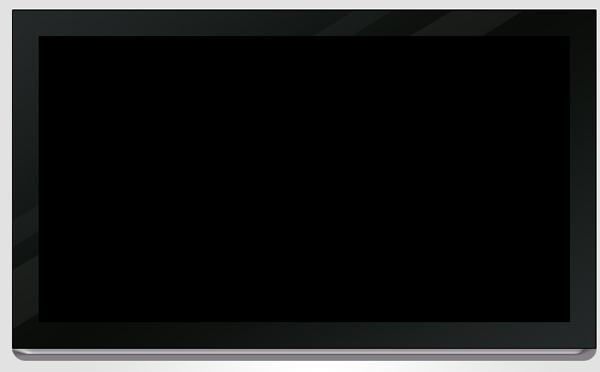 Double-click your “black screen” layer and add a 1px stroke using the settings below.
Step 7: Make the monitor screen
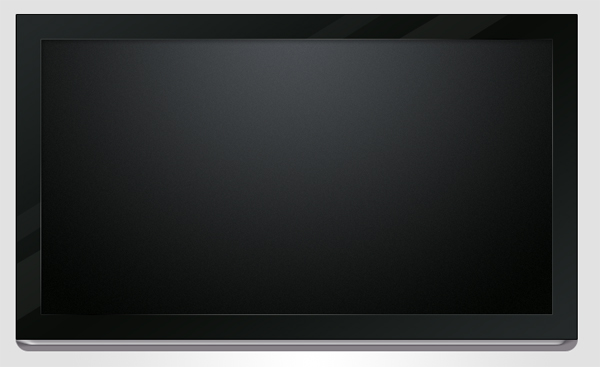
Load a selection around your “black screen” layer by selecting the layer and then going to Select > Load Selection. Create a new layer labeled “tv screen” then select the Gradient Tool (G) with a radial gradient. Set your Foreground color to a dark grey (#494c50) and Background color to a very dark grey (#070908).
After that, drag the radial gradient from the top of the selection down to the bottom. 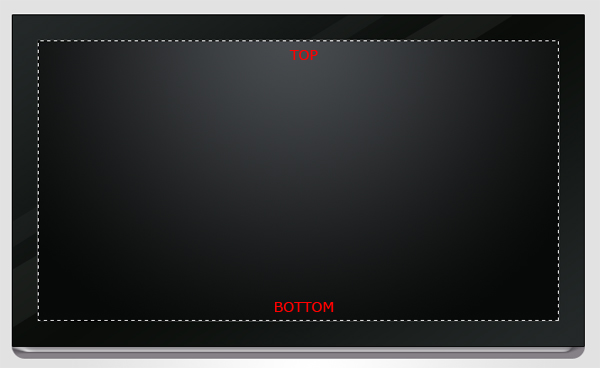 Keep the selection active, don’t deselect just yet. Add some noise by going to Filter > Noise > Add Noise.
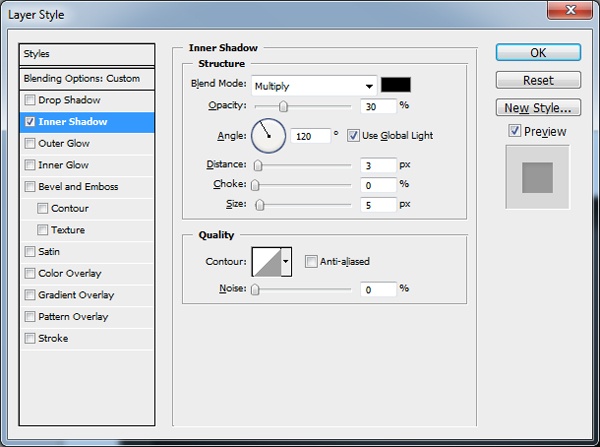
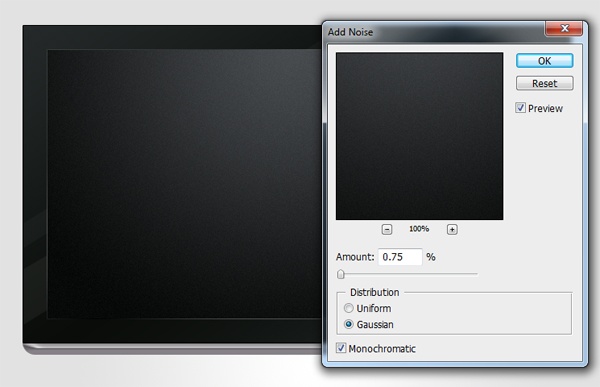 Deselect the selection by pressing Ctrl/Cmd + D and then give it an inner shadow using the settings below.
Step 8: Adding a screen shine
Let’s apply a reflection/shine on our monitor screen. Create a new layer above your “tv screen” layer then label your new layer “screen shine”. Select the Pen Tool (P) and create a curvy path that crosses the screen. 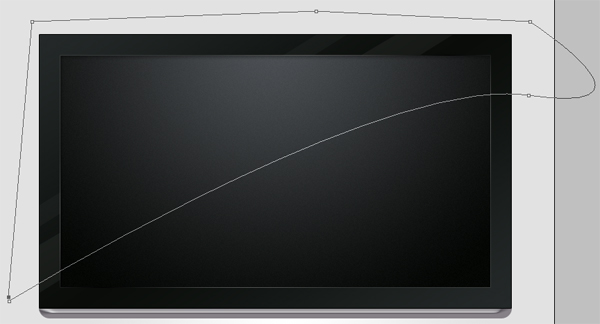 Fill the path with the color white (#ffffff) and set the layer’s Opacity to 1%. We now need to remove the excess shine that exceeds past the screen.
Do this by clicking the little thumbnail image of the “tv screen” layer in your Layers Panel whilst holding down the Ctrl/Cmd key on the keyboard—this should create an automatic selection around it. Make sure the “screen shine” layer is highlighted in the Layers Panel, go to Select > Inverse, and then hit the Delete key and the excess should now be removed. 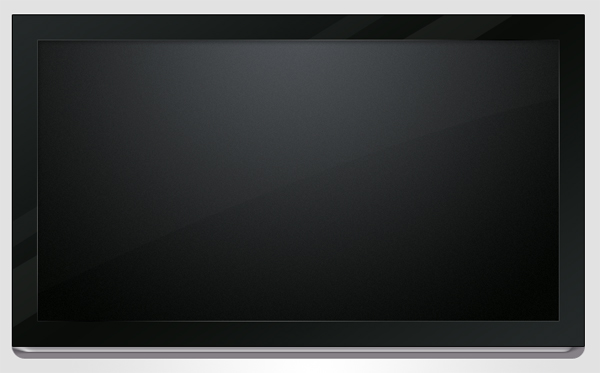
Step 9: Creating the webcam
To give our monitor an interesting detail, we will draw a webcam on the top center part of its bezel.
Select the Elliptical Marquee Tool (M) and on a new layer labeled “webcam1”, drag out a small circular selection in the top center border area of the monitor. Hold down the Shift key to make a perfect circle. 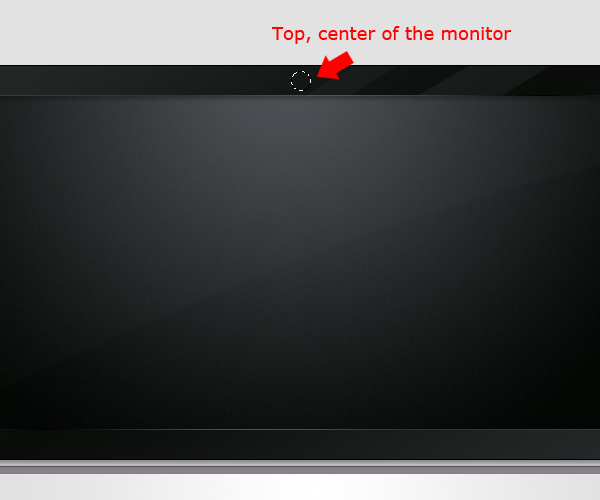 Fill the selection in with black (#000000) then add a drop shadow using the settings below.
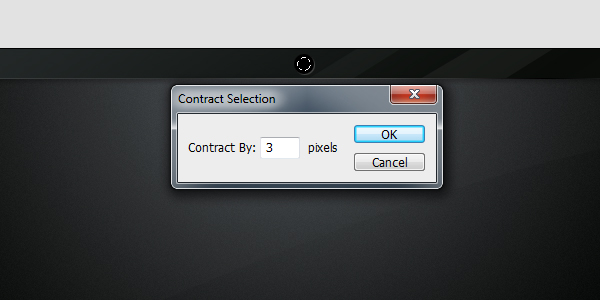
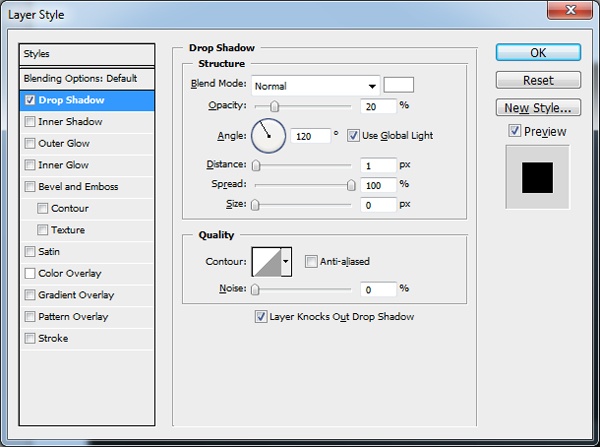 Load a selection around your “webcam1” layer by selecting the layer then going to Select > Load selection. Create a new layer labeled “webcam2”. Next, with the selection we just created still active, contract the selection by 3px by going to Select > Modify > Contract.
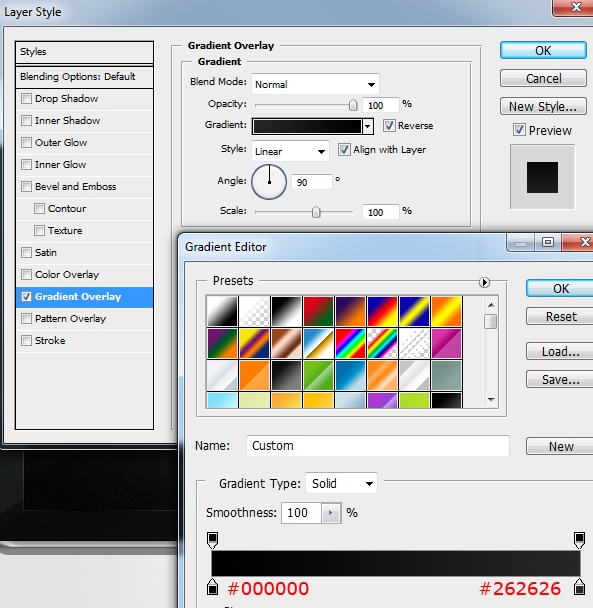
  Fill the selection with any color then add a gradient overlay using the settings below.
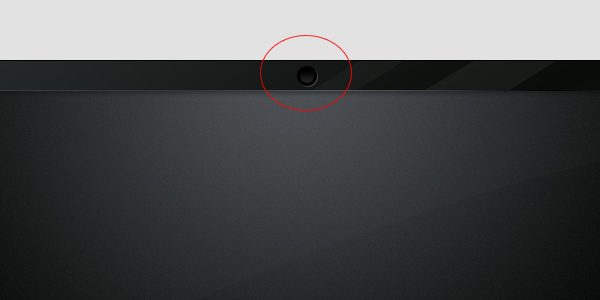 Load a selection around your “webcam2” layer then contract the selection by 3px.
Create a new layer and label it “webcam3”, then fill your selection with a grey color (#4e4e4e). 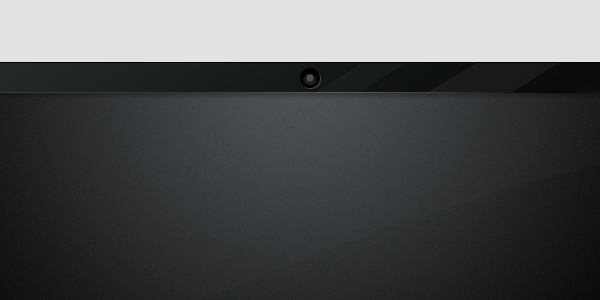
Step 10: Creating the chrome shine
Select the Elliptical Marquee Tool (M) then drag out an ellipse with the same height as your chrome bar at the bottom of your monitor. Fill the selection on a new layer labeled “chrome shine” with white (#ffffff).
 Deselect the selection by pressing Ctrl/Cmd + D, then blur the ellipse by going to Filter > Blur > Gaussian Blur.
 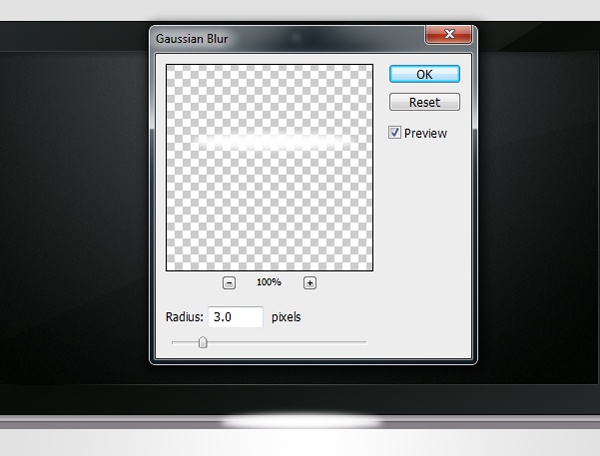 Once you’ve blurred the ellipse, use the Free Transform command (Edit > Free Transform or by pressing Ctrl/Cmd + T) to pull out the left and right anchor points to spread the ellipse across the chrome bottom. Also, drag the bottom anchor point up to reduce the size of the shine.
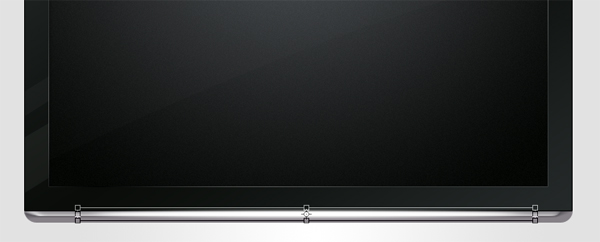 Move the shine down a touch so that it lines up nicely with the chrome bottom.
 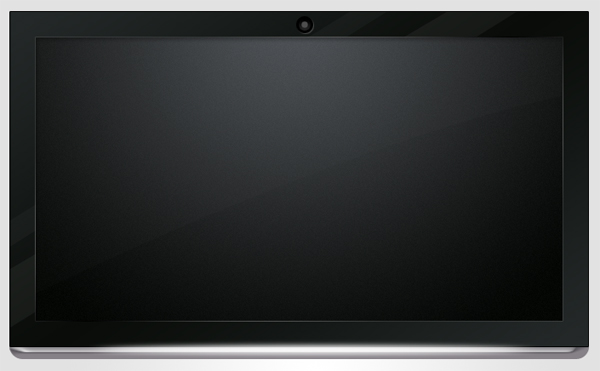 Tip: To increase the shine intensity you can also add an outer glow to the ellipse.
Step 11: Creating the glowing LED
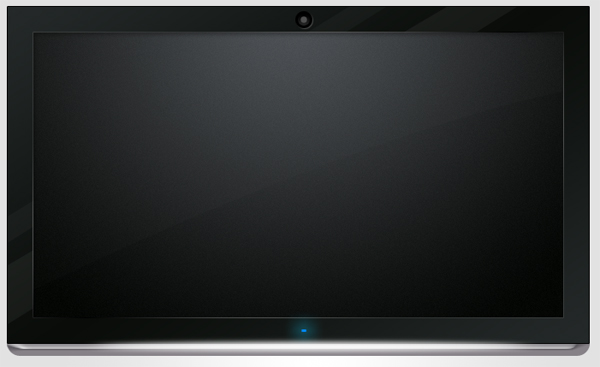
Most monitors have an LED light to indicate that it’s turned on; to make our LCD monitor as realistic as possible, we’ll add a glowing LED light at the bottom center of our monitor’s bezel.
To begin, create a new layer and label it “LED light”. Select the Rectangular Marquee Tool (M) and drag out a small 6x3px rectangle at the bottom of the monitor. 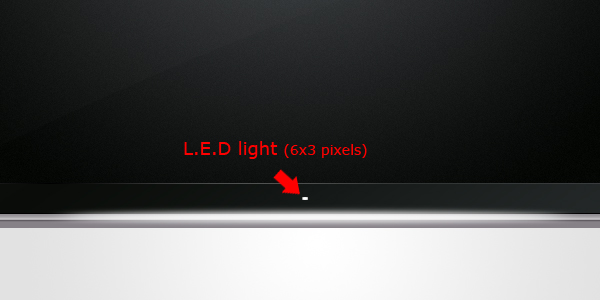 Now add an outer glow and color overlay to your “LED light” layer to finish off the effect.
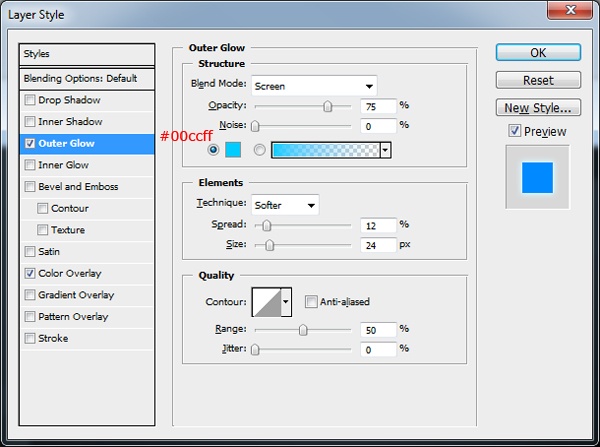
Outer Glow Layer Style
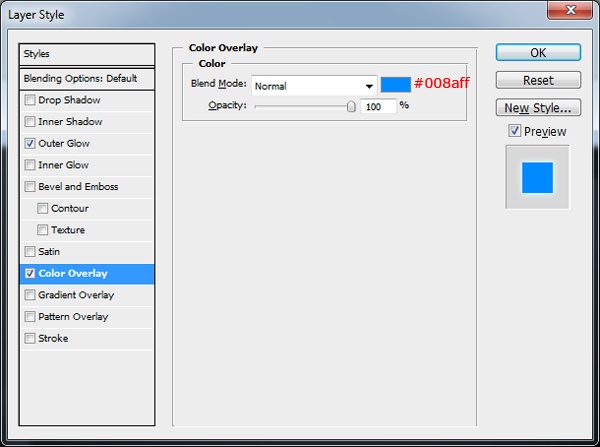
Color Overlay Layer Style
Step 12: Design the monitor buttons
We will now give our monitor some controls so that its user can adjust their viewing settings—again for the purposes of making it as realistic as we can (details count).
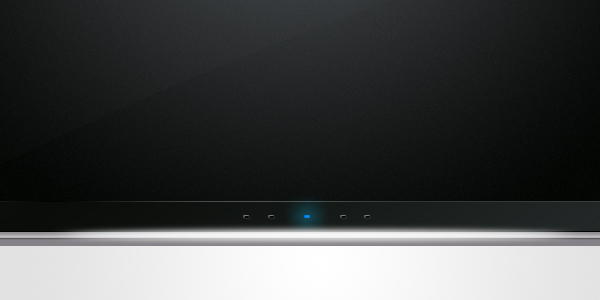
Start by creating four new layers and label each layer as “button 1”, “button 2”, “button 3”, “button 4” to keep our work tidy. Using the Rectangular Marquee Tool (M), create the same 6x3px rectangle as we did for the LED light. Place two buttons on either side of the LED light spaced equally apart.
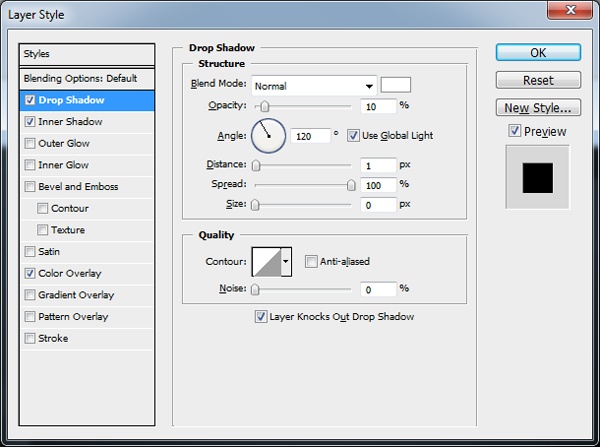
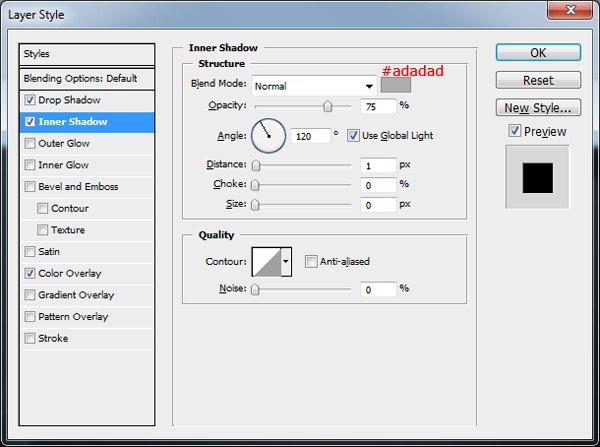
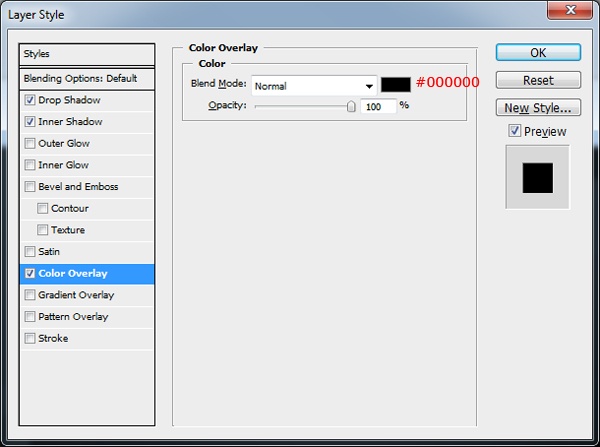
Tip: To keep the buttons aligned perfectly, experiment and utilise the Layer > Align commands in Photoshop. 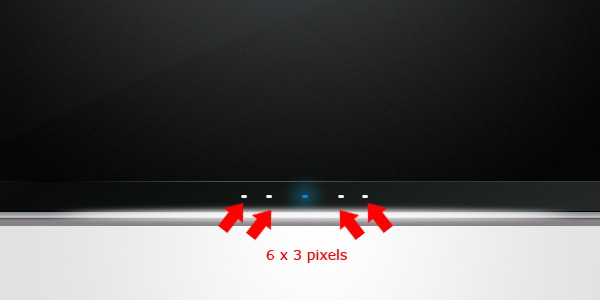 On each of the button’s layers, add a drop shadow, inner shadow, and color overlay.
Drop Shadow Layer Style
Inner Shadow Layer Style
Color Overlay Layer Style
Step 13: Creating the monitor’s stand
Create a new layer underneath your monitor layer, label your new layer “stand top” then select the Elliptical Marquee Tool (M).
Then drag out an ellipse underneath your monitor. 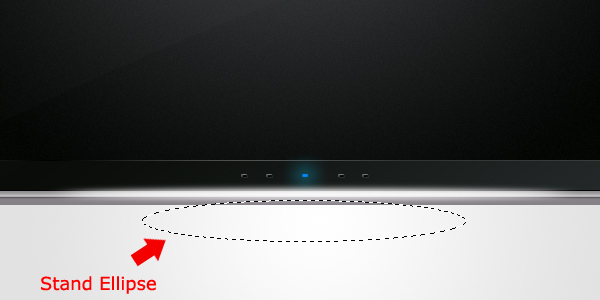 Fill the selection with any color (it doesn’t matter what color you pick because we will be using layer styles to adjust the color later). We are now going to duplicate the ellipse a couple of times to build up the thickness of the monitor stand.
To do this, highlight your “stand top” layer in your Layers Panel, hold down the Alt/Option key on the keyboard and press the Down Arrow key 3-5 times depending on how thick you want your stand to look. Holding down Alt/Option and pressing your arrow key duplicates and moves the layer. Select all the duplicated layers and drag them underneath the original layer (“stand top”).
Here’s how mine looks. I’ve purposely colored my duplicated layers in red to make it easier to see for the purpose of this tutorial. 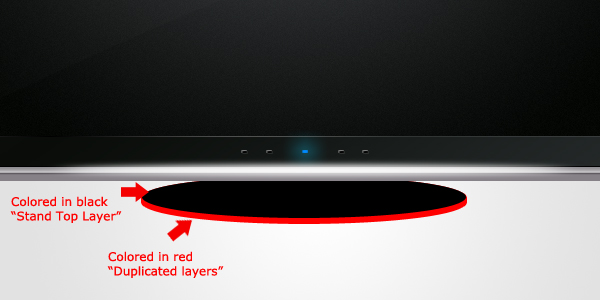 Merge your duplicated layers by highlighting them in the Layers Panel, right-clicking and picking Merge Layers.
Label your new single layer “stand bottom”. We’re now going to add a gradient overlay to our “stand top” layer. 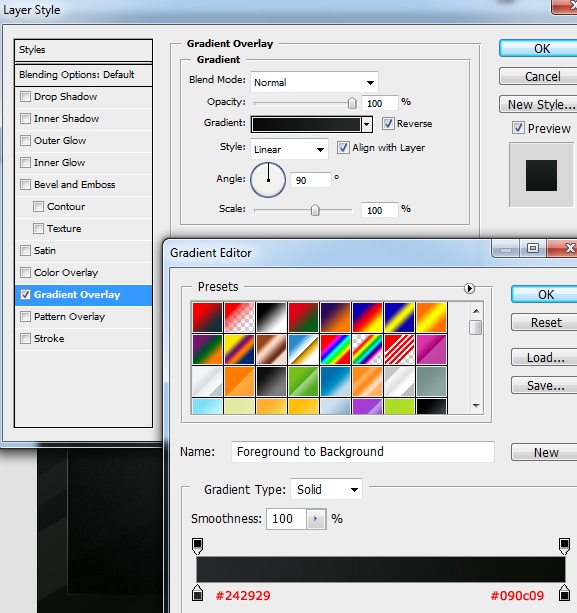 Once you have added your gradient overlay to “stand top”, add the following layer styles to your “stand bottom” layer.
Gradient Overlay Layer Style
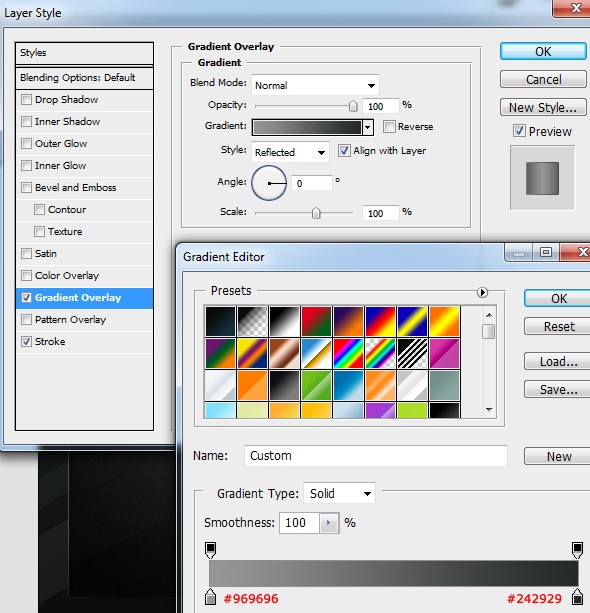
Stroke Layer Style
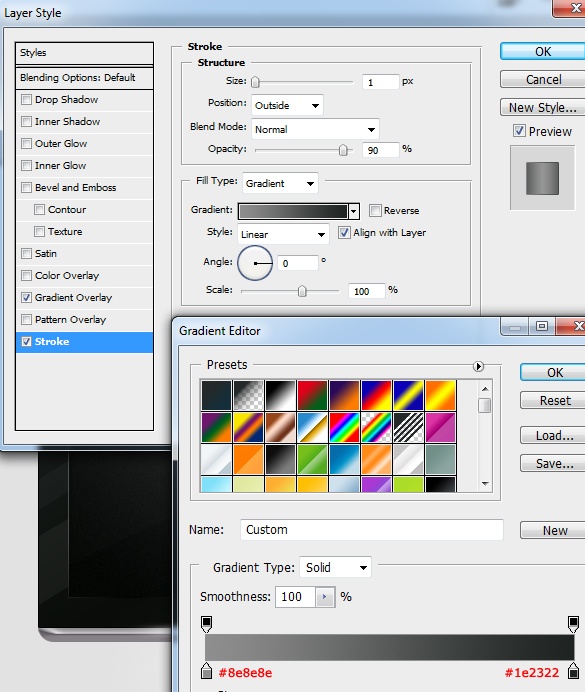
Step 14: Make the stand’s neck reflection
Select the Rectangular Marquee Tool (M) and on a new layer labeled “stand neck”, drag out a rectangle starting from underneath the monitor, down to the bottom of the stand.
Fill the selection with black (#000000). 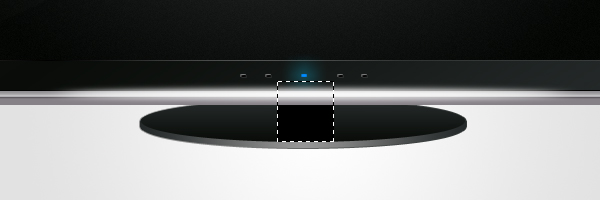 Add a layer mask to your “stand neck” layer by clicking the Add layer mask button at the bottom of the Layers Panel.
 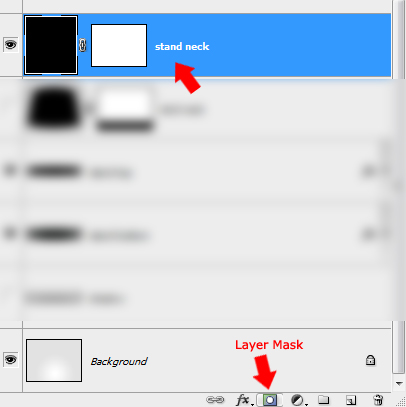 Drag a linear gradient from the bottom of the rectangle upwards with the Gradient Tool (G).
The effect you are looking for is to have the bottom of the rectangle blend into the stand. 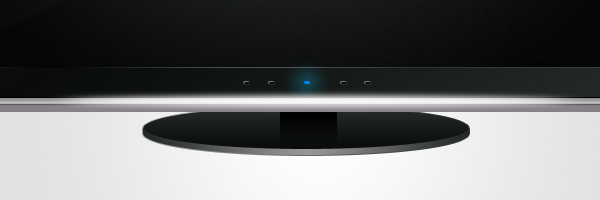 We are now going to adjust the stand neck’s perspective so that the base of the neck is wider than the top portion of it. Make sure your “stand neck” layer is selected then go to Edit > Transform > Perspective.
Drag the left or right anchor point outwards just a little bit. 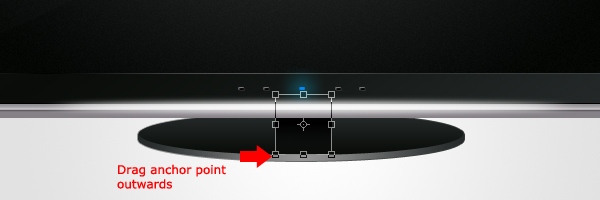
Step 15: Creating the stand’s highlights
Let’s give the stand some more details. Choose the Elliptical Marquee Tool (M) and make a new layer labeled “stand highlight”. Next, drag out a thin ellipse somewhere in the middle bottom of your stand.  Fill your selection with white (#ffffff) then apply a Gaussian blur by going to Filter > Blur > Gaussian Blur.
 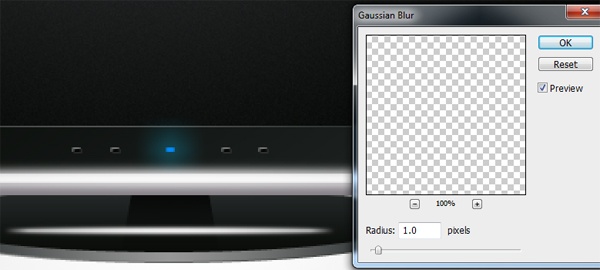 Once you have applied the blur, use the Free Transform command (Ctrl/Cmd + T) to modify the shape of ellipse.
You want to drag the top anchor point down to reduce the ellipse’s height—you are looking to make a 2 to 3px horizontal line that’s thicker in the center to be consistent with the monitor’s base. Then, position the ellipse across the stand bottom using your Move Tool (V). 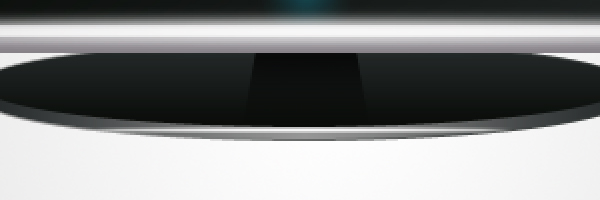 We are now going to match the highlight up with the base of our stand.
Use the Warp transform command (Edit > Transform > Warp). In the Options bar, choose Arc for the Warp option value. 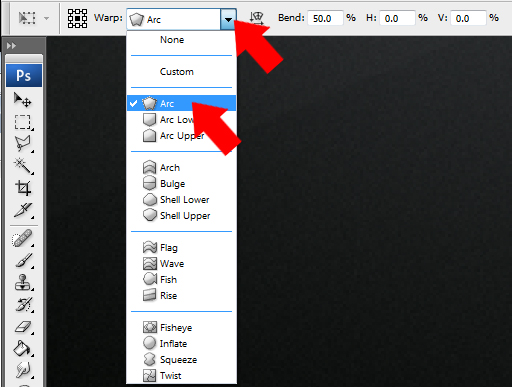 Adjust the Bend % in the Warp command’s Option bar to a value that matches the contours of the base; this will be trial and error on your part until you get value that is a good fit.
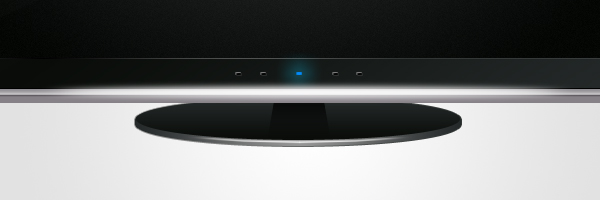
Step 16: Give the monitor stand a shine
Continuing on with the details of our graphic design, we will give the stand a reflective shine. Select the Elliptical Marquee Tool (M) and drag out a big ellipse that covers about 50% of the stand.  Create a new layer and label it “stand shine”. Fill the selection with the color white (#ffffff) and then deselect the selection (Ctrl/Cmd + D). We now need to remove the excess ellipse from the stand. Do this by selecting your “stand shine” layer but loading a selection around your “stand top” layer (by Ctrl/Cmd-clicking on its thumbnail).
Go to Select > Inverse then hit the Delete key. Finally, set the “stand shine” layer’s Opacity to 5%. 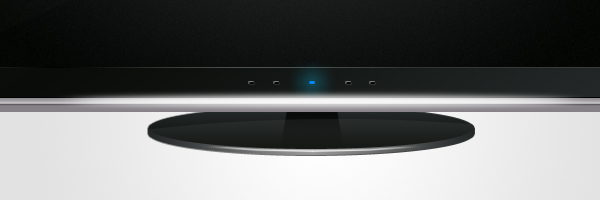
Step 17: Create a shadow at the base of the monitor
Using the Elliptical Marquee Tool (M), make a big selection underneath your monitor but crossing the stand; the selection should also be the same width of the monitor (roughly).
 Fill the selection on a new layer labeled “shadow” and fill the selection using the color black (#000000). Set the layer’s Opacity to about 5%. Finally, blur the ellipse using the Gaussian blur filter at about 3 to 5px Radius.

Tutorial Summary
In this graphic design tutorial, I showed you a way of creating an LCD monitor using easy techniques such as using selection tools and shape tools like the Ellipse Tool. We used a couple of Free Transform commands to modify objects to get it shaped the way we need to. To color in our artwork, we just used layer styles (color overlay and gradient overlay).
I hope you enjoyed following along this tutorial, and I look forward to your thoughts, questions, and comments. 
Download Tutorial Source Files
- lcd_monitor_design (ZIP, 1.03 MB)
-
 Trevin serves as the VP of Marketing at WebFX. He has worked on over 450 marketing campaigns and has been building websites for over 25 years. His work has been featured by Search Engine Land, USA Today, Fast Company and Inc.
 -

WebFX is a full-service marketing agency with 1,100+ client reviews and a 4.9-star rating on Clutch! Find out how our expert team and revenue-accelerating tech can drive results for you! Learn more
Make estimating web design costs easy
Website design costs can be tricky to nail down. Get an instant estimate for a custom web design with our free website design cost calculator!
Try Our Free Web Design Cost Calculator
Table of Contents
- Preview
- Step 1: Create Your Document and Background
- Step 2: Draw the LCD Monitor’s Bezel
- Step 3: Add the Monitor Bezel Layer Styles
- Step 4: Add the Bottom Chrome Layer Styles
- Step 5: Create the Monitor’s Shine Effects
- Step 6: Draw the Black Screen
- Step 7: Make the Monitor Screen
- Step 8: Adding a Screen Shine
- Step 9: Creating the Webcam
- Step 10: Creating the Chrome Shine
- Step 11: Creating the Glowing LED
- Step 12: Design the Monitor Buttons
- Step 13: Creating the Monitor’s Stand
- Step 14: Make the Stand’s Neck Reflection
- Step 15: Creating the Stand’s Highlights
- Step 16: Give the Monitor Stand a Shine
- Step 17: Create a Shadow at the Base of the Monitor
- Tutorial Summary
- Download Tutorial Source Files


Web Design Calculator
Use our free tool to get a free, instant quote in under 60 seconds.
View Web Design CalculatorMake estimating web design costs easy
Website design costs can be tricky to nail down. Get an instant estimate for a custom web design with our free website design cost calculator!
Try Our Free Web Design Cost Calculator

