
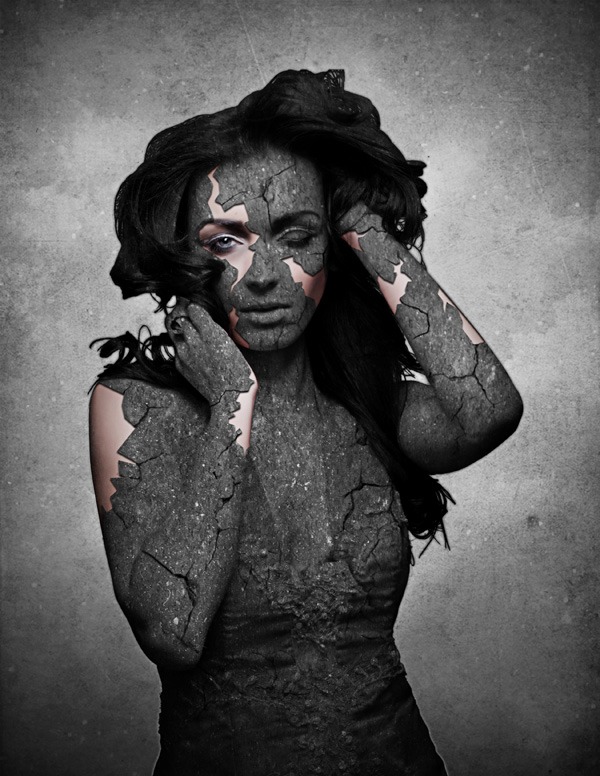
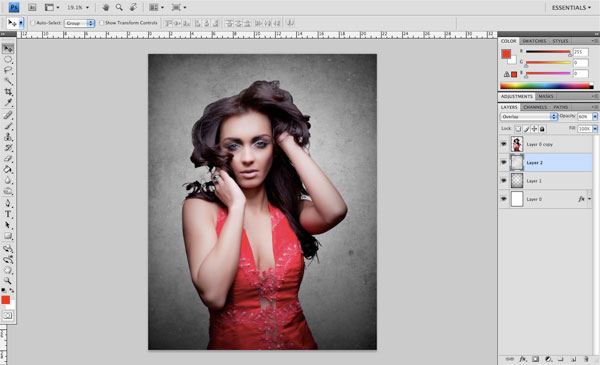
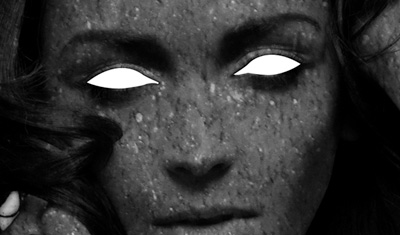
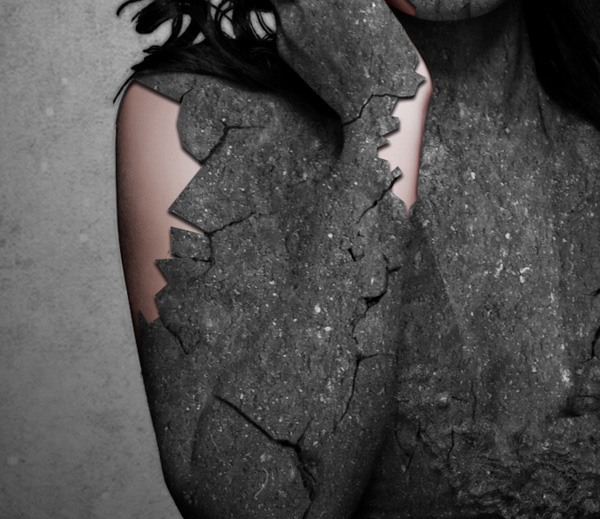
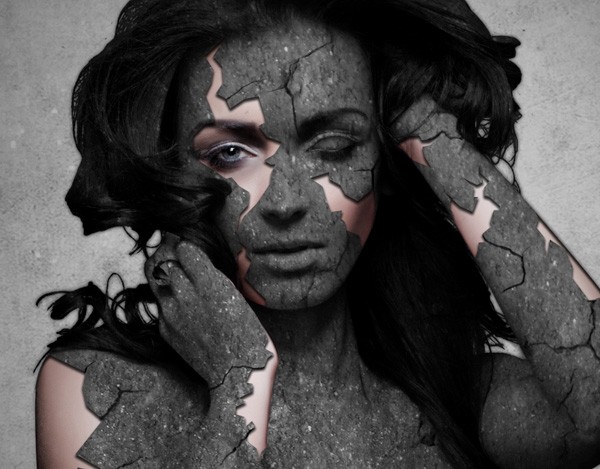
Preview
Click on the image below to see the full size.

Tutorial Resources
- Stock image: Makeup & Fashion on iStockphoto
- Textures: Texture Pack 04 (Paper texture pack) by AnOrderOfFishSticks
- Texture: rock texture 1 by Mardukex
- Brushes: Crack Brushes i by Hawksmont
- Texture: Free Nebula Dust Texture by Zerofiction
Step 1: Isolate the Subject from the Background
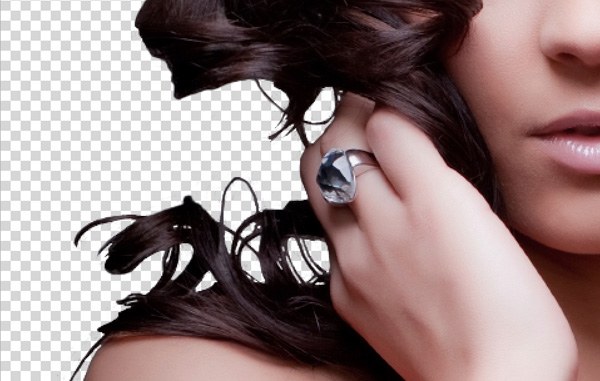
First, pick a stock photo of the model you want to feature. It’s best to pick a stock photo with a flat background so that you can easily extract the subject from it.
I used the Makeup & Fashion stock photo from iStockphoto. We want to open up our stock photo in Photoshop as we are going to need to remove her from the background.
I know that when working with photos such as this, that the hair can be particularly tricky to deal with. The good news is that this really gets easier the more you do it and practice it.
If you happen to be fortunate enough to have a tablet, then that will make the job much easier. I am using a Wacom 9×12” tablet and what I’ve done is create a layer mask (Layer > Layer Mask > Reveal All) on top of the stock image.
I zoom in very closely using the Zoom Tool (Z) and begin to trace around the model, brushing the mask with a solid black brush to hide the extraneous background elements. There are of course other ways of achieving the same result and it is best to use the method that you feel most comfortable with for this step.
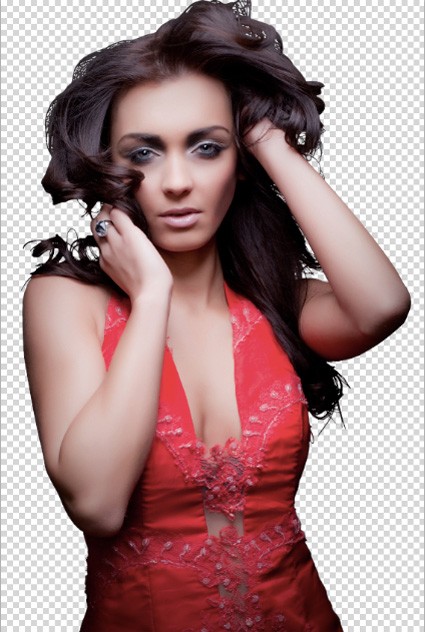
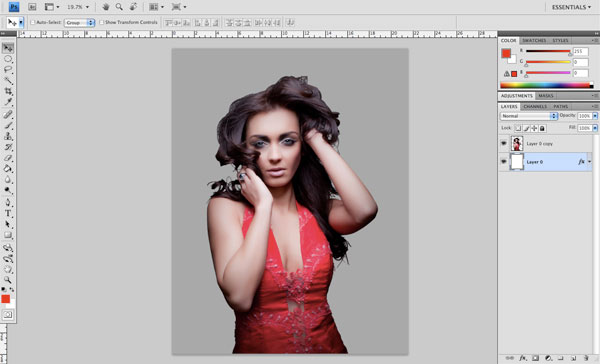
Step 2: Create a New Photoshop Document
Now that we have isolated our subject, we are going to create a new Photoshop document — I have chosen a standard paper size (8.5×11”) where I have moved my image over.
Double-click on the default Background layer to unlock it, and double-click again to bring up the Layer Style dialog window. Check off the Color Overlay box on the right to apply this layer effect.
For the color, use a mid-tone gray (#a9a9a9) which should work nicely.
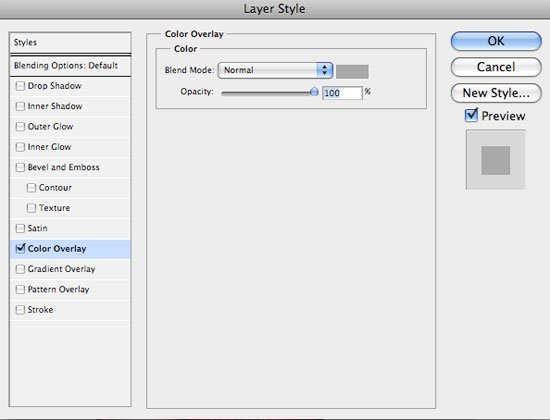
Once you have selected the color, click OK to accept the changes. You should now have something like the image below.
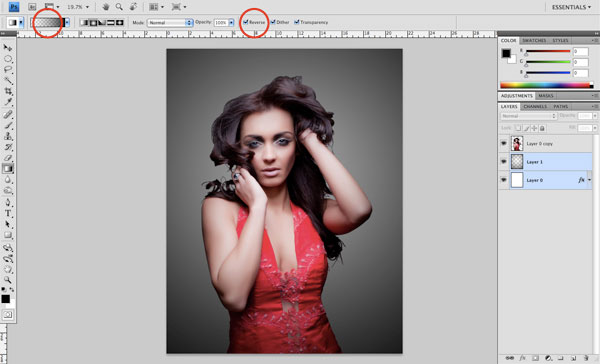
Step 3: Darkening the Edges
Create a new layer between the Background layer and the layer containing the image of the model. Select the Gradient Tool (G) from the Tools Panel and then you should be able to find the Options Bar for the Gradient Tool.
Make sure to select a gradient that goes from solid black to transparent, and also check off the Reverse option.
Create a fairly large gradient fill on this layer — you may have to resize it a bit using Free Transform (Cmd/Ctrl + T) so that the fade occurs only around the four sides of our image. You could also do this manually with a large soft brush, but I find that by using the radial gradient, you can ensure that the fade is even on both sides.
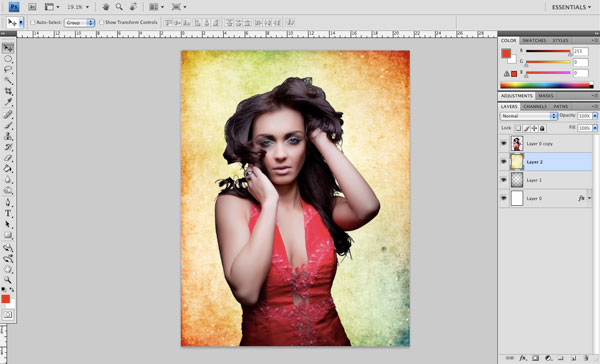
Step 4: Building a Grunge Background
Next, we will be using one of the awesome Grunge Paper Textures by AnOrderOfFishSticks. For this image, I am going to be using the 5.png file from the texture pack, but feel free to use any of the paper textures that you like the most.
Drag the texture image into your document and scale it up so that it spans across the entire dimension of the canvas.
Once you have enlarged the paper texture, we are going to desaturate this layer (Image > Adjustments > Desaturate).
A quick way of desaturating an image is to use the shortcut keyboard shortcut: Shift + Cmd/Ctrl + U.
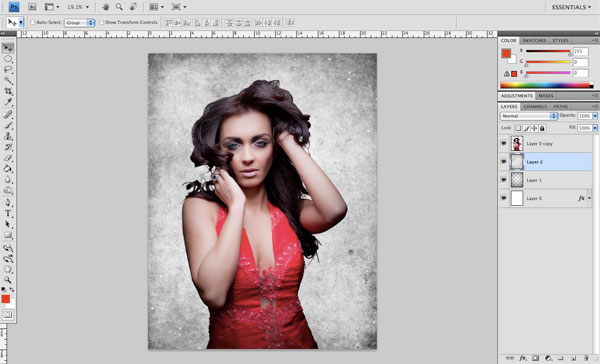
After desaturating the texture, the last thing we want to do for now is to change the blending mode of this layer to Overlay and reduce the Opacity to about 60%. By doing this, the grunge texture will be a little bit more subtle rather than using the colorful variation that we started with. If you haven’t already done so, this would be a good time to save your work.
Save, save, and save again… just in case! Don’t lose the work you’ve been slaving on for hours.
Step 5: A Bit of Styling
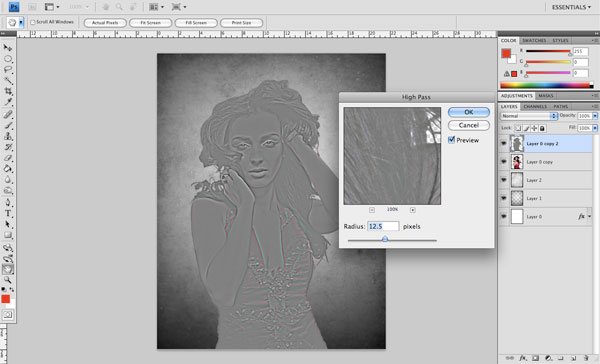
Duplicate the image of the model by selecting the layer and then pressing Cmd/Ctrl + J (shortcut for Layer > Duplicate Layer).
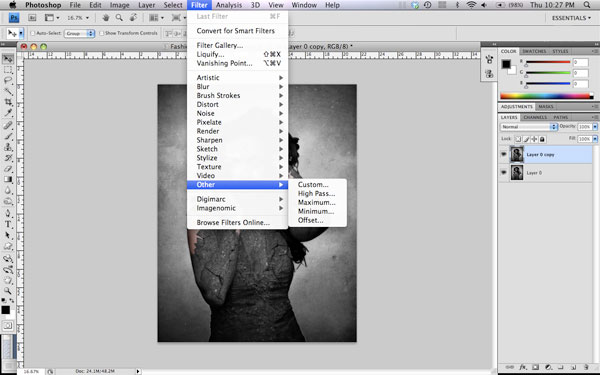
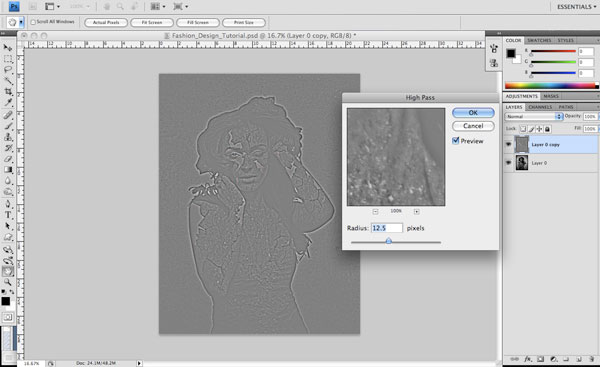
Next, go to Filter > Other > High Pass and then set the Radius to 12.5 before clicking OK to apply the filter.
After applying the High Pass filter, we will once again apply another filter. Choose Filter > Blur > Gaussian Blur with the Radius set at 5.
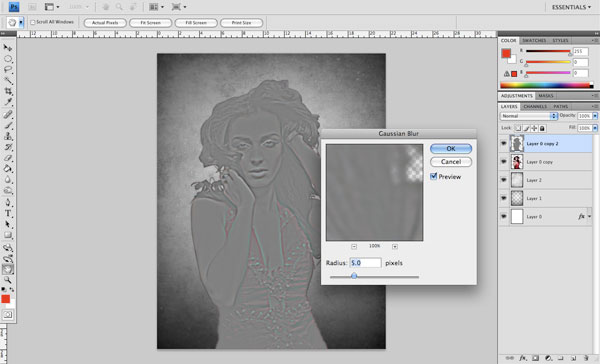
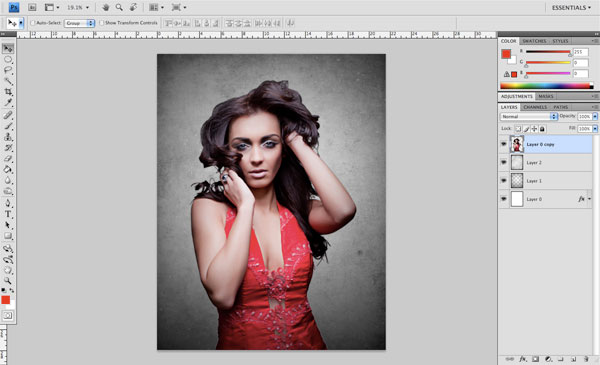
After applying both filters, change the blending mode of the top image to Overlay and merge it (Layer > Merge Down) with the layer beneath (which should be the original image of the model) by pressing Ctrl/Cmd + E. You should notice a subtle softening effect on the model, particularly on her face and the details of the dress.
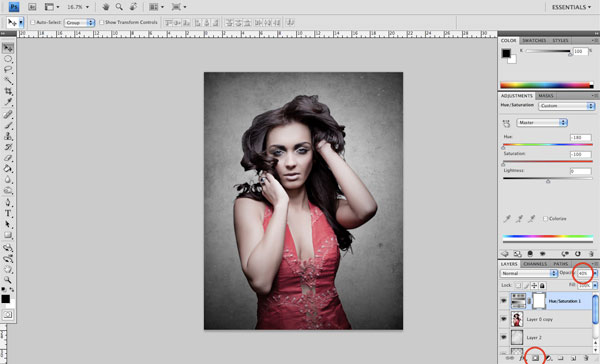
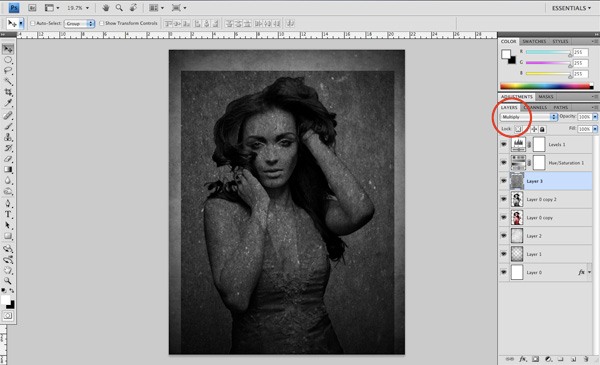
Step 6: Apply a Hue/Saturation Adjustment Layer
Press on the black and white icon (Create new fill or layer adjustment) at the bottom of the Layers Panel and then select Hue/Saturation. This will bring up the Hue/Saturation Panel.
Slide the Saturation option’s slider all the way to the left side to desaturate the image of the model. Lower the Opacity of this Hue/Saturation adjustment layer to about 40%.
Adjustment layers will affect everything below it but will maintain the quality/integrity of those layers (i.e. it is non-destructive and will not permanently alter any layers).
Conversely, if we had applied the effect directly to the image, we run the risk of degrading the quality and being stuck with something that we can’t later undo. By doing it this way, we aren’t actually applying an effect to the photo of the model.
Just so you can see the effect of the Hue/Saturation adjustment layer, I have placed a before and after image below.
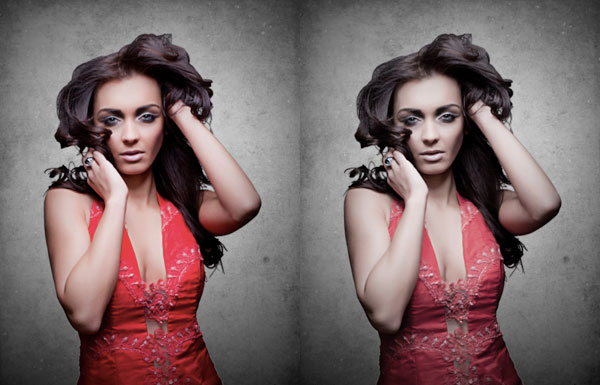
As you can see, it’s not an extremely drastic change that we are applying, but it gives the image a slightly washed-out look, helping us create a mood/tone that will help to make the image feel more cohesive and unified.
Step 7: Add a Levels Adjustment Layer
Once again, we are going to press on the Create new fill or layer adjustment button at the bottom of the Layers Panel, but this time we will choose Levels. You will then see a dialog window that shows us the histogram.
What we want to do here is to boost the contrast (the dark colors) a little bit more.
To do this, grab the middle gray slider and set the position to 0.86.
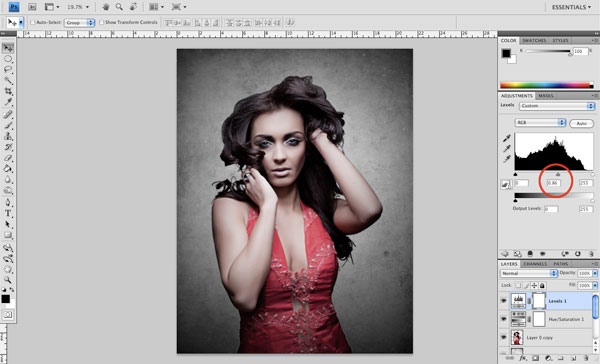
Even though we have slightly desaturated the image of the model, we don’t want to completely lose the nice contrast between light and dark colors. Modifying the levels is a great way to bring some of that contrast back into the image. If you were to move this slider the opposite way, we would be brightening the image and giving it more of a lighter feel.
I would encourage you to play with this option more as most photos can benefit from a bit of an adjustment (unless it has already been touched up or was taken with flawless lighting).
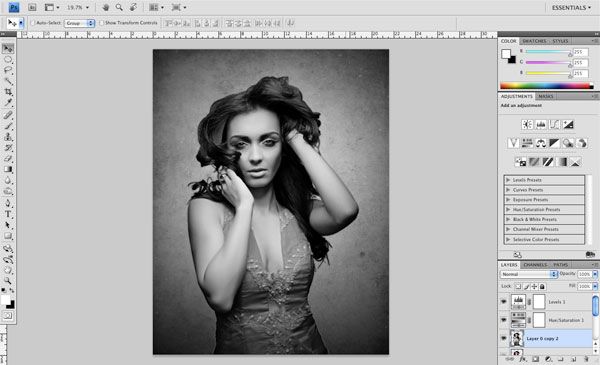
Step 8: Duplicate and Desaturate
Select the layer with the model and press Cmd/Ctrl + J to duplicate the layer. After that, go to Image > Adjustments > Desaturate (Shift + Cmd/Ctrl + U) and drag the Saturation option’s slider all the way to the left.
Step 9: On the Rocks
Open up Rock Texture 1 in Photoshop then drag it into your document. I have rotated the rock texture 90 degrees (Edit > Transform > Rotate 90o CW) and enlarged it slightly using Free Transform (Ctrl/Cmd + T) to ensure that it entirely covers our model.
When you are happy with the orientation and size of the rock texture, change the blending mode of its layer to Multiply.
Step 10: Making Your Selection
Hold down Ctrl/Cmd and then click on the model’s layer in the Layers Panel to put a selection around her. You know you’ve selected the subject properly if you see an active selection that is indicated by the marching ants (as I like to call them).
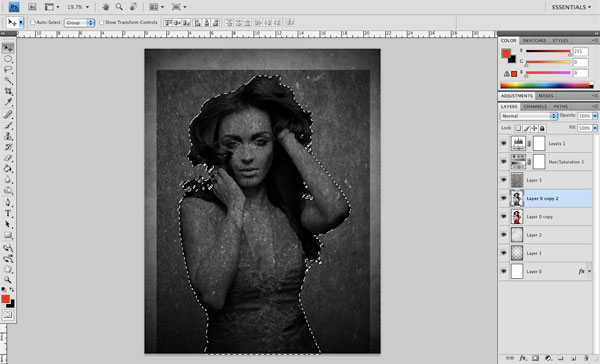
With this selection still active, click on the layer above containing the rock texture to make it the active layer, and then click on the Add layer mask button at the bottom of the Layers Panel.

Step 11: Merging the Two Layers
Next, hold down Cmd/Ctrl and click on the mask we have just created on the rock texture layer. You should then see a menu where you will want to select Apply Layer Mask.
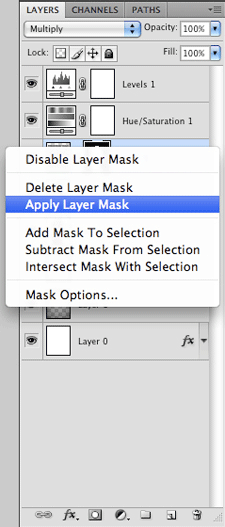
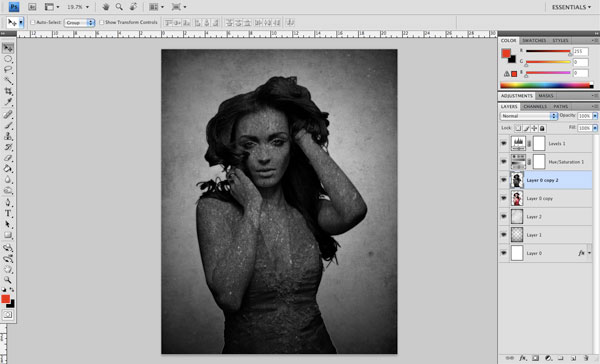
After applying the layer mask, we are going to merge this layer (Ctrl/Cmd + E) with the desaturated image of the model below it.
Step 12: Eyes Made of Stone
Using the Pen Tool (P), make a selection around both our subject’s eyes, one at a time.
When you have the selection finished, create a new layer and fill this selection with white.
Next, select the Stamp Tool (S) and sample some of the rock texture before creating a new layer above the white eyes. Start to fill in this area on the new layer until the white area is completely covered.
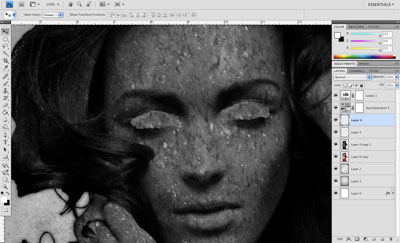
Hold down Cmd/Ctrl and click on the layer containing the eyes that are filled with solid white. This layer’s content should be hidden at the moment because of the textured layer on top, but that is okay!
When you make the selection, you will see the marching ants again to indicate the area around the eyes has been selected. While this selection is active, click on the layer containing the rock texture fill over the eyes, just on top of the white eyes.
Next, click on the Add layer mask icon at the bottom of the Layers Panel. You can now get rid of the “white eyes” layer as we have now trimmed the rock texture layer that covers the eyes.
We want to minimize the number of layers that we will ultimately end up with so that we don’t end up with an unwieldy PSD, but at the same time, by separating them as we have just done, it makes the process easier when dealing with selections and layer masks.
Create another new layer above the eyes and while holding down Ctrl/Cmd, click on the eye layer to create a selection.
Grab a medium-sized, soft round brush with a low opacity setting (18-22% should be good) and begin to brush around the edges of the eyes on the new layer.
The goal here is to add some shading around the eyes to add some depth.
At this point, we can merge the shadows with the eyes and the rock texture-filled image of the model. We should still have the color version beneath these merged layers, so your Layers Panel should look like this:
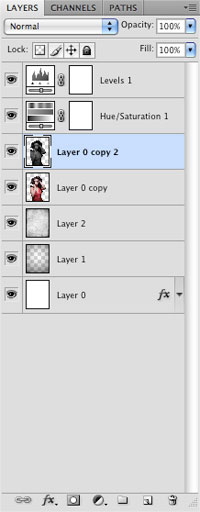
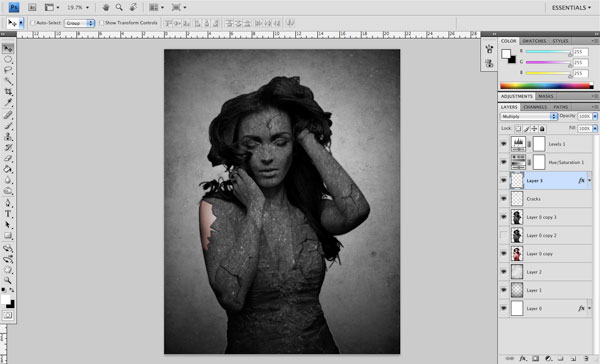
Step 13: Add Some Cracks
Next, we are going to create a new layer above the layers with the image of the model. Download and install the Crack Brushes i brush library.
Set your brush tip to one of the crack brushes and then use a solid black color to paint a few cracks here and there on top of the image.
The idea is to apply your brush strokes sparingly and only use them in a couple of areas. The reason for this is that we want to save some of the larger areas for the subsequent steps where we are going to have larger chunks of the statue falling off to reveal the model beneath.
Step 14: Breaking Away
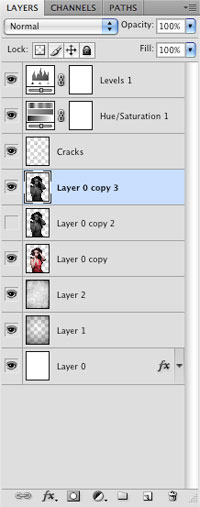
We want to prepare to make some larger areas that will break away and reveal the girl underneath in order to give the illusion that she is breaking free from her stone confines. So what we will do before that is duplicate the rock texture girl layer and then turn off the visibility of the original layer.
We are doing this so that we can retain the statue layer in its current state in case we need to go back to it at any point. Your Layers Panel should look like this:
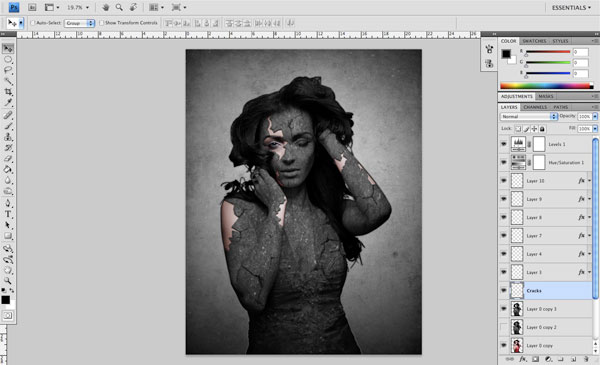
Create a new layer above the “Cracks” layer where we painted in some cracks in the statue earlier. On this new layer, we are going to use the Pen Tool (P) to create some large shapes on top of the other layers and fill it with a solid white color.
These are going to be the areas where we will reveal the model below. We want the shapes we are creating to be jagged, organic, and random — and by no means neat, precise or calculated.
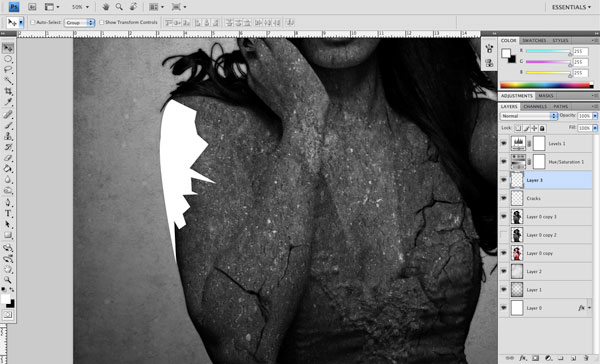
Once you have created your first shape, change the blending mode of its layer to Multiply.
Double-click on the layer to access the Layer Style dialog window and add an Inner Shadow with the following settings:
- Opacity: 75
- Angle: 90 (and check off Global Light)
- Distance: 7
- Choke: 8
- Size: 8
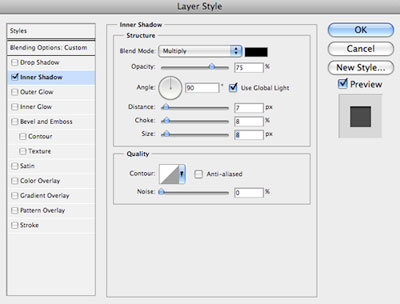
Click OK to apply the Inner Shadow effect.
Next, hold down Cmd/Ctrl and then click on the shape layer. This should make a selection around the shape. While you still have this selection active, choose the rock texture girl layer that we duplicated.
Press the Delete key to erase this selection from the rock texture layer. You have now subtracted this shape area from the duplicate copy.
By applying the Inner Shadow layer effect, it will make it look as though the broken statue has some space between it and the figure beneath, which is exactly what we want.
Continue this process by creating a new layer, making some selections and filling them with solid white.
You can copy and paste the layer style from the first shape we created rather than inputting the same values each time.
Change the blending mode to Multiply, then hold down Cmd/Ctrl and click the shape to activate the selection. Delete the selected area from the duplicated rock texture girl layer simply by hitting your Delete key.
This may seem like a complex process at first, but after you try it a few times, you will get the hang of it, and it really won’t seem so hard.
As you go along, try to be mindful of where some of these larger cracks will appear.
I have gone back and used the crack brush set in a few places because in order to depict a more realistic breaking, we must think of how concrete would actually crumble and crack. By this, I mean that we will essentially want to add some thinner lines around the larger areas to show them sort of leading up to the bigger breaks. Notice on the left arm (our left, her right) that I have added a few of these thinner lines around the large break.
You can erase the pieces of the brush strokes that you don’t need, but feel free to transform and rotate them until you are satisfied with the result.
Once you are satisfied, you can merge it together with the other brush strokes on the “Cracks” layer.
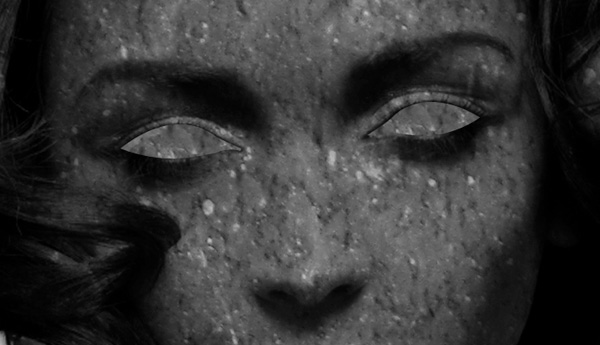
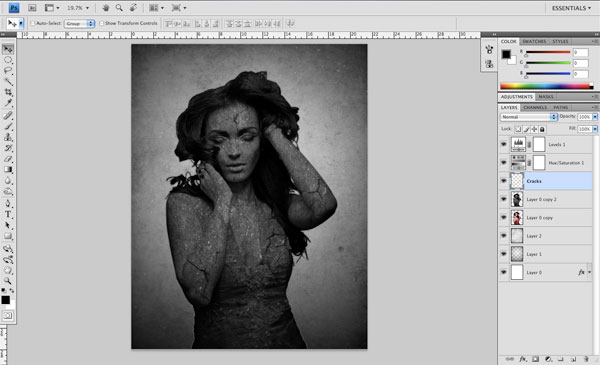
Step 15: Coming to the Surface
As we add additional shapes and cracks around the larger areas (as we have done in the previous steps), you will see we are gradually building up the image. At this point, I am hoping that you will have something similar to what I have below:
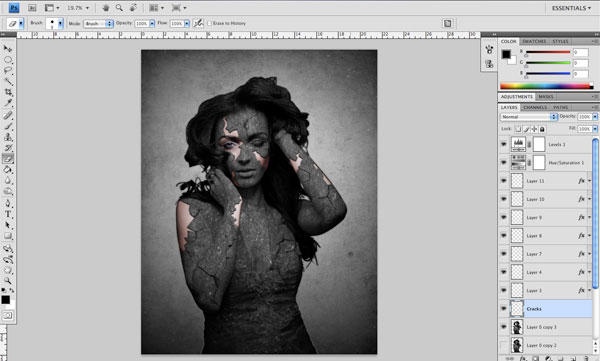
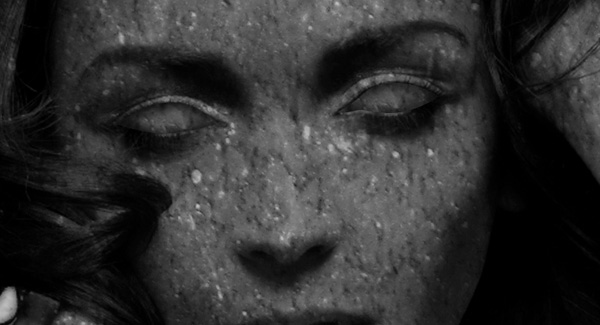
You can take as little or as long as you would like on this part, but I have spent some time adding more and more details to the piece until it really starts to come to life. Here are a few close-up shots so that you can see where I have added some additional details around the larger areas:
Step 16: Make It Shine
Next, we are going set our Foreground color to a solid white color and create a new layer above all of the cracks and images of the model.
Select the Gradient Tool (G) and make a radial gradient that fades from solid white to transparent. Set the blending mode of this layer to Overlay and reduce the Opacity to about 30%.
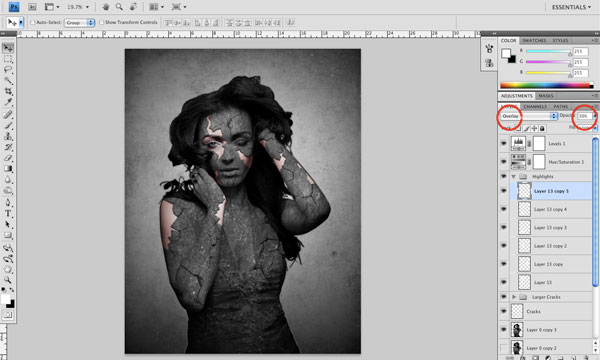
Duplicate the white-to-transparent gradient layer a couple of times and move each one to a different spot in the image where you want to bring out some of the detail and add a bit of contrast. This is more of a subtle technique that will enhance the detail of the image.
Step 17: Add an Additional Texture
Now it’s time for us to add a bit of extra texture to the piece.
Open up the Free Nebula Dust Texture in Photoshop. We are going to desaturate this image by pressing Shift + Cmd/Ctrl + U (Image > Adjustments >Desaturate). Once you have done that, drag the image into your document.
We want to add this nebula dust texture all the way at the bottom of our layers, so that it’s the second to last layer.
You may have to scale the image up a bit so that it covers the background. After that, we want to set the blending mode to Screen.
At this point, only the original background layer should be beneath it.
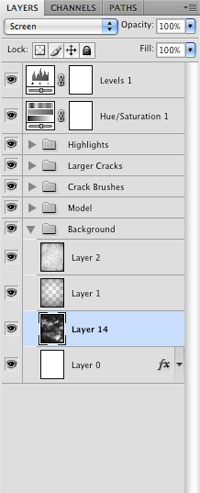
You will notice from the image that I have organized some of my layers just by grouping them in folders. This isn’t absolutely necessary, but it is good practice and can save you time when looking for a particular layer or group of layers later on.
Step 18: Smoothing It Out
As the final step, we will process our scene to enhance it.
First, we are going to need to save our document (Ctrl/Cmd + S) just to make sure that everything is up to date and that we have a backup in case things get hairy in this phase. Once you’ve saved your PSD, flatten the image so that all of our layers are merged (Layer > Flatten Image).
Make a copy of this flattened layer (Cmd/Ctrl + J) to duplicate the artwork. Next, go to Filter > Other > High Pass, setting the Radius to 12.5 before clicking OK to apply the filter.
Afterwards, choose Filter > Blur > Gaussian Blur and apply the filter with a 3-pixel blur Radius.
Change the blending mode of this layer to Overlay and reduce the Opacity to 40% to let a bit of the original layer shine through.
You can see the effect by turning this layer on and off, but essentially, we have used a photo retouching technique to sharpen and smooth out the image to add a nice polish to our design.
It may be a subtle difference, but you will notice that some of the details of our model (most noticeably around the eyes) have been sharpened and have been given an extra bit of crispness.
Tutorial Summary
You have now successfully gone through the process of creating a photo manipulation of a beautiful woman breaking free from the confines of her stone prison. We have used stock images to piece together a scene that was built using intermediate-level Photoshop techniques such as adding adjustment layers, selecting with the Pen Tool, and image-processing techniques such as the High Pass/Gaussian Blur filter combination. Thanks for following along and I hope that you have picked up a few new tricks along the way!
Download Source Files
- stone_woman_photomanipulation (41.00 MB)
-
 Trevin serves as the VP of Marketing at WebFX. He has worked on over 450 marketing campaigns and has been building websites for over 25 years. His work has been featured by Search Engine Land, USA Today, Fast Company and Inc.
 -

WebFX is a full-service marketing agency with 1,100+ client reviews and a 4.9-star rating on Clutch! Find out how our expert team and revenue-accelerating tech can drive results for you! Learn more
Make estimating web design costs easy
Website design costs can be tricky to nail down. Get an instant estimate for a custom web design with our free website design cost calculator!
Try Our Free Web Design Cost Calculator
Table of Contents
- Preview
- Tutorial Resources
- Step 1: Isolate the Subject from the Background
- Step 2: Create a New Photoshop Document
- Step 3: Darkening the Edges
- Step 4: Building a Grunge Background
- Step 5: a Bit of Styling
- Step 6: Apply a Hue/Saturation Adjustment Layer
- Step 7: Add a Levels Adjustment Layer
- Step 8: Duplicate and Desaturate
- Step 9: on the Rocks
- Step 10: Making Your Selection
- Step 11: Merging the Two Layers
- Step 12: Eyes Made of Stone
- Step 13: Add Some Cracks
- Step 14: Breaking Away
- Step 15: Coming to the Surface
- Step 16: Make It Shine
- Step 17: Add an Additional Texture
- Step 18: Smoothing It out
- Tutorial Summary
- Download Source Files
Share this article


Web Design Calculator
Use our free tool to get a free, instant quote in under 60 seconds.
View Web Design CalculatorMake estimating web design costs easy
Website design costs can be tricky to nail down. Get an instant estimate for a custom web design with our free website design cost calculator!
Try Our Free Web Design Cost Calculator


