

Drupal is a popular open source content management system. With its powerful and advanced features, you can build complex websites with ease, compared to building them from scratch. With the support of a huge community and a big number of available modules, no wonder Drupal is a system you keep hearing about over and over again.
In this guide, we are going to discover Drupal using a pragmatic approach.
We will create a Drupal site with a custom content type and views.
Ready? Let’s dive right into this immensely powerful content management system.
Objectives
By the end of this guide, you will:
- Learn the benefits and disadvantages of using Drupal
- Install Drupal
- Understand the Drupal back-end
- Learn about Drupal modules
- Explore the Administer page
- Create and publish content
- Create custom content types with the Content Construction Kit
- Create Views
- Create Page view displays
- Create Block view displays
- Learn about Drupal themes
What We Will Create
We will set up and develop a basic Drupal website with a job board that visitors can post job openings and projects to. The intention here is to get you started using Drupal by actually creating a Drupal site instead of just reading about it.
Why Use Drupal?
It is worth a few moments to discuss the benefits (as well as disadvantages) of using Drupal so that you can determine if it’s the right CMS for you.
Pros of Using Drupal
Open source: Yes, Drupal is open source. This means you get all the benefits of using an open platform.
Highly customizable: The main power of Drupal lies in its flexible nature.
You can mould it into any type of content-centered/user-generated site: from a social media site that allows users to submit and vote on content, a forum, a job board, to an image gallery or a service for deploying portfolio sites for designers — Drupal can get it done (with a little bit of work on your behalf, of course).
Big and intelligent community: Drupal has one of the biggest and brightest open source community of supporters, users, and developers. This means great modules, quick bug fixes and core updates, great support, and a never-ending supply of amazing documentation and tutorials on the Web.
Modules: There is a huge amount of modules that extend the capability of Drupal. (We will talk about what modules are a little bit later.)
Developer-friendly: As a web developer, you will never feel any limitations while using Drupal.
Drupal has been built keeping the needs of developers in mind. Some faults of a few mainstream CMSes is that there is a disproportionate focus on the end-user’s interface, and with that, means neglecting or focusing very little on the needs of the people who actually develop and deploy the CMS; this isn’t so with Drupal.
Built-in caching system: Drupal has built-in support for caching your web pages, which helps reduce the load on your web server, as well as speed up page response times. This feature eliminates some resource-intensive database queries, aiding your server in performing better.
Decent built-in search capabilities: Drupal, when compared to many CMSes out there, has a pretty good search feature baked right into its core.
It still would not beat a third-party search API like Google Search or Yahoo! Search BOSS, but it’s still decent enough to use in production.
Cons of Using Drupal
Big learning curve: Yes, it’s a fact that Drupal is a bit harder to grok than other content management systems out there. I will not suggest you use Drupal if you want a website done in a week the first time you use it.
It may take you some months to really understand Drupal, and as much as a month to be able to deploy a fully custom site the first time around. However, I should also note that you can deploy a basic site in less than a day’s worth of work (and that’s what we will be doing in this guide).
Complex for non-developers: Since developers’ needs are prioritized with Drupal, for those that aren’t very familiar with computing technologies, Drupal might take a while to get used to. This means that professionals that only dabble in web development might not find it easy to develop (or even administer) Drupal sites.
Complex user interface: Drupal’s admin interface is a bit difficult to understand; it’s not as user-friendly as it should be.
(That’s going to change soon, though.)
Drupal Versus WordPress
Whenever you talk about Drupal, there is always the inevitable desire to compare it to another leading open source publishing platforms; and that is usually WordPress.
And whenever you suggest that WordPress is not a fully featured CMS and that it is just a blogging platform will always generate a heated debate. I am myself a WordPress developer, but it’s a fact that sometimes WordPress is just not enough.
Rather than spending time in customizing WordPress, it’s the right decision to use a more robust CMS if you’re doing something very complex that involves user registration, authentication, custom permissions, custom user role, highly customized content types for sites such as user-generated social media sites, e-stores, forums, and so forth.
I will not suggest you use Drupal if your client only needs a blog or simple portfolio site with only a few pages and basic content types — it is quicker and easier to build these sites using WordPress. Using Drupal for these purposes seems like overkill.
Another major argument against using Drupal is its user interface, which is emphatically hard to learn for people who are not computer-savvy.
This is a solid point where WordPress wins.
Websites That Use Drupal
For inspiration, here are a few sites that use Drupal.
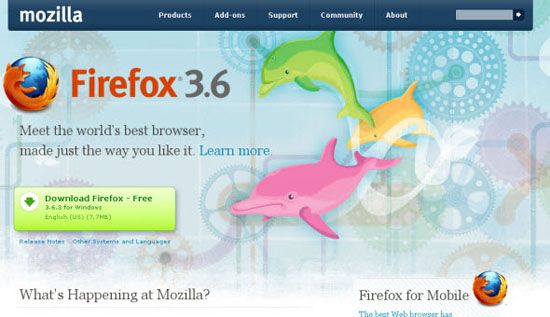
Mozilla
Mozilla, the company behind Firefox, uses Drupal for almost all of its web properties. The official website of Mozilla and Spread Firefox are both built with Drupal.
Spread Firefox

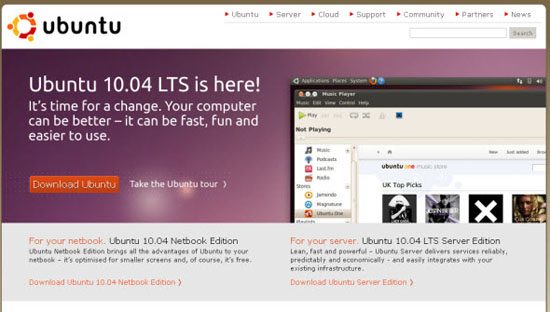
Ubuntu
The official website of Ubuntu, a popular distro of Linux and the operating system that many web servers use, is built on Drupal. Study the enormous nature of the site and the variety of content types and features available on it; you will soon see why Ubuntu chose Drupal.
Want to see more examples?
Check out these other remarkable Drupal-powered websites if you would like to see more.
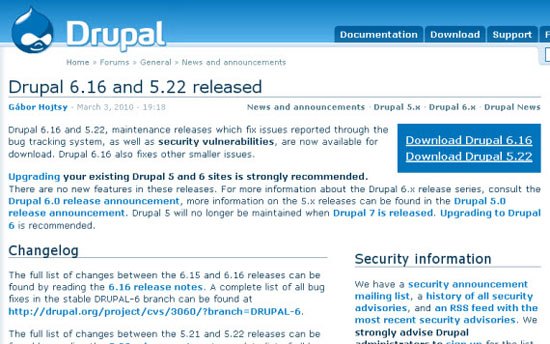
Downloading and Installing Drupal
We will use the latest stable release of Drupal 6 for this guide; download it here.
Installing Drupal on XAMPP
We will install Drupal on our computers, but if you want to install it on a live web server, the process will be the same.
To install Drupal on your local machine, you will need a web server platform like XAMPP or WAMP. Don’t be intimidated if you haven’t heard of them; they are really very easy to install and use.
If you don’t have a local web server platform installed yet, install XAMPP now.
Below is a user-friendly guide written by Jacob Gube (Founder and Chief Editor of Six Revisions) that will get you up and running with XAMPP in no time flat (the tutorial is for WordPress, so just follow the first part of the tutorial, Steps 1-26 tweaking the steps by keeping in mind you are installing Drupal):
This Drupal guide will assume that you are using XAMPP, so you might have to tweak the Drupal installation process if you choose another web server platform package.
Copy the Drupal Files to XAMPP Directory
Copy the Drupal package you downloaded earlier to xampp\htdocs. Extract the files and rename the folder to drupal for easy navigation.
Now go to the xampp\htdocs\drupal\sites\default folder.

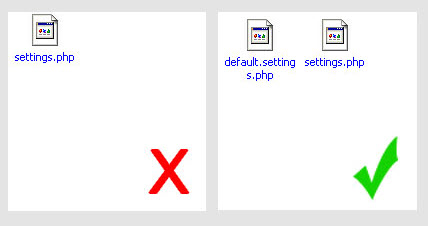
Create settings.php
Make a copy of the file named default.settings.php and rename it to settings.php.
Make sure that you don’t delete default.settings.php otherwise your Drupal installation will throw you an error; this is one of the most common mistakes beginning Drupal developers make.
Create a MySQL Database for Drupal
Drupal uses MySQL to store all the content, so we need to set up a MySQL database for it.
We will use phpMyAdmin — a browser-based MySQL database administration GUI — to make this easier (it comes with XAMPP by default).
Navigate to phpMyAdmin using your favorite web browser via the following URL:
http://localhost/phpmyadmin/
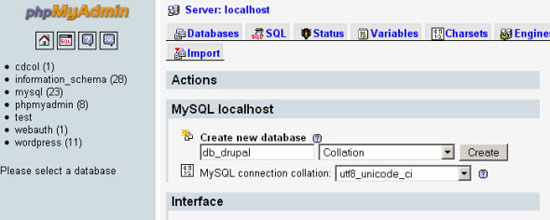
For this example, I named the database db_drupal. You can give the root user permission with all privileges to the db_drupal database so that it can read/write/modify it if you want to save some time, but it’s not good practice to use root in a production environment.
It’s better to create a new dedicated user just for the Drupal database and then only provide the needed permissions; we should do that next.
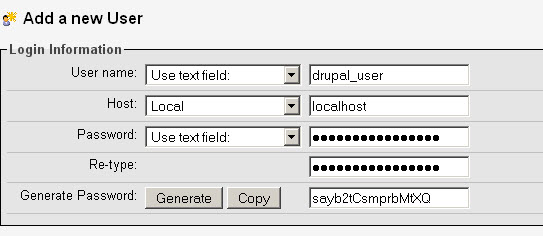
Create a New Dedicated MySQL User for the Drupal Database
For this example, I will create a new MySQL user called drupal_user. For production, it’s not a bad idea to use a user name that is obscure and random to minimize the event of a bruteforce attack being successful.
Definitely do not use root though as that is what most hackers will likely try first because the root MySQL user has super privileges that can access not only your drupal_db, but also your other databases. (In fact, it’s a good idea to delete and not use root at all and instead create a pseudo-root user, but that is another story for another day).
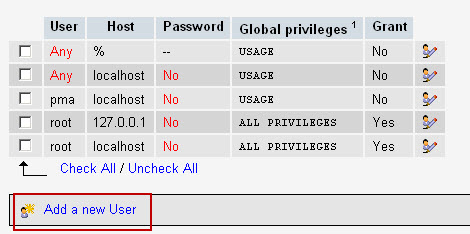
To create a new MySQL user, go to the home page of phpMyAdmin and then click on the Privileges tab.
Now click on Add a new user and then fill out all the required information.
While working on localhost (e.g.
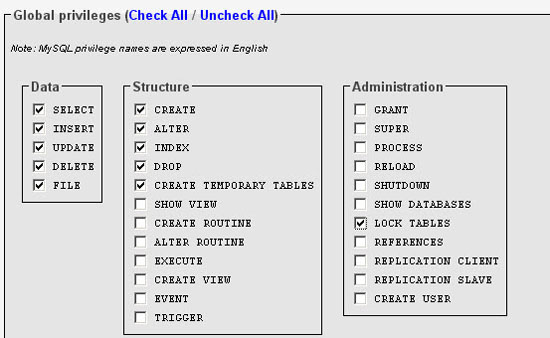
deploying Drupal in our computer using XAMPP), you can definitely select all the privileges, but in production, it is strongly recommended that you select only the privileges that drupal_userreally needs.
In this example, I have selected only those privileges I want drupal_user to have.
- Select
- Insert
- Update
- Delete
- File
- Create
- Alter
- Index
- Drop
- Create Temporary Tables
- Lock Tables
At this point, we are done with phpMyAdmin and any MySQL-related tasks.
Install Drupal Using the Installation Wizard
Now let’s point our browser to the following URL:
http://localhost/drupal
If you renamed the folder in htdocs to drupal, this should work. If not, replace drupal in the URL string above with whatever folder name you used for the Drupal files.
When you navigate to the URL above, you will see the installation wizard of Drupal. You can select the language you want for the Drupal interface in the first page.
Note that this option can be changed later from the Drupal back-end. We will continue with English, so let’s choose “Install Drupal in English”.
In the next screen, Drupal will verify whether your web server (In this case localhost) is able to run Drupal or not. If your web server is missing server applications that are essential to Drupal functioning on it, then it will give an error message.
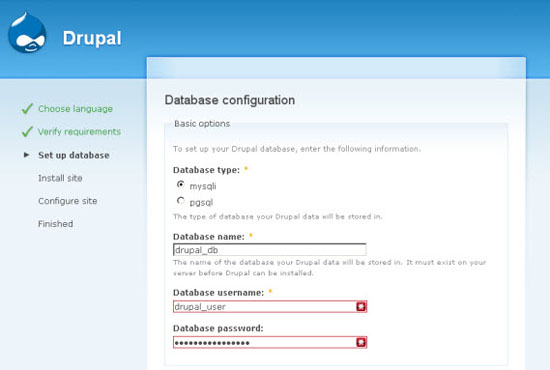
Next, you will see the Database configuration screen.
Here you will have to give all the information you used in creating drupal_db and drupal_user.
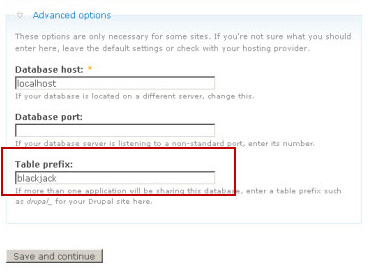
Still in the Database configuration screen, click on Advanced options and you will see an option named Table prefix which will append all Drupal MySQL tables with a string (e.g. blackjack_drupal_table). I recommend you use some random table prefix that will only make sense to you; this is a precautionary security measure to reduce the threat of a SQL injection attack on your databases.
If you have done everything correctly then you will successfully move to the next screen where Drupal will install some necessary modules.
You will be automatically directed to the Configure site screen after this is done.
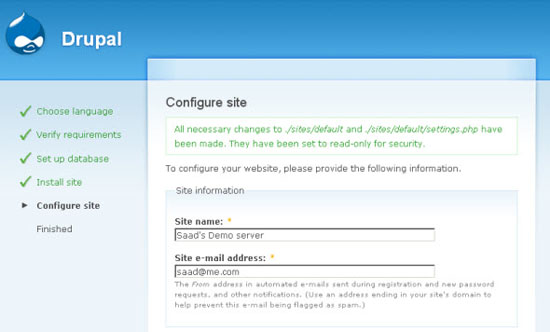
Options on the Configure site screen are mostly self-explanatory, so I will let you fill out the needed information yourself.
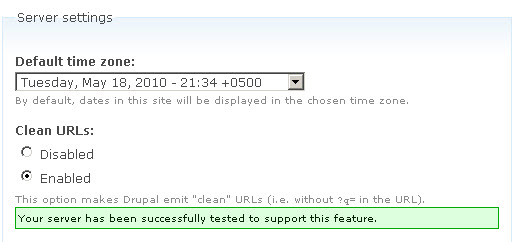
Clean URLs Option
One thing many might not be familiar with is the Clean URLs option under Server settings. By default, the links generated by Drupal are unintuitive like http://localhost/index.php?q=21.
With Clean URLs enabled, your URLs will look nicer and will be more SEO-friendly, such as http://localhost/events.
The Clean URLs option requires mod_rewrite (an Apache module) to be installed in your web server — and it probably is installed already.
If mod_rewrite isn’t installed or running (highly unlikely if you’re on an Apache server), then Drupal will give you an error and you will not be able to use the Clean URLs option. It’s fine and won’t prevent you from deploying your site, but it really is advised for the purposes stated above that you get Clean URLs working as soon as you can.
Installation Complete
If you have followed along correctly, then you will get the following screen.
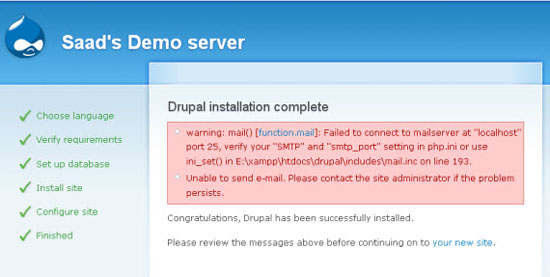
Don’t worry about the error being shown, as it is because if you are doing this on localhost using XAMPP, it just means we didn’t set up a mailserver, and it will not permit Drupal to send emails to administrators.
When you are on an actual server, these things should already be set up for you (unless you built your own web server and don’t have it configured).
Log Into Drupal’s Back-End
Let’s move to the back-end of Drupal.
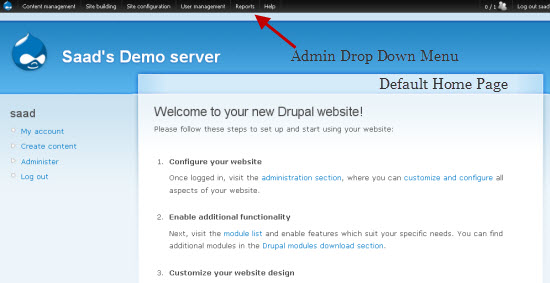
After navigating to your new website at http://localhost/drupal, you will see the following page.
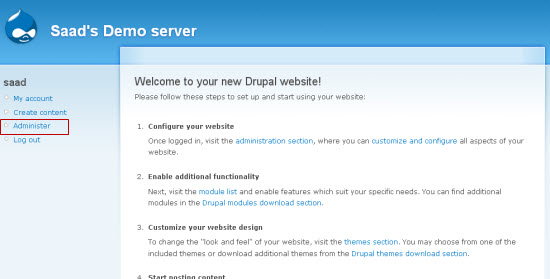
Log in by clicking on Administer.
Now that you have installed Drupal, let’s move on by talking about the concept of modules.
What Are Drupal Modules?
Modules are extensions of Drupal that enhance it with additional functionality.
For example, Drupal comes with a pre-installed module called “System”. In fact, Drupal itself is a group of core modules (which are modules developed and maintained by the Drupal project). The System module is one of them, and Drupal can’t work without it.
How to Add Drupal Modules
Aside from the core modules that come with your Drupal installation, you can download add-on modules from Drupal’s official repository. You can also make your own modules as you advance through your Drupal development skills using Drupal’s module API.
After finding a module you want to install, download it to your computer.
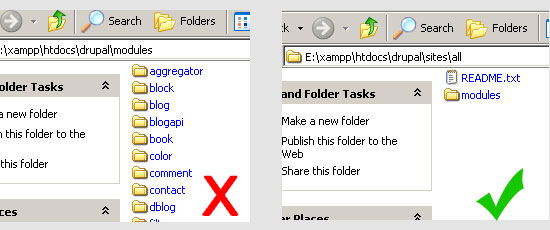
You will have to move the extracted module to the following location:
drupal\sites\all\modules
By default, there is no folder for modules, so you will have to create one manually; create a folder called modules inside drupal\sites\all.
It’s good practice to keep your downloaded modules separate from ones that come with the default Drupal distribution so don’t put add-on modules in drupal\modules.
Installing an Add-on Module: The CCK Module
The CCK (Content Construction Kit) add-on module is a popular Drupal module that allows you to add different types of custom content.
Let’s practice adding modules to our Drupal sites by installing CCK, which we will use later on in this guide.
First, download the appropriate version of CCK and then place it inside drupal\sites\all\modules.
After downloading and placing CCK inside drupal\sites\all\modules, you will need to enable it from Drupal’s administration interface. Go to Site Building> Modules and there you will see CCK. Enable it.
You can enable different sub-modules of CCK if you need them (and we will do so later on in this guide when we start using CCK).
Congratulations! You have just installed a Drupal module.
Drupal’s Administer Page: A Crash Course
When you are in the Drupal Administer page, you will see two ways in which you can view it:
- By task
- By module
If you are in the By task view, you will see the page organized by administration tasks.
For example, in the By task view, under Content Management, you will see all the tasks associated in dealing with your content, such as Content which enables you to view, edit, and delete content as well as Post settings, which controls the behavior and display of your content.
Each task will have a short description below it to help you figure out what it is for.
If you are in the By module view, links are organized by modules.
For example, in the By module view, under the System module, you will see Configure permissions, Clean URLs, Modules, etc.
Learning Curve of the Back-end UI
The administration interface of Drupal takes a lot of time to get used to, but there are plenty of add-on modules that you can download and install to make the administration UI easier to work with.
I suggest installing the Administration menu module, which adds a navigation bar at the top of all your web pages when you are logged in as a site administrator.
Setting Up Your Home Page
It’s time for some action. Let’s build our home page. To do this, we will create our very first content.
Our first post will be of a Page content type. To start, go to Content Management > Create Content > Page.
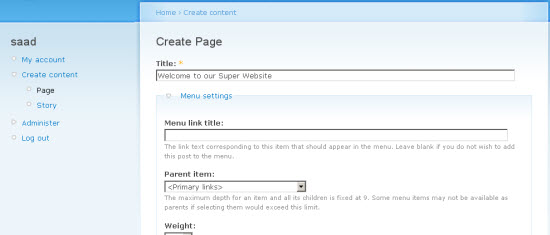
Menu settings
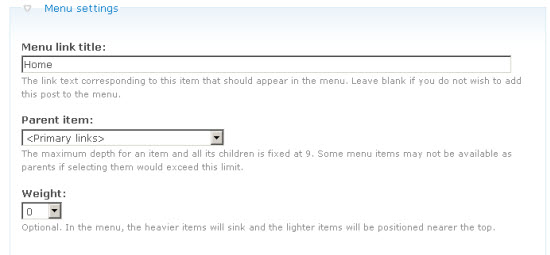
The default Drupal theme has a navigation menu in the top-right corner. The options under Menu settings will decide whether to include the home page link to that navigation or not.
If you would like to add a Home link to your primary navigation menu, select <Primary Links> under the Parent item dropdown menu.
The Weight option allows you to organize your links in sequence.
A link with a lower weight will float to the top of the list.
So if your Home link is 0 and your About link is 5, for example, then your Home link will show up first because it is less heavy.
If your Home link has a Weight option of 0 and your About link also has a weight of 0, then Drupal will make a judgment of organizing your links in alphabetical order, such that since their weight is equal, About will show up first.
In our case, leave the Weight option for your Home link unchanged (its value by default is 0).
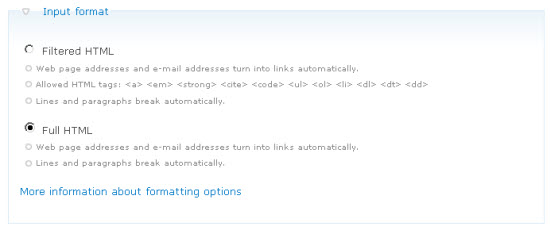
Input format
The options under Input format enable you to choose how you want to enter in your content.
Filtered HTML limits the amount of HTML you can use, filtering out dangerous HTML elements like <script>, which can be exploited for a client-side-based site attack.
Use Filtered HTML if you have site administrators that are not familiar with HTML.
For developers, use the Full HTML option. This input format option assumes that you are well aware of HTML.
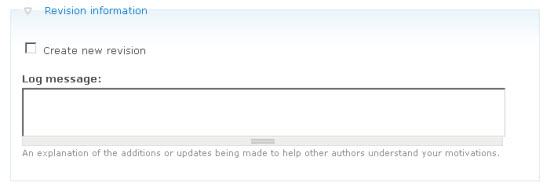
Revision information
If the content of your Drupal website is being maintained by a single person, then this feature may not be useful (unless you’re very forgetful).
If you work with a team of different content creators and you want to save different versions, log changes to content, and make notes of revisions in your content — the Revision information optionst can be handy.
Also, with the Create new revision option checked, it will keep the older version in case you want to restore back to it later.
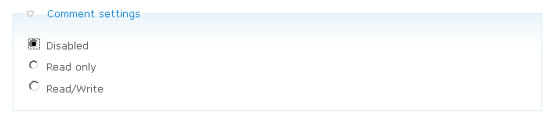
Comments settings
These settings allow you to enable or disable the ability of people visiting your site to make comments on your content. We probably don’t want comments on our home page, so I’ve chosen the Disabled option.
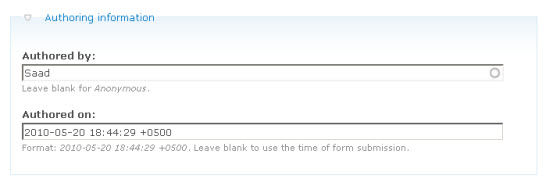
Authoring information
You can change the name of author and time of publishing under the Authoring information options.
You don’t need to fill out these options all the time as Drupal will automatically fill it in if you don’t change the options.
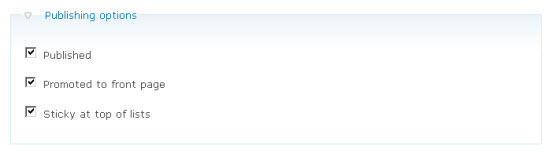
Publishing options
This set of options dictates publishing settings of your content.
- Published shows the status of the content. Uncheck it if you want to un-publish something.
- Promoted to front page will display the page in the front page. Uncheck it if you don’t want the content to be published in your home page.
- Sticky at top of lists will keep your content at the top of the front page and any content listings.
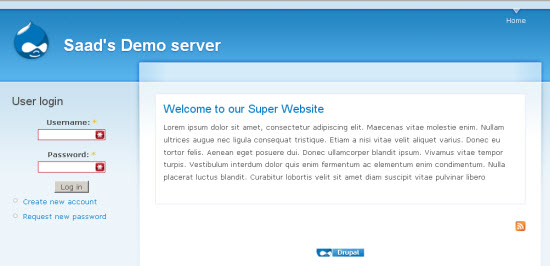
Check Out the Front Page
Here is our home page now; it is still simple, but don’t worry, we will be adding stuff next.
What We’ll Do Next
Now, we will create a job board for user-generated content.
While creating this part of our website, we will be working with custom content types, views and other Drupal features.
What is a Drupal Node?
Before we go any further, we should discuss one of the most befuddling topics for Drupal beginners — and that is the concept of nodes.
A node is the elementary unit of Drupal’s content architecture. In simple words, if we pretend that a Drupal website is a house, the nodes are the bricks of that house. Each bit of content in Drupal is referred to as a node — whether it’s a comment, a page, a forum post, a story, and so forth.
Keep in mind that the Admin and User profile back-end pages are not referred to as nodes as they are created by the system and not by its users.
The node is a very important concept to familiarize yourself with if you want to build complex websites with Drupal.
While the concept of nodes is confusing for Drupal beginners, it’s the core foundation that gives Drupal developers ultimate flexibility and customization options.
To give you an example, let us navigate to the home page content we created earlier. If you take a look at the address bar of your web browser, you will have something like this (note that you might not see this if you have Clean URLs enabled).
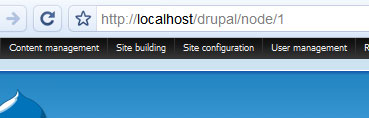
You can see the word “node” in the URL, which is an indication that the page you are looking at is a node.
Creating a Custom Content Type with Drupal
Custom content types are a great way to customize your Drupal site. For each content type, you can control how it is displayed, the user permissions, give it custom attributes — the possibilities are excitingly endless.
Create a “Jobs” content type
For this example, we will create a job board in our website; a place where users can post job vacancies and projects, sort of like a mini-Craigslist.
We will have the following fields for each job posting:
- Job Title
- Job Description
- Department — which will be a drop-down menu
- Experience — A text field
- Salary — A text field
Working with custom content types in Drupal is a piece of cake. First, navigate to Administer > Content types > Add content type.
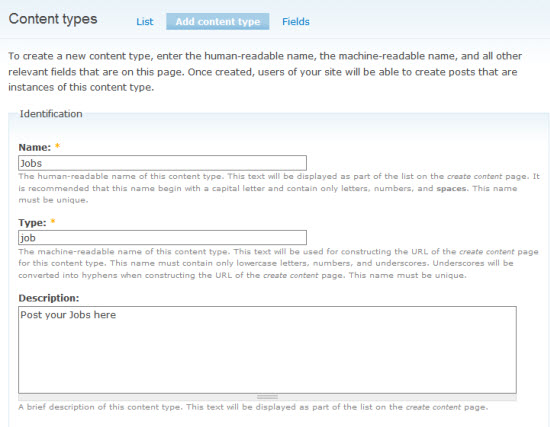
Most of the options in the Add content type interface have descriptions. The one I think is essential to talk about is the Type option.
Type is the machine-readable name of your custom content type that is used in more advanced Drupal development.
For this example, the Type we will assign job posts will be job. This will be important in the future when you become a Drupal ninja master and want to create more complex customizations to your site, such as in the case where you want to create a custom page template for job postings, which you can do by creating a template file called node-job.tpl.php (this topic is out of the scope of this guide).
To move forward, fill out the Title, Type, and Description fields.
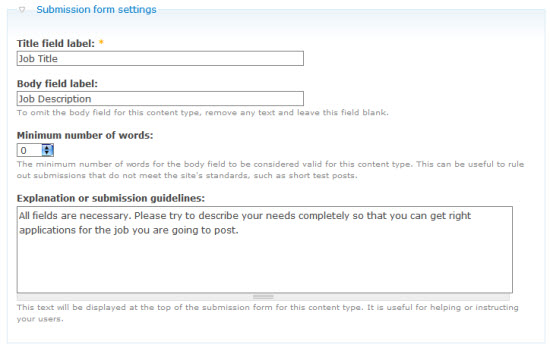
Submission form settings
In this set of options, you will have the ability to create and set up a web form for accepting a job posting; this is what job posters will see when they want to submit information about a job.
Workflow settings
Under the Workflow settings, you will find some basic publishing options for a Job posting that is submitted. If you want the job post to be published without first getting reviewed by a Drupal administrator, then check the Publish box.
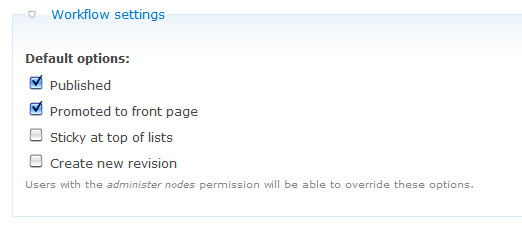
Continue to set up your workflow settings to move forward.
For example, under the Comments settings, you can change different settings for comments in the job posts. If you want site visitors to be able to comment on a job post, turn it off. If you don’t, disable comments.
Create the Jobs Content Type
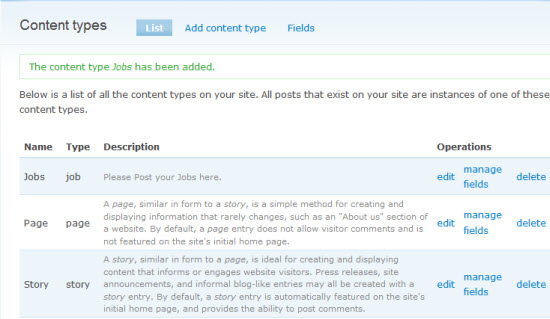
Time to hit Save to create our first content type.
If you followed all the instructions exactly, then you should see Jobs in your Content types list (along with default Drupal content types like Page, Story, etc.)
Customizing Content Types with the Content Construction Kit
So now we have our very own Drupal custom content type. What we will do next is to customize the Jobs submission web form with the help of a very helpful Drupal module: CCK.
CCK is usually the first module most seasoned Drupal developers install on a new Drupal site. Because this add-on module is so important, Drupal 7 will include it as a core module so that you don’t have to download it manually anymore.
You should have already installed CCK at this point because of our exploration of Drupal modules in the beginning of this guide.
Enable Some CCK Sub-Modules
First step in our customization process is to go to Administer > Site Building > Modules.
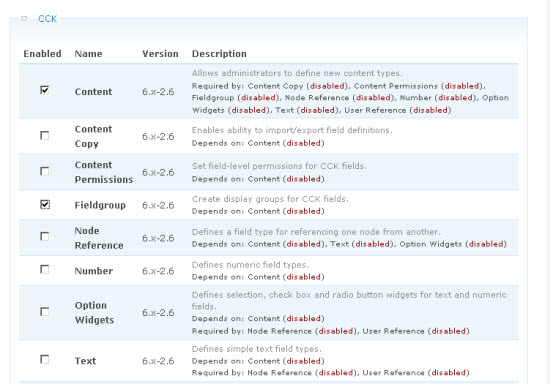
Under CCK, you will find a list of CCK sub-modules; some of them are already enabled (by default), and some of them aren’t.
Why is this so? Drupal is extremely modular, giving you the choice to use only the things you need. Drupal module developers are encouraged to compartmentalize their feature set, which in turn results in less bulky and more resource-conscious add-on modules.
As a Drupal administrator, you should only enable the modules and sub-modules that you are actually using on your site.
For our job posting web form, let us enable the CCK sub-modules we need.
Here are all the sub-modules we need to enable for our Job post web form:
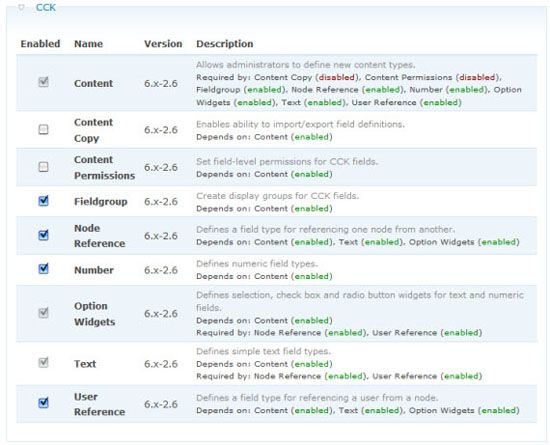
Since we need the user of the form to be able to enter float values (like years of experience needed by the job applicant to qualify for the job), then we will have to enable the Number sub-module.
We also need to enable the Option Widgets, which allows us to add different kinds of web form input fields like checkboxes, radio groups, and so forth.
Each of these sub-modules depends upon the parent module called Content — and you can’t enable a sub-module without first enabling Content.
Add the Form Fields
Finished enabling the CCK sub-modules?
Great, now let’s start modifying our job post submission form.
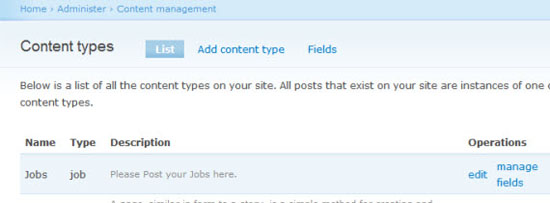
Go to Administer > Content Management > Content Types, then in the Jobs content type, under Operations, and click manage fields — this is where we will add custom fields.
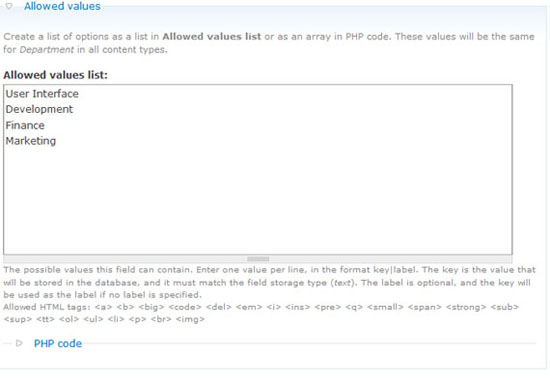
First, I am going to add the Department field, which will permit the job poster to select an option of job types (e.g. Development, Finance, User Interface, IT, Marketing) from a dropdown list.
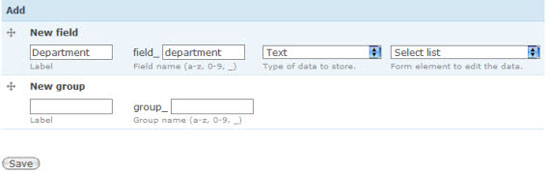
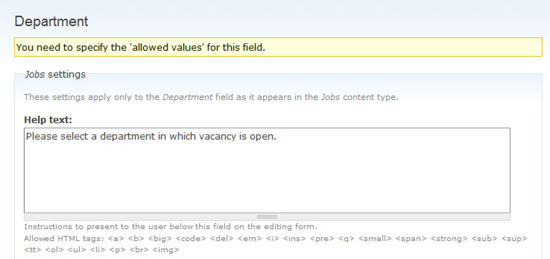
After hitting the Save button, you will be forwarded to a page where you can write allowed values and where you can fine-tune the Department field.
The next field is the Experience field, which is going to allow the input of floating point values (e.g. 3.5 years of experience).

Under Help text, add instructions on how to fill out the Experience field so that the job poster can get a better understanding of how to input the values correctly.
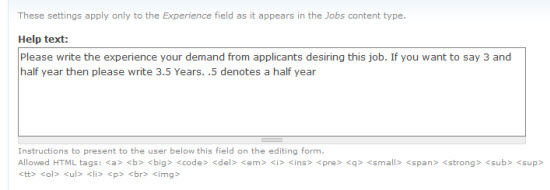
Under Global settings, you can specify valid input values.
For example, under the Minimum option, if you specify 2.3, then a job poster typing 1.4 will see an error.
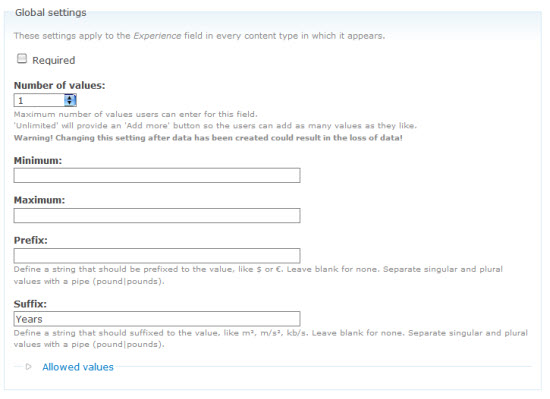
Our last field for our Jobs content type is the Salary field. It can take in an Integer value such as 5000 USD.

Under Global settings, specify 0 as the Minimum because you don’t want people entering negative integers like -1200. (Why not specify something greater than 0? Because entering 0 for the salary might mean that it’s an unpaid job).
After creating all the fields, you should have something like the following image in your Fields view for the Jobs content type.
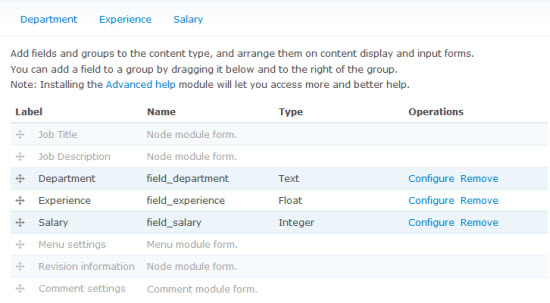
Click and drag on the cross-arrows icon on the left side of each field to reorganize their order.
Create Job Postings
Before moving forward, create some sample job postings by going to Create Content > Jobs. Create a few sample job postings because we will need this data for the next section of this guide.
CCK is Really Powerful
While we have worked with some basic field types here, CCK also allows you very robust ways of taking in content.
For example, you can use the ImageField add-on module to allow people to post an image (maybe you want the job poster to have the ability to show pictures of the office space where the job is located).
Check out this list of available CCK fields if you need custom input fields.
Using the Views Module to Populate the Job Posting Page
Though you can use queries to call out content from your database, that’s a really a complex process even with Drupal’s powerful API.
To help populate the data of a Job post page, we will use Views, which is a module that allows you to call content from your database without writing a single bit of code.
In simple words, it is a user interface for MySQL queries. Views is a very powerful module and sometimes it can be a bit difficult to understand for new users. The best way to learn about Views is to play with it; and that’s what we will do next.
Install the Views Module
Before we begin, we need to install Views.
After downloading, installing and enabling Views, you can access it under Site Building.
Creating the First View
Any listing of data provided by Views is referred as a view.
We will create a view that will show all the available job postings on one page. You can also create attachments, blocks and customizable RSS feeds with Views, but we will keep it simple.
Go to Site Building > Views > Add and type out the fields as shown in following image.
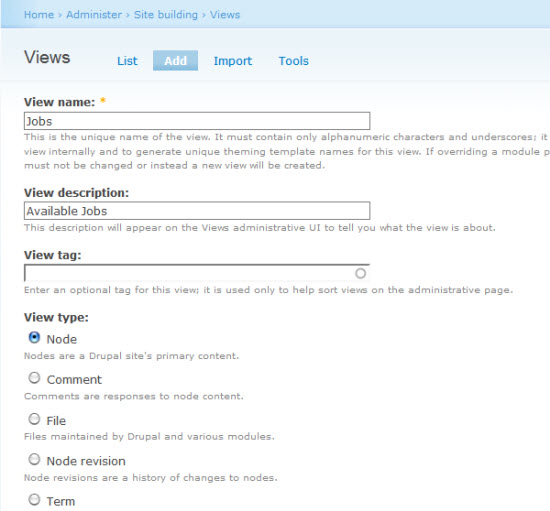
Drupal will show you the actual user interface that is used to create views. Don’t feel overwhelmed, we will talk about the user interface shortly.
What is a Display?
To start customizing our Jobs view, we have to understand what a display is.
Displays present our data in different styles. A view can have multiple displays.
In our Jobs view, we will create 2 displays: a page and a block. We will revisit this topic shortly.
Add Fields to the View
Let us add some fields to our view.
Fields are the content that we want to show on our page. Click on the plus (+) icon under Fields to add fields to your view.
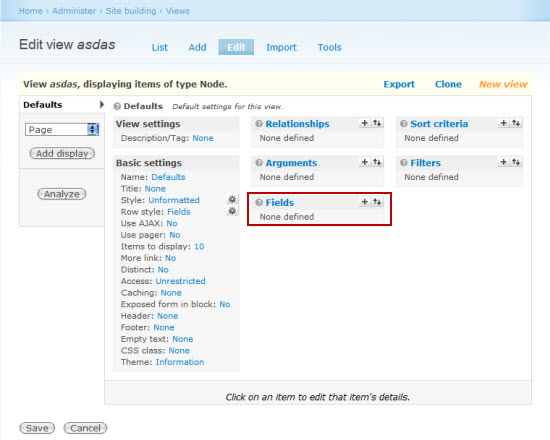
We will show the Job Title, Job Posting Date, Department, Salary and Experience that is supplied through our Job CCK web form.
We will have to select the following fields from the additional box opened at the end of page when we clicked on the plus (+) icon. These are the fields we are interested in:
- Node: Title
- Node: Post Date
- Content: Department (field_department)
- Content: Salary (field_salary)
- Content: Experience (field_experience)

After checking the appropriate boxes, make sure that you hit the Add button so that you can configure each field separately.
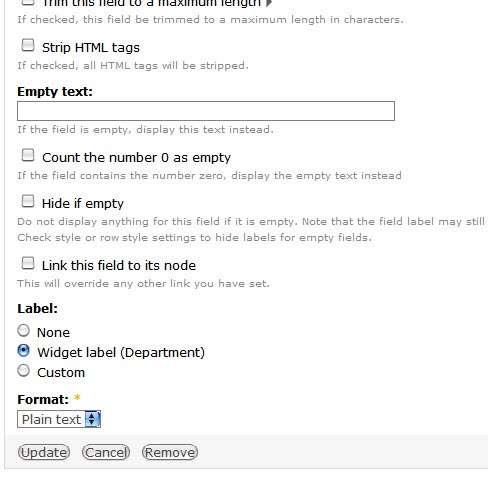
After hitting the Add button, the first option will be to customize Content: Department (field_department). Leave everything as it is except just change the Format option to Plain Text (from Default), and then click Update.
After hitting Update, the next field you will customize is Content: Experience (field_experience). Don’t change the default values; just hit Update. Do the same thing for the Salary field.
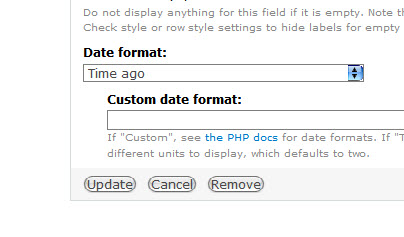
After finalizing your custom fields, the next option is to change the field Node: Post Date. You just have to change the Date Format to Time ago so it shows the number of days the job post has been up (e.g. “12 days ago”).
The next and final field to customize is Node: Title. We just have to check the box that it should be linked to.

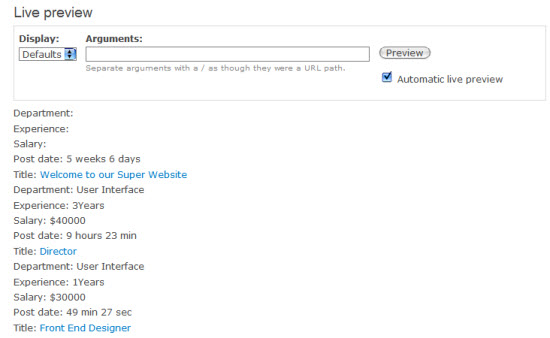
Live Preview Tab
You can use the Live preview tab to see how your view looks like as you make customizations to it.
Basic Settings
Now we will set up our basic settings.
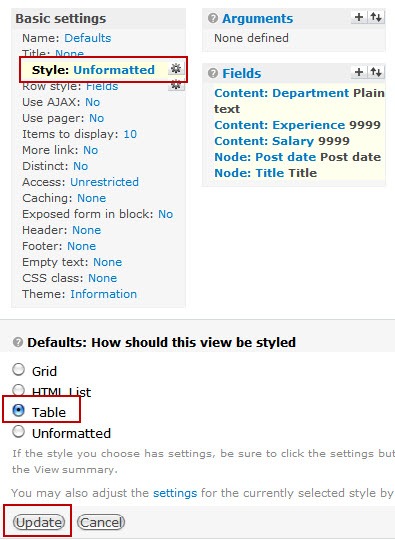
Let us choose Unformatted for Style, and display the data in a Table format.
Once that’s done, click Update.
We want to display all the job postings in one page, instead of being split up in multiple pages, so we will select No for Use pager. Again, click Update once you’re done.

After all these customizations, you can see that our Live Preview tab looks nicer than the initial view, but we are not done yet.

View Filters
At this point, our view is displaying all of our content, even ones that aren’t job postings. We only want to show jobs on our Jobs page.
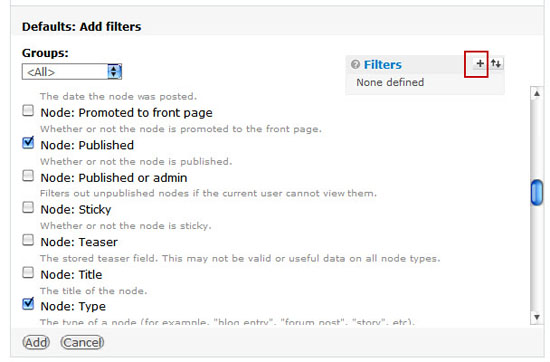
We will select two filters so that we only show only published job nodes:
- Node: Published
- Node: Type
Click on that plus (+) icon beside Filters, select the Node: Published and Node: Type options, and then click Add.
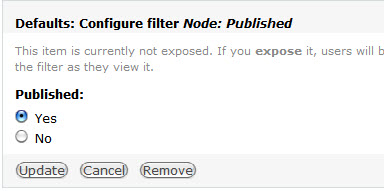
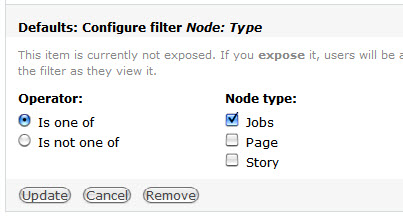
Then configure the Node: Published filter so that the criteria is such that Published is set to Yes, which will omit all jobs that are not yet published from our Jobs view.
Configure the Node: Type filter so that only nodes that is a Jobs content type is shown.
Use the Live Preview tab to check your filters.

Sorting Criteria
If we look at the Live Preview, you will notice that nodes are sorted from oldest to newest. It would be nice to show the latest jobs first.
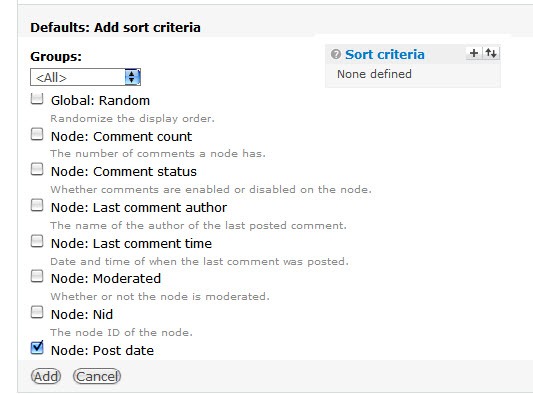
In order to sort jobs such that the newest jobs are displayed at the top, we will apply a sorting criteria. Under Add sort criteria, select Node: Post Date from the box, which will then open when you click the Add button.
Under Sort order, choose Descending.
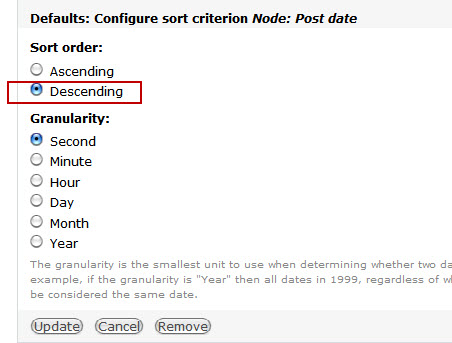
Check the Live Preview tab again; it will now show you the latest jobs first.
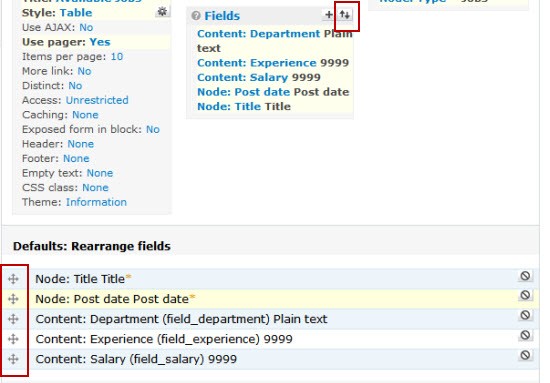
Rearrange the Fields
There’s one other thing we can do to improve our view: rearranging the order of the fields.
It makes sense that the Title should be first, and the post date second, and so forth. You can do so by clicking the up/down button on fields tab.
Check out the Live Preview tab; our view is looking nice.

We are done creating our view. Next, we just have to create 2 displays for our view.
Creating a Page Display
On the left of your Views page, select Page and then click Add display.
After clicking it, you will be automatically directed to the Page settings page.
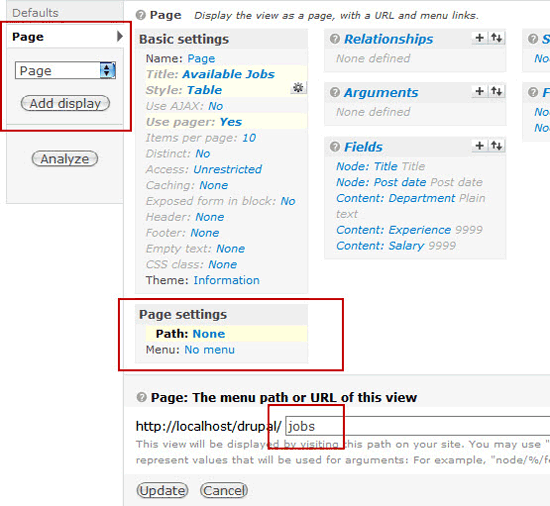
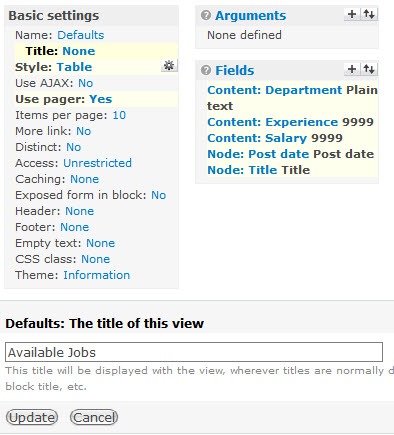
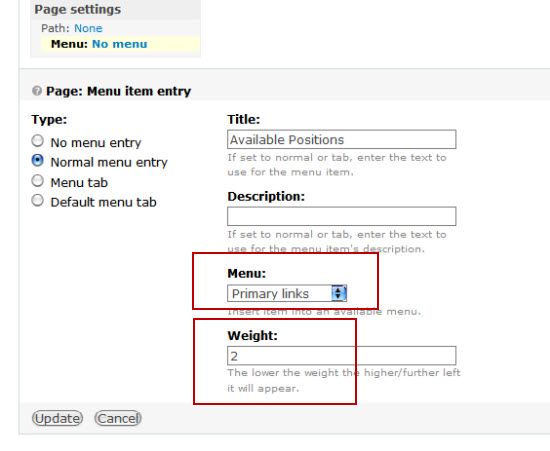
We just have to add a path to our page and a place to show the link to our display. I have put the value of 2 for Weight so that it appears after the Home navigation link.
After filling the values, don’t forget to click on Save the Display.
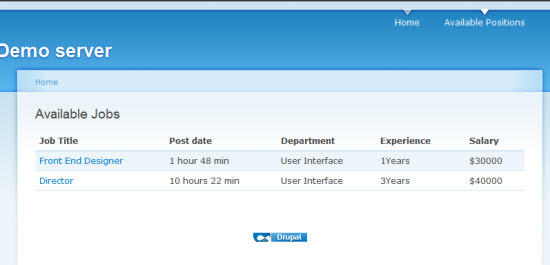
Now, you can see the link (called Available Positions) to our page display in the main navigation.
Creating a Block Display
Blocks are used to show information in various regions of a Drupal website. They are widgets that can display things like current events, the top 5 most popular posts, and so on in regions like the left sidebar, the header, the footer, and more.
You can place blocks in the header, footer and left and right sidebars in Drupal’s default theme.
You can manage your blocks by going to Administer > Site Building > Blocks.
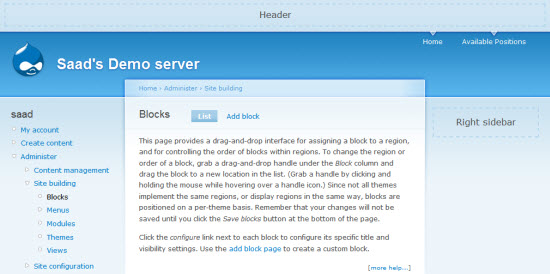
Now we are going to create our second display for the Jobs view so that we can show the latest job postings in the right sidebar.
Go to Administer > Site Building > Views and choose edit Jobs view. On the left, select Block and click Add display as you did before.
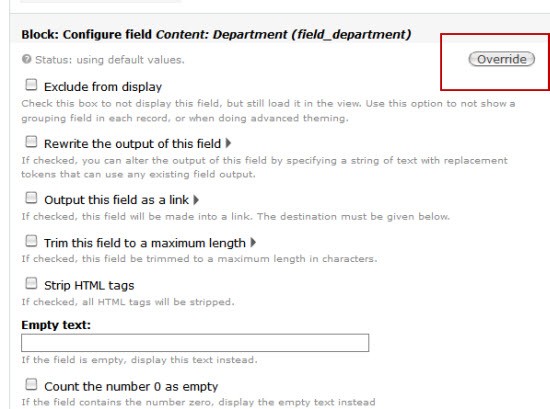
Click Override
We will remove 3 fields in our block display so that the block fits in the sidebar and so that it isn’t so overwhelming with information. Click on each field under the Fields tab.
Before removing a field, make sure that you click the Override button, otherwise it will change the default view and will also affect the page display we constructed earlier.
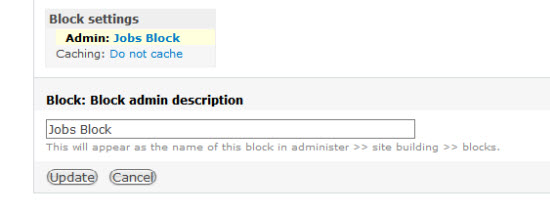
You can also change the name of the block, which will be shown in Administer pages.
Add the Block to the Sidebar
Now let’s move to Blocks and add our generated block display to right sidebar.
Go to Administer > Site building and click on Blocks.
Go to the Disabled section, find the block display we just created, and select right sidebar under Region.
Make sure that you hit Save to perform the change.
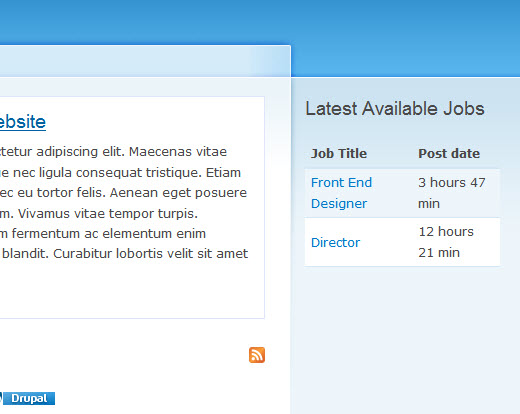
Awesome, and with that — we’re done with our job board!
Drupal Themes
The final subject we will discuss in this guide are themes. Themes are used to change the visual appearance of a Drupal website.
There are many themes available on the Web. Here is the Themes list on Drupal’s official site.
To install a theme, you have to download it and then copy it in your drupal/sites/all/themes directory.
If there isn’t a themes directory, then you can create one and then place your theme files inside it.
You can activate or deactivate themes by going to Administer > Site Building > Themes.
There are 5 themes that comes bundled with the Drupal core installation. I have just activated the Marvin theme to give my test site a clean, new look.
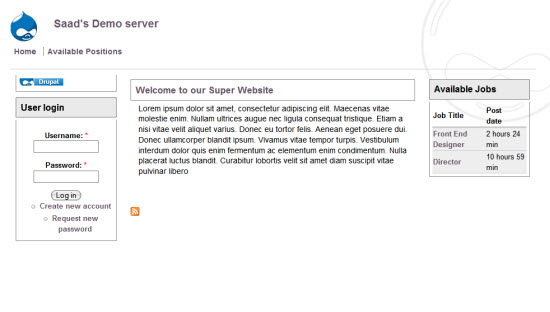
Make sure that you choose the theme default so that it can be applied to your Drupal site.
Wrapping Up
Drupal is big. I have done my best to cover the most confusing and difficult subjects that beginners often struggle with; however, this guide merely scratches the surface of the true power of Drupal.
I encourage you to explore the Drupal site for more advanced topics.
If you have questions, feel free to ask via the comments section and I will be more than happy to help you!
Related Content
- CMS Showcase: 31 Remarkable Drupal Powered Websites
- Convincing Your Clients to Use Open Platforms
-
 President of WebFX. Bill has over 25 years of experience in the Internet marketing industry specializing in SEO, UX, information architecture, marketing automation and more. William’s background in scientific computing and education from Shippensburg and MIT provided the foundation for MarketingCloudFX and other key research and development projects at WebFX.
 -

WebFX is a full-service marketing agency with 1,100+ client reviews and a 4.9-star rating on Clutch! Find out how our expert team and revenue-accelerating tech can drive results for you! Learn more
Make estimating web design costs easy
Website design costs can be tricky to nail down. Get an instant estimate for a custom web design with our free website design cost calculator!
Try Our Free Web Design Cost Calculator
Share this article


Web Design Calculator
Use our free tool to get a free, instant quote in under 60 seconds.
View Web Design CalculatorMake estimating web design costs easy
Website design costs can be tricky to nail down. Get an instant estimate for a custom web design with our free website design cost calculator!
Try Our Free Web Design Cost Calculator


