- Home
- Blog
- Web Design Draw an Ornate Bell in Adobe Illustrator
Draw an Ornate Bell in Adobe Illustrator
-
 20 min. read
-
 Trevin Shirey
 VP of Marketing
- Trevin serves as the VP of Marketing at WebFX. He has worked on over 450 marketing campaigns and has been building websites for over 25 years. His work has been featured by Search Engine Land, USA Today, Fast Company and Inc.
Preview

Step 1: Set Up a New Illustrator Document
Open up Illustrator and create a new document by pressing Ctrl/Cmd + N. Set the artboard’s size to 400x500px. 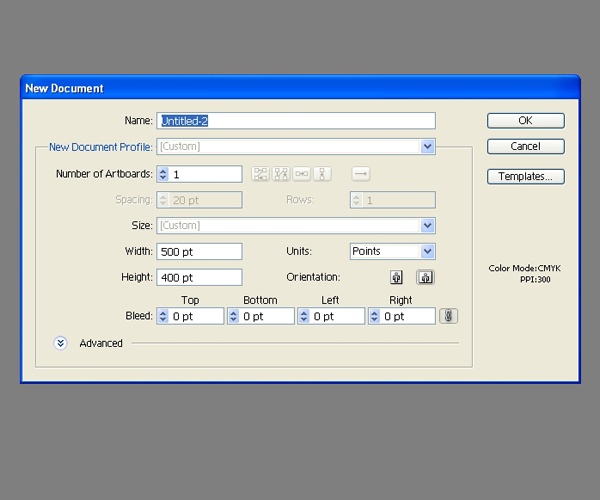
Step 2: Create the Basic Outline
When you have to draw an object with symmetrical sides, it’s much easier to create just one side and then make a mirror copy of it — this not only saves time, but more importantly, ensures that the two sides are identical and symmetrical.
First, Grab the Pen Tool (P) and draw just one side of the bell.  Select the vector path we just drew with the Selection Tool (V) and then choose Object > Transform > Reflect. Choose the Vertical option and then click on the Copy button to create a mirror image of the vector path.
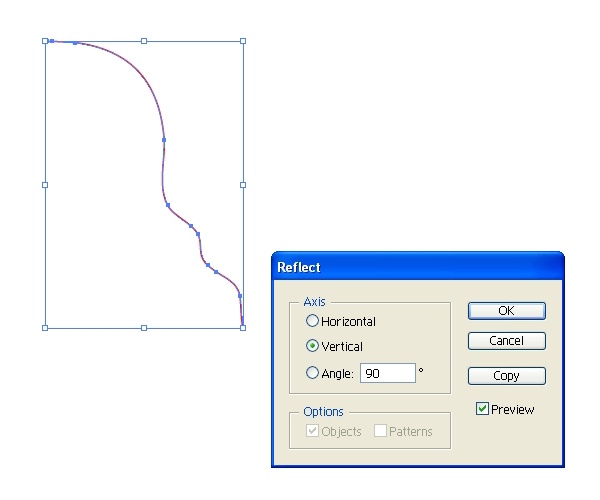 Hold down Shift (to constrain the movement horizontally) and then drag the copy to the right until the upper terminal anchor points match.
 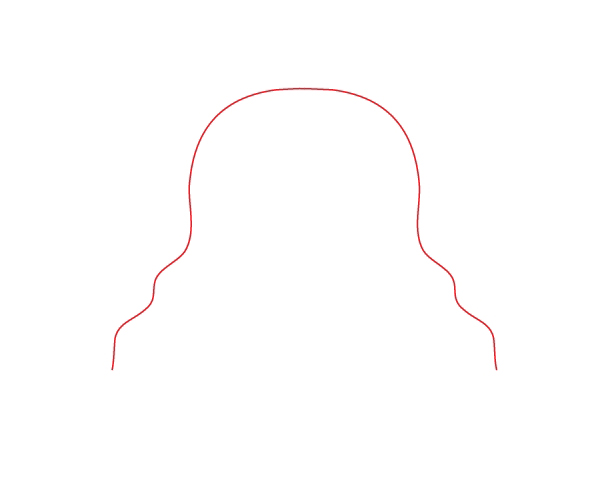 Grab the Direct Selection Tool (A) and select only the endpoints of both paths. Right-click on the anchor points and choose Join in the menu that appears.
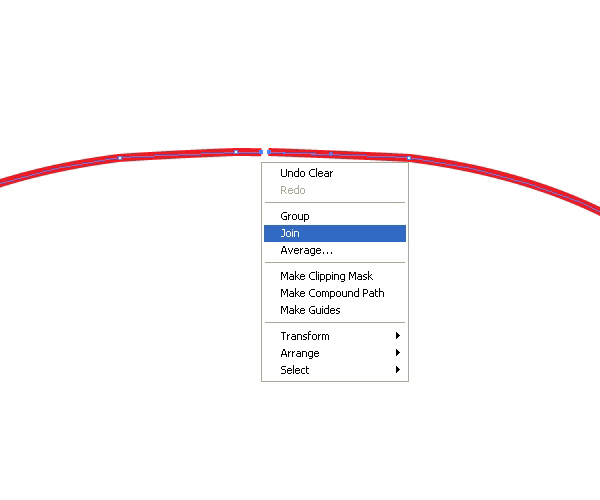 Let’s completely close the path. Switch to the Pen Tool (P) and click on the lower endpoints to close the path. Remove the Stroke and set the Fill color of the vector object to red just to make things easier to see (we will change this color later on).

Step 3: Dividing the Bell Shape into Segments
We have to try to get rid of the flatness of our bell. In order to do that, we will divide the shape of the bell into several segments, and then we’ll fill those segments with color gradients to simulate a 3D appearance later on. With the Pen Tool, draw two arcs as shown below.
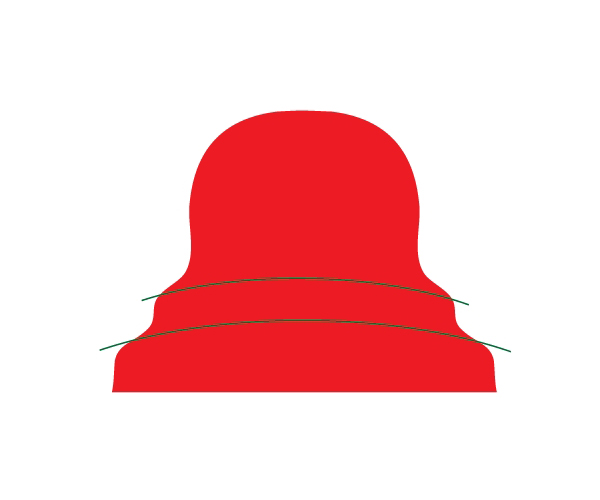 Switch to the Selection Tool (V) to select the shape of the bell and one of the arcs, and then, in the Pathfinder Panel (press Shift + Ctrl/Cmd + F9 if the panel is hidden), click on the Divide button. This segments our bell shape into two parts.
 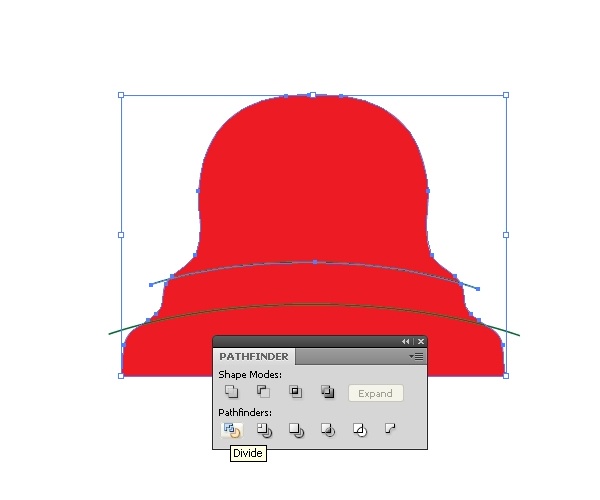 While the resultant object is still selected, ungroup it (Shift + Ctrl/Cmd + G).
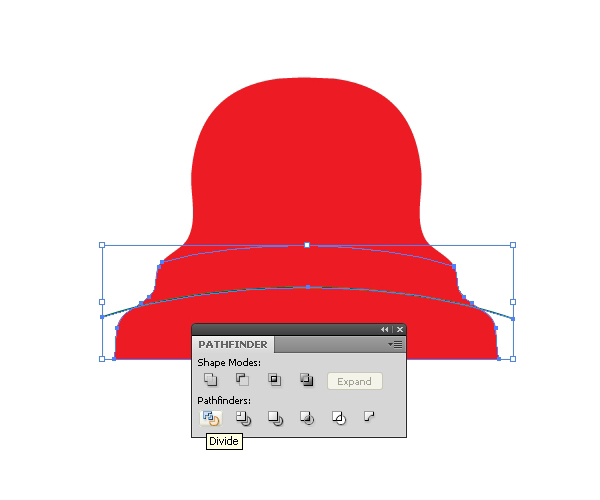
Then select the lower part of the bell shape and the other arc, then hit the Divide button again. This will create the lowest part of the bell. Our bell shape should now be divided into 3 parts.
Step 4: Create the Bottom of the Bell
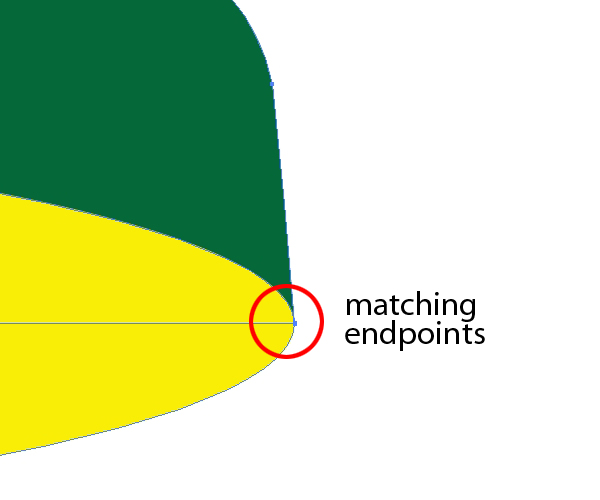
Grab the Ellipse Tool (L) and create an ellipse for the lower part of the bell. Make sure to match the anchor points on the left and right so that you end up with smooth, contiguous sides. 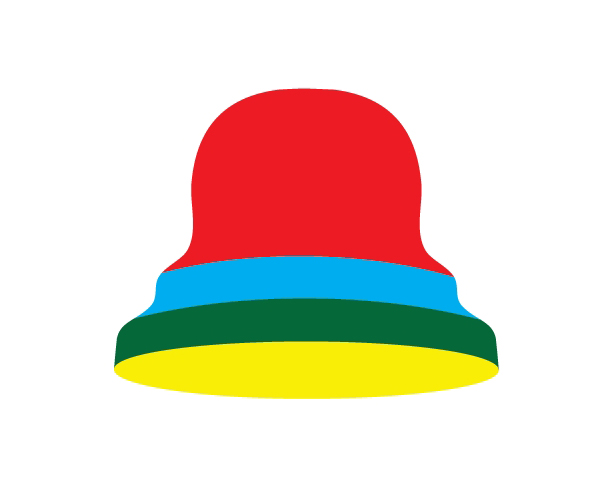
Step 5: Divide the Upper Part in Half
Now we have to divide the upper part of the bell in half.
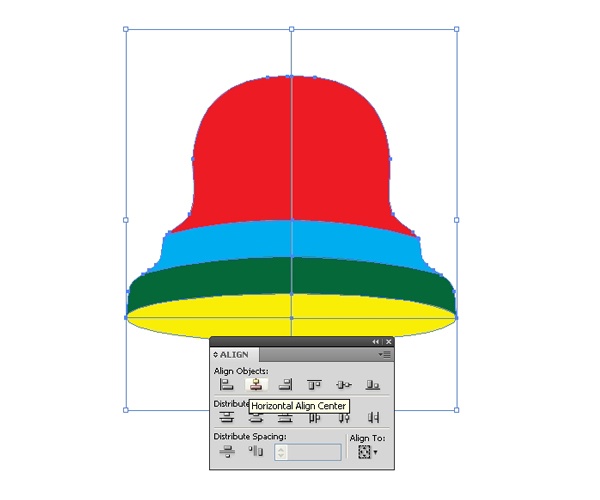
This will enable us to apply color gradients more easily. Choose the Line Tool (/) and draw a straight vertical line down the middle of the bell. To make sure the vertical line is dead-smack at the center, select all the segments of the bell and the vertical line, then, in the Align Panel (Press Shift + F7 to toggle the panel’s visibility), click on the Horizontal Align Center button.
 Next, select the line and just the upper part of the bell. Then press the Divide button in the Pathfinder Panel.
 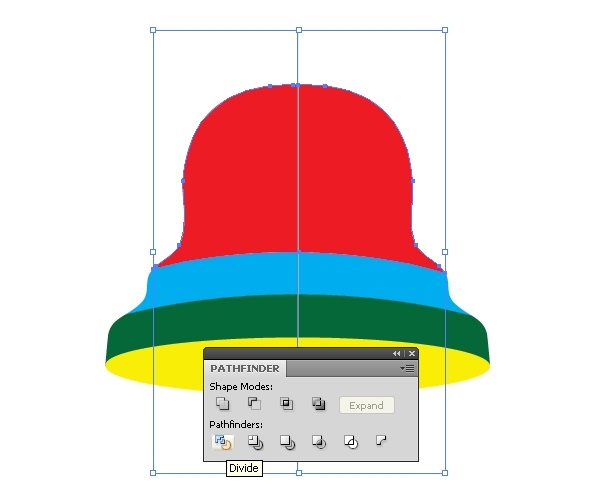 Ungroup (Shift + Ctrl/Cmd + G) the resultant object and then get ready for some fun.
We’re going to apply gradients next!
Step 6: Applying Color Gradients
Let’s choose some good colors and create color gradients to make our bell come alive. To start, make sure the Gradient Panel is open; if you can’t locate it in your workspace, go to Window > Gradient or press Ctrl/Cmd + F9. We will apply the same radial gradient to both upper sides of the bell. 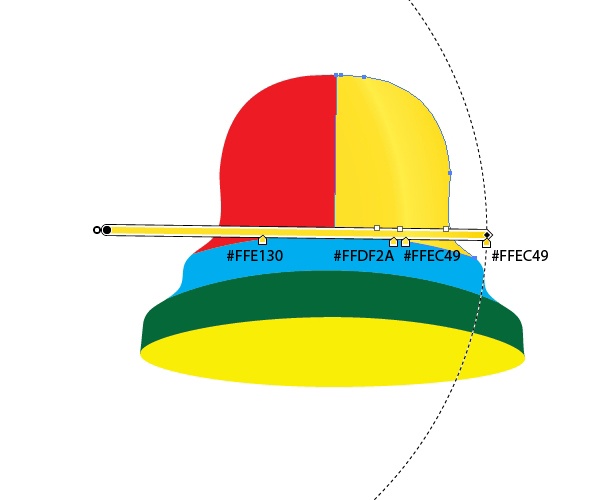
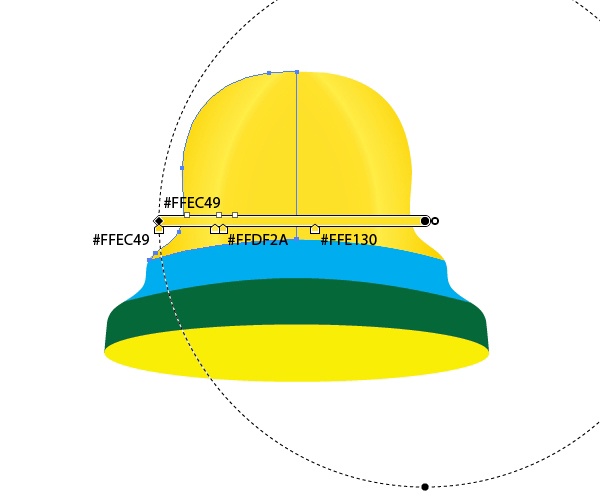 For the middle part of the bell, we will use a linear gradient.
 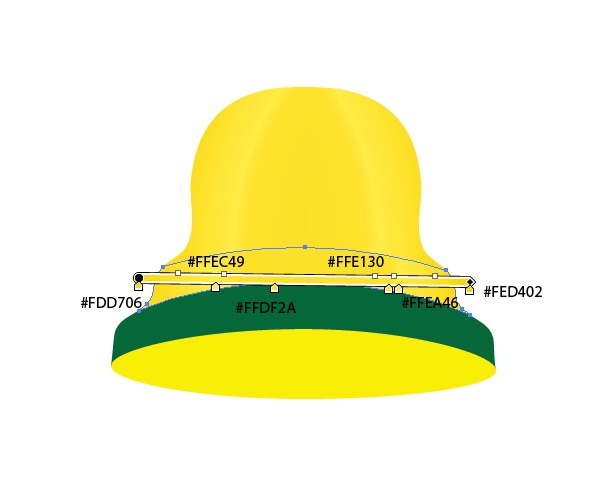 And for the lower part of the bell, we will also use a linear gradient.
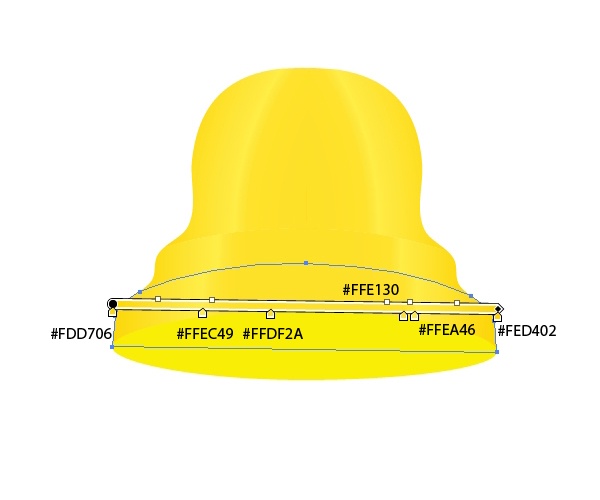 For the ellipse, we will use linear gradients too.
 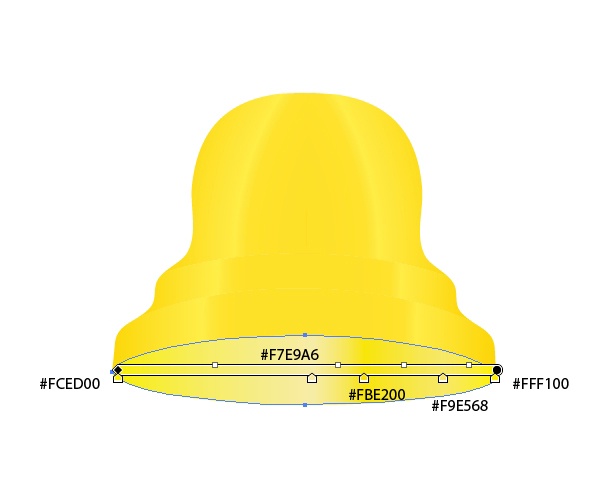 Let’s create the thickness of the bell. To do this, we have to duplicate the ellipse we already have and then we need to scale it down.
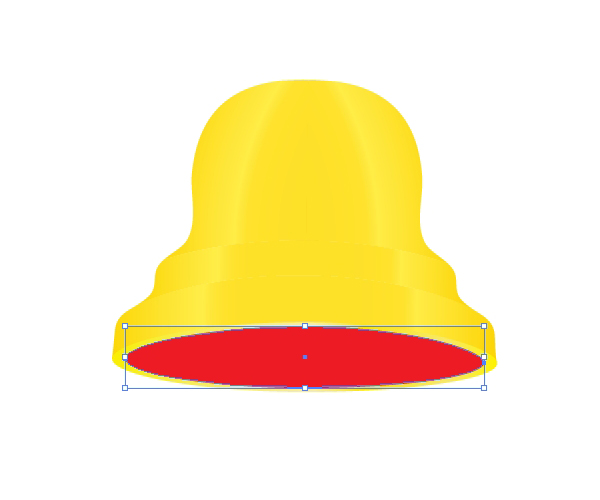 Apply the radial gradient as shown below.
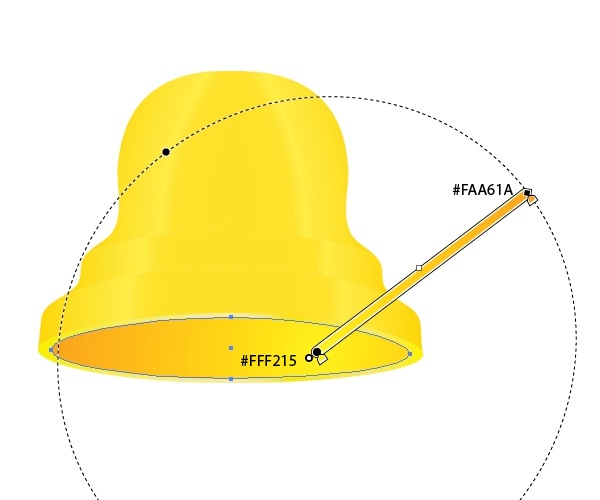
Step 7: Adding Reflections and Shadows
In this step, we will create the necessary reflections and shadows in order to be accurate with the light source. Golden objects are capable of reflecting light in different ways.
We will use that ability to create all sorts of reflections (dark, light, semi-transparent, etc.). In this process, the Pathfinder Panel will have a major role. Select all parts of the bell, except the ellipses.
Duplicate them (Ctrl/Cmd + C, Ctrl/Cmd + F) and unite them using the Unite Pathfinder command. 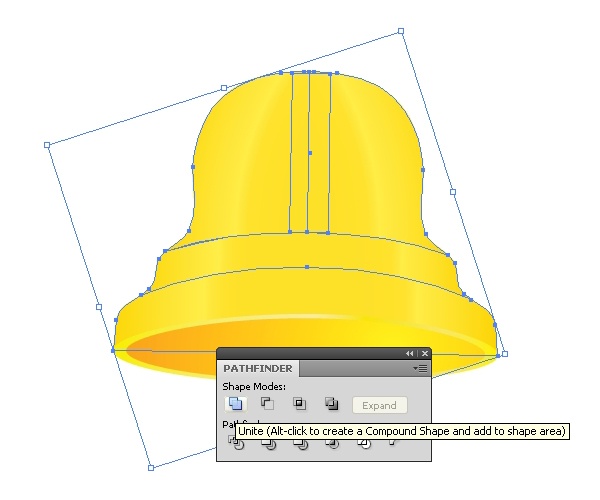
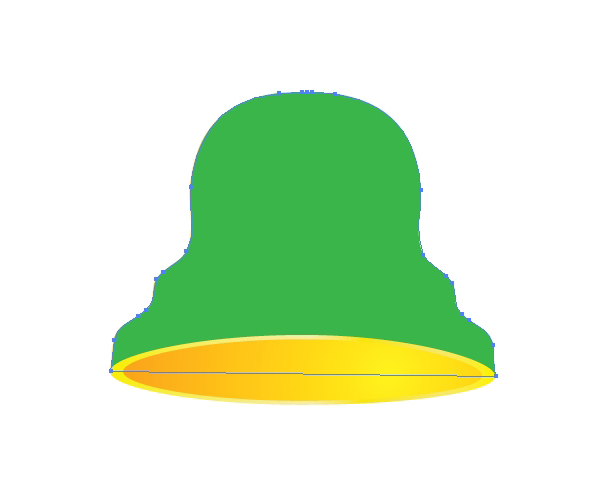 To create a reflection, we will have to combine a copy of the shape we’ve just created with the copy of the different parts of the bell. Let’s try this out to see what we can create.
Duplicate the green shape of the bell and, in the Layers Panel, lock the original object and then hide it. We will save the shape for later, but for now, we lock and hide it so it won’t disturb us as we continue working. Select the visible copy of the green shape and nudge it 2px to the right and 2px down.
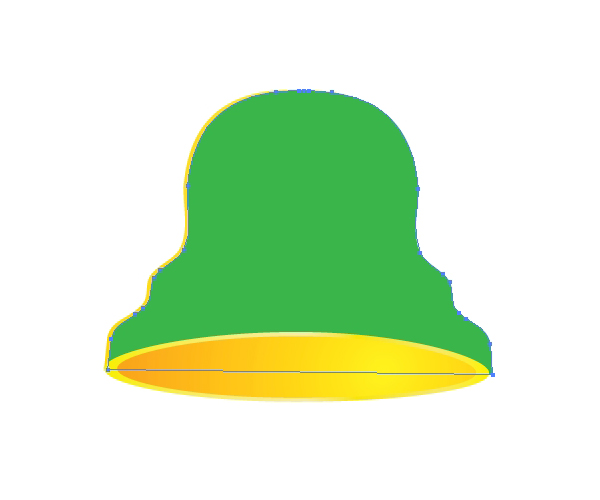 Duplicate all three visible parts of the left side of the bell. Then, make three copies of the green shape (one for each of the duplicate parts). Combine each copy of the bell with each copy of the green shape using the Minus Front button in the Pathfinder Panel.
This will create small reflection shapes on the left side of the bell. 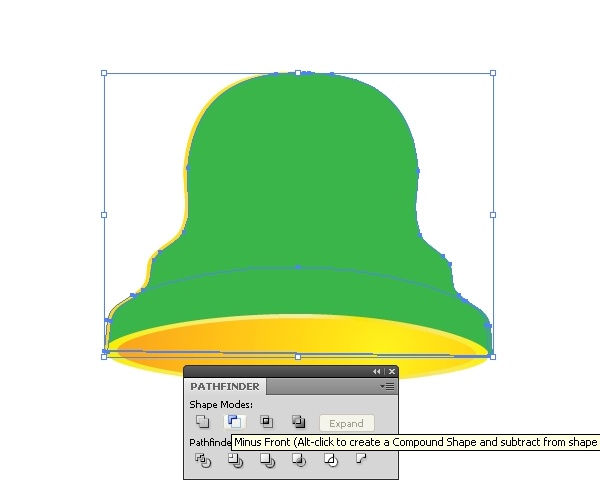 Set the Fill color of the reflection to #FFFABC. Select the remaining green shape of the bell and move it to the right a little bit more.
Create the copy of the upper part of the bell on the left side and a copy of the green shape. Select both copies and hit the Minus Front button in the Pathfinder Panel. 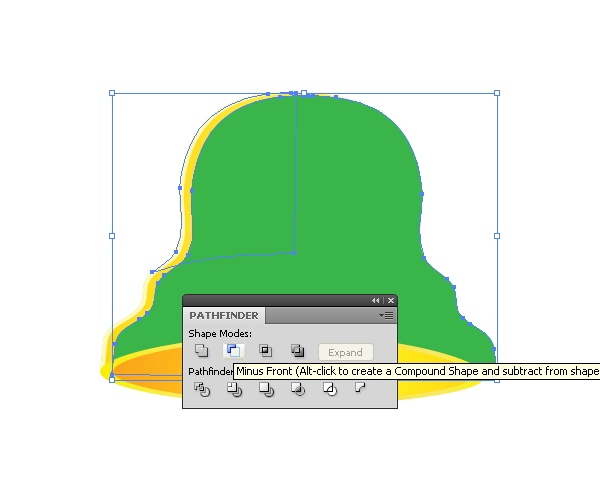 Apply a linear gradient to the new shape.
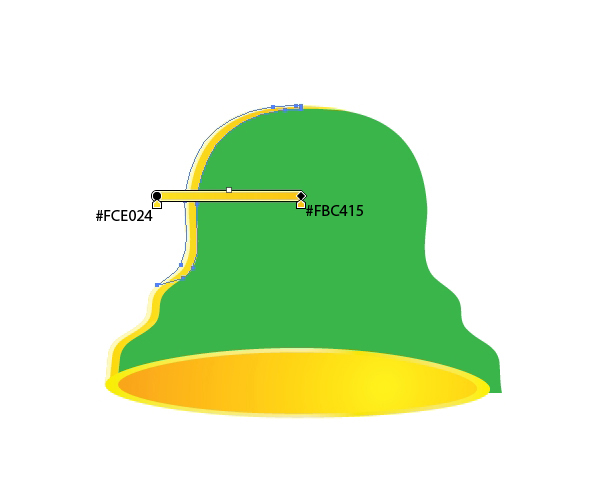 In order to create another reflection, repeat the previous process.
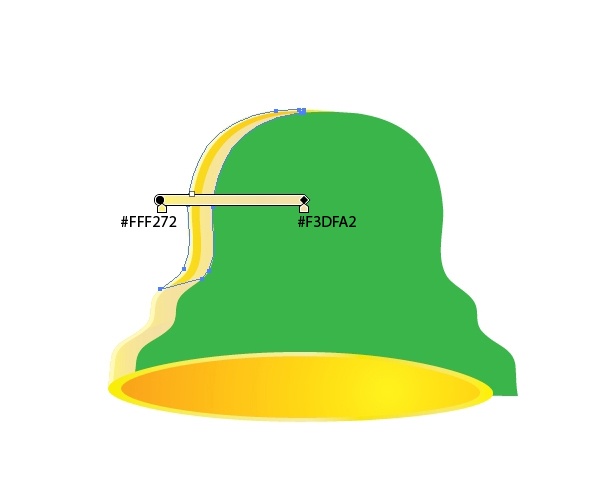
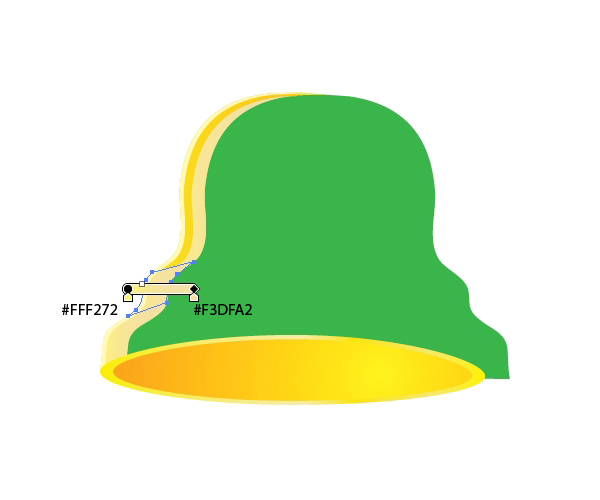
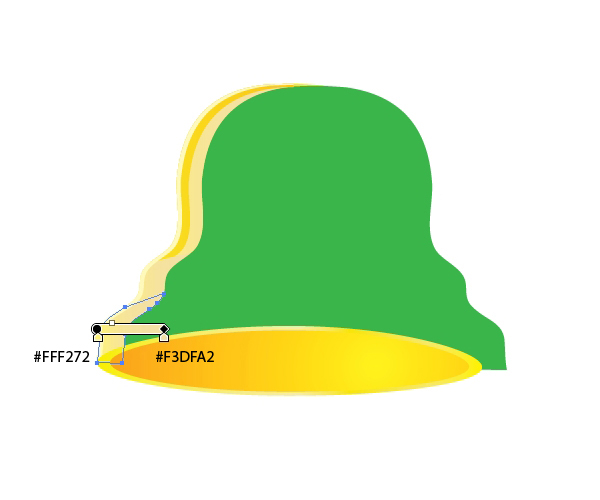 Copy the green shape and move the copy to the right. Select both shapes and, in the Pathfinder Panel, click on the Minus Front button.
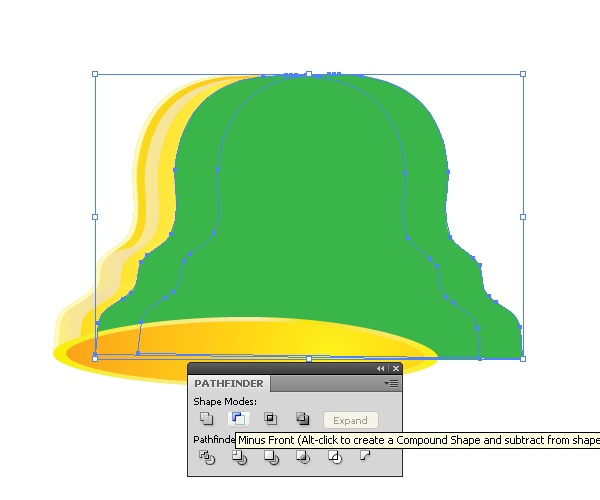 We have to intersect the shape with other parts of the bell. Create copies of each part of the bell on the left side and two copies of the green shape. Select each copy of the bell and the copy of the green shape and click on the Intersect button in the Pathfinder Panel.
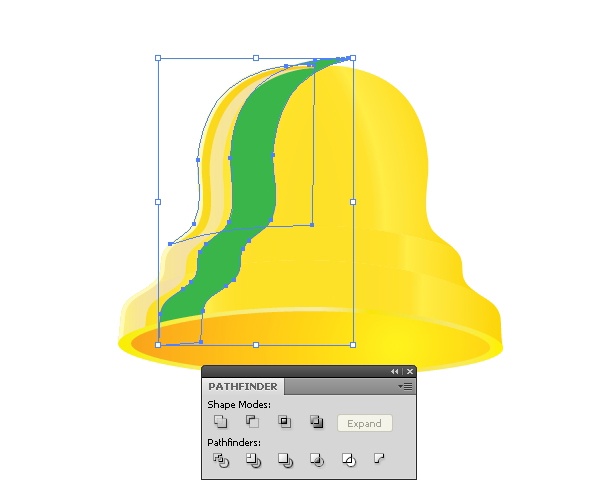
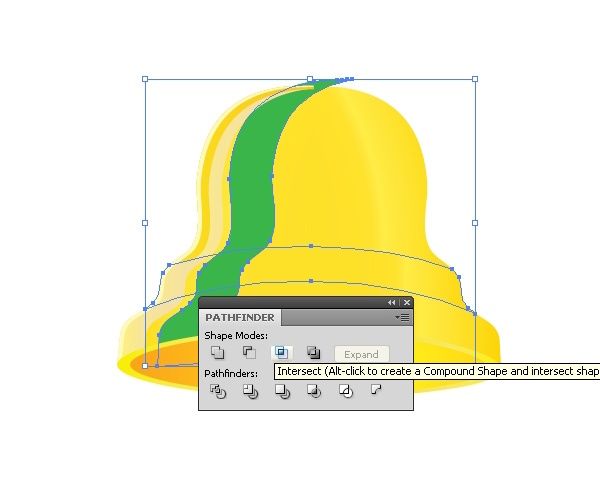
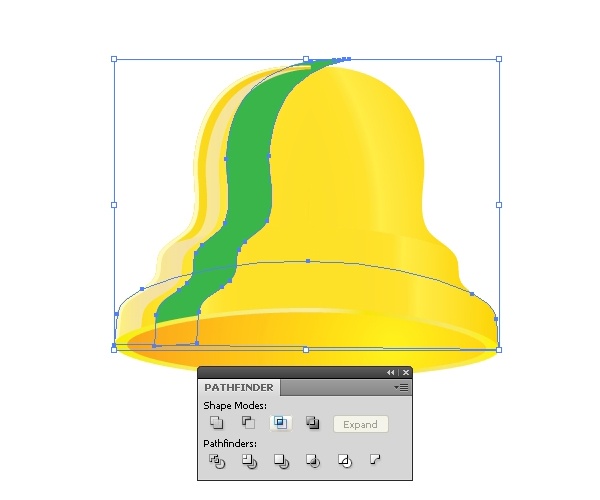 Apply a linear gradient to the new shapes.
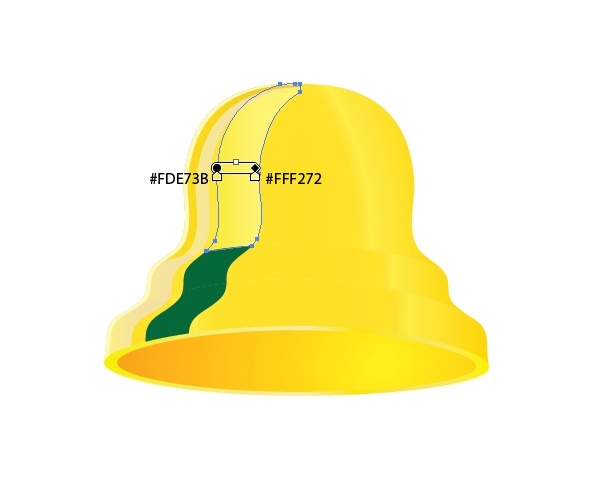
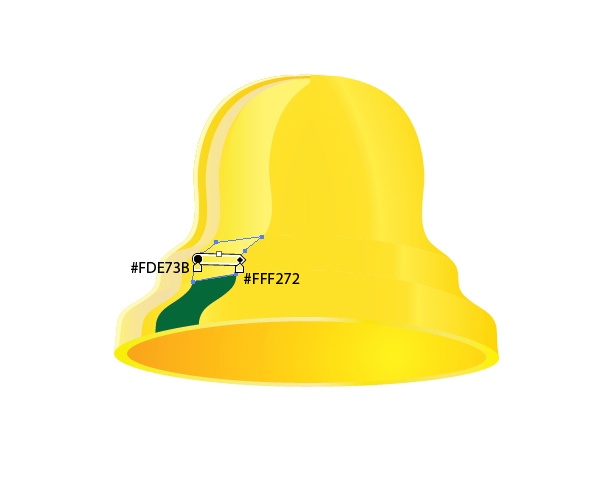
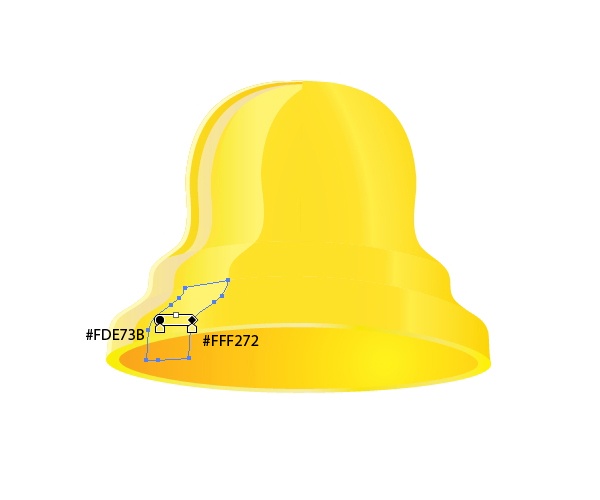 For the right side of the bell, we will need a few reflections and a couple of shadows as well. I think you get the idea of how to create all the shapes you need, so I’ll let you make them yourself.
You just have to combine different shapes and fill them with the right colors. Now it is time to unlock and toggle the visibility of the green shape we created earlier. You will need it to create the shadows and reflections on the right side of the bell.
For the shadows, apply the linear gradient below. 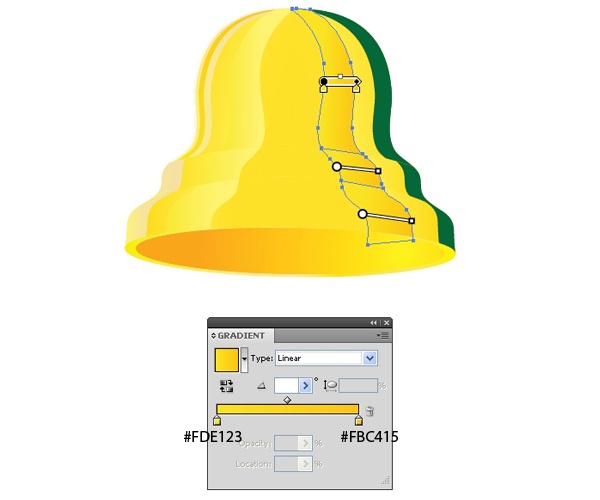 Feel free to play around with gradients until you achieve a desirable result.
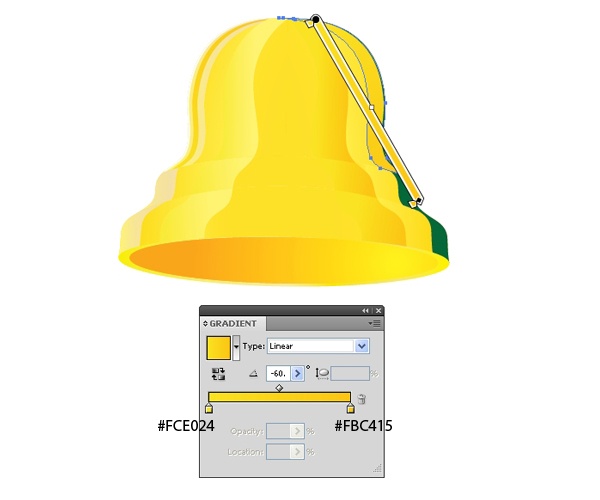
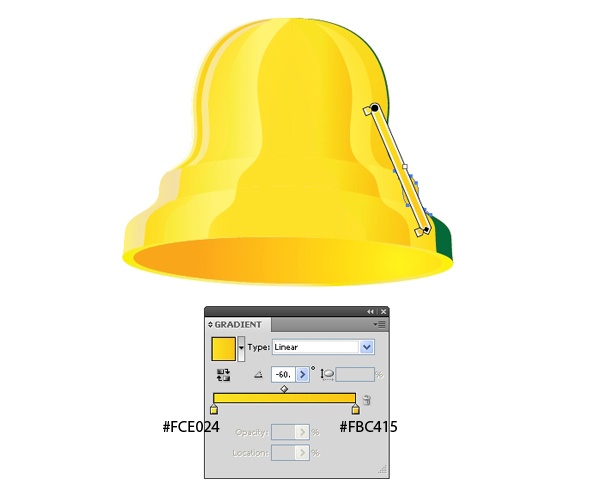
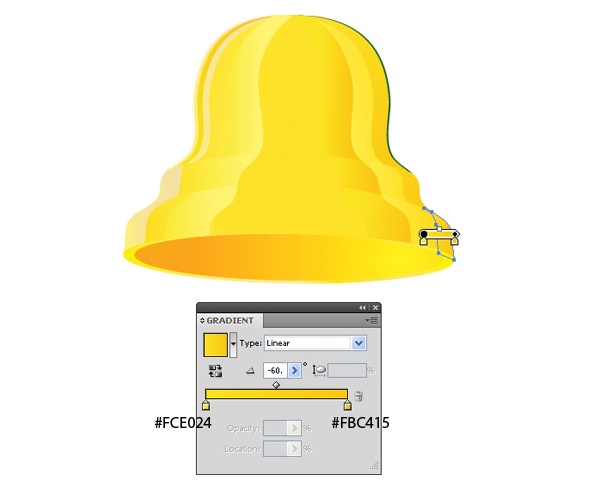 Also, create a small edge reflection on the right side.
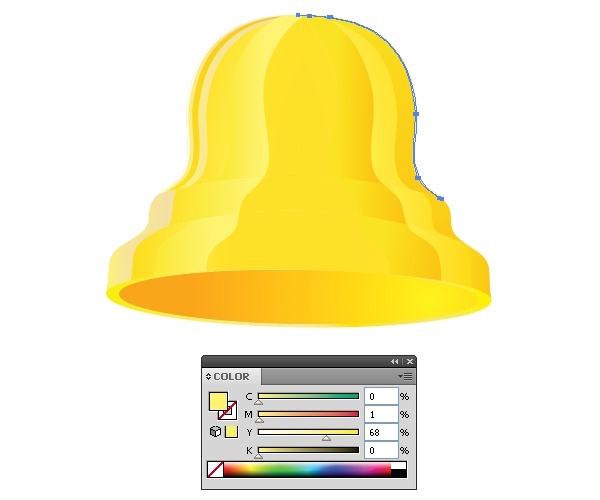
Step 8: Create Horizontal Curvatures
We want to reinforce the shape of the bell better. To do this, we should define the curvatures of the bell horizontally. Duplicate the middle part of the bell twice and nudge one of the copies a few pixels downwards.
You can scale up the copy if needed. Select both copies and, under the Pathfinder Panel, click on the Minus Front button. The resultant object should be a horizontal strip.
Apply the radial gradient on the horizontal strip as shown below. 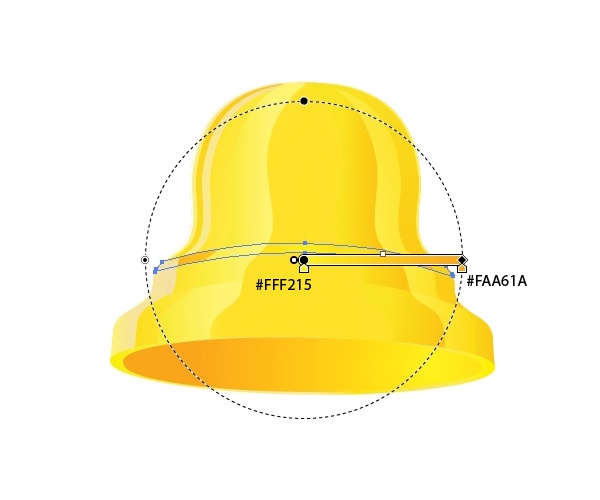 Now we need to intersect the shape with the reflections and shadows we made earlier. This means we need to make copies of each part we want to use to intersect.
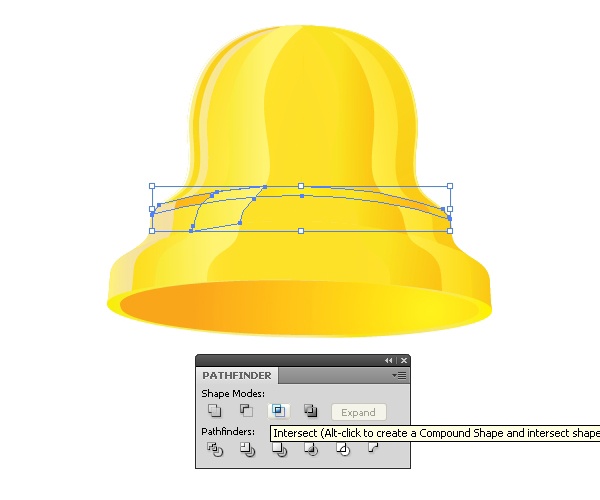
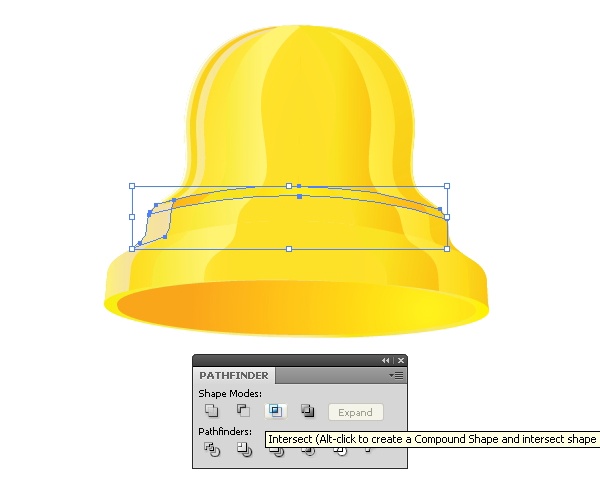 Create another strip below the first one and give it a radial gradient.
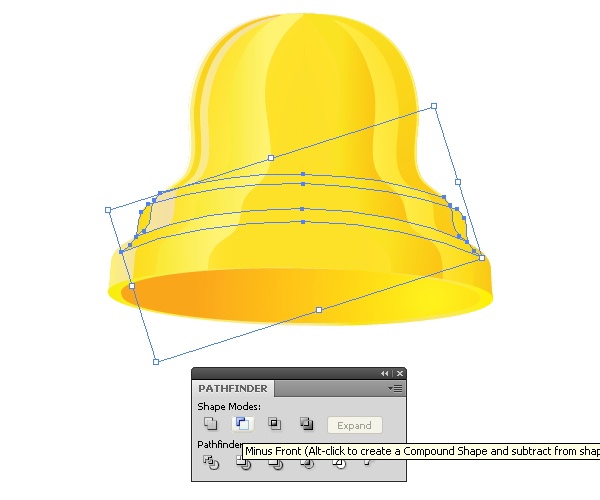
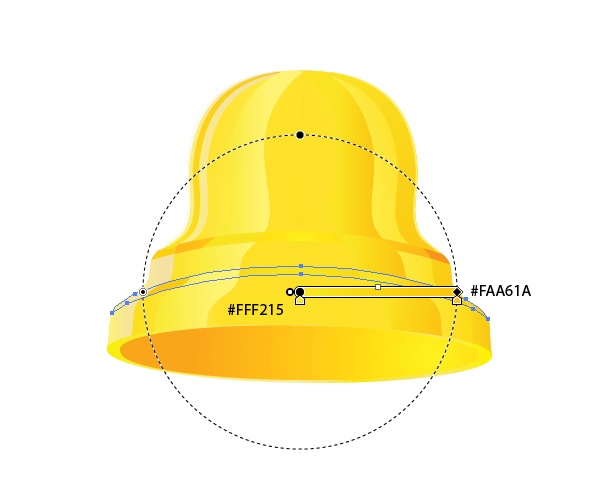
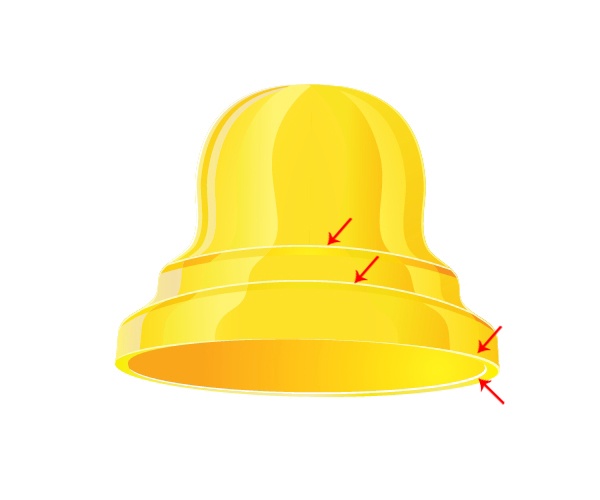
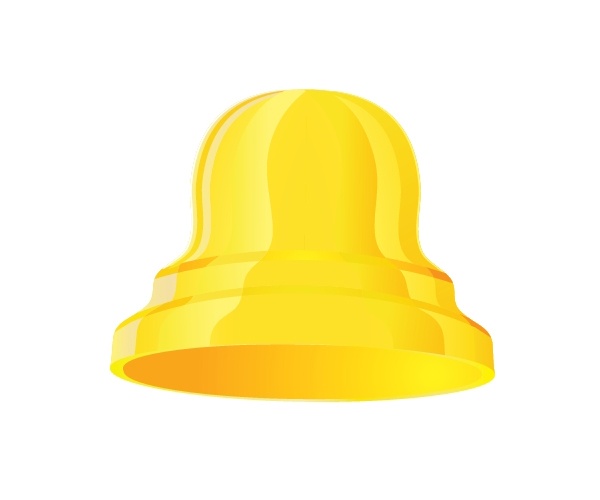 We need highlights now. Using the same technique for creating reflections, try to create fine highlighted edges on the strips.
Give the highlights a thickness of about 1px. 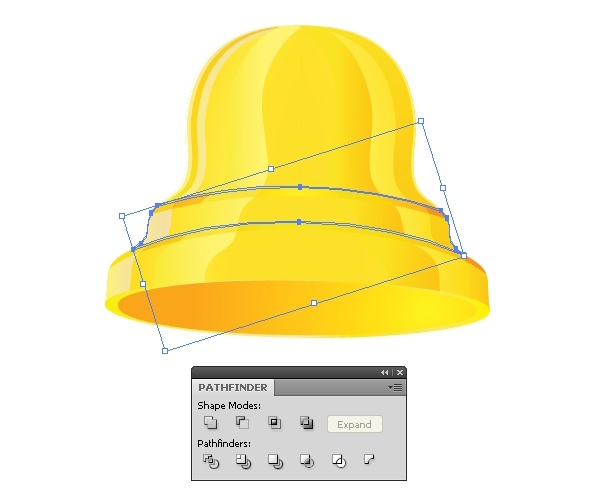 Set the Fill color of the highlights to #FFFABC.
Step 9: Create a Shadow Inside the Bell
Now we need a shadow inside the bell.
Select the inner ellipse of the bell and copy it in front. Grab the Ellipse Tool (L) from the Tools Panel and create the blue ellipse shown below. 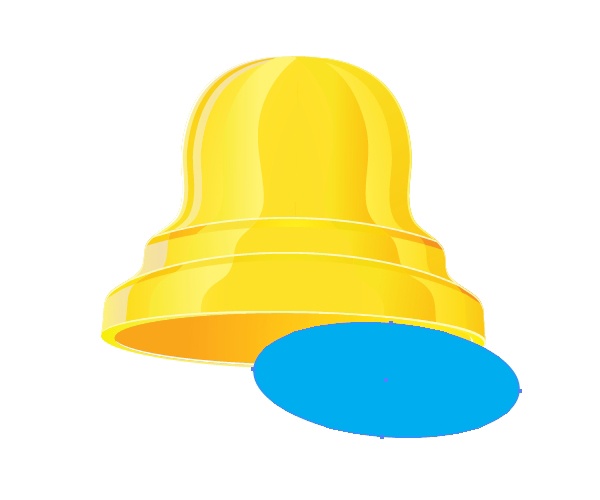 Select the blue ellipse and the inner ellipse copy and then, under the Pathfinder Panel, hit the Minus Front button.
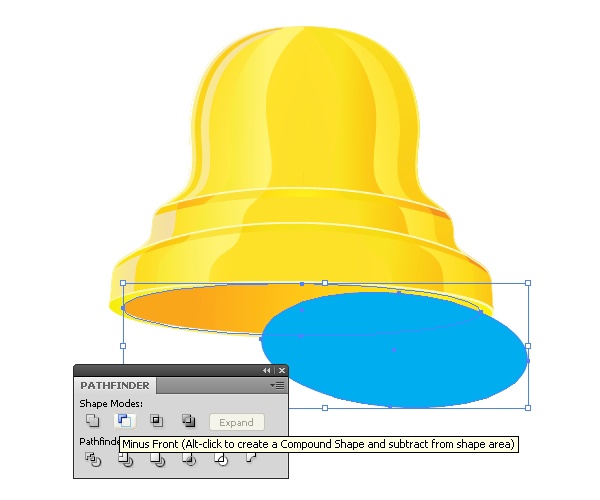 Apply the linear gradient shown below in order to create the inner shadow.
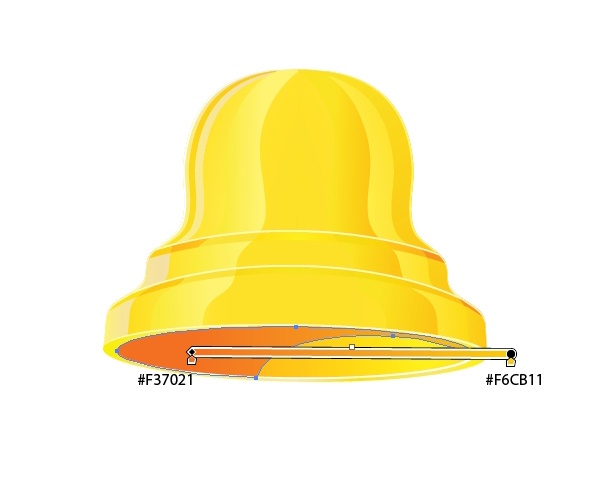
Step 10: Creating a Clapper
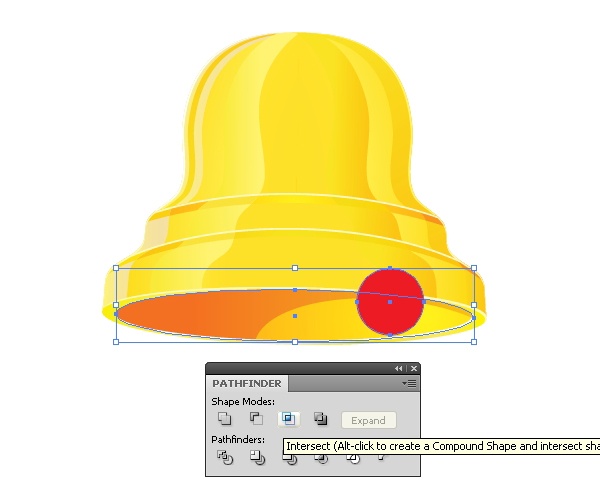
Bells need a clapper inside it to make sound; it’s the component of a bell that hits the inner walls of the bell to make ringing sounds. To start, grab the Ellipse Tool (L) and create a circle at the bottom right of the bell.
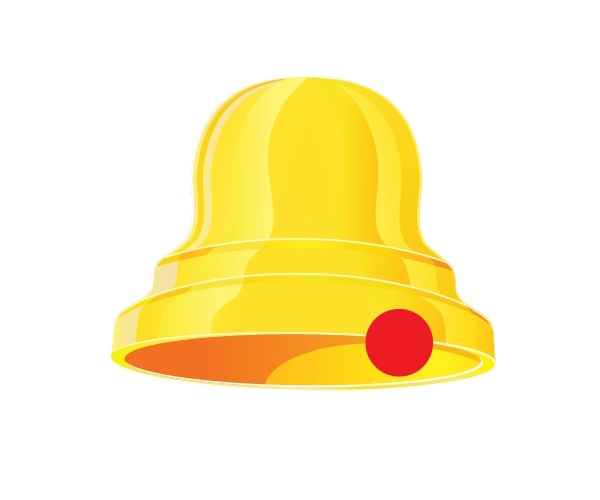 Duplicate the inner ellipse of the bell. Select the duplicate and the red circle we created and press the Intersect button in the Pathfinder Panel.
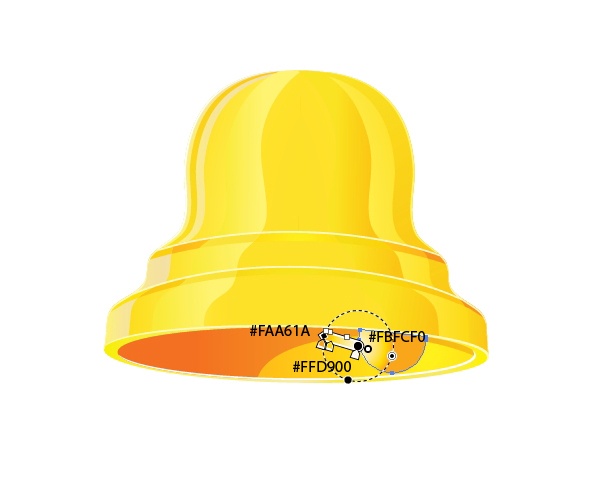
  All we need is to apply a nice radial gradient in order to give the clapper a 3D appearance.
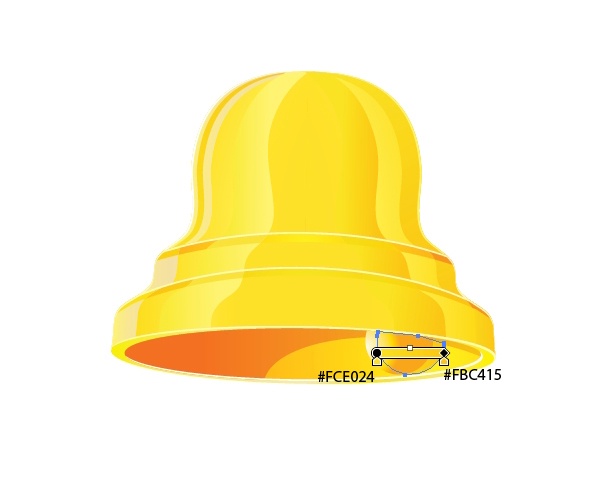
 Duplicate the clapper, apply the linear gradient shown below, rotate it a bit and send it behind the clapper. This is the shadow the clapper is creating on the inner wall of the bell.
Step 11: Create a Crown
We now need to create a handle on top of the bell (known as the crown).
To create a crown, we will need two ellipses and a few reflections. To begin, grab the Ellipse Tool (L) and create two circles on top of each other, with the one on top smaller than the one below it. Make sure that the inner circle is centered on the bigger circle by using the Horizontal Align Center and Vertical Align Center command in the Align Panel.
Select both circles and press the Minus Front button in the Pathfinder Panel. 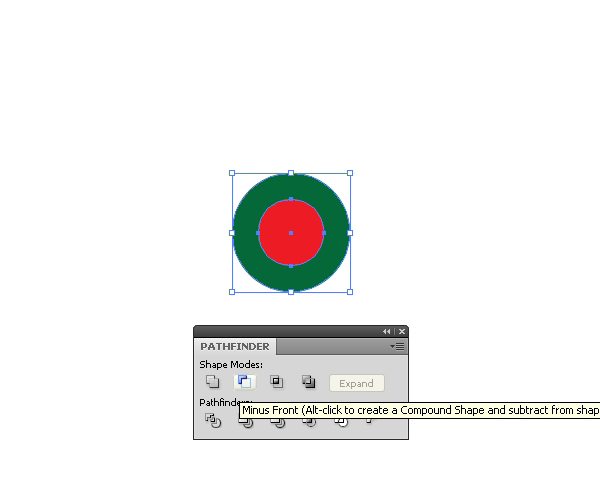 Apply the linear gradient shown below.
 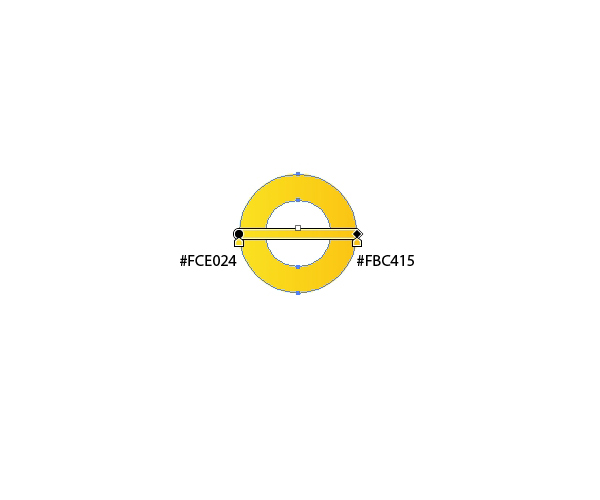 Next, we will create a highlight object.
Duplicate the crown twice. Move them to form a highlighting shape, select them both and then hit the Minus Front button in the Pathfinder Panel. Then give the highlight object a linear gradient (as shown below).
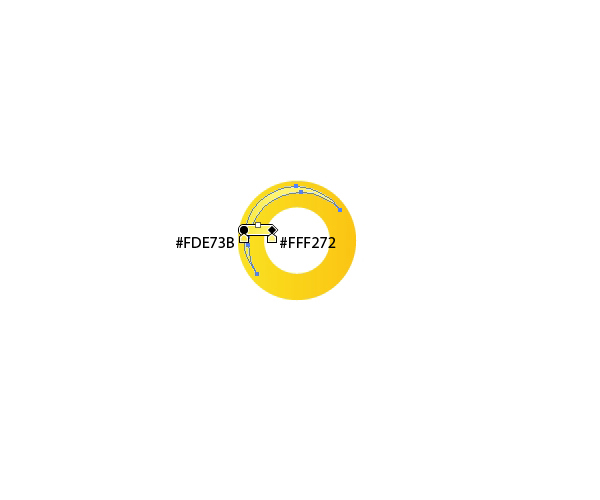 Select all the parts of the crown, group it (Ctrl/Cmd + G) and place it on the top of the bell. Send it back (Shift/Ctrl/Cmd + [).
 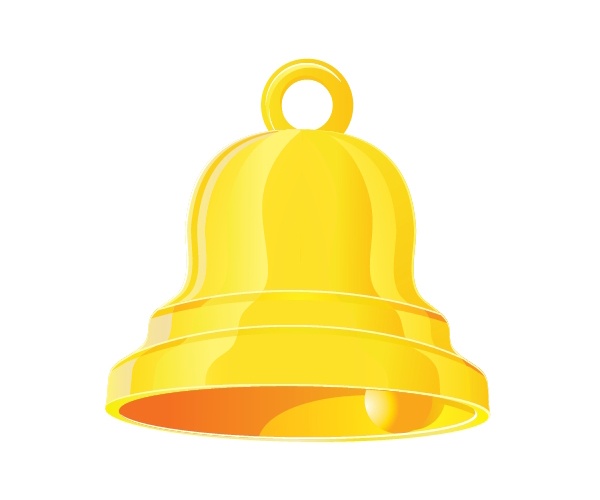 At the end, you can add decorations such as a sign or a colorful ribbon, as I have below.

Tutorial Summary
Lots of people have trouble with the Pen Tool, but thankfully the Pathfinder commands allow us to make sophisticated illustrations using simple shape-drawing tools such as the Ellipse Tool. With a lot of imagination, there is almost nothing you can’t create with Pathfinder commands. I hope you liked the tutorial.
Thank you for reading! 
Download Source Files
- ornate_bell_illustrator (ZIP, 0.14 MB)
-
 Trevin serves as the VP of Marketing at WebFX. He has worked on over 450 marketing campaigns and has been building websites for over 25 years. His work has been featured by Search Engine Land, USA Today, Fast Company and Inc.
 -

WebFX is a full-service marketing agency with 1,100+ client reviews and a 4.9-star rating on Clutch! Find out how our expert team and revenue-accelerating tech can drive results for you! Learn more
Make estimating web design costs easy
Website design costs can be tricky to nail down. Get an instant estimate for a custom web design with our free website design cost calculator!
Try Our Free Web Design Cost Calculator
Table of Contents
- Preview
- Step 1: Set Up a New Illustrator Document
- Step 2: Create the Basic Outline
- Step 3: Dividing the Bell Shape into Segments
- Step 4: Create the Bottom of the Bell
- Step 5: Divide the Upper Part in Half
- Step 6: Applying Color Gradients
- Step 7: Adding Reflections and Shadows
- Step 8: Create Horizontal Curvatures
- Step 9: Create a Shadow Inside the Bell
- Step 10: Creating a Clapper
- Step 11: Create a Crown
- Tutorial Summary
- Download Source Files


Web Design Calculator
Use our free tool to get a free, instant quote in under 60 seconds.
View Web Design CalculatorMake estimating web design costs easy
Website design costs can be tricky to nail down. Get an instant estimate for a custom web design with our free website design cost calculator!
Try Our Free Web Design Cost Calculator


