

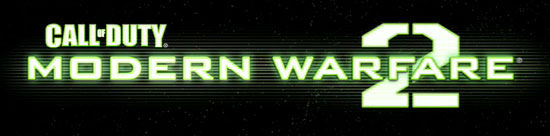
 In this step by step tutorial, you’ll learn how to recreate the modern/futuristic text effect in the Call of Duty: Modern Warfare video game using some simple Adobe Photoshop techniques. You’ll learn two text effects in this tutorial. With the recent release of Call of Duty: Modern Warfare 2, a popular and record-breaking video game, we thought it would be a fun activity to show you how to remake the text used in the game’s logo. In this tutorial, you’ll learn two text effect techniques, both featured in the video game.
Final Result
This is what our work will look when we finish.
Text Effect 1
Text Effect 2

Before you begin
Get the Bank Gothic Lt BT font and install it in your computer if you don’t have it.
Create the Photoshop canvas
1 Open a new blank canvas using Edit > New (Ctrl + N) in Photoshop.
Use a large canvas to give us plenty of room: 1600px width and 500px height will do just fine (knowing that we can easily rescale our work down later on if we need to). 
Fill the Background layer
2 Now we have a brand new canvas to work with. We fill the Background layer with black (#000000) by setting the Foreground color to black (#000000) in the Tools Panel, choosing Edit > Fill while the Background layer is active in the Layers Panel, making sure that the Use option is set to Foreground Color, and pressing OK.
That will fill our Background layer with the desired color.
Working on the text
3 Next we create our text. Choose the Horizontal Type Tool (T) from the Tools Panel.
In the Options bar, set the font to Bank Gothic Lt BT and change the color to white (#FFFFFF). Also, set the font size to 30pt or so. 4 We then type our chosen phrase or slogan in the Bank Gothic Lt BT font onto our canvas.
We should now have something that looks like the following figure. 
Adding the Outer Glow layer style
5 We now change the settings of the text layer by choosing it in the Layers Panel, and then clicking on the Add a layer icon (it’s the “fx” icon) at the bottom of the Layers Panel. In the contextual menu that will appear upon clicking the Add a layer icon, choose Outer Glow.
This will then open the Layer Style dialog box. Change the settings of the Outer Glow layer style to the settings you can find below. The color used is #7DFF6E.

Creating a repeating pattern
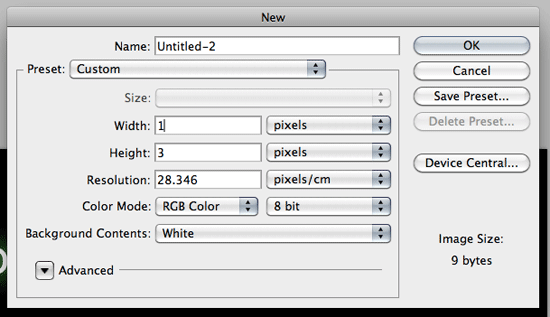
6 To complete the effect, we must create a Photoshop pattern that we’ll apply to our text. To do this, first create a new Photoshop document with the following settings. Note that the dimension of the canvas is very small, 1px wide and 3px high.
 7 By default, the Background layer of the new document will be locked an un-editable. Double-click on the Background layer to open the New Layer dialog box. Press “OK”, and the background layer will be unlocked and renamed to Layer 0. 8 Since the canvas is small, use the Zoom Tool (Z) to zoom in as close to the canvas as possible. 9 Set your Foreground color in the Tools Panel to black (#000000). Then we use the Pencil Tool (B) to draw a 1px square box right in the middle of the canvas.
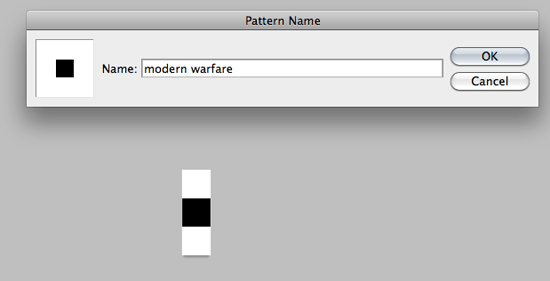
10 Select the entire canvas using Select > All (Ctrl + A). Choose Edit > Define Pattern, and name it something intuitive, like modern warfare. Now we can switch back to our original canvas with our text and apply the repeating pattern we just created.
Applying the repeating pattern
11 You should have now switched back to our original Photoshop document (and you can close the pattern document after defining it, we’re done with it). Get out the Clone Stamp Tool (S) from the Tools Panel.  12 In the Options bar, change the Clone Stamp Tool’s option to the setting below.
Make sure that you change the pattern to the one we just made. ![]() 13 We then create a new layer on top of everything that will host the pattern we’ll apply to the text. With the Pattern Stamp Tool, draw/paint over your text.
13 We then create a new layer on top of everything that will host the pattern we’ll apply to the text. With the Pattern Stamp Tool, draw/paint over your text.
14 Finally, lower the opacity of the pattern layer to around 80% or to something that you like, finishing off the first text effect. 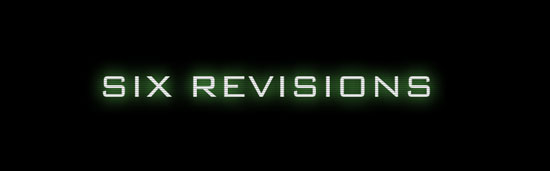 We’re now finished with the first text effect, and it’s time to move on to the second text effect.
Part 2: The second text effect
1 The second text effect will be simpler.
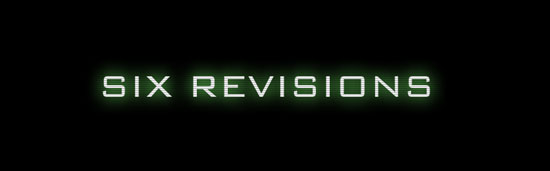
Create a new canvas to work with, and you can use the same settings as the first text effect above, also changing the Background layer to black (#000000). 2 Use the Horizontal Type Tool with Impact as the font family and the font size to around 70pt. Type out the desired text in all caps; in this tutorial, I used “SIX REVISIONS” as the text.

Add layer styles
3 We will now apply several layer styles. To do this, double-click on your text layer’s thumbnail in the Layers Panel to open the Layer Style Dialog box. First, we’ll add an Inner Shadow layer style.
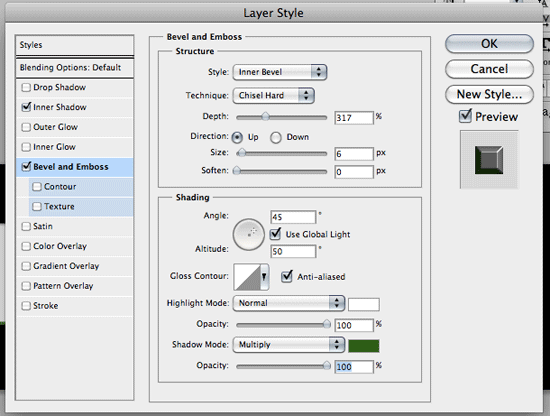
Change your settings to the same values as shown below and it’s worth noting that you should feel free to play around with the settings to get the effect you like. 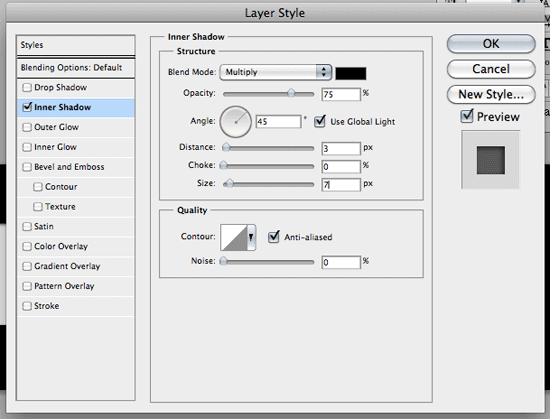 4 We now click on Bevel and Emboss to apply a beveling effect onto our text. You can use the settings shown below to get the perfect Call of Duty effect.
 5 We’ll add a contour to our bevel effect; you can do this by checking the Contour checkbox below Bevel and Emboss. You may use the settings shown in the following figure.
 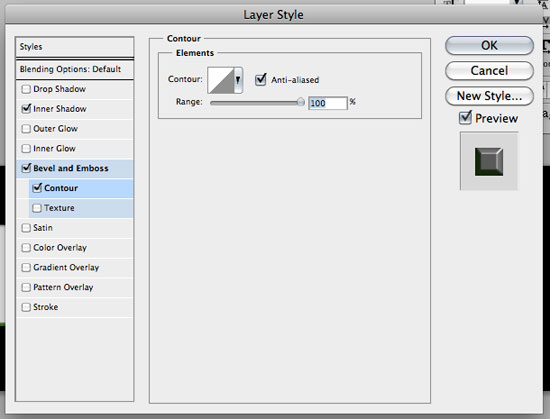 6 We now add a Gradient Overlay layer style.
Double-click on the Gradient option to open the Gradient Editor dialog box and use the settings below. The left color stop’s color is #91FD83 (light green), the middle color stop is white (#FFFFFF), and the right color stop is (#314834) which is a dark/olive green color. 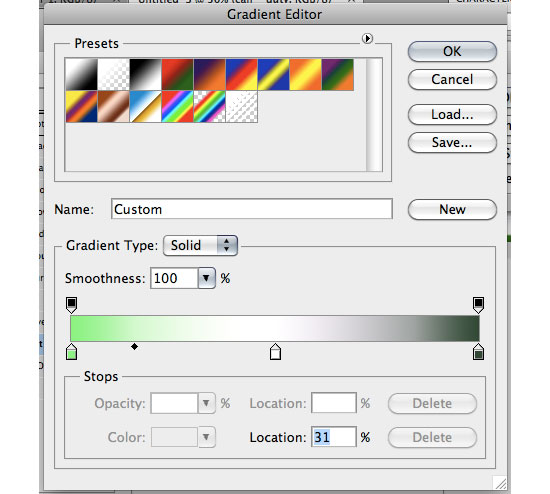 7 Change your gradient overlay settings (shown below).
Switch the Blend Mode to Normal, and change the angle to 90 degrees, and reduce the scale of the gradient to 86%. 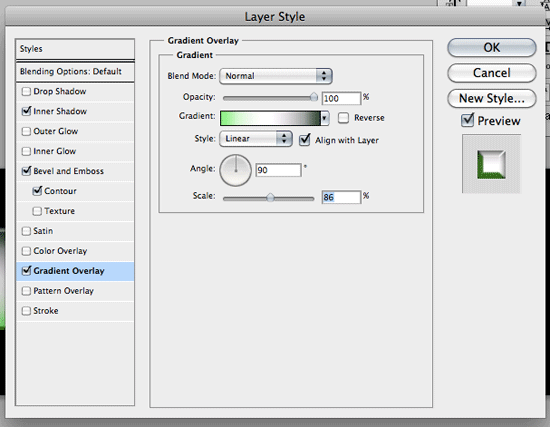 You finished product should look like this:
We’re done!
Text Effect 1
Text Effect 2
Video Version
I hope you learned a trick or two in this Photoshop tutorial. If you’d prefer a video tutorial of what we’ve done above, check out my screencast below.
Related Content
-
 President of WebFX. Bill has over 25 years of experience in the Internet marketing industry specializing in SEO, UX, information architecture, marketing automation and more. William’s background in scientific computing and education from Shippensburg and MIT provided the foundation for MarketingCloudFX and other key research and development projects at WebFX.
 -

WebFX is a full-service marketing agency with 1,100+ client reviews and a 4.9-star rating on Clutch! Find out how our expert team and revenue-accelerating tech can drive results for you! Learn more
Make estimating web design costs easy
Website design costs can be tricky to nail down. Get an instant estimate for a custom web design with our free website design cost calculator!
Try Our Free Web Design Cost Calculator
Share this article


Web Design Calculator
Use our free tool to get a free, instant quote in under 60 seconds.
View Web Design CalculatorMake estimating web design costs easy
Website design costs can be tricky to nail down. Get an instant estimate for a custom web design with our free website design cost calculator!
Try Our Free Web Design Cost Calculator


