

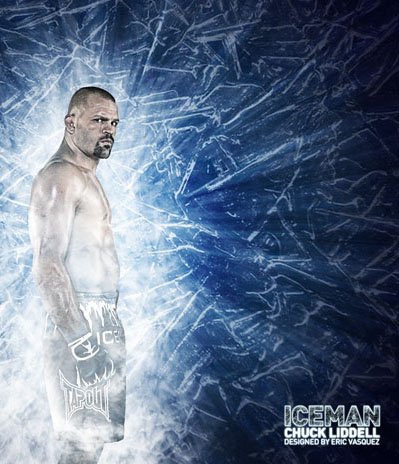
Preview
You can click on the scaled-down image below to see the full scale final result (it’s huge though!).
Tutorial Resources
- Stock Image: Chuck Liddel (TIFF)
- Photoshop Brush Set: Ice Shatter Brushes by Rangthorn on DeviantArt
- Photoshop Brush Set: Ice Sense Brushes by JavierZhX on DeviantArt
- Stock Image: Ice background by Mark Ahsmann on Wikimedia
Step 1: Create a New Photoshoop Document
Start by creating a new document in Photoshop (Ctrl/Cmd + N). I like to use standard paper size in case I want to print out the piece. If you do intend to print this piece, you should make sure that your image is in CMYK mode by going to Image > Mode > CMYK Color, otherwise RGB mode will be fine.
For this particular design, I will be using 11×8.5in canvas — so the image is wider than it is tall.
It is better to begin with a larger size that can be reduced, rather than working small and trying to blow up the image later.
This is also a good time to save the document we will be working on. You can call it whatever you would like, but for this tutorial, I have named my file “Iceman_ChuckLiddell.psd.”
Step 2: Import the First Image
Open up the image of Chuck Liddell (listed in the Tutorial Resources) and drag it over into your Photoshop file. The image will need to be scaled up to about the same size.
It doesn’t have to be exact, but for the purposes of this tutorial, try to match it as best as you can. You can use the Free Transform command (Ctrl/Cmd + T) to scale the stock image.
Step 3: Isolate the Image
Now what we will want to do is isolate the image of Chuck so we have him by himself without any background. There are many ways of doing this, but with the image listed in the Tutorial Resources above, it should be very simple as the image already has a solid color background.
Select the Magic Wand Tool (W) and, on the layer containing the image, click any part of the white area around Chuck Liddell to see your selection.
I have turned off the bottom layer just so you can see the selection, but this isn’t absolutely necessary.
You will then see your marching ants (as I like to call them) indicating the selection we have just made.

Next, hit Delete to erase the background and — Voila! — you are now left with an image of Chuck on a transparent background.
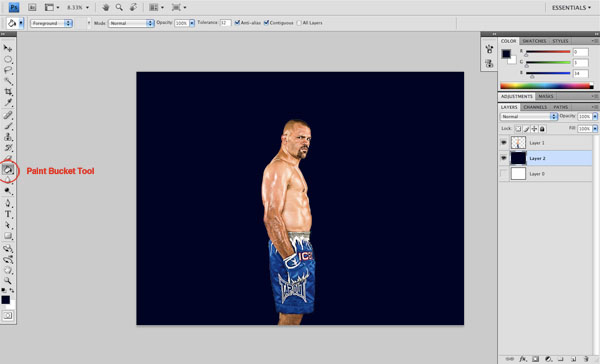
Step 4: Background Fill Color
Next we are going to select a nice dark blue color (#000322) and then create a new layer just below the image of Chuck.
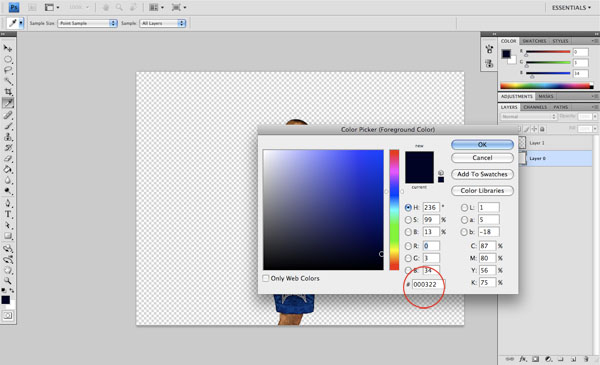
After creating the new layer, select the Paint Bucket Tool (G) and click anywhere in the new layer to fill it with our dark blue color.
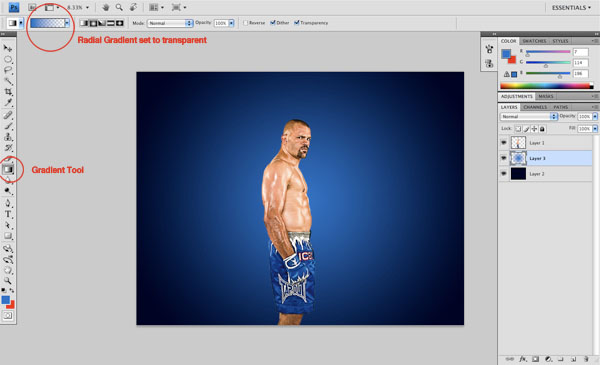
Step 5: Create a Transparent Radial Gradient
Select a lighter blue color (#0772c4) and click on your Gradient Tool (G). Along the top of the screen, you will see your gradient Options Bar.
Select radial gradient from this row, and then make sure that the gradient goes from solid to transparent.
Next, create a new layer above our dark blue background and with your Gradient Tool ready to go, click-and-hold in the center of the image and drag your mouse outwards towards one of the four corners of the image.
Now you should have a background that’s light blue in the center and gets darker towards the edges of the canvas.
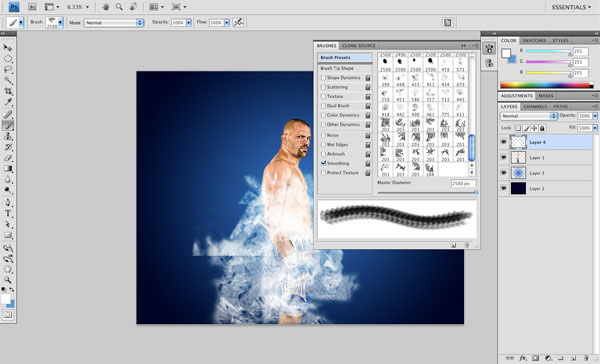
Step 6: Make It Icy
Now for some fun with the brushes! First, though, create a new layer at the top of all the layers thus far.
Using the first set of ice brushes listed in the Tutorial Resources listings (Ice Shatter Brushes by Rangthorn) with a solid white Foreground color, begin applying some of the ice brushes around Chuck’s body with the Brush Tool (B), mostly below the head and neck area, as we will want to make him appear as though he is thawing out from a deep frost.
You can use as few or as many of these brushes as you would like.
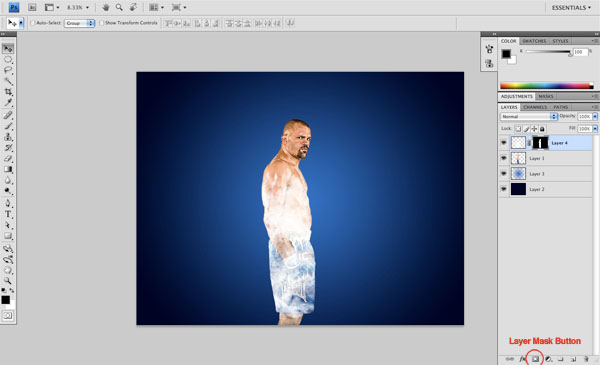
Step 7: Masking the Ice
Once you are happy with the overall shape and look of the ice brushes, hold down the Cmd/Ctrl key and, in the Layers Panel, click on the layer thumbnail containing the image of Chuck. This should give you a selection (the marching ants) that outline his body.
Now, while you still have this selection active, you will want to go to the layer just above him (which contains the brushwork we applied in the previous step) and click on the Add layer mask button located at the bottom of the Layers Panel.
Once you do this, you should only see the ice within Chuck’s body.
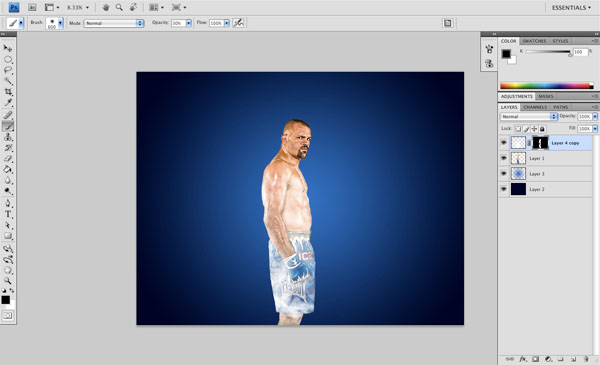
Step 8: Thawing Out
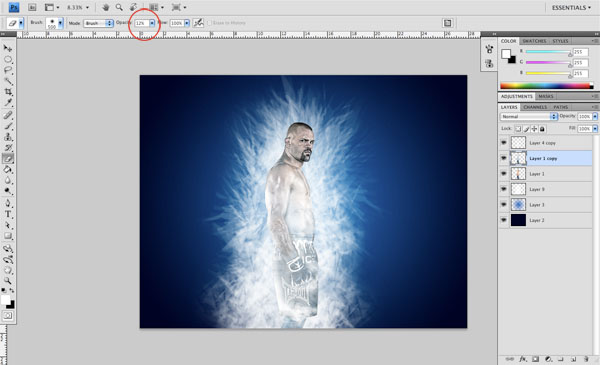
Now that we have a mask on the layer containing our ice, we want to remove parts of it so that we can retain some of the detail in Chuck’s form underneath.
So go to your Brushes Panel (hit F5 if you can’t see it) and grab a large, soft, round brush.
Lower the Opacity option of your brush to around 25–30% and begin brushing into the mask layer with a solid black Foreground color. You will want to focus mainly on brushing around his arm, hand, and torso. This will remove some of the excess ice that’s covering our subject.
Once you are happy with the results, hold down Cmd/Ctrl and click on the Add layer mask icon in the Layers Panel.
Select Apply Mask from the menu to apply the changes.
This would be a great time to save your work in case you haven’t done that already.
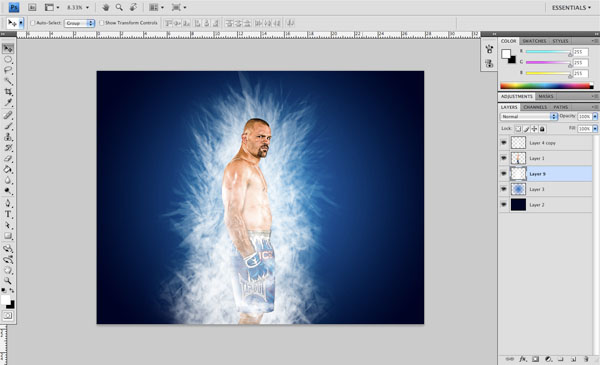
Step 9: Ice Ice Baby
This step will require you to use the other set of custom brushes found in Tutorial Resources listings (Ice Sense Brushes) and will really begin to help build up some more foundation for our image.
Set your Foreground color to solid white and on a layer underneath Chuck, begin to build up an icy background with the Brush Tool (B) with your brush tip set to the one of the Ice Sense brushes.
You can spend as much or as little time as you would like on this, but the idea is to transform, flip, and rotate the brushes all around Chuck Liddell so that we get a nice form going behind him. This is going to be a little bit different for everyone as you are in complete control of the size, shape, and positioning of the shapes as you build them up.
Once you are happy with the shape you have going, it’s good practice to merge all of these layers to keep our file size to a minimum, unless you anticipate that you’ll need to change these later on.
Still with me? Great!
Let’s move on.
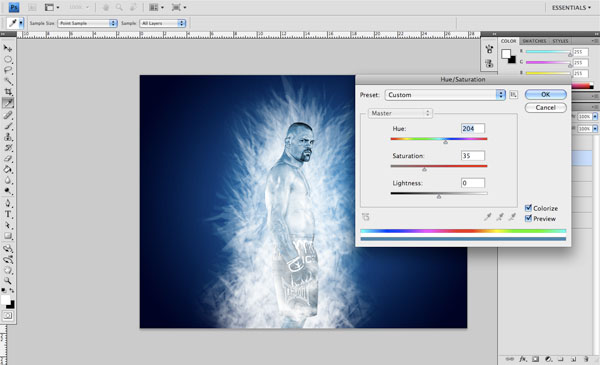
Step 10: More Chuck for Your Buck
Next, we are going to create a copy of the Chuck Liddell layer. The shortcut to do this is to select the layer and press Cmd/Ctrl + J (the shortcut for Layer > Duplicate Layer). This will create a copy of the layer just above our original layer, which is exactly what we want.
On this new duplicate layer that we have just made, we want to give Chuck an icy tone that will help to further enhance the frozen look.
To do this, you will need to go to Image > Adjustments > Hue/Saturation. Once the dialog box appears, make sure that the Colorize box is checked off and use the following settings:
- Hue: 204
- Saturation: 35
- Lightness: 0
Step 11: Backing Off the Cold
Select the Eraser Tool from the Tools Panel and on the top of the toolbar where you have your eraser options, choose a medium-sized, soft, round brush and also lower the Opacity to about 12–15%.
On the layer that we have just colored with the Hue/Saturation image adjustment, begin to lightly erase some of the areas on Chuck’s skin that are too saturated. This will give a more subtle, realistic look to the image.
Step 12: Breaking the Ice
You will want to open up the other stock image (Ice background). Once this image is open, drag it over into your document on top of all of the other layers.
You will need to hit Cmd/Ctrl + T to transform this image and scale it up quite a bit so that it covers the entire canvas.
It may look a bit odd at first (as is usually the case when you scale up raster images), but we are going to fix that in just a moment.
Make sure that you have the broken ice image’s layer selected in the Layers Panel and go up to Image > Adjustments > Desaturate.
Next, change the Blend Mode of the image’s layer to Screen. You may notice that this image is covering up Chuck Liddell almost completely, so what we want to do next is erase some of the image. Hold down the Cmd/Ctrl key and select the Chuck Liddell layer so that you have an active selection that follows the outline of his body.
While the selection around Chuck still active, select the top layer (which contains the broken ice image).
Next, grab the Eraser Tool (E) and with a soft, round brush, begin to erase some of the image with a low Opacity option setting (12% should work).
You should now notice some of the detail being brought back into the figure.
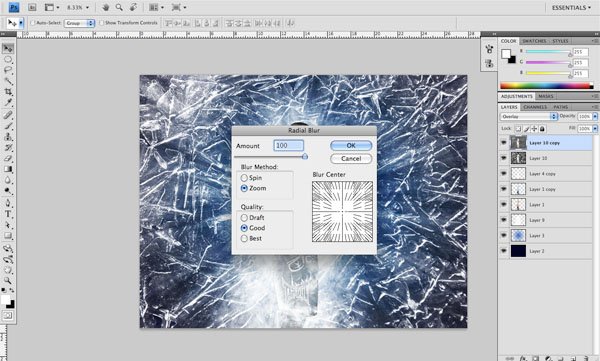
Step 13: Getting Blurry
Select the layer containing the broken ice that we just worked on. With this layer selected, press Cmd/Ctrl + J to duplicate the layer. This will intensify the appearance of the effect, however, rather than setting the Blend Mode of both layers to Screen, we will set this newly duplicated layer’s Blend Mode to Overlay.
Next, go to Filter > Blur > Radial Blur.
Set the Blur Method to Zoom and the Amount to 100. Press OK or hit Enter to apply the filter. You can really see what is happening here by turning this layer off and back on again, switching back and forth to see the results. This adds a nice feeling of motion as the rays of light start from the center and emanate outwards from the focal point.
Step 14: Skating on Thin Ice
As I mentioned in the previous step, the focal point of this piece is (of course) Chuck Liddell.
At this point, the background is really jumping out, so I want to reduce some of the contrast here to maintain our visual hierarchy.
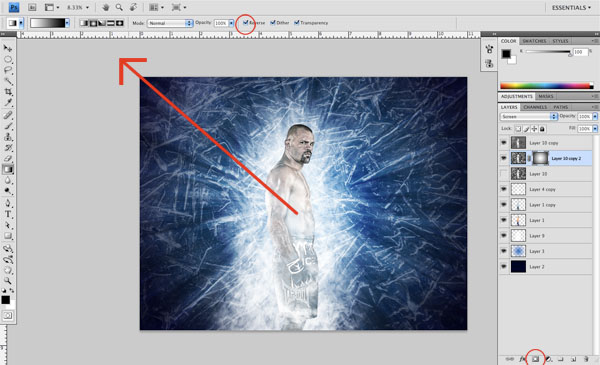
What we will do next is create a copy of our original ice layer (the one whose Blend Mode we set to Screen) and make a duplicate (Cmd/Ctrl + J) of it.
Once you have a copy of this layer, turn off the original layer—this is really just to have a back-up copy underneath in case we need to go back, and is generally just good practice.
Now, hit D on your keyboard to reset your colors to default (black Foreground, white Background).
Next, we are going to click on the Add layer mask icon at the bottom of our Layers Panel. This should add a new mask to the original ice layer above Chuck.
Choose your Gradient Tool (G) from the Tools Panel and make sure that the setting goes from one solid color to another (white to black or black to white). If yours goes from white to black, then we also need to make sure that we select Reverse from the Gradient Tool Options Bar.
Once we have this set, we can go ahead and apply our fading radial mask.
Click-and-hold in the center of the image, and drag outwards towards any of the four corners of our canvas, going a little bit past the corner.
Now you should have reduced the opacity all the way around the outside of our image. Note that this step may take a couple of tries, but that is why we are working off of a copy, and thankfully we can always undo with the History Panel.
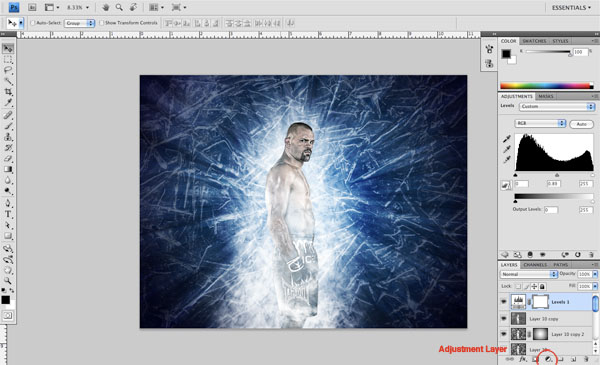
Step 15: Level Adjustment
On the bottom of the Layers Panel, you will notice an icon that looks like a small black and white cookie (to me, it also looks a little bit like a ying-yang symbol) — this is the icon for creating a new adjustment or fill layer. The thing to remember here is that by adding an adjustment layer, as opposed to simply going to the Image menu and applying the adjustments there, is that by doing it this way, it’s non-destructive, which ensures that we maintain the highest possible quality for our image without commiting permanent changes to any layer that we can’t undo later on.
Moving forward, click on the Create new adjustment or fill layer icon and select Levels from the menu.
Now you will see the Histogram pop up. We want to grab the middle slider and move it so the setting value is at 0.89. Everything else is okay where they are. This adjustment layer will add a bit more contrast to our design.
Step 16: Finishing Touch
Lastly, I have added a bit of frosty text at the bottom of the design. If you’ve made it through all of the steps, then you have just successfully completed this tutorial.
Nice work!
Tutorial Summary
This tutorial showed you some handy techniques for creating a dramatic design piece. We used custom brushes, adjustment layers, image adjustments, radial blurs, and a variety of other Photoshop features to arrive at the final product.
Download Source Files
- electrifying_composition_liddel (ZIP, 119 MB)
-
 Trevin serves as the VP of Marketing at WebFX. He has worked on over 450 marketing campaigns and has been building websites for over 25 years. His work has been featured by Search Engine Land, USA Today, Fast Company and Inc.
 -

WebFX is a full-service marketing agency with 1,100+ client reviews and a 4.9-star rating on Clutch! Find out how our expert team and revenue-accelerating tech can drive results for you! Learn more
Make estimating web design costs easy
Website design costs can be tricky to nail down. Get an instant estimate for a custom web design with our free website design cost calculator!
Try Our Free Web Design Cost Calculator
Table of Contents
- Preview
- Tutorial Resources
- Step 1: Create a New Photoshoop Document
- Step 2: Import the First Image
- Step 3: Isolate the Image
- Step 4: Background Fill Color
- Step 5: Create a Transparent Radial Gradient
- Step 6: Make It Icy
- Step 7: Masking the Ice
- Step 8: Thawing out
- Step 9: Ice Ice Baby
- Step 10: More Chuck for Your Buck
- Step 11: Backing off the Cold
- Step 12: Breaking the Ice
- Step 13: Getting Blurry
- Step 14: Skating on Thin Ice
- Step 15: Level Adjustment
- Step 16: Finishing Touch
- Tutorial Summary
- Download Source Files
Share this article


Web Design Calculator
Use our free tool to get a free, instant quote in under 60 seconds.
View Web Design CalculatorMake estimating web design costs easy
Website design costs can be tricky to nail down. Get an instant estimate for a custom web design with our free website design cost calculator!
Try Our Free Web Design Cost Calculator


