

Preview
Below you can see the final image of this tutorial. Click on it to see it in full size. 
Tutorial Resources
- Font: Avenir Font (85 Heavy and 95 Black)
- Reference Image: Light Bulb
- Photoshop Brushes: Watercolor Spatter Brushes
- Texture: Grunge Texture
Step 1: Make the Text in Photoshop
We’ll start by creating the 3D text using Photoshop (and then later on, Cinema 4D). First, open a new document in Photoshop with the dimensions 1280px by 1024px. Then select the Horizontal Type Tool (T) and write your text using a bold font.
I wrote “Ideas are all around us” in two lines, using Avenir 85 Heavy at 175 pt for the first line and Avenir 95 Black for the second line. To change the space between letters, open the Character Panel and modify the tracking value to -35. 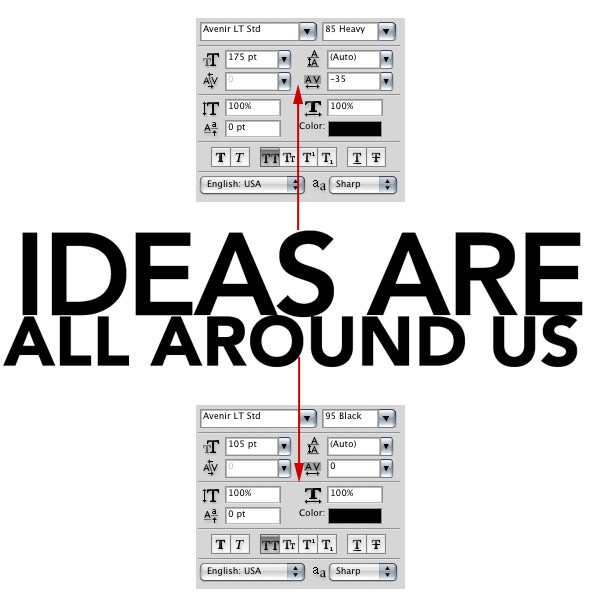
Step 2: Convert the Text into Shape Layers
Now we need to convert the text layers into shape layers so that we can export the document later as Illustrator paths and open it in Cinema 4D. Right-click on each text layer and select Convert to Shape from the menu. 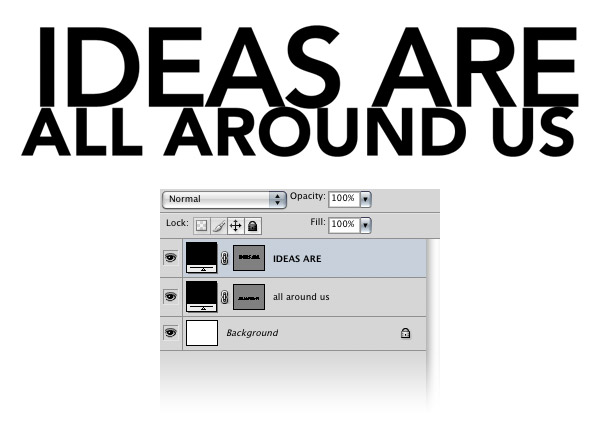
Step 3: Save the Paths
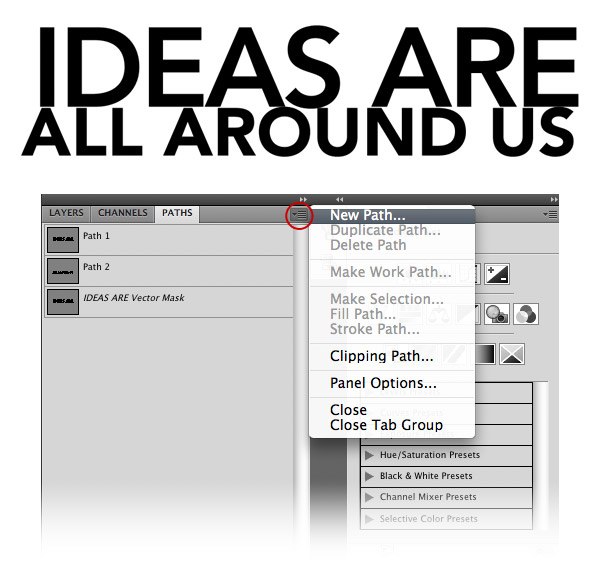
To export the shape layers into Illustrator paths, we need to save the text paths first.
Select the first shape layer and go to the Paths Panel (Window > Paths). Click on the button from the upper right corner and select New Path. Do the same thing for the second shape layer.
Step 4: Export the Document
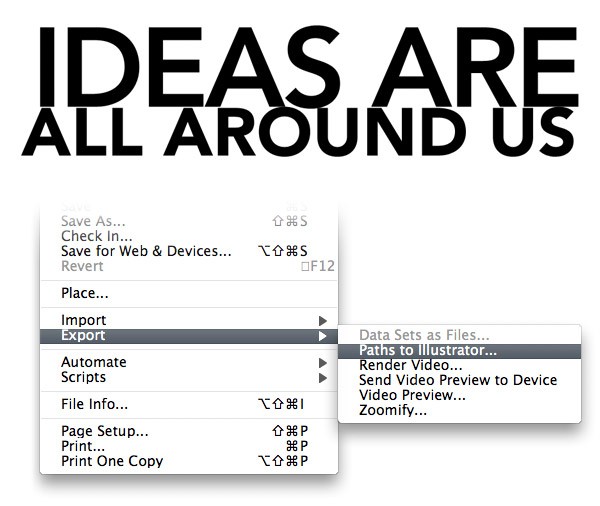
Go to File > Export > Paths to Illustrator, give your file a name, and then click Save. A new document will be created with the .AI (Adobe Illustrator) extension. Now you can close this Photoshop document.
Step 5: Import the Document in Cinema 4D
Open Cinema 4D. Then go to File > Open, locate the .AI file you exported from Photoshop, and then click Open. A new window will appear.
Leave the importing settings as they are and just click OK. Now we can use the paths to create our 3D text. 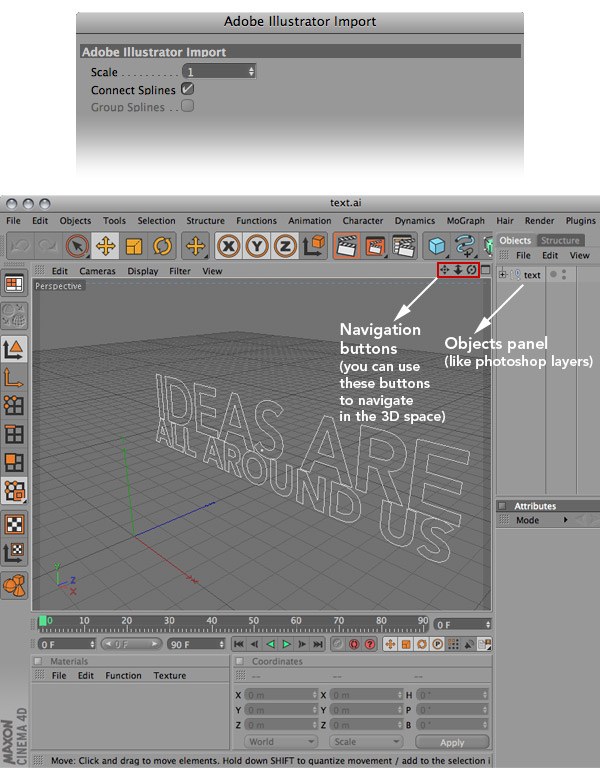
Step 6: Merge the Paths
In the Object panel you can see a null object (it’s like a Photoshop group).
Click on the plus button next to the null object to expand it. Hold down the Ctrl/Cmd key and from the Objects panel, select all the paths of the first line of text. Then right-click on one of the paths and select Connect + Delete.
This will merge all the paths into one path. Do the same for the rest of the lines of text (if you have more than one). 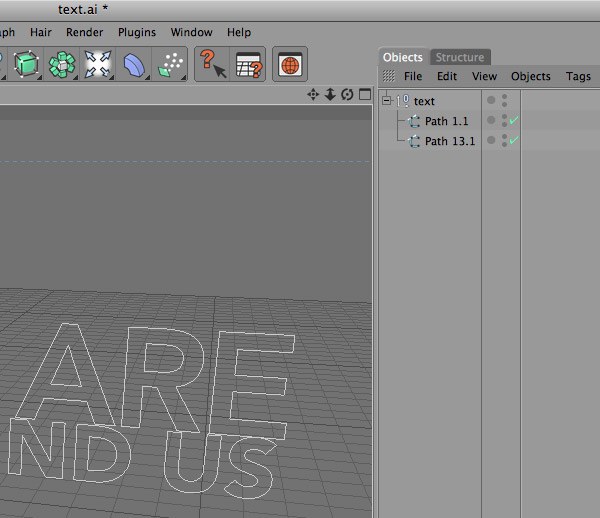
Step 7: Create the 3D Text
Select the first path from the “text” null object.
Then hold down the Alt/Option key, click and hold on the HyperNURBS button and select Extrude NURBS. This will put the active path directly into the Extrude NURBS object. You will notice that your first line of text is now three dimensional.
Do the same for the second text path. 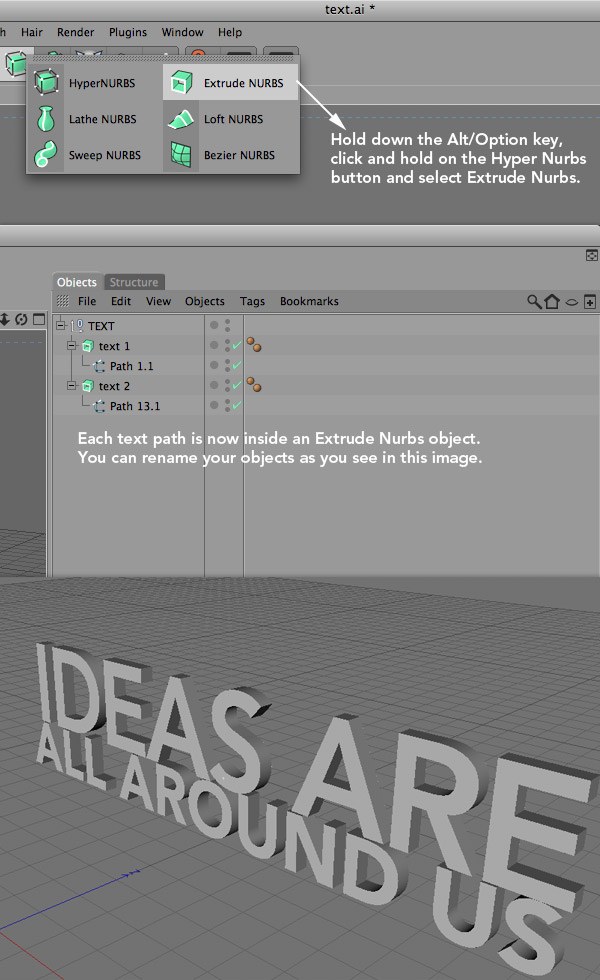
Step 8: Set the Atrributes for the First Object
Select the first Extrude Nurbs object (“text 1”), go to the Attributes panel, and then click on the “Coord.” tab. Change the Z axis to 4. Then select the Caps tab and use the settings from the following image. 
Step 9: Set the Attributes for the Second Object
Repeat the previous step for the second line of text (the “text 2” Extrude NURBS object), but this time, set the Z axis to 3.5. 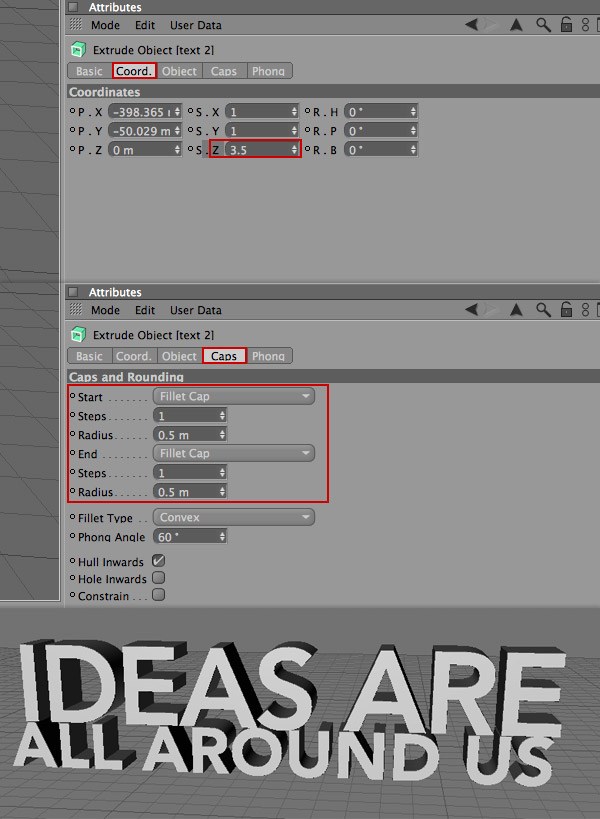
Step 10: Add an Environment
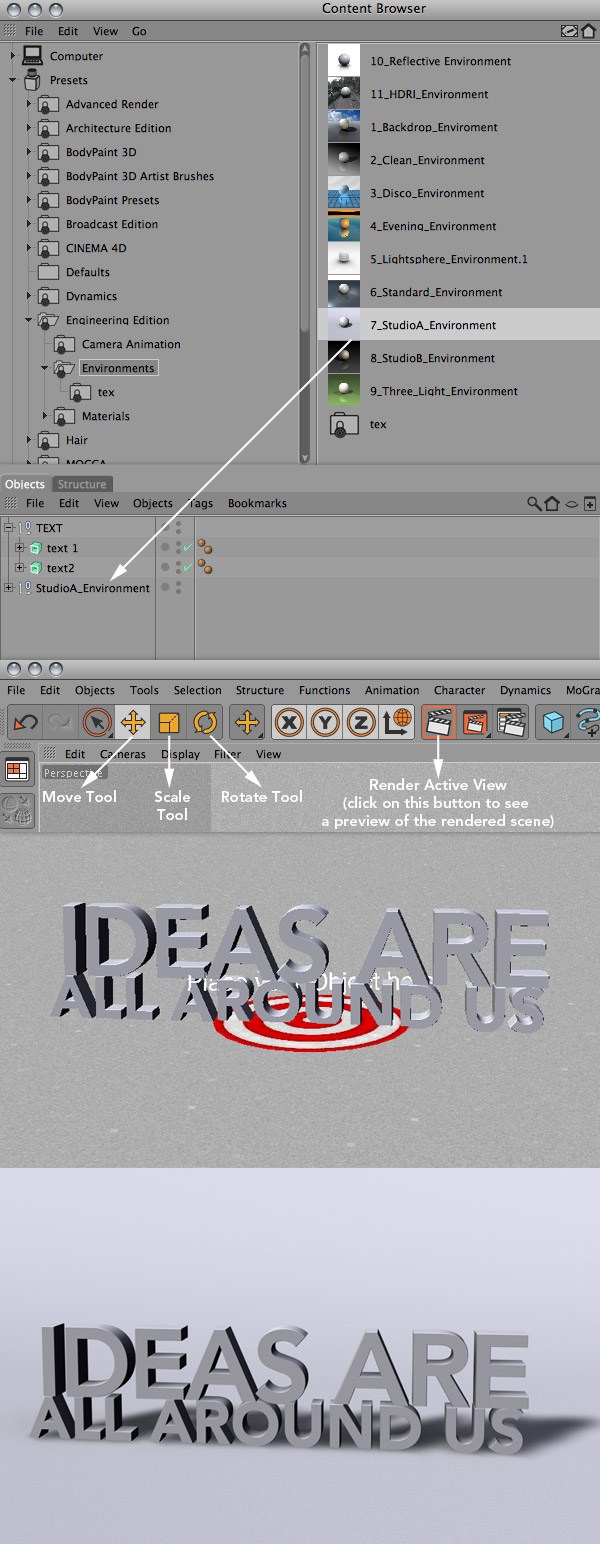
Now we will add a studio environment to the 3D scene. Cinema 4D has a set of default environments that we can use. Click on the Content Browser button and find the Environments folder.
Then double-click on the “7_StudioA_Environment” and close the Content Browser window; make sure that the “StudioA_Environment” null object is underneath the “TEXT” null object. This environment will provide us the light and background that we need. You will see a red target in your scene; that’s where we will put the 3D text.
Don’t worry, the red target is only for positional reference and it will not appear when we render the scene. Select the “TEXT” null object and use the Move Tool (E) to move your text. You can also use the Scale Tool if you want to change the size of the text and the Rotate Tool if you want to change the texts’ angles.
Step 11: Create the Path for the Light Bulb
Now that we have finished creating the 3D text, we will move on to creating a light bulb using Photoshop and Cinema 4D. Download this photo and open it in Photoshop. We will only use it as reference photo that we will trace our paths on.
Activate the Photoshop rulers (Ctrl/Cmd + R), click-and-hold on the vertical ruler, and then drag a guide towards the middle area of your light bulb photo. Select the Pen Tool (P), make sure that the Shape layers option in the Options Bar is activated and then create a path over the right hand area of the bulb. The color of the shape is not important.
After you create your shape, go to the Paths Panel, click on the upper right corner button and select Save Path. Give your path a name and click OK. 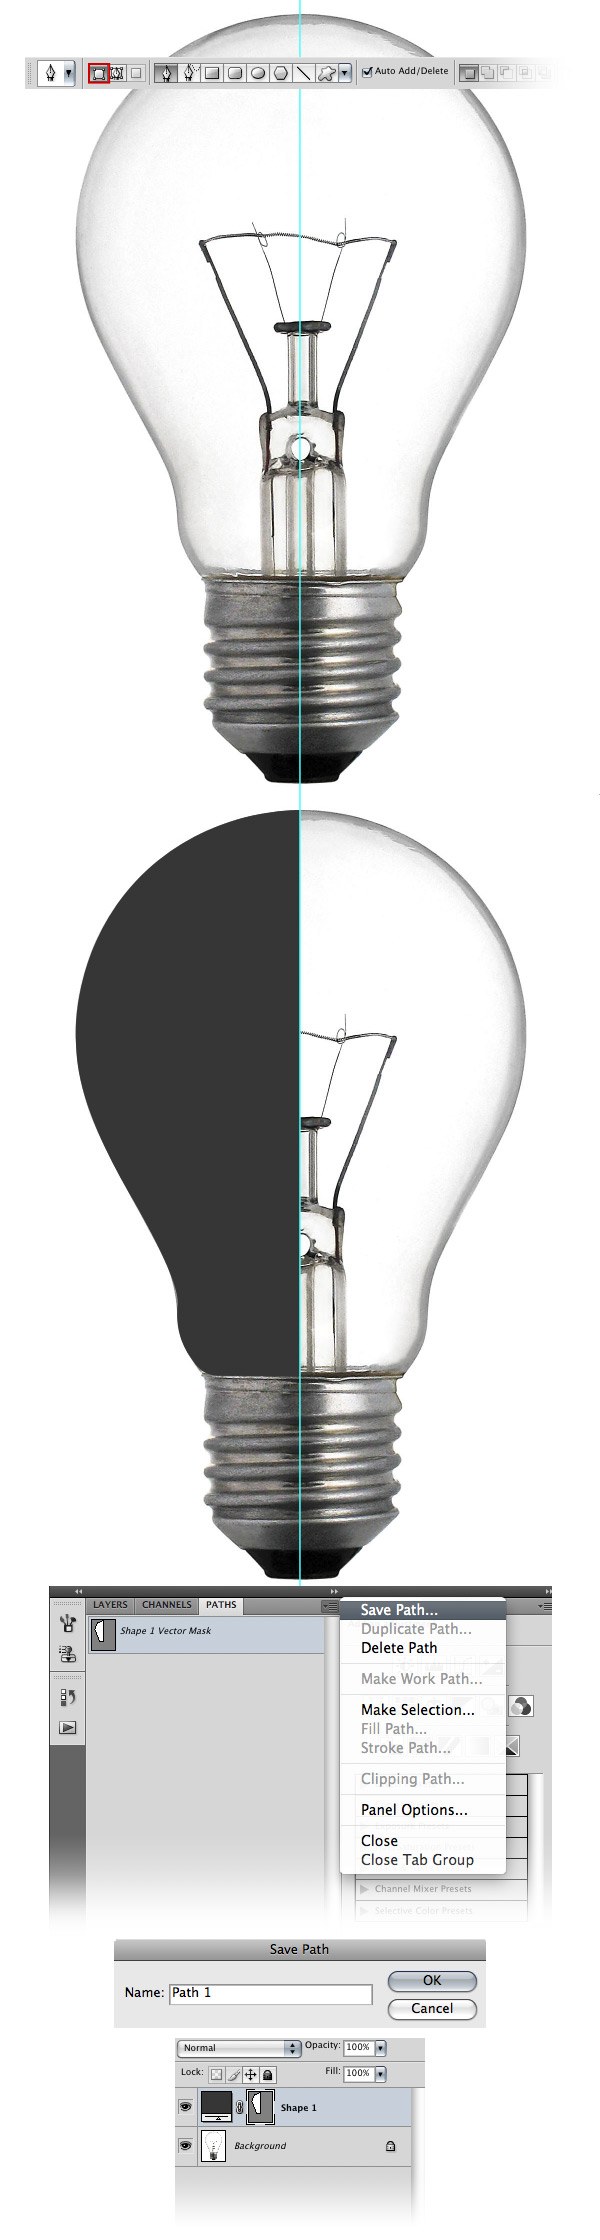
Step 12: Create a Path for the Metallic Part of the Light Bulb
Select the Pen Tool (P) again and create a shape over the right hand side of the metallic area of the light bulb.
Then go to the Paths Panel and save this path as well. 
Step 13: Export the Paths to Illustrator
Go to File > Export > Paths to Illustrator and save the .AI file on your computer. 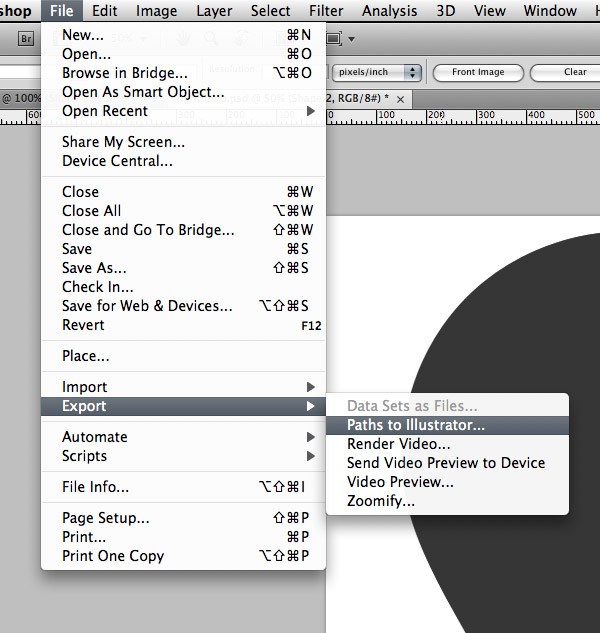
Step 14: Import the Light Bulb Paths in Cinema 4D
Open the .AI file of the exported light bulb.
In the Objects panel, you will see a null object with two paths inside it. 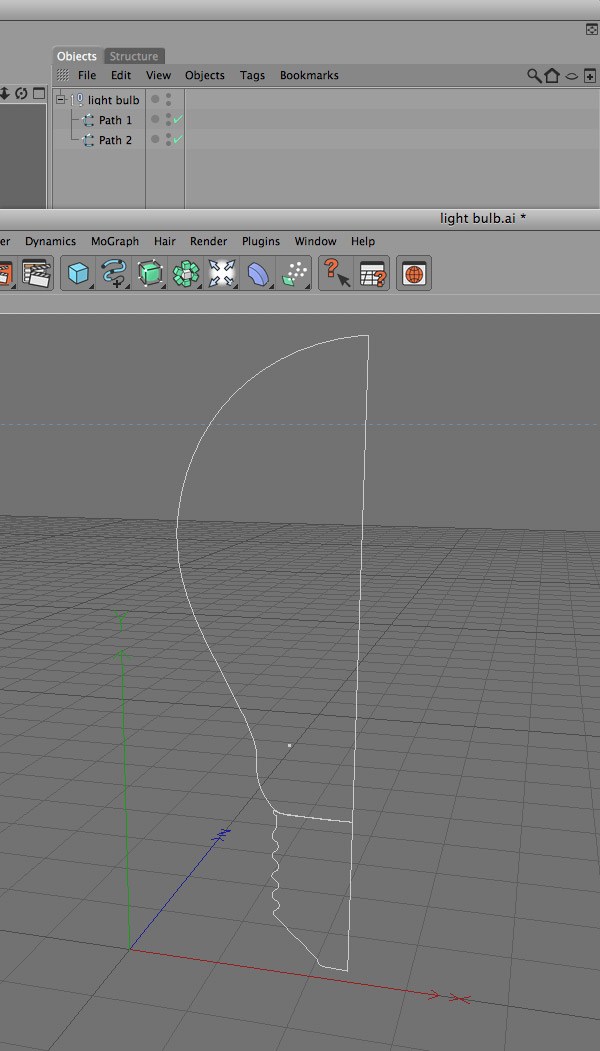
Step 15: Create the 3D Light Bulb
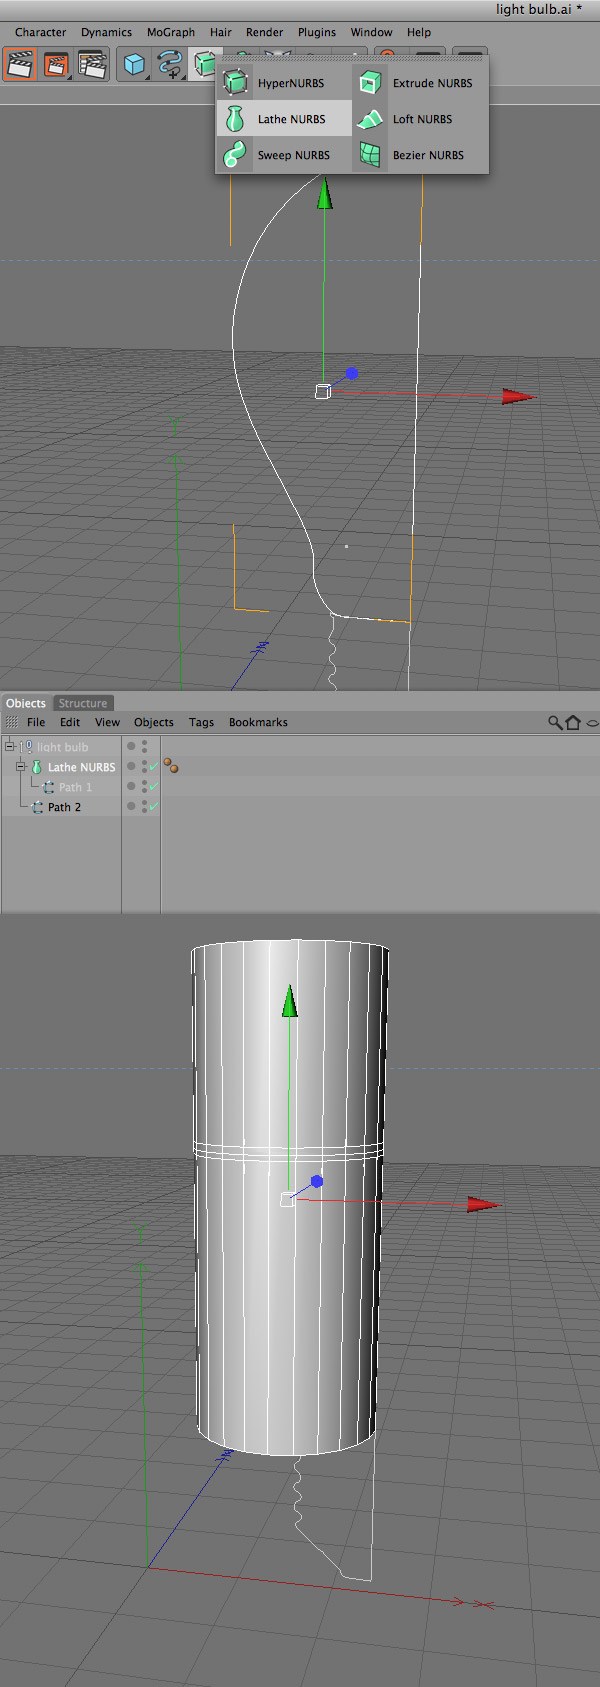
Select the first path, hold down the Alt/Option key, click-and-hold on the Hyper NURBS button and select Lathe NURBS. You will see that your path will be transformed into a 3D shape that looks like a cylinder rather than a light bulb — we will correct this shortly.
Step 16: Correct the 3D Bulb
Select the path that is inside the Lathe NURBS object. Then select the Move Tool (E), click on the red arrow (the X axis arrow) and drag it to the left until you have the light bulb shape. 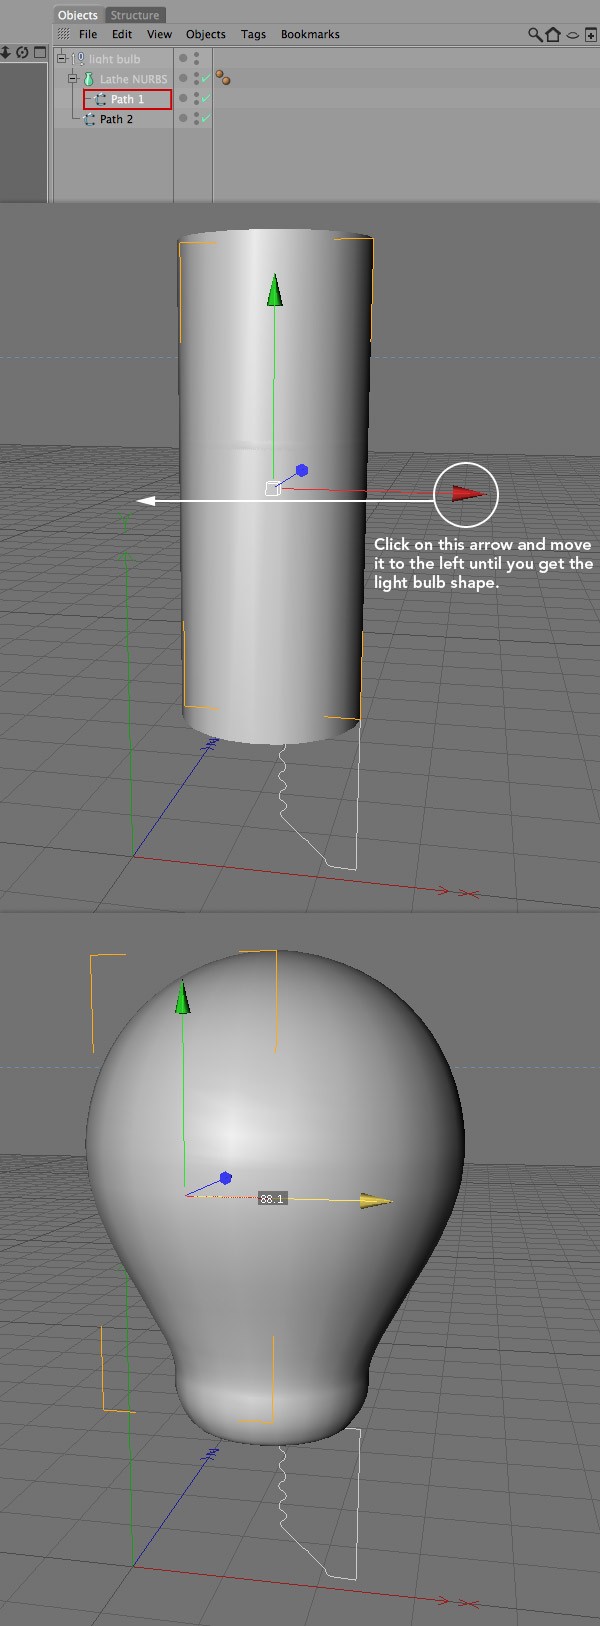
Step 17: Correct the 3D Metallic Part of the Light Bulb
Repeat the previous two steps for the second path as well.
The bottom part of the light bulb will not be correctly placed, so you will have to select the Lathe NURBS object and move it underneath the bulb using the Move Tool. 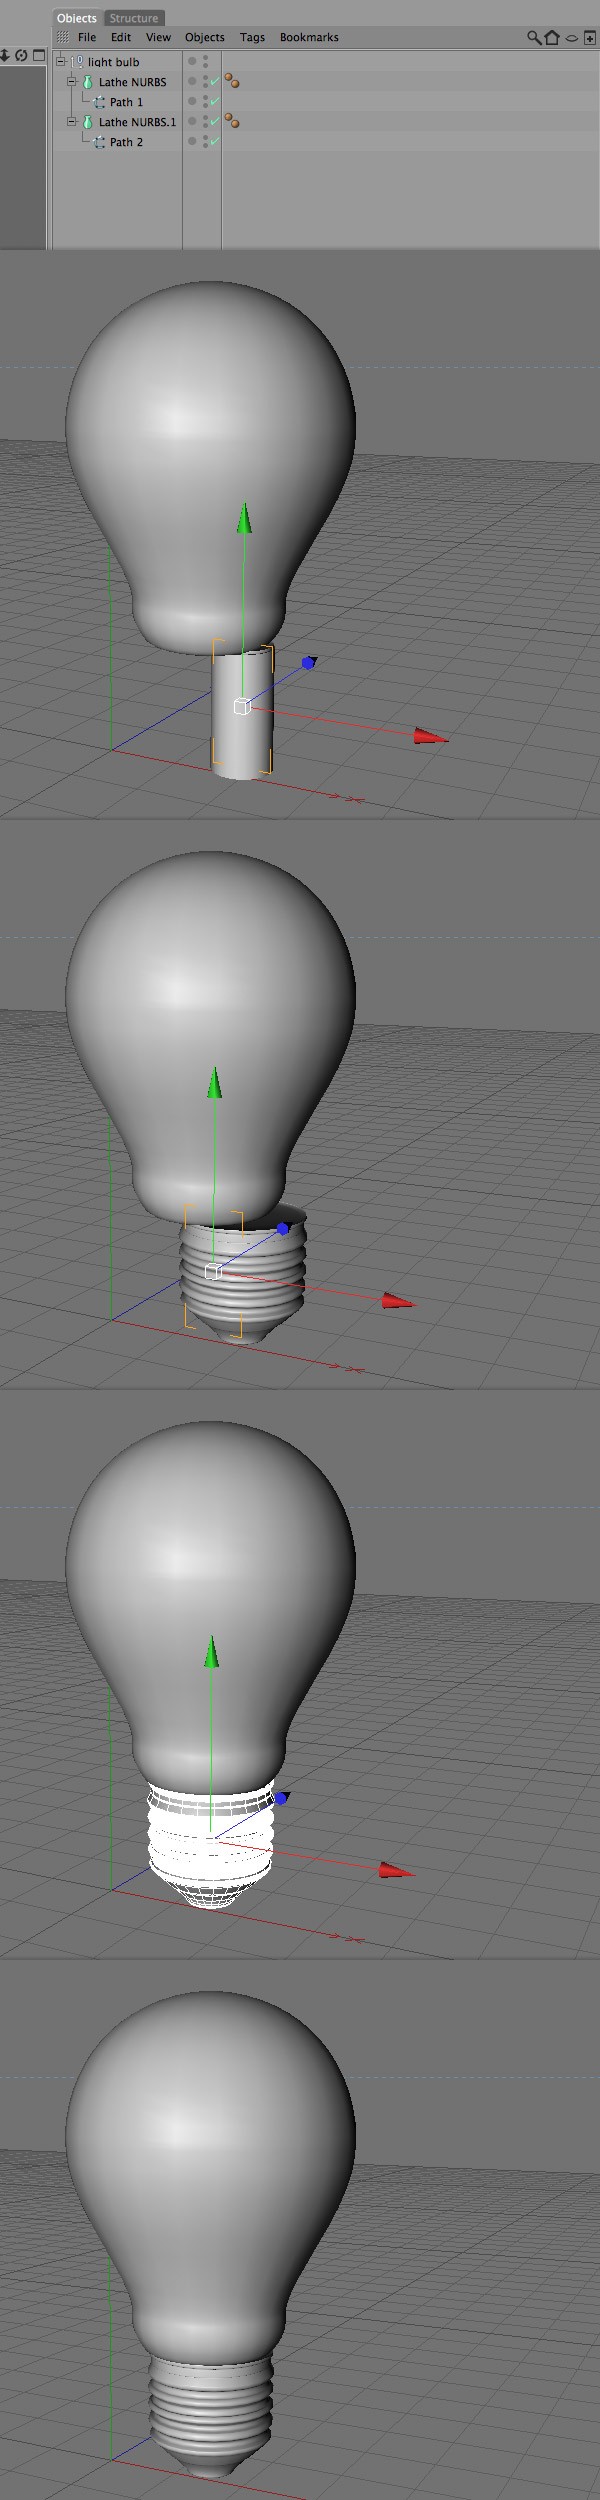
Step 18: Set the Attributes of the Light Bulb
Hold down the Ctrl/Cmd key and select the two Lathe NURBS objects. Then click on the Object tab from the Attributes panel and set the Subdivision to 120. 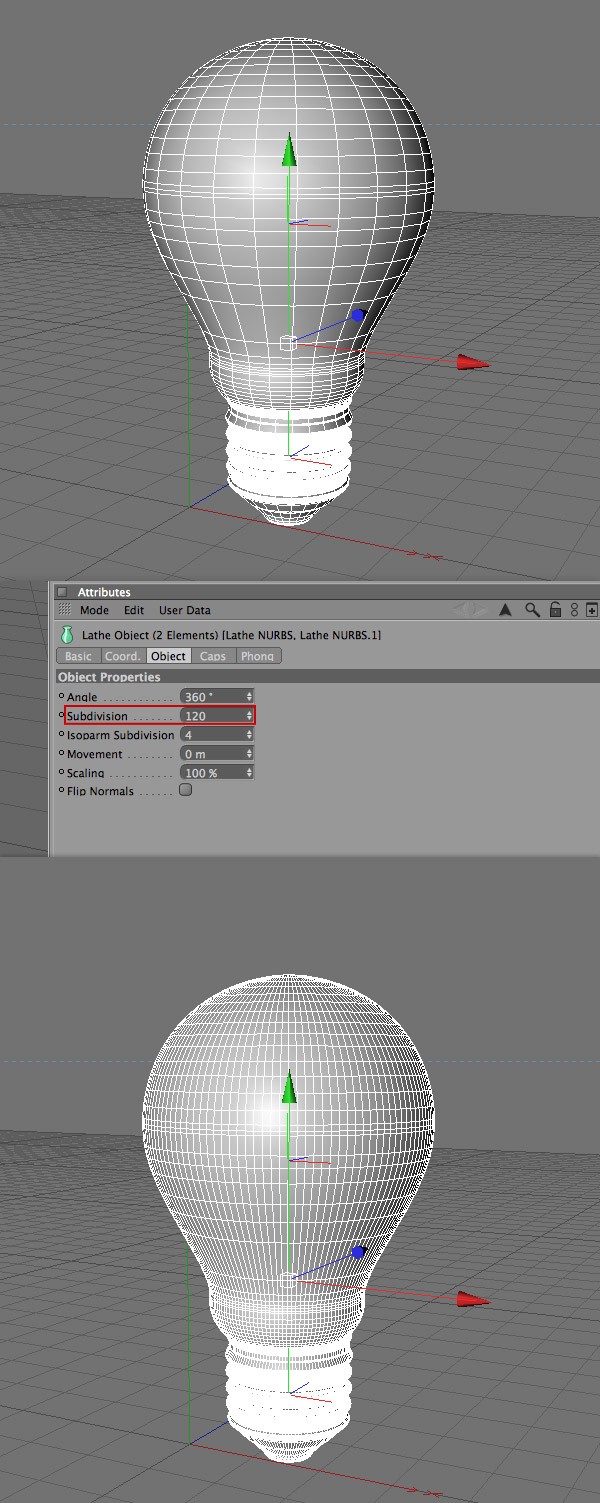
Step 19: Place the Light Bulb into the Stage
Click on the “light bulb” null object and copy it (Ctrl/Cmd + C). Then select the initial document from the Window menu and paste the light bulb (Ctrl/Cmd + V). If your light bulb is too big, use the Scale Tool (T) to make it smaller.
Then use the Move Tool (E) to move the light bulb above the 3D text. 
Step 20: Add Some Materials
Now that we have all the 3D objects we need, we’ll add some materials to them to give them their surfaces. Click on the Content Browser button and find the following three materials:
- chrome1 (Cinema 4D > Materials > Channel > chrome1)
- chrome2 (Cinema 4D > Materials > Channel > chrome2)
- glas001 (Cinema 4D > Materials > Basic > glas001)
After you find each material, double-click on it to add it to the Materials panel. The other materials that you see there are from the studio environment we added earlier. 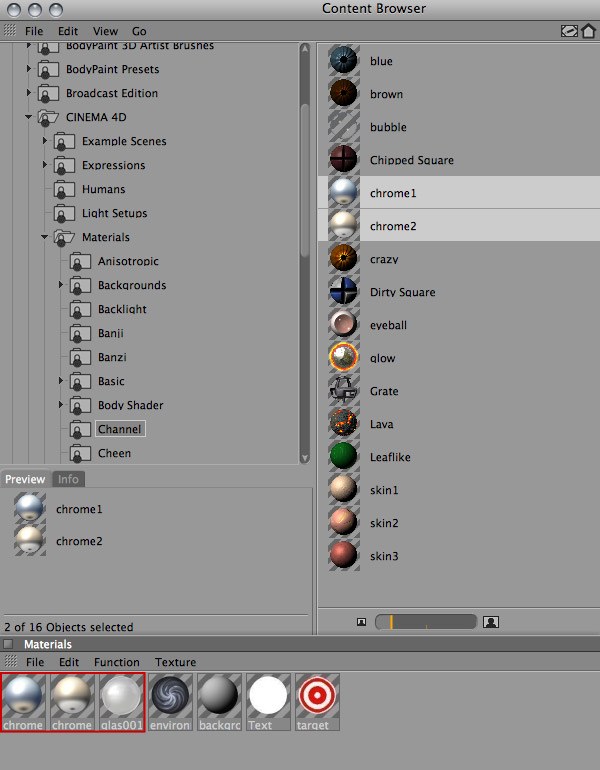
Step 21: Apply the Materials
Drag the “chrome2” material onto the “TEXT” null object.
Then add the “glas001” material to the bulb (“Lathe NURBS” object) and the “chrome1” material to the metallic area of the light bulb (the “Lathe NURBS.1” object). In the image below, you can see the rendered scene. It looks much better now.
What do you think? 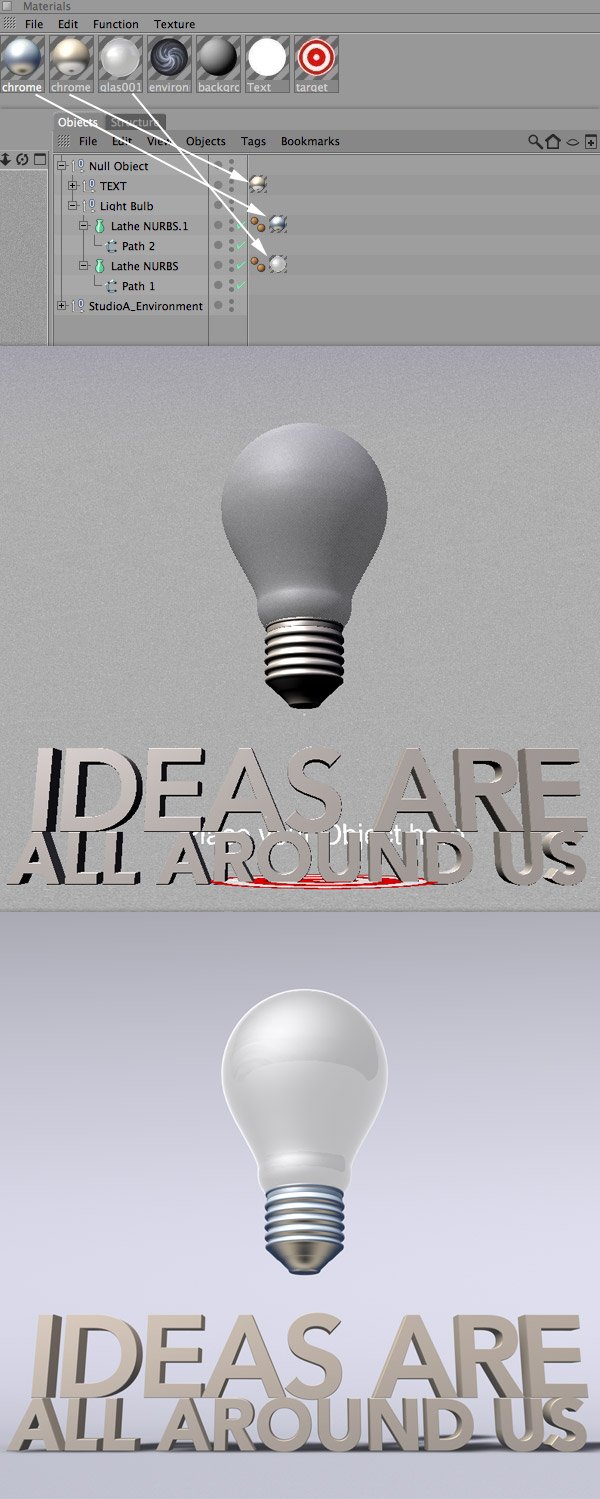
Step 22: Render the 3D Scene
Click on the Render Settings button (render settings are shown in the following image). I set the size of the image to 1500px by 1200px at 72 DPI and in JPEG format.
Then you can close the Render Settings window. Use the navigation buttons from the upper right corner of the 3D scene to move the point of view right in front of the text. Find an angle from which you would like to render the scene in.
In my rendered image, I tried to make the 3D elements look big and imposing by placing the point of view as low as possible. After you find the perfect angle for you, click on the Render in Picture Viewer button. Wait until the image is rendered and then close this window.
The image will be saved on your computer, in the specified path you picked. Now we’re done with Cinema 4D and we’ll finish the project in Photoshop. Don’t forget to save your C4D file before moving on in case you need to modify it later.

Step 23: Add a Pattern to the Text
Open the JPEG image that you have just exported from Cinema 4D, in Photoshop. We’ll start by adding a pattern to the text to make it look more interesting and to give it a tactile texture. Select the Magic Wand Tool (W); set the Tolerance to 12 in the Options Bar.
Hold down the Shift key and click on the front face of each letter until you will have selected the entire text. Hit Ctrl/Cmd + J to create a new layer using the selected area. Name the new layer “text pattern,” double-click on it to open the Layer Style window, and use the settings from the following image.

Step 24: Separate the Light Bulb from the Background
Click on the Background layer in the Layers Panel to make it the active layer. Select the Rectangular Marquee Tool (M) and create a selection around the light bulb. Select the Magic Wand Tool (W), hold down the Alt/Option key, and then click on the background area inside the rectangular selection until you get a selection around just the light bulb.
Then hit Ctrl/Cmd + J to create a new layer using the selected area. Name this new layer “light bulb,” put it inside a layer group (Ctrl/Cmd + G), and then name the group “light bulb” as well. 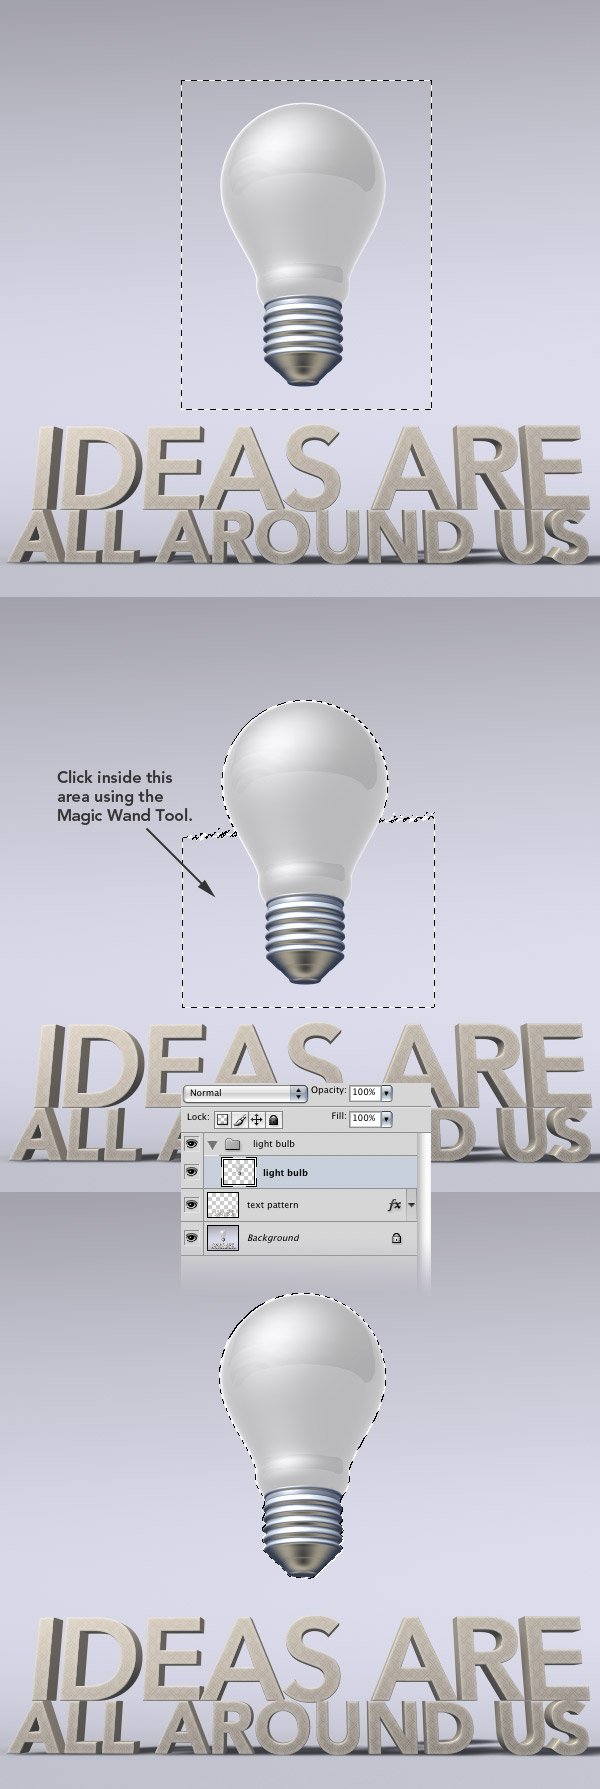
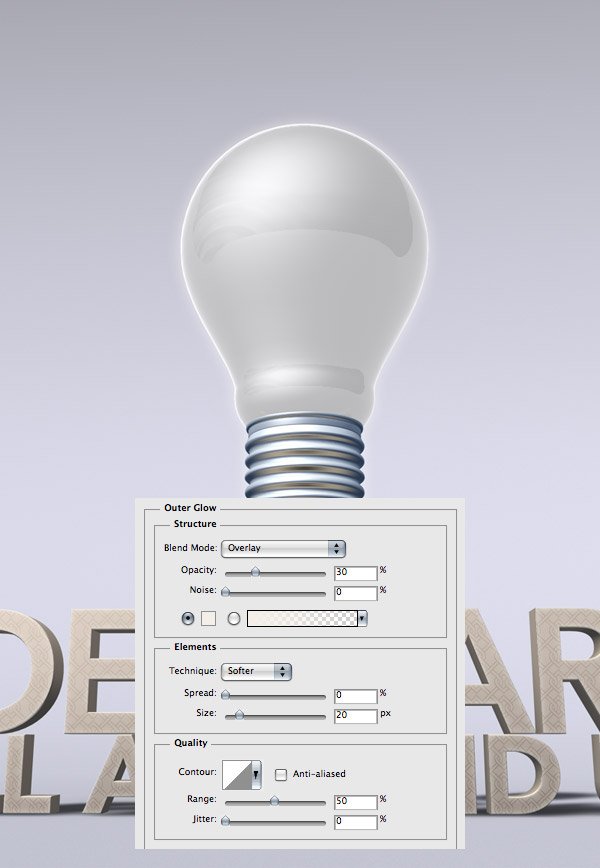
Step 25: Give the Light Bulb an Outer Glow Layer Style
Double-click on the “light bulb” layer to see the Layer Style dialog window and give the light bulb an Outer Glow layer style.
Step 26: Create a Brightness/Contrast Adjustment Layer
Hold down the Alt/Option key, click-and-hold on the Create new fill or adjustment layer button at the bottom of the Layers Panel (it looks like a half-white, half-black circle) and then select Brightness/Contrast. This will open a new window. Tick the Use Previous Layer to Create Clipping Mask option and use the settings from the following image.
By using the “light bulb” layer as clipping mask, the adjustment layer will only affect the “light bulb” layer and not any other layers underneath it. 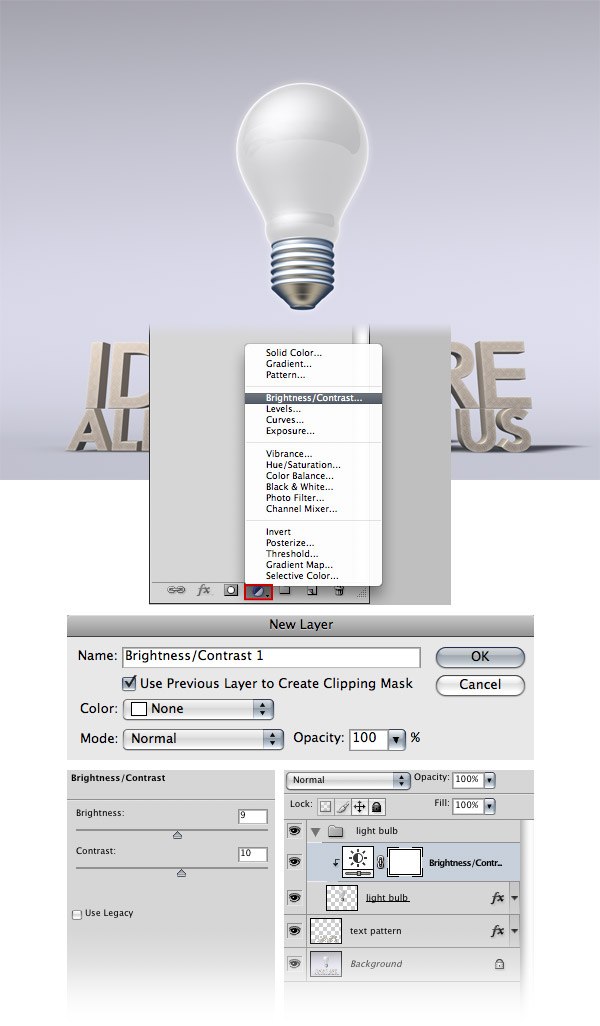
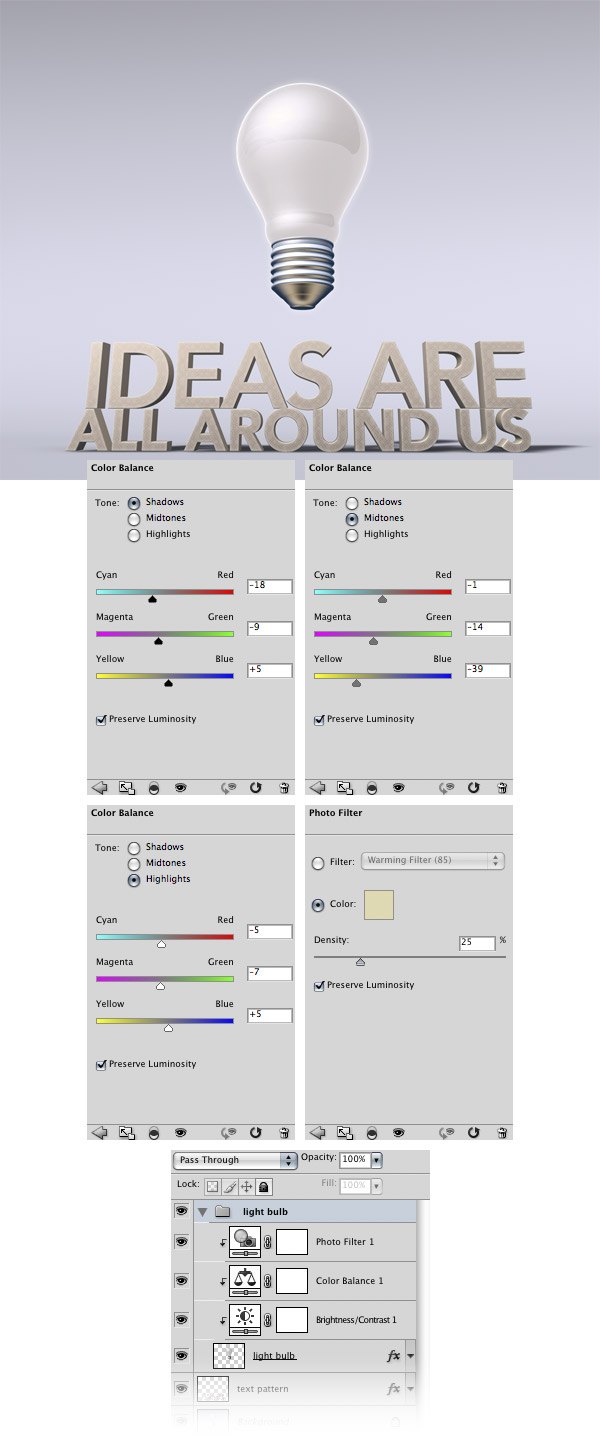
Step 27: Create a Color Balance and a Photo Filter Adjustment Layer
Add a new Color Balance adjustment layer and make sure to tick the Use Previous Layer to Create Clipping Mask option. Then add a Photo Filter adjustment layer, set the color to #e2dab2 and the Density to 25%.
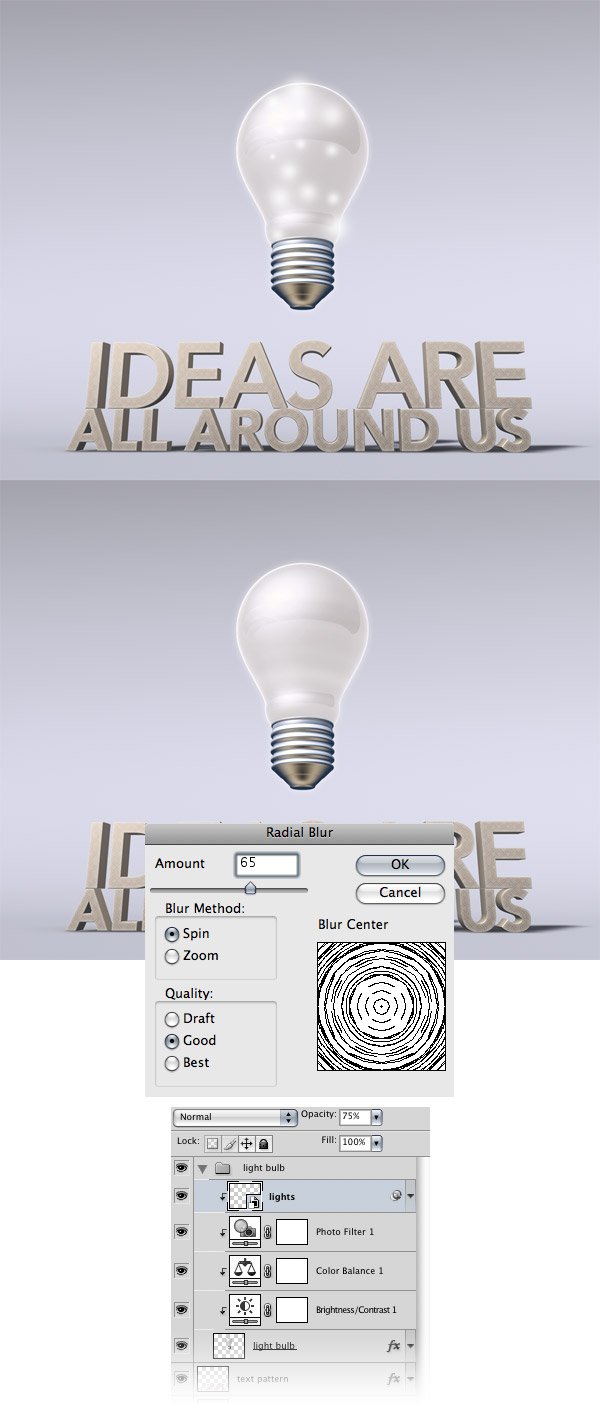
Step 28: Brush In Some Light Reflections
Create a new layer, pick a soft-tipped white brush for the Brush Tool (B), and use it to create some soft circles inside the light bulb. Vary the Master Diameter of your brush so that the soft circles are at different sizes. Name the layer with your soft circles as “lights,” right-click on it, and then select Convert to Smart Object.
Then go to Filter > Blur > Radial Blur to soften up the white circles and blend it better with its background. Right-click on this layer and select Create Clipping Mask. Then set the layer opacity of this layer to 75%.
Step 29: Add Florid Vector Shapes to the Scene
Now we will use Adobe Illustrator to add some florid vectors behind the light bulb. Open Illustrator and create a new document. Go to the Symbols Panel (Window > Symbols), click on the button from the upper right corner of this panel, go to Open Symbol Library and select Florid Vector Pack (a standard vector pack included with Illustrator CS).
Drag some symbols that you like into your artboard. I only used two symbols (as you can see in the image below). Select your first vector using the Selection Tool (V), copy it (Ctrl/Cmd + C), go back to Photoshop and paste your vector (Ctrl/Cmd + V) as a smart object.
Do the same for the rest of your vectors. In Photoshop now, put these smart objects inside a layer group (Ctrl/Cmd + G) and name it “florid vectors” so that we can keep our work organized. Use Free Transform (Ctrl/Cmd + T) to change the size, the position and the dimensions of these florid vectors.
Duplicate them (Ctrl/Cmd + J) as many times as you want and arrange them on the right side of the light bulb in a way that you like. In the following image, you can see how I created my florid ornament step by step. Add a Color Overlay layer style to each of these layers to give them a dark purple-blue color (#403f67).
Group all these smart objects again and name the group “right”. Right-click on this group and select Duplicate Group. Go to Edit > Transform > Flip Horizontal and move this group in the left side of the light bulb. Name this group “left”. You can also add a guide in the middle of the light bulb to help you arrange your layers symmetrically. 
Step 30: Make the Light Bulb See-Through
Now we will make the light bulb look like it’s semitransparent to make it look realistic. Duplicate the “florid vectors” group and hit Ctrl/Cmd + E to merge it into one layer.
Put the merged layer above the “light bulb” group. Right-click on it and select Convert to Smart Object. Go to Filter > Blur > Gaussian Blur and set the radius to 1.4px.
Then go to Filter > Distort > Spherize and use the settings from the following image. We want this layer to be visible only inside the light bulb. To do this, we will use a mask.
Go to the “light bulb” group, hold down the Ctrl/Cmd key and click on the thumbnail of the “light bulb” layer to place a selection around it. Then click on the “florid vectors” smart object to make it active, and then go to Layer > Layer Mask > Reveal Selection. Select a big soft black brush (B) and paint over the metallic area of the light bulb to erase the florid ornaments from that area.
Set the opacity of this layer to 10%. 
Step 31: Duplicate the Layer Group
Duplicate the “right” group from the “florid vectors” group. Hit Ctrl/Cmd + E to merge this group into one layer.
Right-click on this layer, select Convert to Smart Object and then put it underneath the “text pattern” layer. Use Free Transform (Ctrl/Cmd + T) to change the size of this layer and rotate it as you see in the image below. Duplicate this layer (Ctrl/Cmd + J), go to Edit > Free Transform (Ctrl/Cmd + T), rotate this new layer and move it down.
Group these two layers and name the group “right”. Then add a 0.3px gaussian blur to the two smart objects. 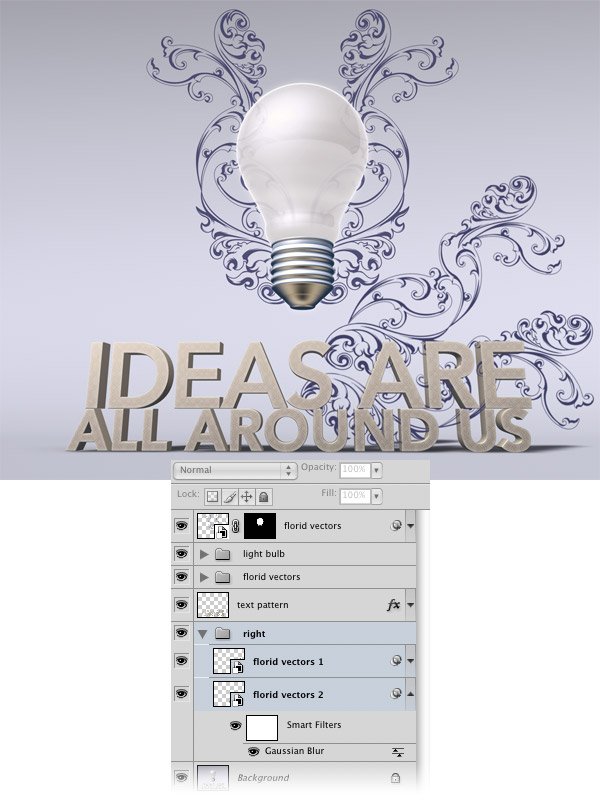
Step 32: Duplicate the Florid Vectors on the Right
Duplicate the “right” group and go to Edit > Transform > Flip Horizontal. Then use the Move Tool (V) to move the new group to the left side of the image.
Name this group “left.” Choose the “right” and “left” layer groups in the Layers Panel, hit Ctrl/Cmd + G to automatically put them inside another group, and name the new group “blurred florid vectors.” 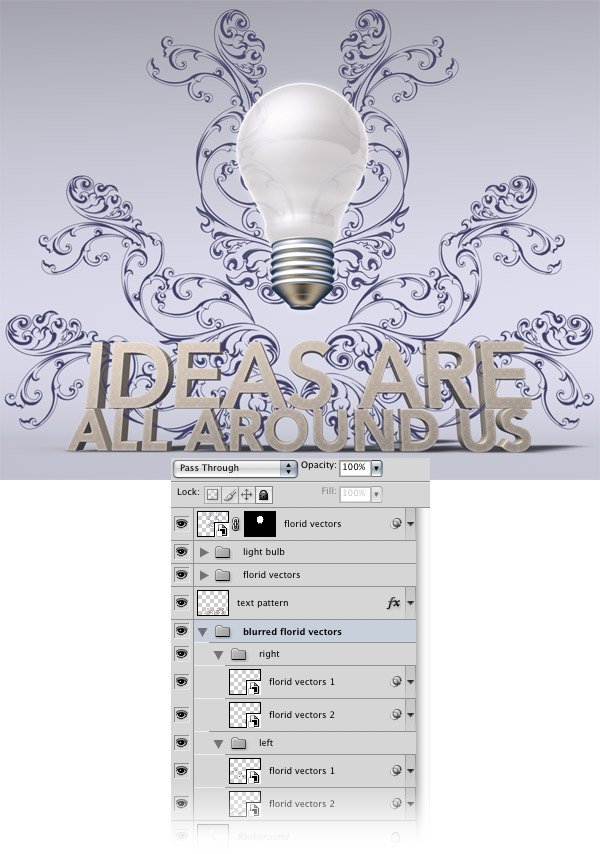
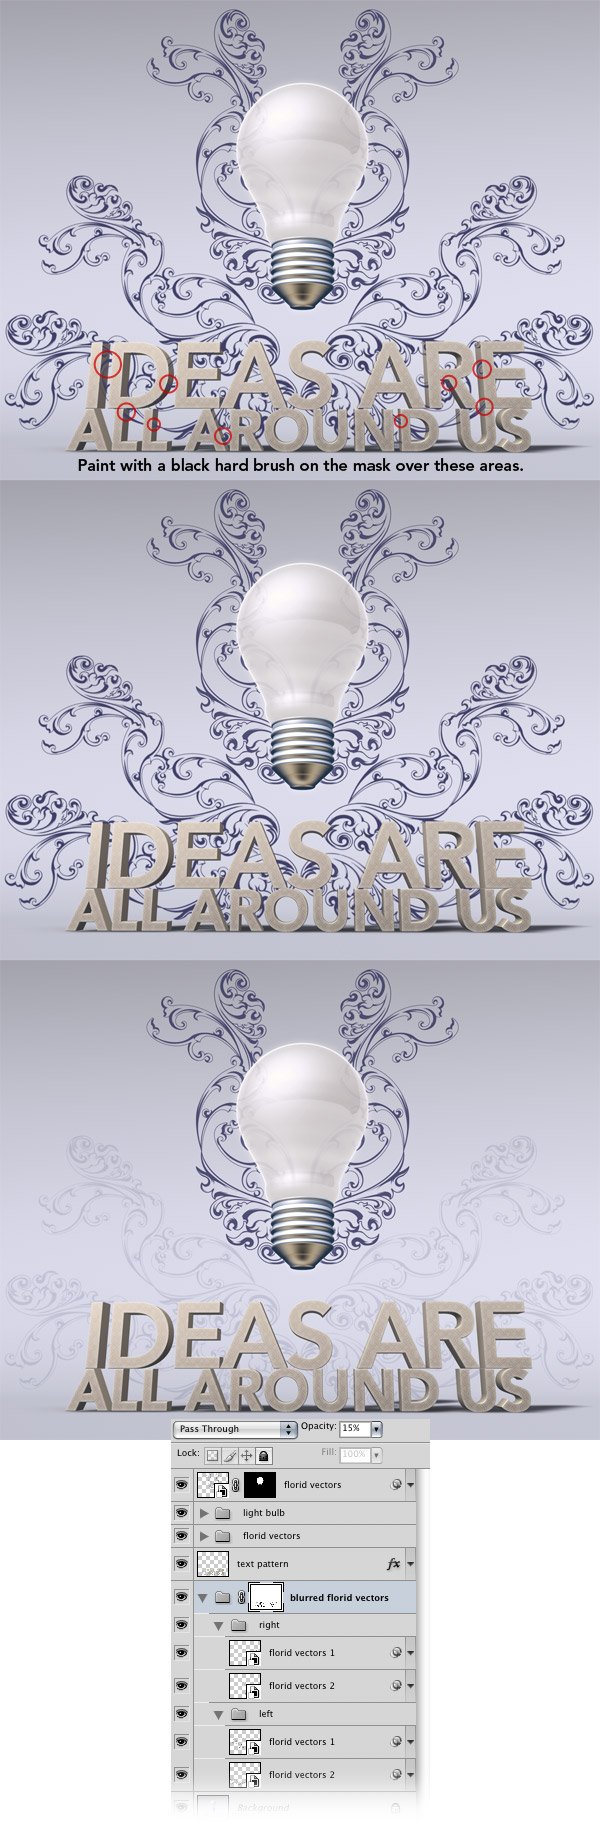
Step 33: Remove Parts of the Florid Vectors Overlapping the 3D Text
Add a mask to the “blurred florid vectors” layer group by clicking on the Add layer mask button at the bottom of the Layers Panel. Select a hard black brush with the Master Diameter at about 10px and use it to erase the area of the florid ornaments that covers the 3D text. Once you’re done with the masking out, set the Opacity of the layer group to 15%.
Step 34: Make More Light Bulbs
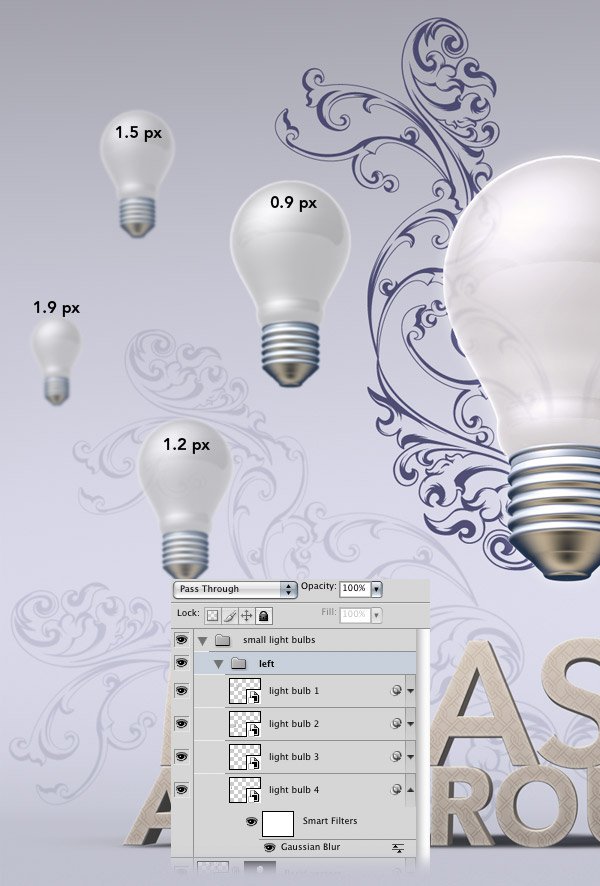
Duplicate the “light bulb” layer from the “light bulb” group (hold down the Alt/Option key, click on the layer and drag it outside of the group). Then right-click on this layer and select Convert to Smart Object. Put this layer inside a group and name it “small light bulbs”. Move this layer to the left and use Free Transform (Ctrl/Cmd + T) to make it smaller. Hit Ctrl/Cmd + J to duplicate this layer, move the new layer to the left and change its size using Free Transform (Ctrl/Cmd + T). Repeat this process until you have four light bulbs.
Put these four layers inside a group and name it “left”. 
Step 35: Enhance Depth Perception of the Light Bulbs
Add a gaussian blur filter to the small-light-bulb layers using different values. The smaller the light bulb the higher the gaussian-blur value. This will create an illusion that the big light bulbs are closer and the small ones are further.
Step 36: Duplicate the Light Bulbs
Duplicate the “left” group, go to Edit > Transform > Flip Horizontal and move the new group to the right using the Move Tool (V). Name this group “right”. 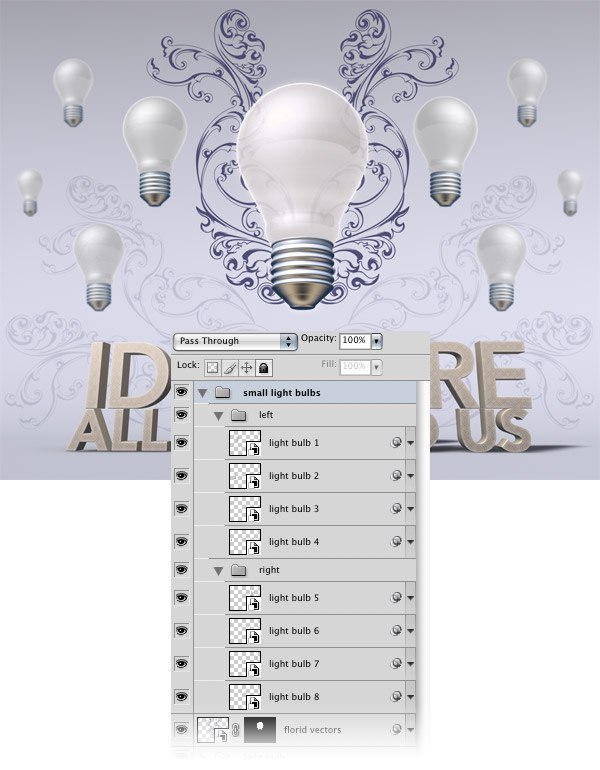
Step 37: Color Adjustments
We will perform the same color adjustments to the small light bulbs that we did for the big one. Hold down the Ctrl/Cmd and Shift keys and, within the Layers Panel, click on the thumbnails of all the small light bulb layers to select them. Create a new group (Layer > New > Group) above all the other layers and name it “light bulbs adjustments.” With the selections still active, (press Shift + Ctrl/Cmd + D if you accidentally deselected) go to Layer > Layer Mask > Reveal Selection.
Now everything we place inside this layer group will be visible only on the area of the small light bulbs. 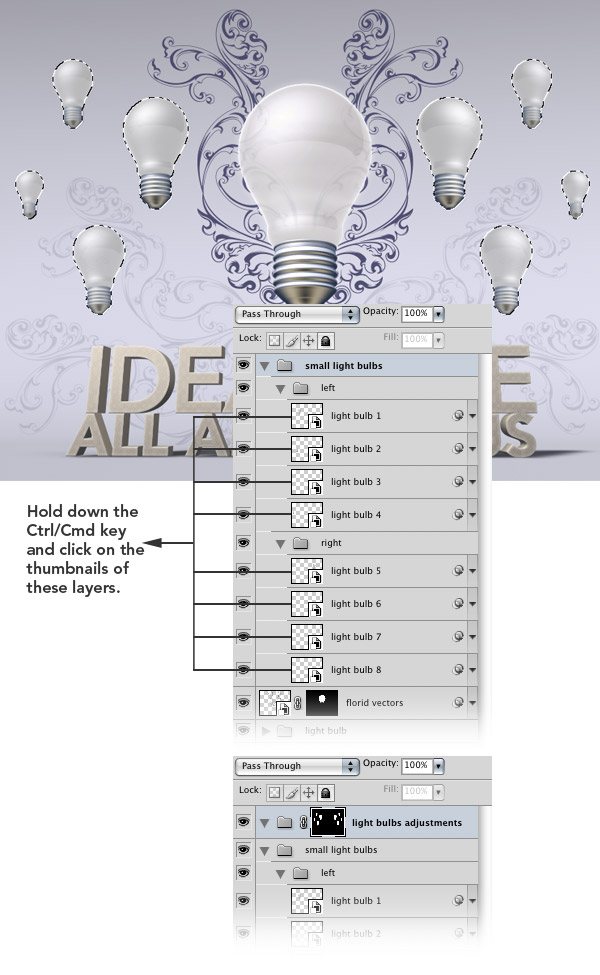
Step 38: Create Some Adjustment Layers
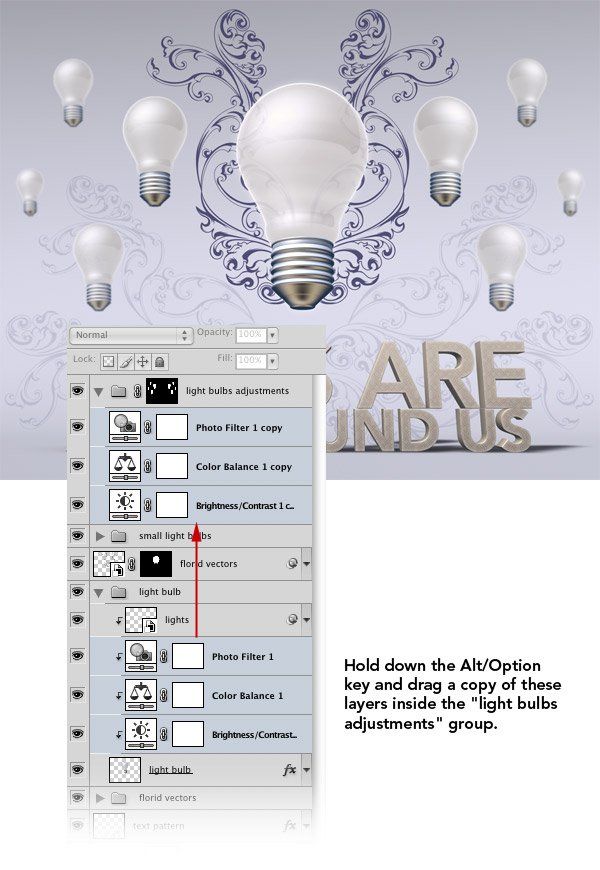
Hold down the Ctrl/Cmd key and select the three adjustment layers from the “light bulb” group. Then hold down the Alt/Option key and drag a copy of these layers inside the “light bulbs adjustments” group.
Step 39: Add Some Textures with Photoshop Brushes
Now we will use some watercolor brushes to create a texture. Download these brushes from Six Revisions and install them. Select one of those brushes (B), open the Brushes panel (F5) and use the settings from the following image.
To save your brush, click on the Create new brush button from the bottom of this panel. Create a new group, name it “textures” and then put the layer group right above the Background layer. Then, create a new layer inside this new group and name it “brushes.” Hit the D key to reset the Foreground Color to black and the Background Color to white, and then paint on this layer with the brush you created.
Blend the textures in by set the Blend Mode of this layer to Soft Light and reducing the Opacity to 20%. 
Step 40: Create and Use Another Brush
Select another watercolor brush, open the Brushes panel and use the settings from the following image to create a new brush. Create a new layer and paint with the brush you created.
Set the Blend Mode of this layer to Soft Light and its Opacity to 15%. 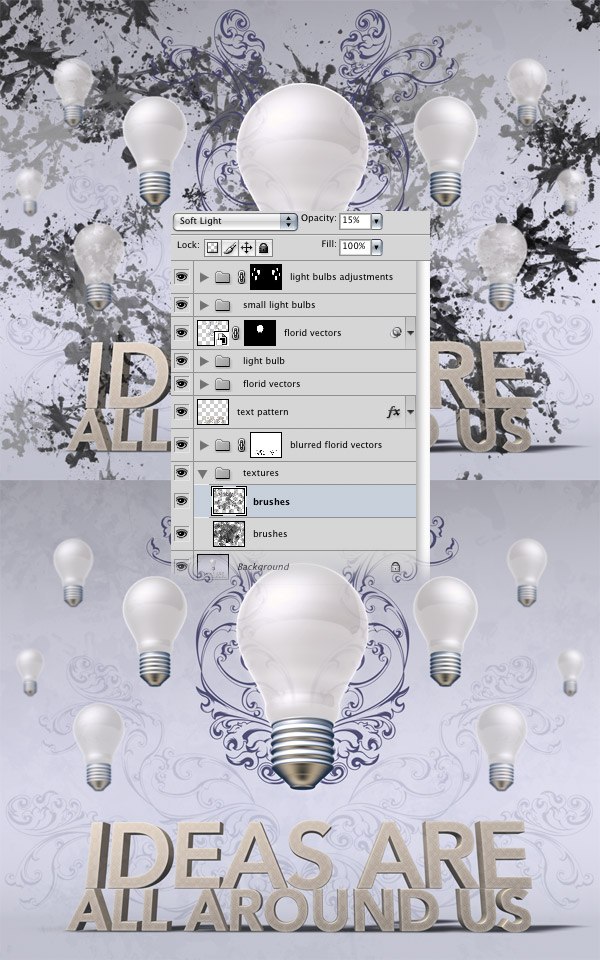
Step 41: Add a Grunge Texture
Download this texture from the Grunge Extreme texture pack. Open the image in Photoshop.
Then go to Image > Adjustments > Channel Mixer, tick the Monochrome box and use the settings from the following image to make this texture black and white. Choose the Move Tool (V) from the Tools Panel to move the image into your first document, then place it inside the “textures” group. Go to Edit > Free Transform (Ctrl/Cmd + T), hold down the Shift key and change the size of this texture.
Name this layer simply as “texture” and then set its Blend Mode to Soft Light and Opacity at 15%. 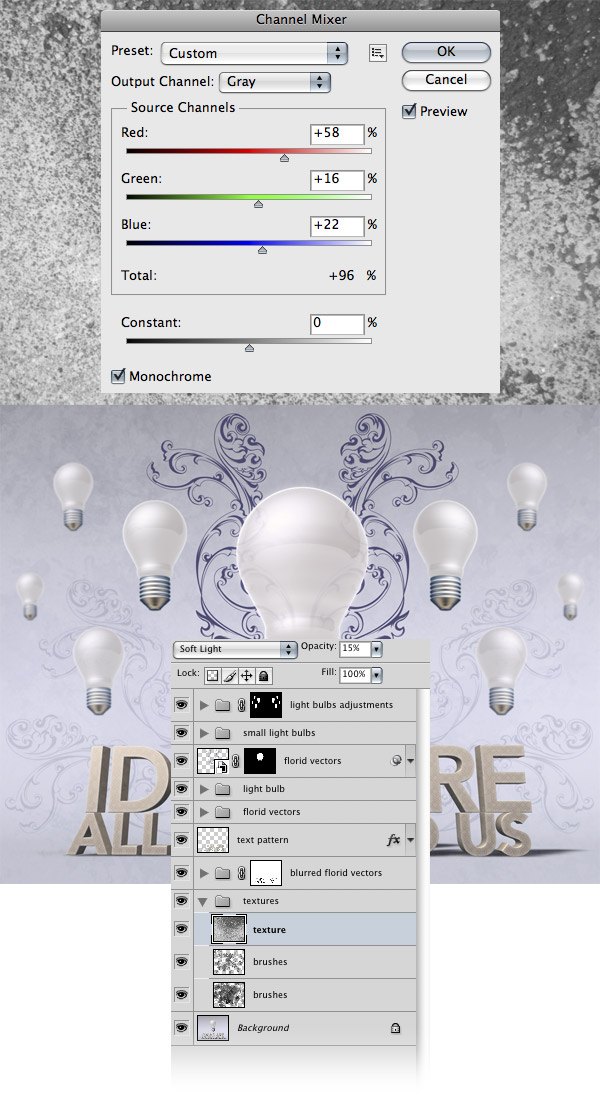
Step 42: Color Adjustments on the Scene
Now we will do some color adjustments onto the entire image. Create a new layer group above all the other ones and name it “adjustments”. Add a new Color Balance adjustment layer, using the settings shown below. 
Step 43: Add a Gradient Map Adjustment Layer
Add a new Gradient Map adjustment layer above the Color Balance adjustment layer we created previously. To create the gradient, I used the colors #393956 and #eef3f4. Once you have your Gradient Map’s settings finished, set the Blend Mode of the layer to Soft Light and reduce the Opacity to 30%. 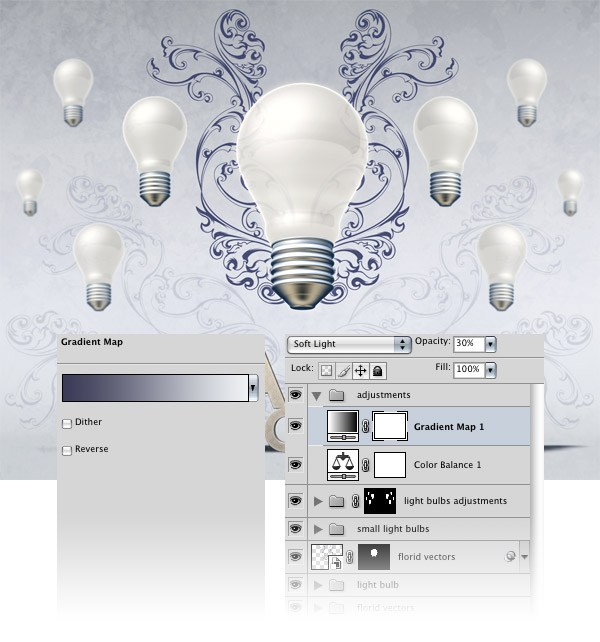
Step 44: Create Another Color Balance Adjustment Layer
Add a new Color Balance adjustment layer on top of the Gradient Map adjustment layer (its settings are shown below). 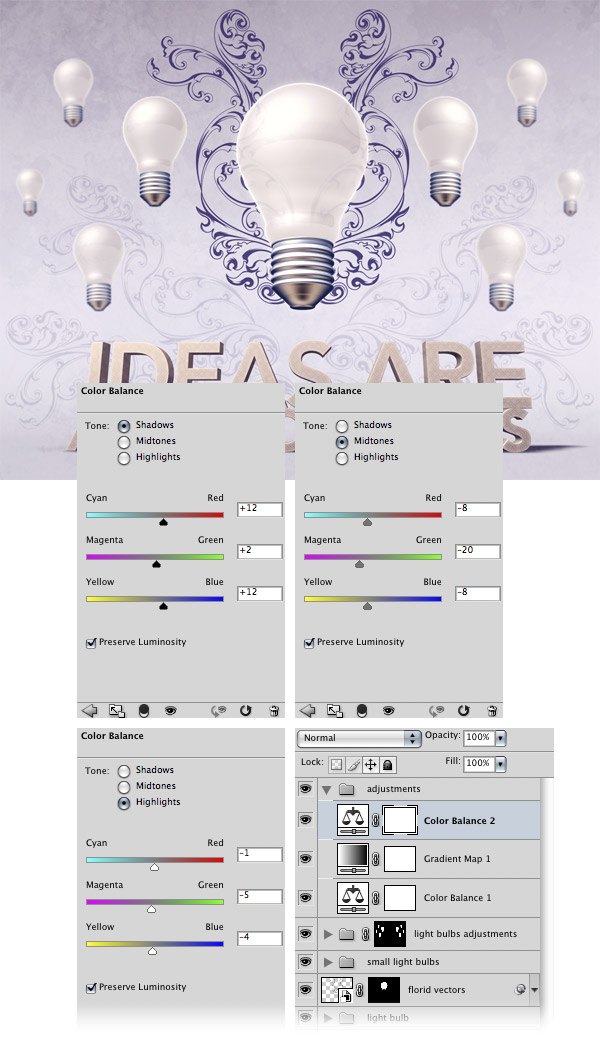
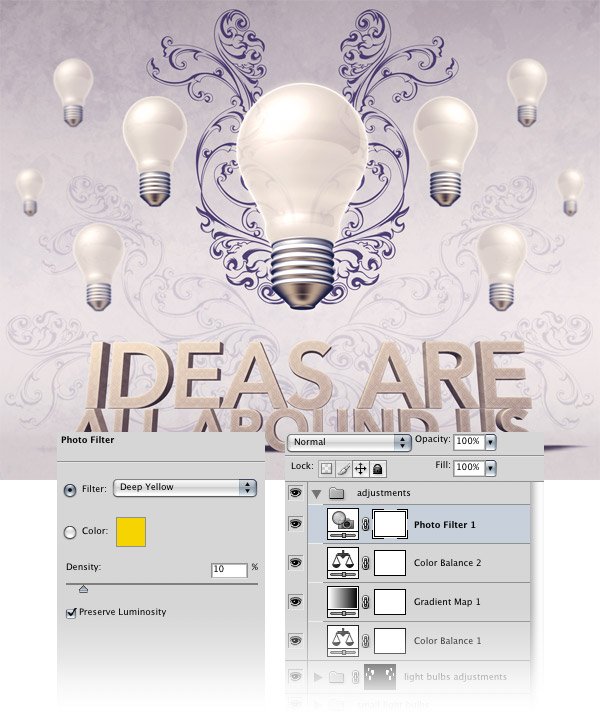
Step 45: Create a Photo Filter Adjustment Layer
Add a new Photo Filter adjustment layer using the settings below.
Step 46: Add a Channel Mixer Adjustment Layer
Add a new Channel Mixer adjustment layer and use the settings shown below. Set the Opacity of this layer to 40%. 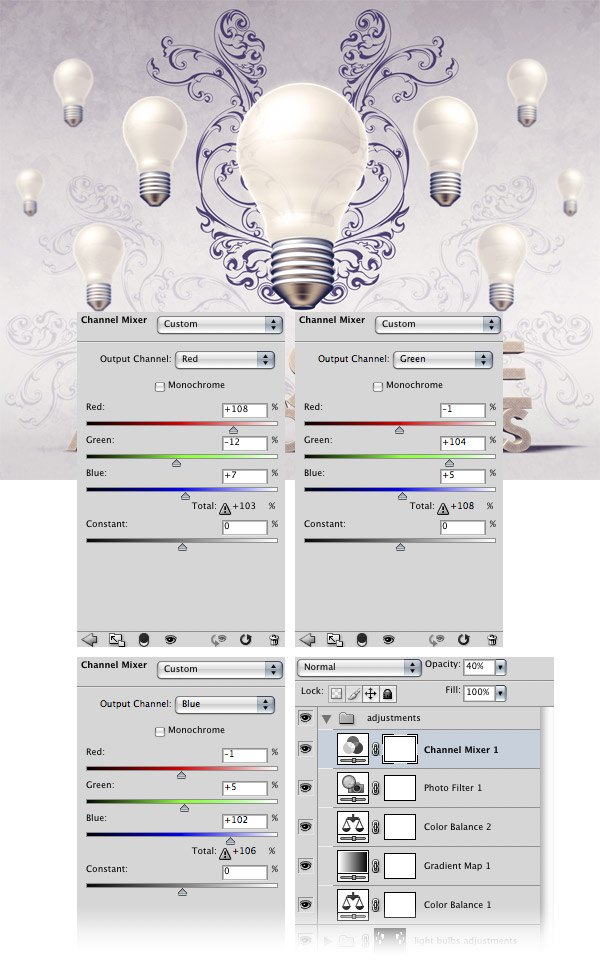
Step 47: Apply the High Pass Filter
We will use a technique for sharpening our scene.
Create a new layer above all the other ones. Then go to Image > Apply Image and click OK. Right-click on this layer and select Convert to Smart Object.
Run Filter > Other > High Pass on the layer, setting the Radius of the filter to 0.7px. 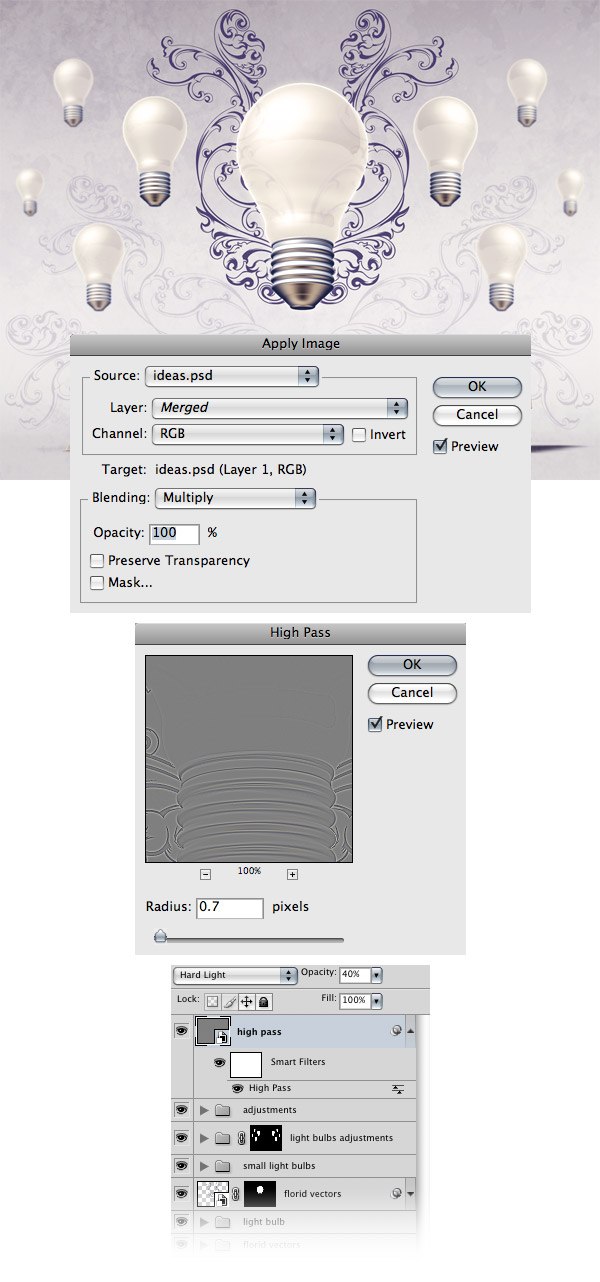
Tutorial Summary
Well, we’re finished! We covered a plethora of techniques in this tutorial.
Some things we did were constructing 3D elements in Cinema 4D, using vector packs from Illustrator, adding textures, leveraging adjustment layers to our advantage, and so much more! At the end, I also showed you a nifty trick for enhancing the sharpness of an entire composition using the High Pass filter. Creating this scene was definitively a fun and enjoying process for me, and I hope that by following this tutorial, you can experience that enjoyment too.
Please share your thoughts and ask your questions in the comments! 
Download Source Files
- artistic_lightbulb_3d (ZIP, 34.00 MB)
-
 Trevin serves as the VP of Marketing at WebFX. He has worked on over 450 marketing campaigns and has been building websites for over 25 years. His work has been featured by Search Engine Land, USA Today, Fast Company and Inc.
 -

WebFX is a full-service marketing agency with 1,100+ client reviews and a 4.9-star rating on Clutch! Find out how our expert team and revenue-accelerating tech can drive results for you! Learn more
Make estimating web design costs easy
Website design costs can be tricky to nail down. Get an instant estimate for a custom web design with our free website design cost calculator!
Try Our Free Web Design Cost Calculator
Table of Contents
- Preview
- Tutorial Resources
- Step 1: Make the Text in Photoshop
- Step 2: Convert the Text into Shape Layers
- Step 3: Save the Paths
- Step 4: Export the Document
- Step 5: Import the Document in Cinema 4D
- Step 6: Merge the Paths
- Step 7: Create the 3D Text
- Step 8: Set the Atrributes for the First Object
- Step 9: Set the Attributes for the Second Object
- Step 10: Add an Environment
- Step 11: Create the Path for the Light Bulb
- Step 12: Create a Path for the Metallic Part of the Light Bulb
- Step 13: Export the Paths to Illustrator
- Step 14: Import the Light Bulb Paths in Cinema 4D
- Step 15: Create the 3D Light Bulb
- Step 16: Correct the 3D Bulb
- Step 17: Correct the 3D Metallic Part of the Light Bulb
- Step 18: Set the Attributes of the Light Bulb
- Step 19: Place the Light Bulb into the Stage
- Step 20: Add Some Materials
- Step 21: Apply the Materials
- Step 22: Render the 3D Scene
- Step 23: Add a Pattern to the Text
- Step 24: Separate the Light Bulb from the Background
- Step 25: Give the Light Bulb an Outer Glow Layer Style
- Step 26: Create a Brightness/Contrast Adjustment Layer
- Step 27: Create a Color Balance and a Photo Filter Adjustment Layer
- Step 28: Brush in Some Light Reflections
- Step 29: Add Florid Vector Shapes to the Scene
- Step 30: Make the Light Bulb See-Through
- Step 31: Duplicate the Layer Group
- Step 32: Duplicate the Florid Vectors on the Right
- Step 33: Remove Parts of the Florid Vectors Overlapping the 3D Text
- Step 34: Make More Light Bulbs
- Step 35: Enhance Depth Perception of the Light Bulbs
- Step 36: Duplicate the Light Bulbs
- Step 37: Color Adjustments
- Step 38: Create Some Adjustment Layers
- Step 39: Add Some Textures with Photoshop Brushes
- Step 40: Create and Use Another Brush
- Step 41: Add a Grunge Texture
- Step 42: Color Adjustments on the Scene
- Step 43: Add a Gradient Map Adjustment Layer
- Step 44: Create Another Color Balance Adjustment Layer
- Step 45: Create a Photo Filter Adjustment Layer
- Step 46: Add a Channel Mixer Adjustment Layer
- Step 47: Apply the High Pass Filter
- Tutorial Summary
- Download Source Files
Share this article


Web Design Calculator
Use our free tool to get a free, instant quote in under 60 seconds.
View Web Design CalculatorMake estimating web design costs easy
Website design costs can be tricky to nail down. Get an instant estimate for a custom web design with our free website design cost calculator!
Try Our Free Web Design Cost Calculator


