
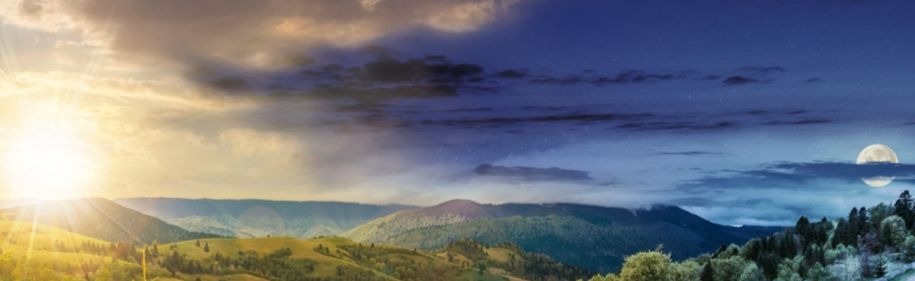
Preview
This is the image that we will create. Click on it to see the larger version. 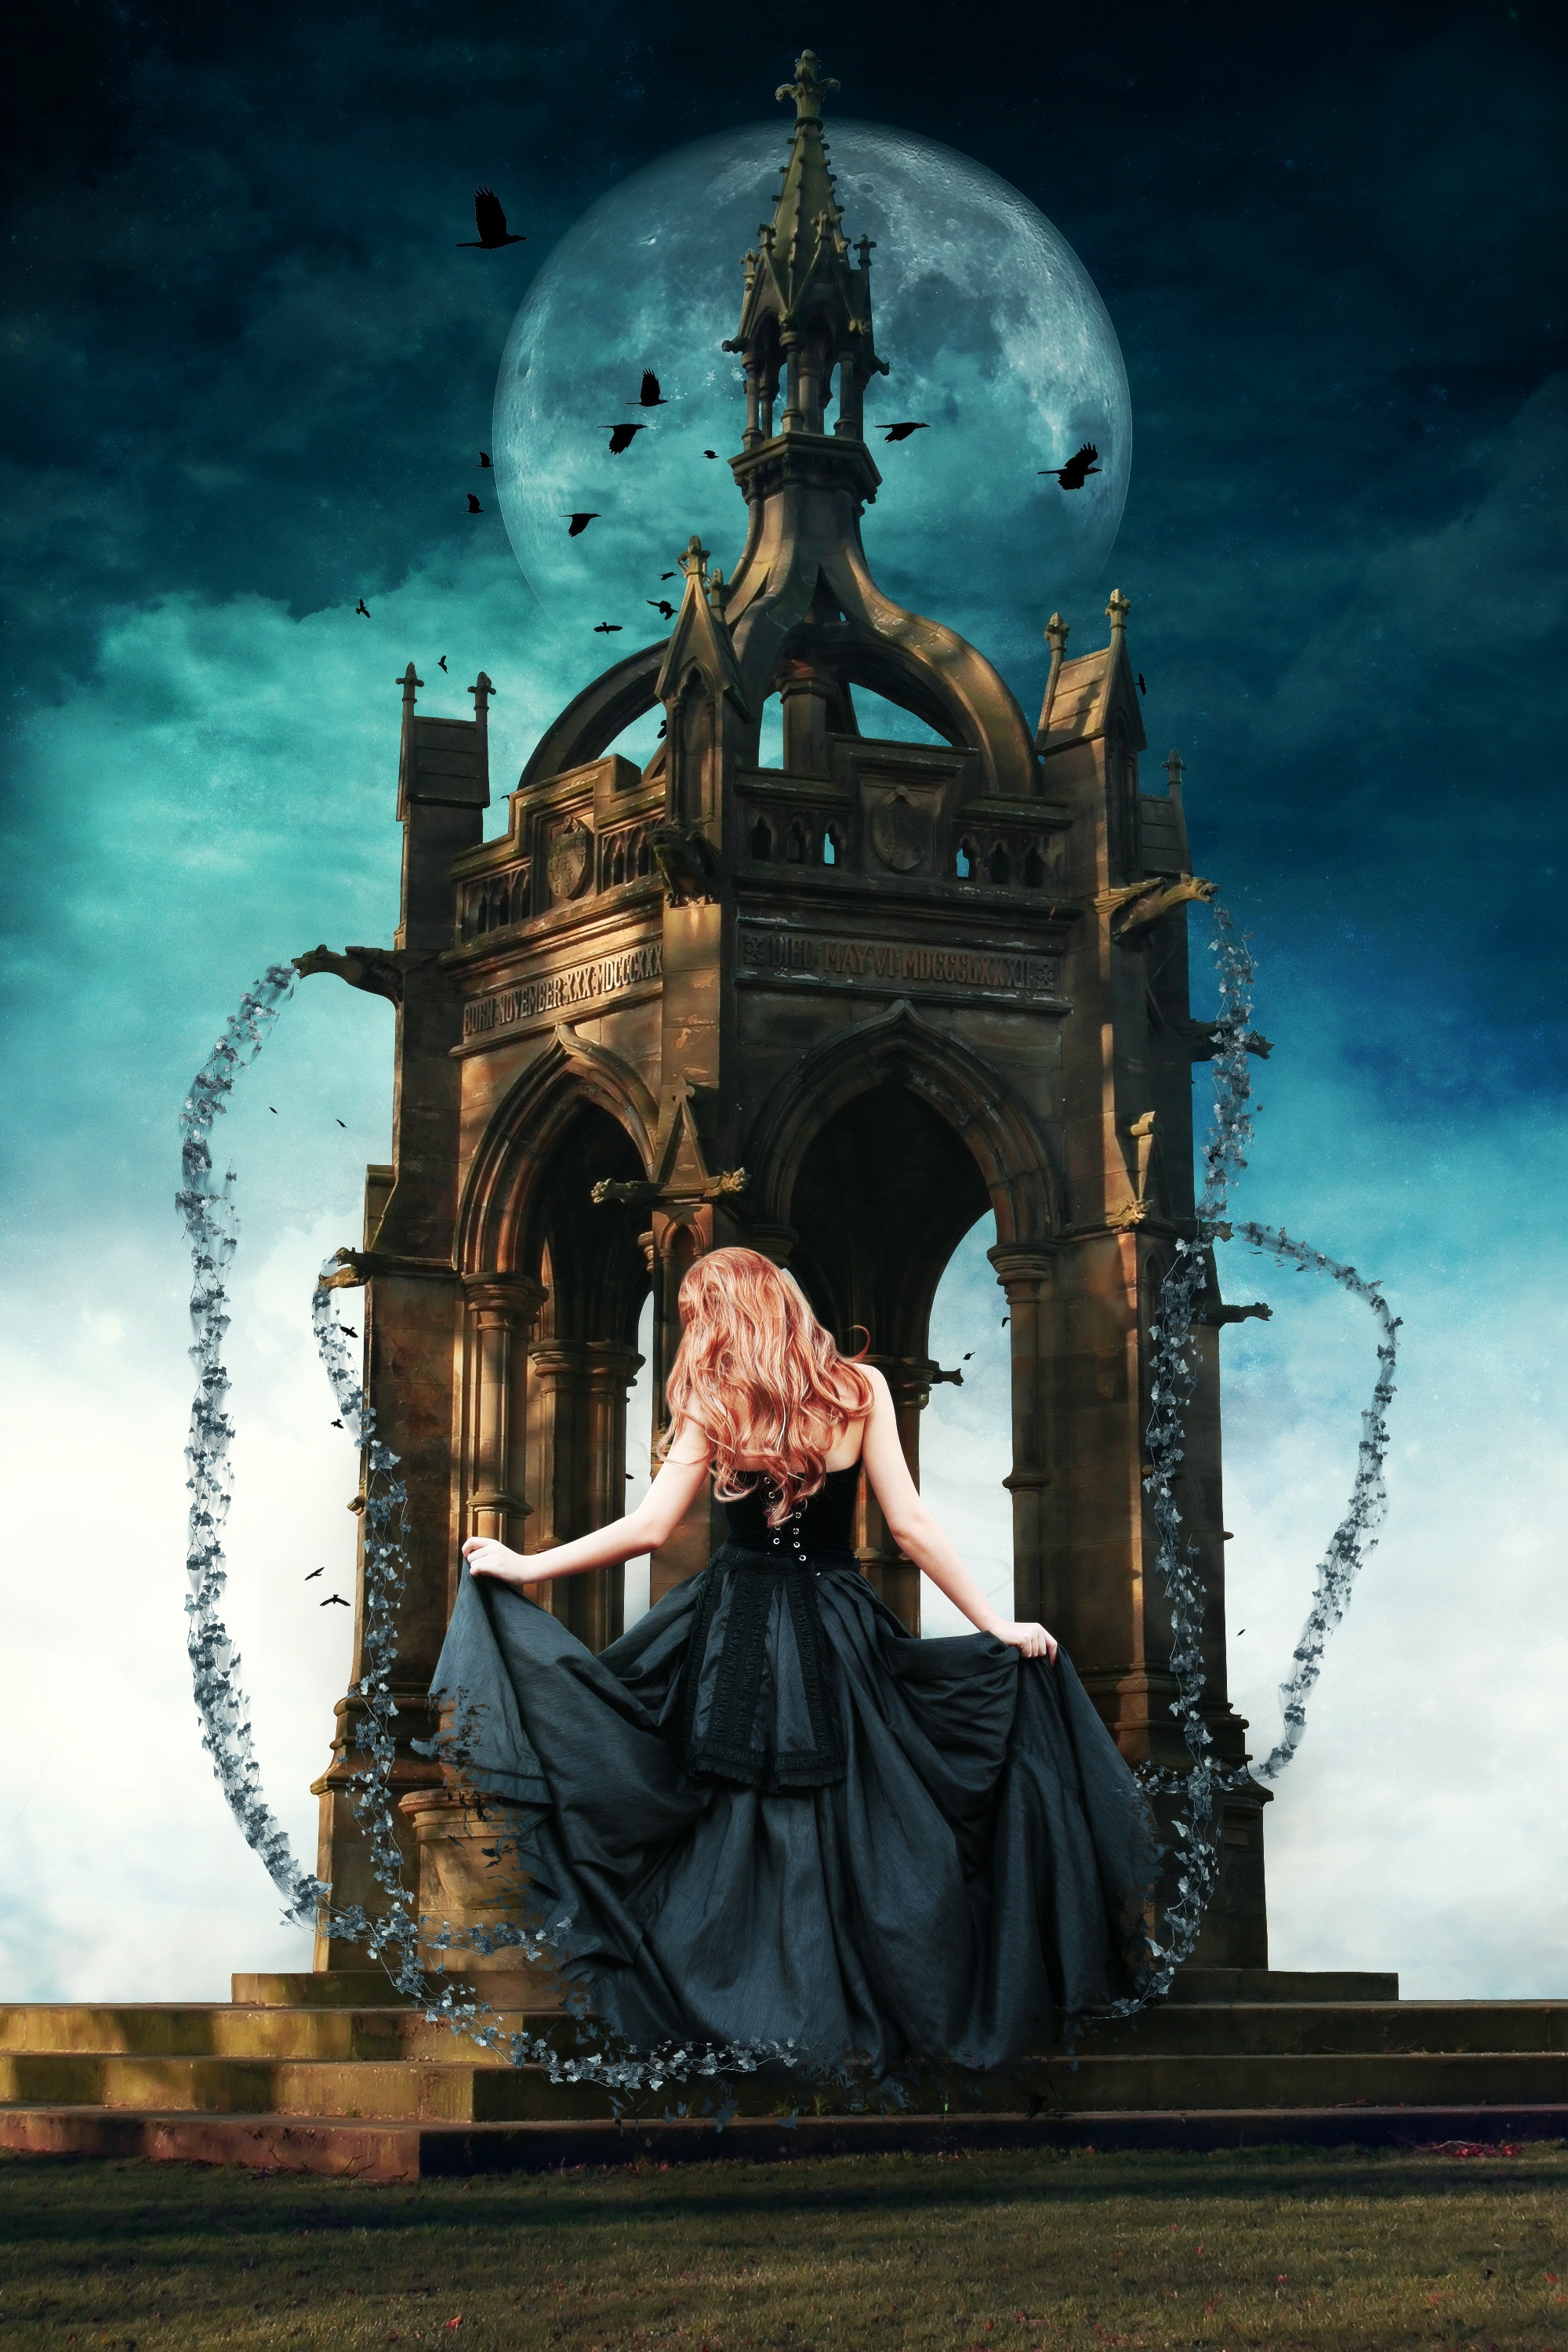
Resources
Here are the resources that we will use to create the photomanipulation.
Before we begin, I’d like to thank the photographers and artists for creating the images and for the permission to use them. Please make sure that you read and respect the stock rules of each artist before using their images. Also, these resources are just suggestions, I would like to encourage you use your own creative judgement and use stock photos that you like or have lying around; doing this will make your composition unique!
- The floating girl (our subject): Bells Falls18 by faestock
- The building: Gargoyles Delight by Elandria
- The blue sky: Nothin’ but Blue Skies by phatpuppy
- The more dramatic sky: Dramatic Sky – III by mattthesamurai
- The vines: vines by sheisprettystock
- The Universe texture: Universe – heic0602a by razielfromhell
- The clouds: Clouds
- The moon: Moon
- Birds: 1 | 2
- Silhouette of Crows: 1 | 2
Step 1: Creating the sky background
Open a new document in Photoshop (Ctrl/Cmd + N) with the dimensions 2000px by 3000px. Download this image, open it in Photoshop and use the Move Tool (V) to move it into your first document. Name this layer “bg”. Then go to Edit > Free Transform (Ctrl/Cmd + T), hold down the Shift key and change the size of this image to fit your document. 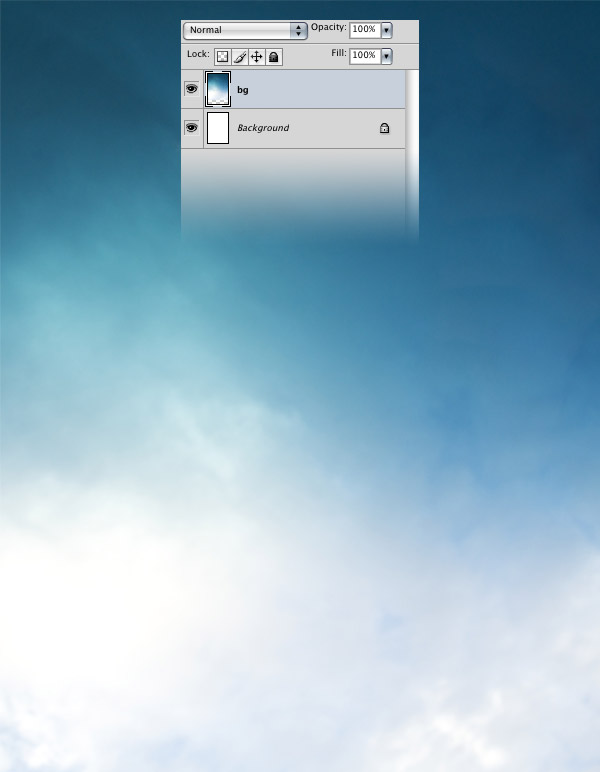
Step 2: Add another sky texture
Download this sky image, open it in Photoshop and use the Move Tool (V) to move it into your first document. Name this layer “sky” and hit Ctrl/Cmd + G to put it inside a group.
Name the group “clouds 1”. Go to Edit > Free Transform (Ctrl/Cmd + T), hold down the Shift key and change the size of the “sky” layer to fill the bottom half of your document. Duplicate the “sky” layer (Ctrl/Cmd + J) and use the Move Tool (V) to move this new layer at the top of your document. Make sure that there is a big enough overlapping area between the two layers.
Add a mask to the duplicated layer by going to Layer > Layer Mask > Reveal All. Then select the Gradient Tool (G) and drag a black to transparent gradient from the bottom of this layer to the middle. Set the blend mode of the “clouds 1” group to Soft Light and opacity to 50%.

Step 3: Add another sky layer with a different blend mode
Repeat the previous step using this sky image and set the blend mode of this group to Hard Light and opacity of 10%. 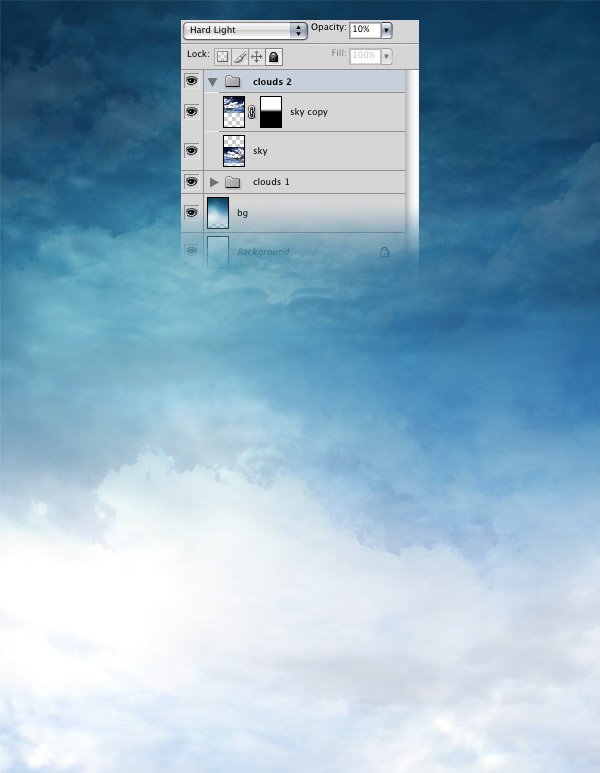
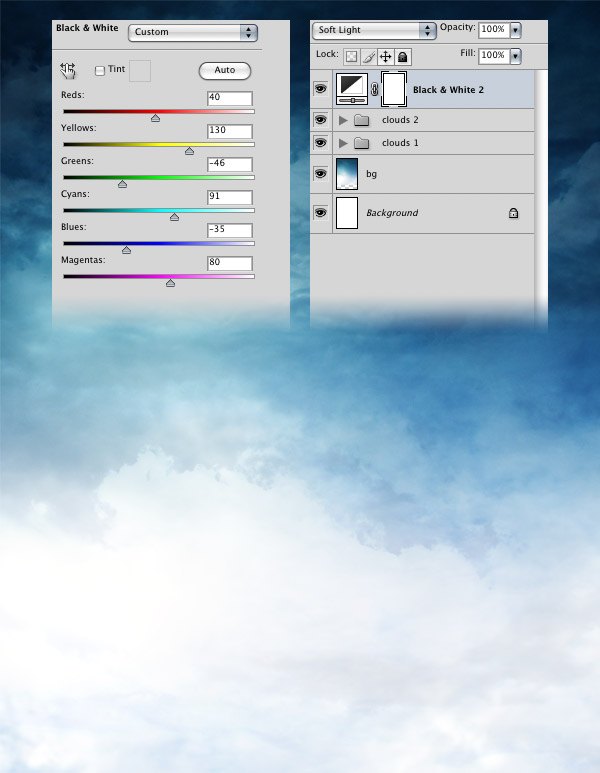
Step 4: Increase the contrast of the background
Go to Layer > New Adjustment Layer > Black & White and use the settings from the following image. Then set the blend mode of this layer to Soft Light.
Step 5: Isolate the building from its background
Download this photo and open it in Photoshop. Use the Pen Tool (P) to create a path around the building. Then hit Ctrl/Cmd + Enter to transform the path into a selection.
Use the Rectangular Marquee Tool (M) to right-click on your image and select Layer via Copy. This will put your selection into a new layer. After you have separated the building from the background, use the Pen Tool (P) to select and erase the small holes that are inside the building.
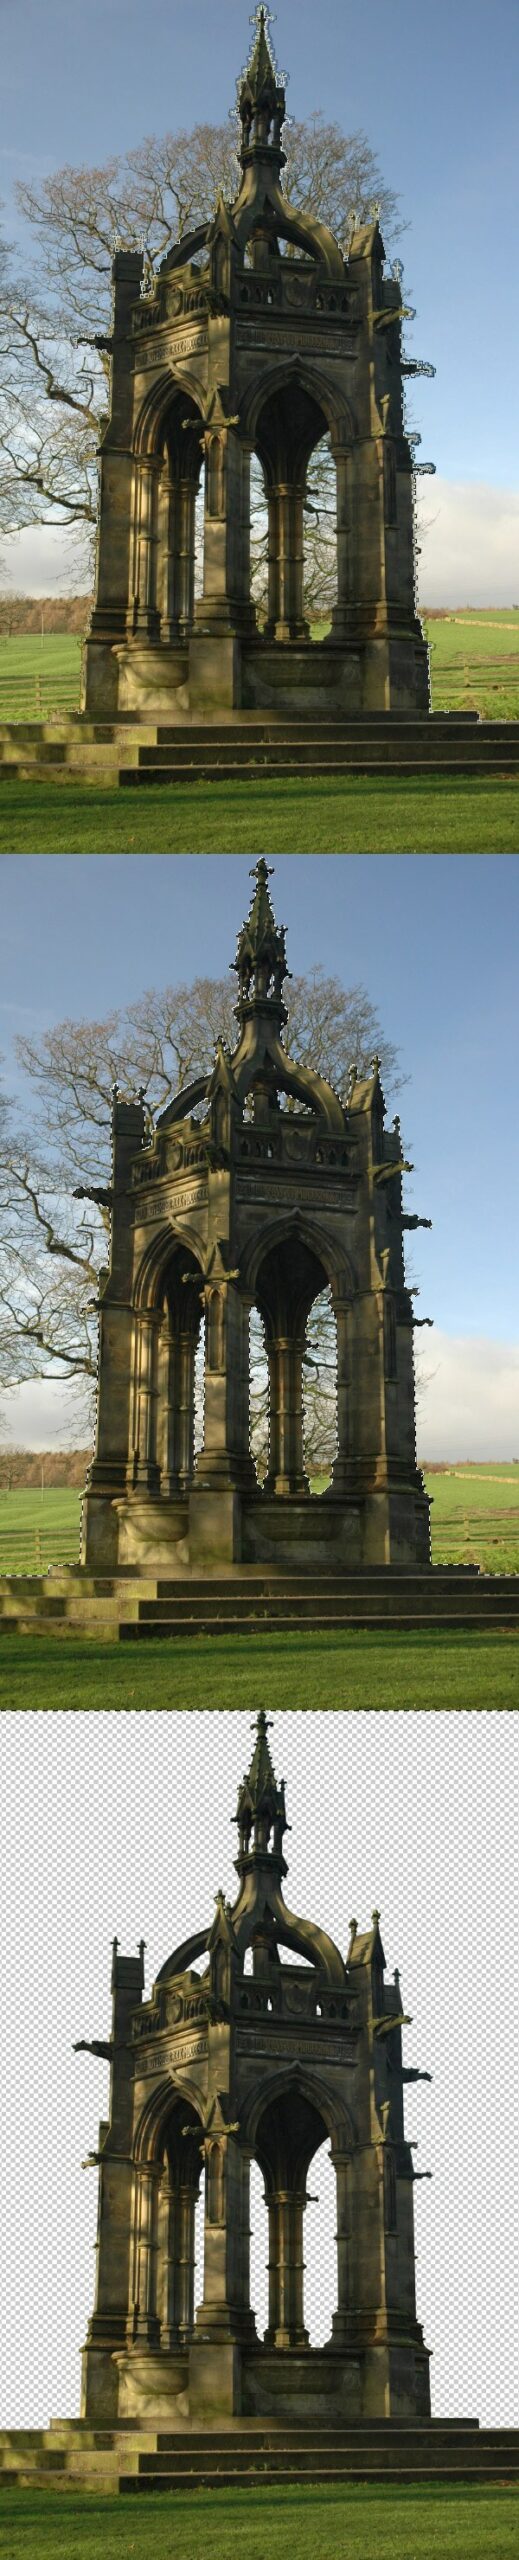
Step 6: Convert the building to an editable Smart Object
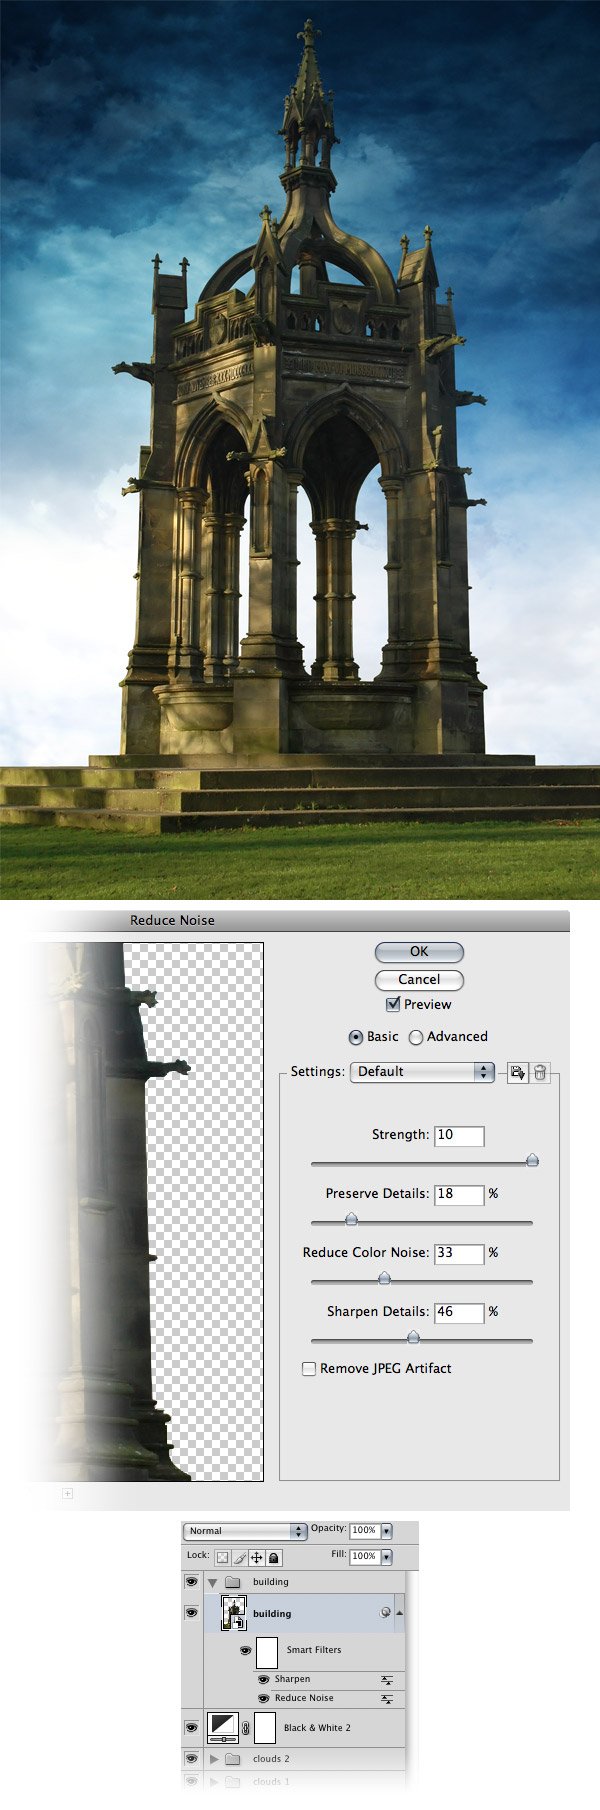
Use the Move Tool (V) to move the building into your first document. Name this layer “building”, hit Ctrl/Cmd + G to put it inside a group and name the group “building” as well. Right-click on this layer and select Convert to Smart Object.
Now we can apply any filters to the smart object and edit them anytime we want. That’s one advantage of using smart objects Go to Filter > Noise > Reduce Noise and use the settings from the following image. Then go to Filter > Sharpen > Sharpen.
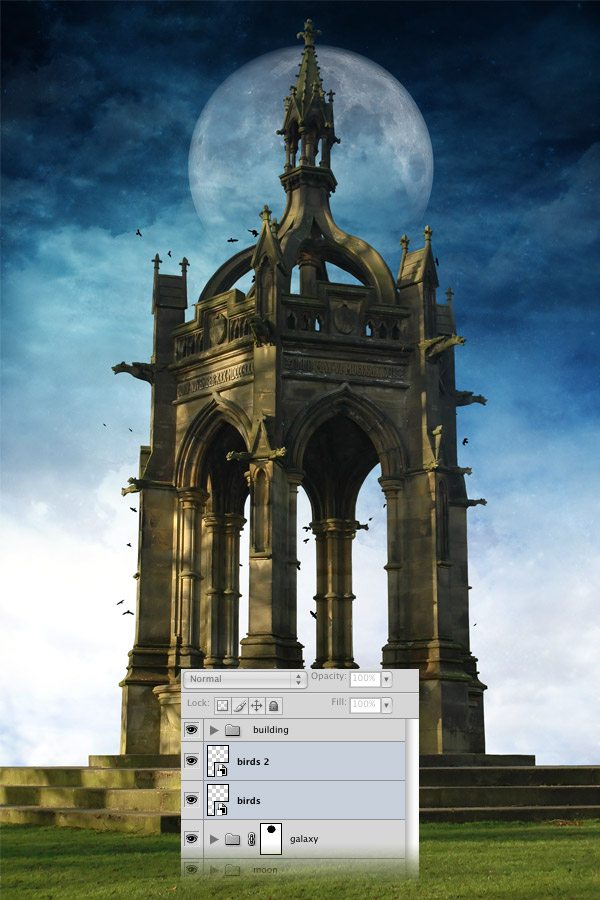
Step 7: Adding a moon
Download this moon image, open it in Photoshop and move it into your first document using the Move Tool (V). Name this layer “moon”, right-click on it and select Convert to Smart Object. Then hit Ctrl/Cmd + G to put this layer inside a group and name the group “moon” as well.
Put the “moon” group beneath the “building” group. Then set the blend mode of the “moon” layer to Screen and layer opacity at 80% to eliminate the black background. Go to Edit > Free Transform (Ctrl/Cmd + T), hold down the Shift key, then resize and rotate the moon.
Another advantage of using smart objects is the ability of resizing them as many times as we want without loosing quality. Add a mask to the “moon” layer (Layer > Layer Mask > Reveal All). Then select a big, black, soft brush tip for the Brust Tool (B) and paint with it on the mask over the bottom area of the moon to make it fade away.
Take a look at the following image for reference. 
Step 8: Add stars
Download this galaxy texture, open it in Photoshop and use the Move Tool (V) to move it into your first document. Name this layer “galaxy” and put it inside a group (Ctrl/Cmd + G).
Name the group “galaxy” too. Set the blend mode of the “galaxy” layer to Soft Light with its opacity at 70%. Add a mask to this layer (Layer > Layer Mask > Reveal All) and use a black, soft brush for your Brush Tool (B) with the its opacity option at 40% to mask some areas of this texture (note: in the following image you can see how my layer mask looks like).
Add a mask to the “galaxy” group and and select a big, black, soft brush (B) with the opacity at 100%. Paint with this brush over the moon because we don’t want the stars to be seen behind it. 
Step 9: Add some birds to the composition
Download this image and open it in Photoshop.
Go to the Channels Panel (Window > Channels) and duplicate the blue channel by dragging it over the ‘Create new channel’ button from the bottom of this panel. Select the Brush Tool (B) and paint with a white brush over that airplane trace because we don’t need it. Now go to Image > Adjustments > Curves (Ctrl/Cmd + M) and create a curve like I did to increase the contrast between the birds and the sky.
Ctrl-click on this mask to select its white area. Inverse the selection by going to Select > Inverse (Ctrl/Cmd + Shift + I). Now only the black areas (the birds) of the image are selected.
Click on the RGB channel to make it active. Then go to the Layers panel and hit Ctrl/Cmd + J to create a new layer using the selected areas. Now the birds are separated from the background.

Step 10: Position the birds
Move the birds into your first document using the Move Tool (V). Name this layers “birds” and convert it into a smart object. Then go to Edit > Free Transform (Ctrl/Cmd + T), hold down the Shift key and change the size of this layer.
Use the Move Tool (V) to move the birds where you want them to be. Then put the “birds” layer beneath the “building” group. You can also duplicate this layer (Ctrl/Cmd + J) to get more birds and use Free Transform (Ctrl/Cmd + T) to move and rotate the new layer.
Step 11: Add more birds
Open this image in Photoshop and separate the birds from the background using the same technique which you used at step 10. Move the birds into your first document and convert this layer into a smart object. Then use Free Transform (Ctrl/Cmd + T) to change the size of this layer. Put these birds above your building.
Select all your birds layers and hit Ctrl/Cmd + G to group them. Name the group “birds”. 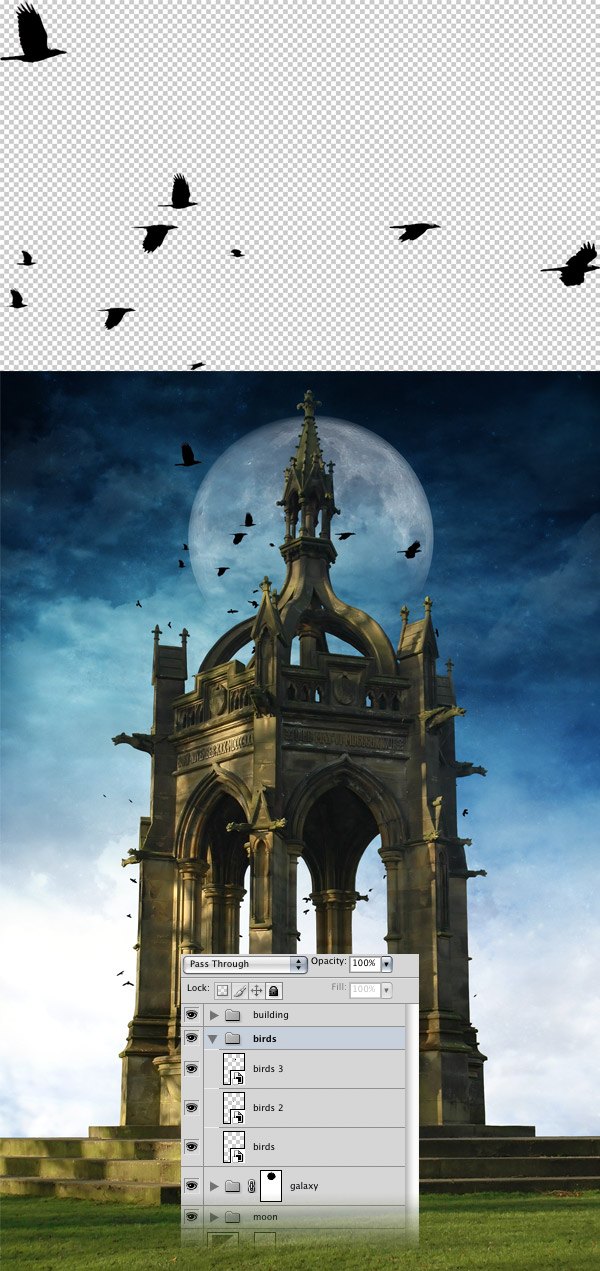
Step 12: Isolate the subject from the background
Download this photo and open it in Photoshop. Then use the Pen Tool (P) to separate the girl from the background. 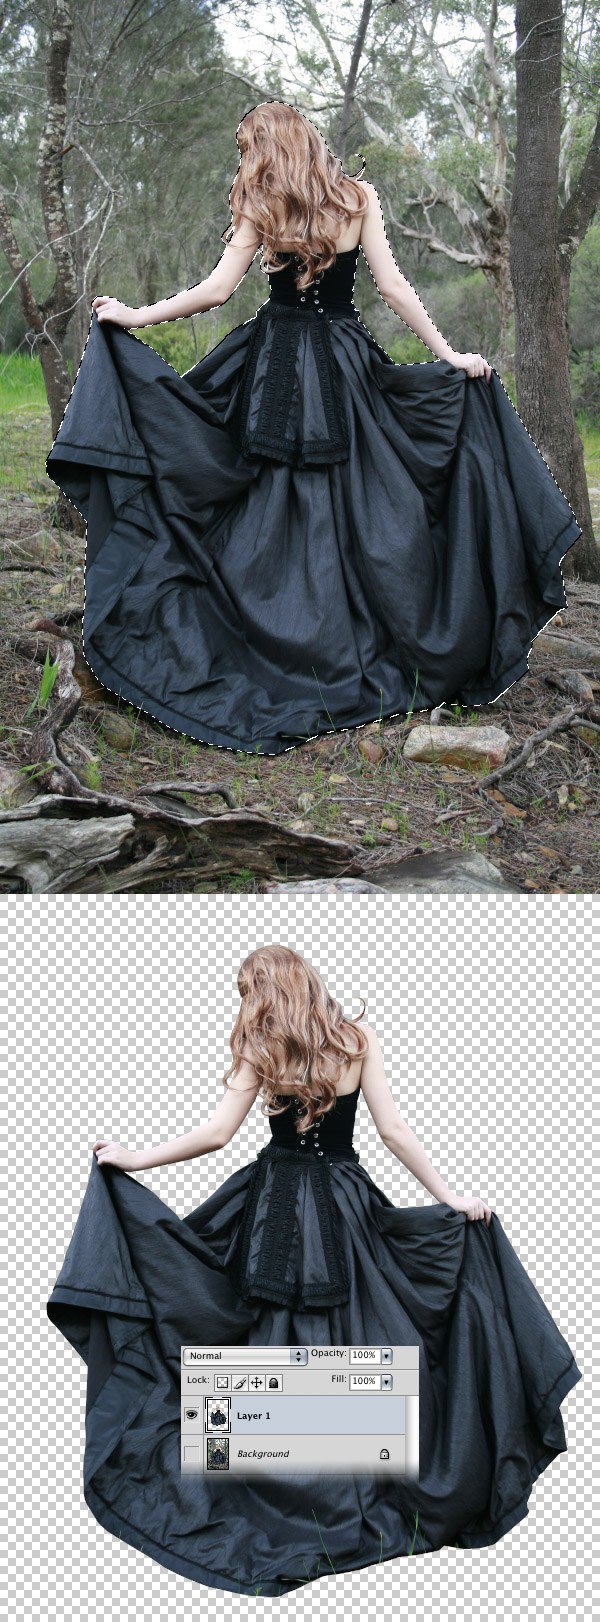
Step 13: Adjusting the hair
Create a new layer beneath the layer of the girl and fill it with black.
Click on the girl layer to make it active. Then select the Smudge Tool, select a 1px soft brush and set the Strength to 90%. Use this tool to make the hair look more realistic.
Take a look at the following image for reference. 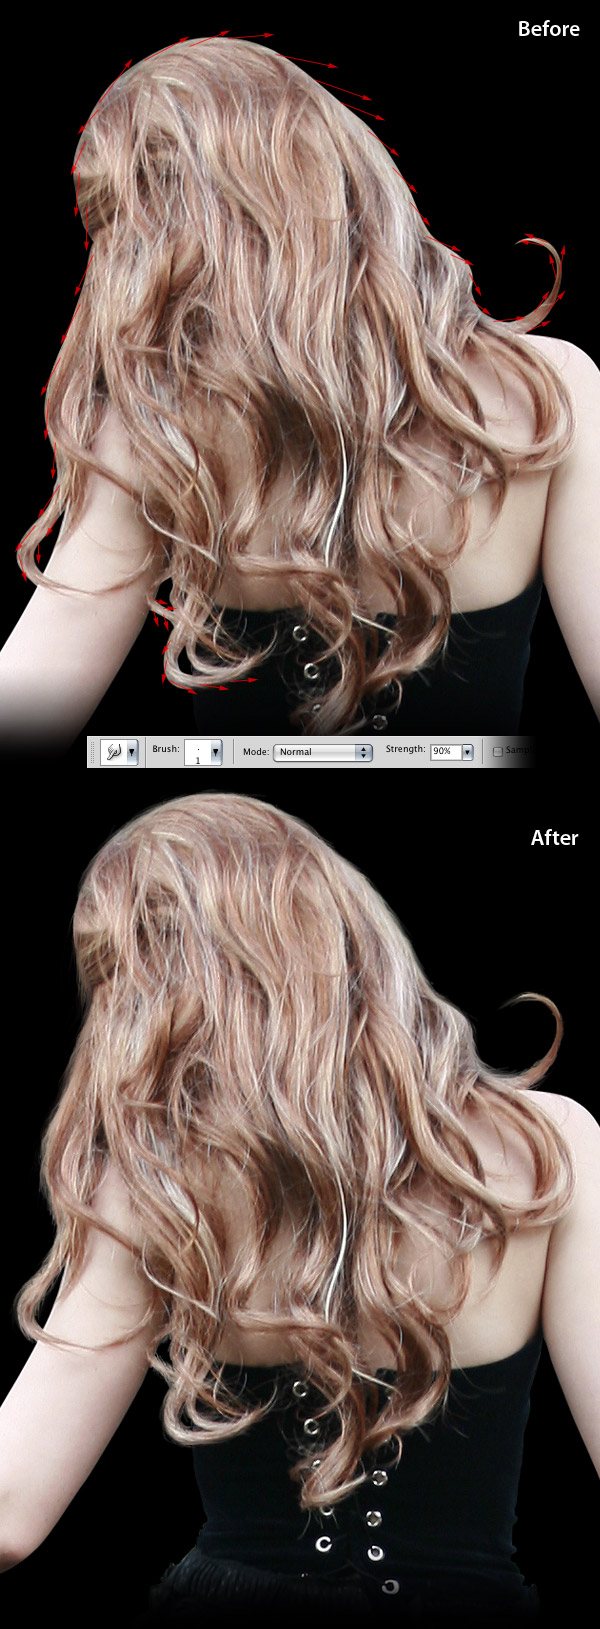
Step 14: Position the subject into the composition
Move the girl into your first document using the Move Tool (V). Convert this layer into a smart object.
Then go to Edit > Free Transform (Ctrl/Cmd + T), hold down the Shift key and change the size of this layer. Name this layer “girl”, hit Ctrl/Cmd + G to put it inside a group and name the group “girl” as well. 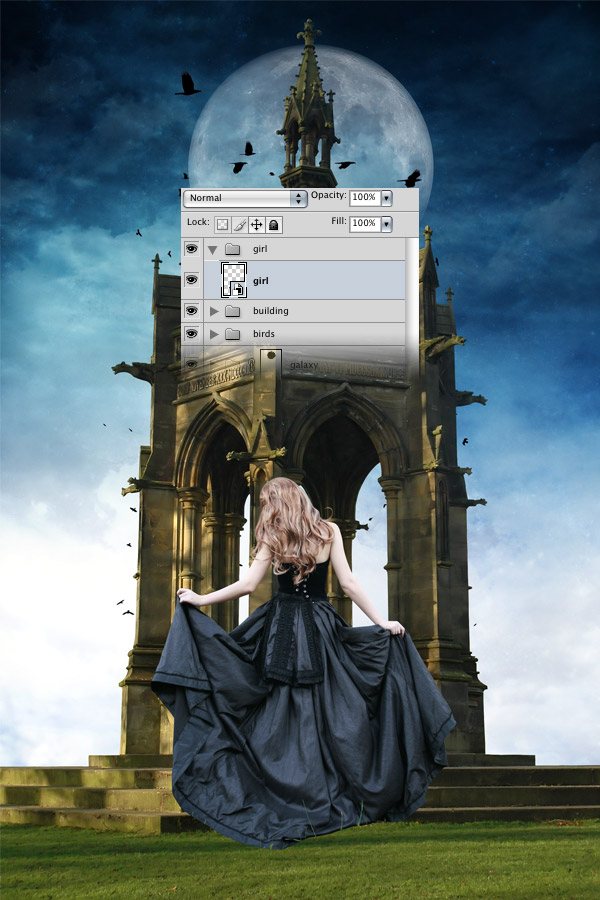
Step 15: Create two new Photoshop brushes
Download these two images and open one of them in Photoshop.
We will use these images to create two new brushes. First, we need to select the black area of the image. Go to Select > Color Range, from the drop-down list select Shadows and click OK.
Then go to Edit > Define Brush Preset, give your brush a name and click OK. Repeat this process for the second image as well. 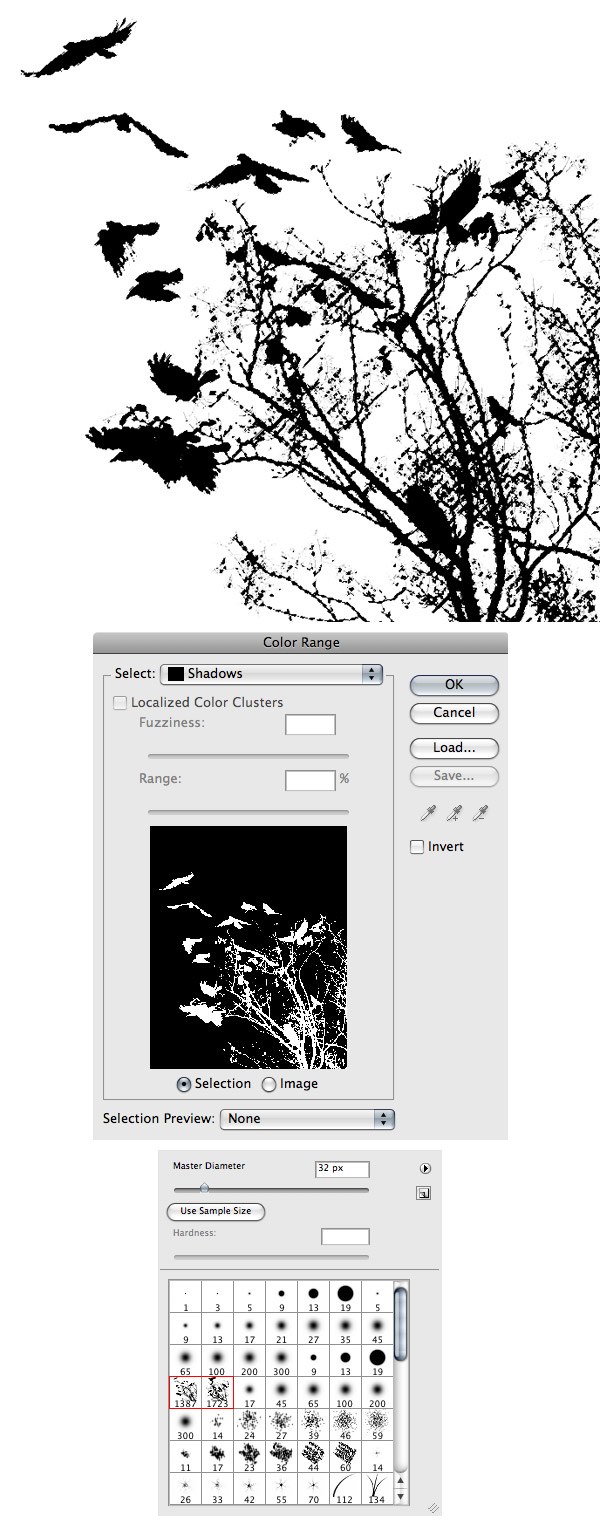
Step 16: Masking the dress of the girl
Add a mask to the “girl” group (Layer > Layer Mask > Reveal All).
Set the foreground color to black and use the two brushes from the previous step to mask the bottom area of the girl’s dress. You can also use the Brushes panel (F5) to rotate the brushes at different angles. 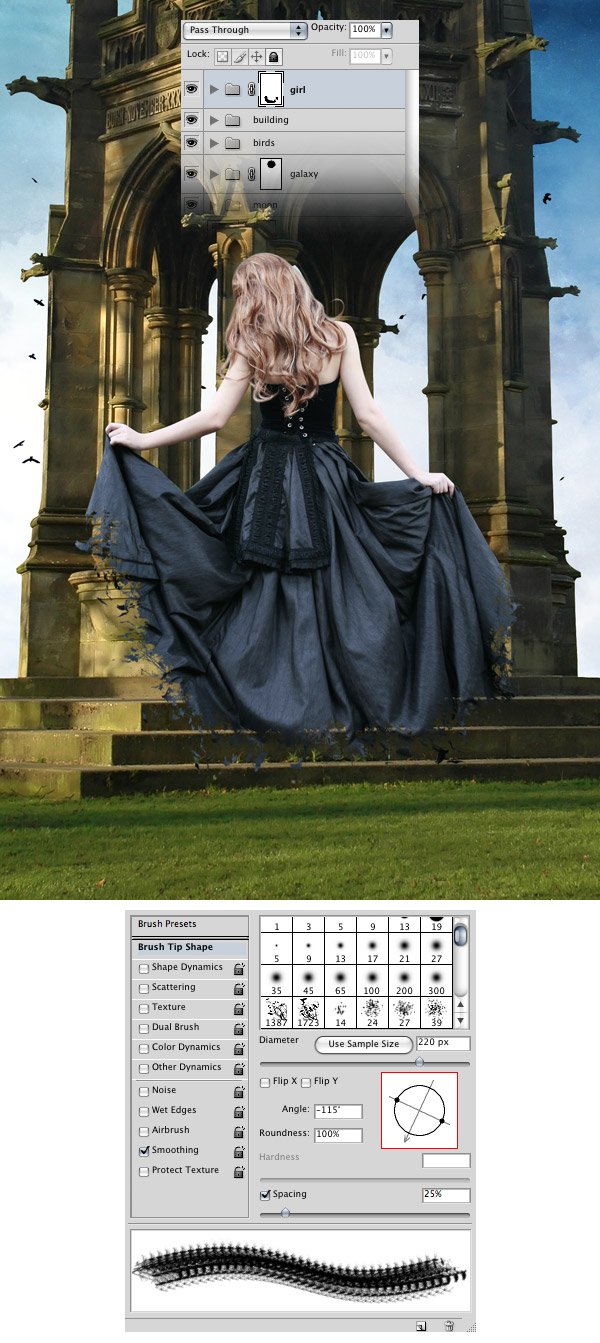
Step 17: Adding the vines
Now we are going to create some vines that connect the girl’s dress with the gargoyles of the building.
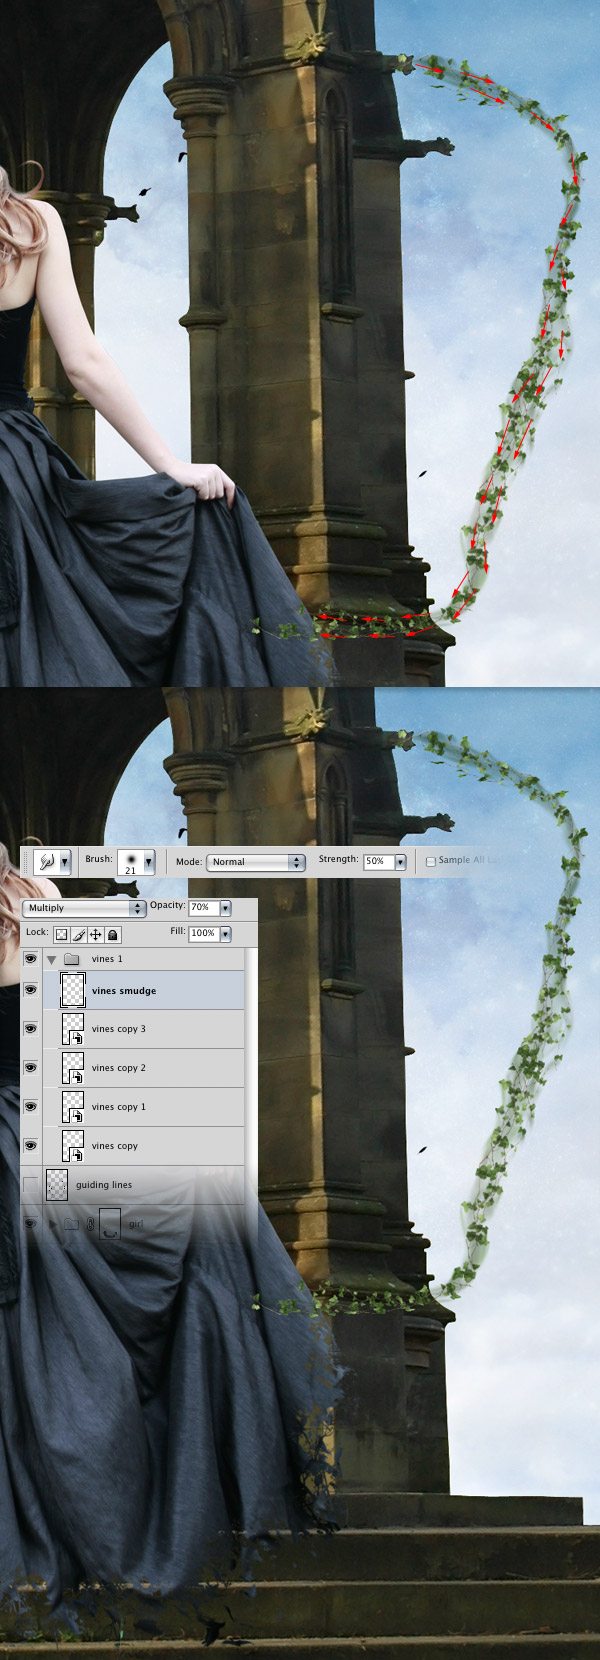
First, create a new layer, select a black brush (B) and draw some lines as you see in the following image to help you create the vines. Name this layer “guiding lines”. Download this vines image and open it in Photoshop. Use the Move Tool (V) to move it into your first document. Hit Ctrl/Cmd + G to put this layer inside a group and name the group “vines 1”. Right-click on this layer, select Convert to Smart Object and then name it “vines”. Use Free Transform (Ctrl/Cmd + T) to change the size of this layer. Make sure that the “vines” layer is active. Then select the Move Tool (V), hold down the Alt/Option key, click on your image and drag the cursor.
This will create a copy of the “vines” layer. Use Free Transform (Ctrl/Cmd + T) to change the size of this new layer and rotate it. Then go to Edit > Transform > Warp and modify the vines to follow the guiding lines which you drew.
Continue to duplicate the “vines” layer and transform each new layer as many times as you need. Take a look at the following image for reference. Set the opacity of each of these layers to 90%.

Step 18: Creating a smoke effect
Hold down the Ctrl/Cmd key and select each of your vines layers. Duplicate these layers by dragging them over the ‘Create a new layer’ button from the bottom of the Layers panel. Then hit Ctrl/Cmd + E to merge the duplicated layers.
Select the Smudge Tool, select a brush with the size of 21px and set the Strength at 50%. Use this tool to modify this layer and create a smoke effect through the vines. Name this layer “vines smudge” and set its blend mode to Multiply 70%.
Step 19: Changing the color of the vines
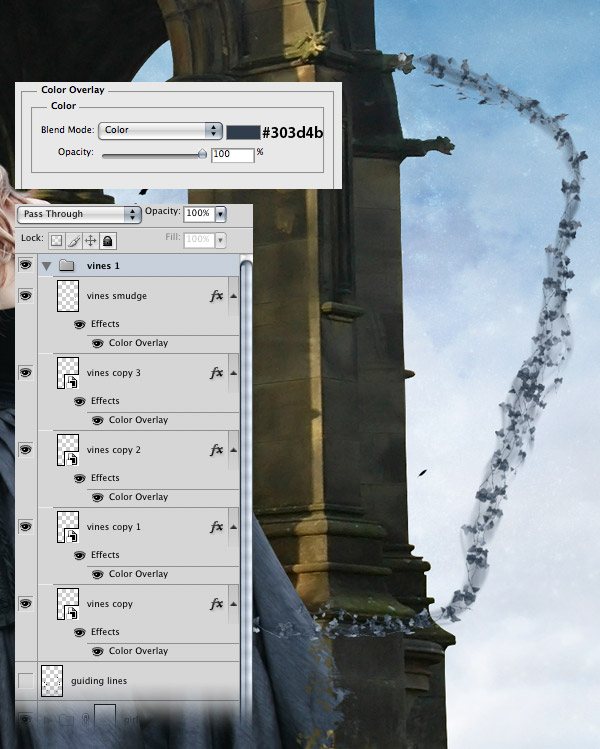
Now we will color the vines in blue. Double-click on one of the layers from the “vines” group to open the Layer Style window and use the settings from the following image for Color Overlay. Then copy the layer style of this layer and paste it to all the other layers from this group.
Step 20:Mask the vines group
Add a mask to the “vines” group (Layer > Layer Mask > Reveal All). Then select a black soft brush (B) and paint with it over the ends of your vines. 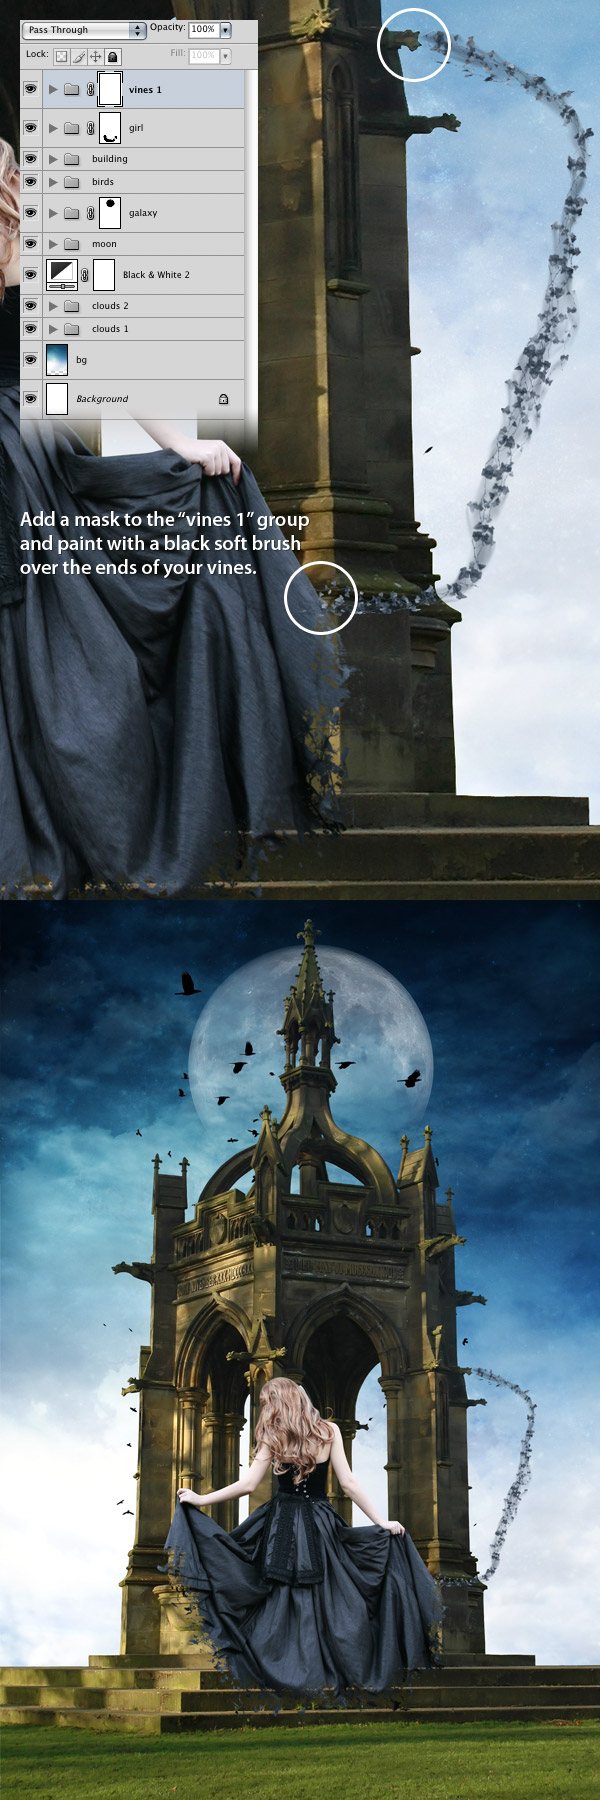
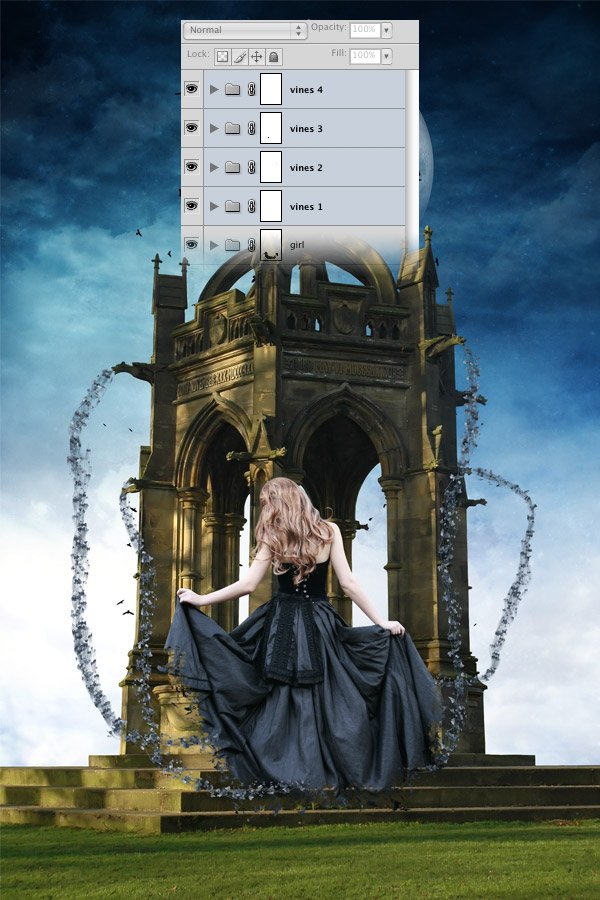
Step 21: Create more vines
Repeat the previous four steps to create more vines.
Step 22: Apply some shadows
Create a new group beneath the “girl” group and name it “shadows”. Ctrl/Cmd-click on the “girl” layer to make a selection of the girl. Hold down Ctrl/Cmd + Alt/Option + Shift and click on the mask of the “girl” group to obtain only the selection of the visible area of the dress. Create a new layer inside the “shadows” group and fill the selection with black.
Hit Ctrl/Cmd + D to deselect. Name this layer “girl shadow” and convert it into a smart object. Then go to Edit > Free Transform (Ctrl/Cmd + T), hold down the Ctrl/Cmd and Shift keys and move the top line of the transformation box as you see in the following image.
Place your shadow on the right side of the building using the Move Tool (V). Then go to Filter > Blur > Gaussian Blur and use the settings from the following image. Set the opacity of this layer to 18%.
We don’t want the shadow to be seen on the sky. To make it visible only on the building we will use a mask. Ctrl/Cmd-click on the “building” layer to select it.
Then click on the “shadows” group to make it active and go to Layer > Layer Mask > Reveal Selection. Now all the layers that we will create inside this group will be visible only on the surface of the building (the white area of the mask). 
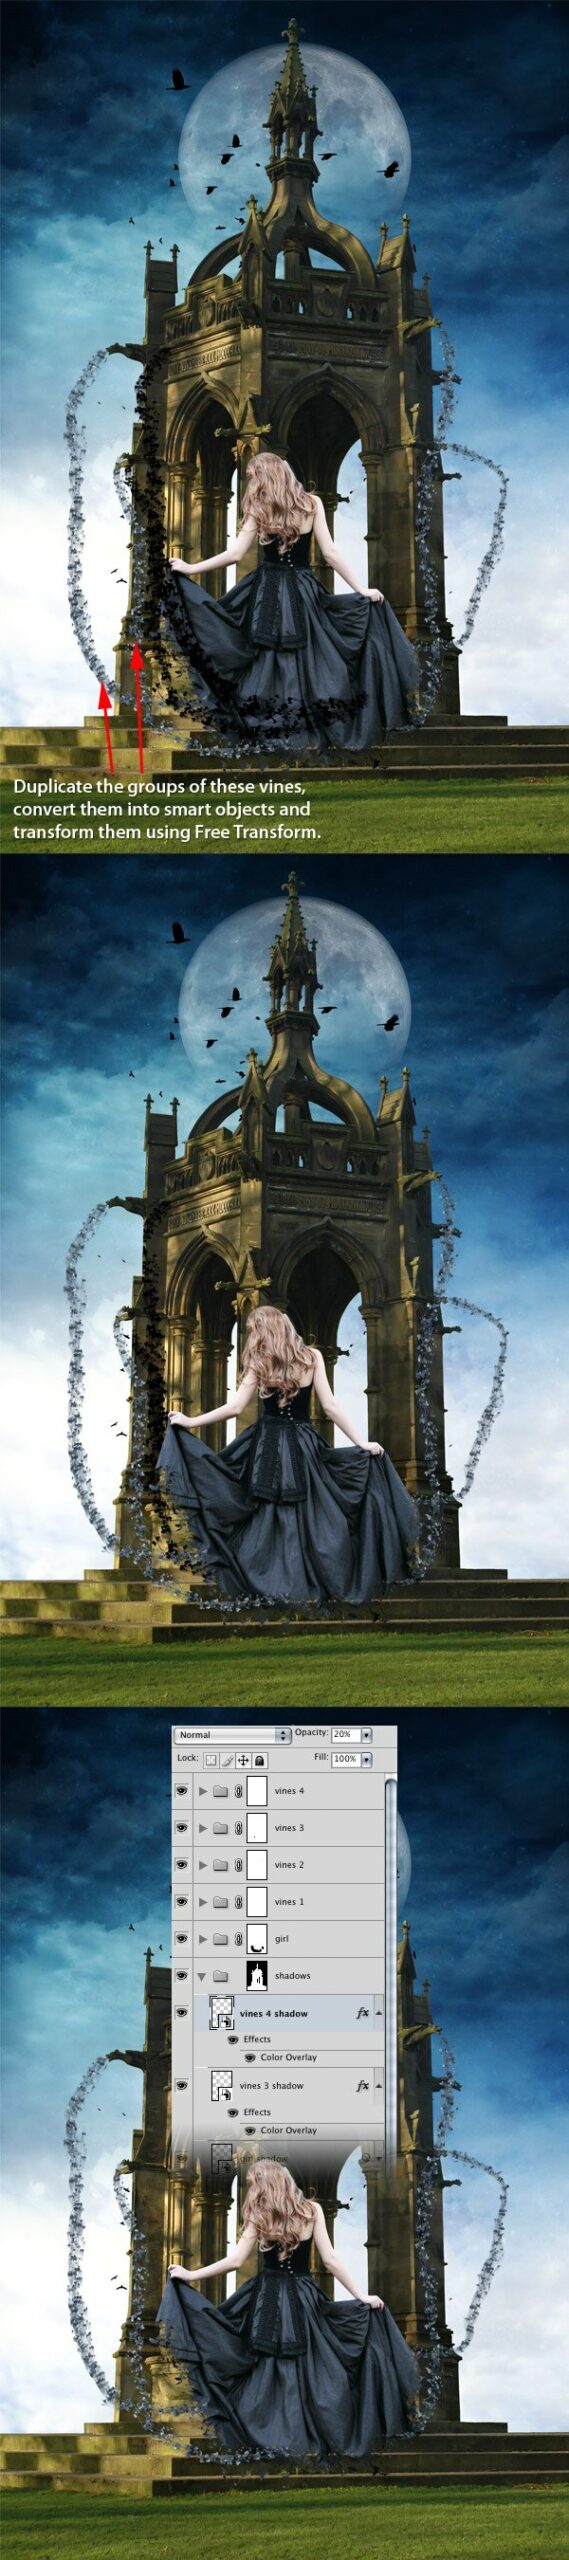
Step 23: Duplicate the vines group
Duplicate the vines groups from the left side of the image.
Then convert each duplicated group into a smart object. Add a Color Overlay to each of these layers using the black color. Move these layers inside the “shadows” group.
Use Free Transform (Ctrl/Cmd + T) to transform the vines shadows just like you did with the shadow of the girl. Move these layers on the building and add a 2px gaussian blur to them. Then set their opacity to 20%.
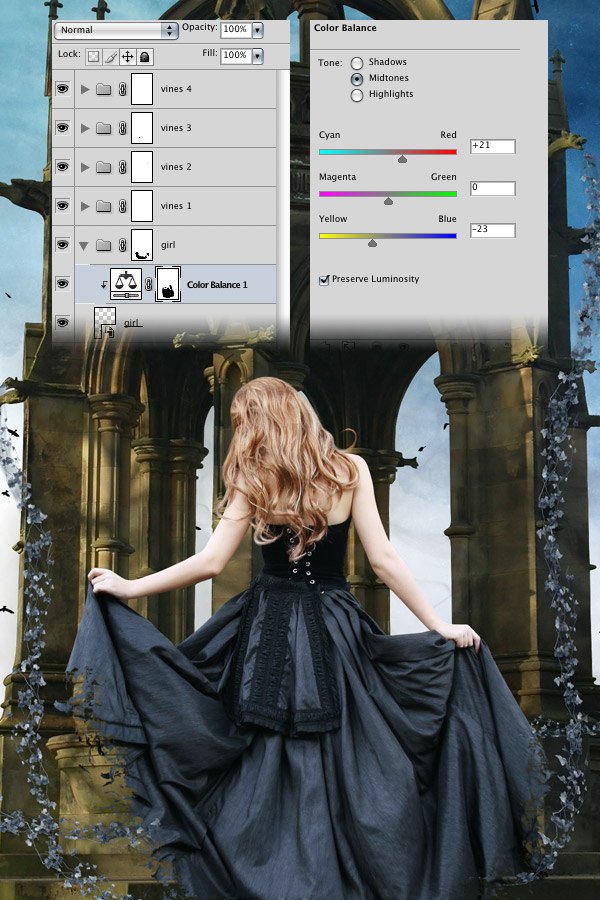
Step 24: Hair color adjustment
Click on the “girl” layer to make it active. Then go to Layer > New Adjustment Layer > Color Balance, tick the Use Previous Layer to Create Clipping Mask option and use the settings from the following image. Then select a big, black, soft brush (B) and paint with it over the girl’s body except for the hair.
Step 25: Image adjustments the subject
Ctrl/Cmd-click on the “girl” layer to make a selection of the girl. Then create a new layer and fill the selection with the color #939393 using the Paint Bucket Tool (G). Select the Burn Tool (O), set the Range to Midtones and the Exposure to 33%.
Then make the right side of this layer darker. Use the Dodge Tool (O) with the same settings to make the left side of the girl brighter. You can use the Alt/Option key to switch faster between the Burn Tool and the Dodge Tool.
Name this layer “light/shadow” and set its blend mode to Soft Light and opacity at 60%. 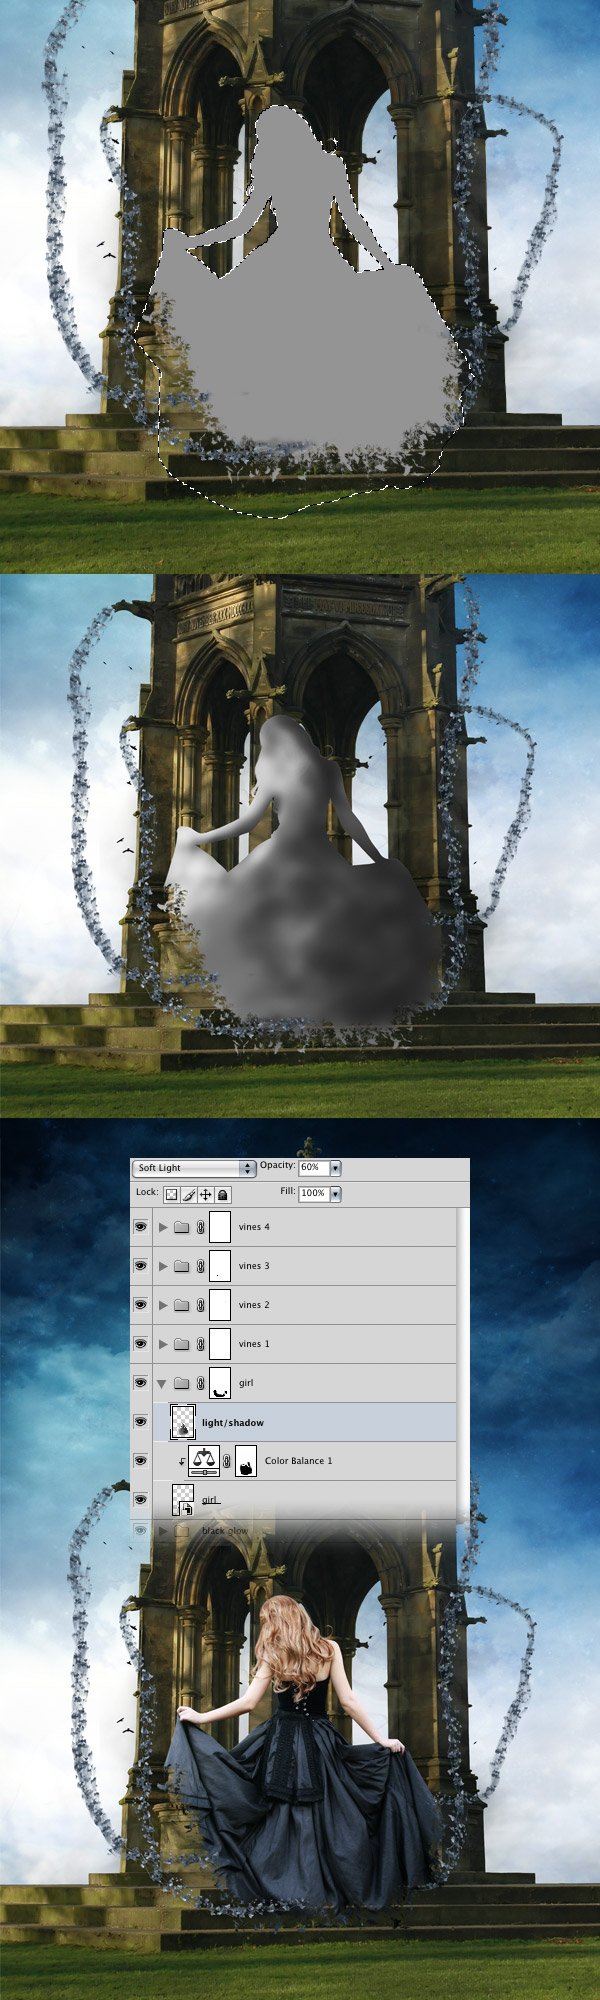
Step 26: Apply a radial blur
Duplicate the “girl” group (right-click on it and select Duplicate Group). Convert this new group into a smart object.
Then go to Filter > Blur > Radial Blur and use the settings from the following image. Name this layer “girl radial blur”, move it beneath the “girl” group and set its blend mode to Color Burn and opacity at 50%. 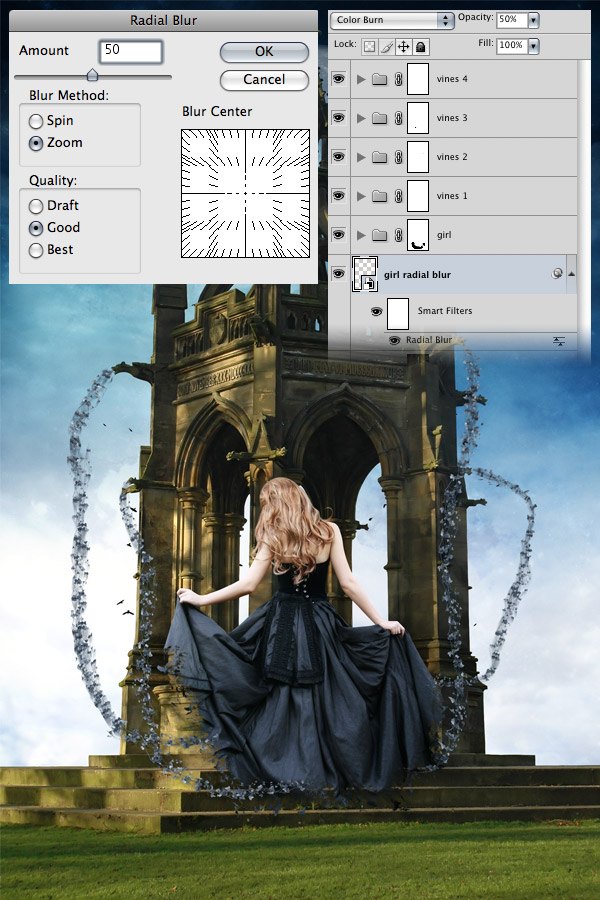
Step 27: Creating a dark fog
Download these Photoshop brushes and install them.
Then create a new group, name it “black glow” and put it beneath the “girl radial blur” layer. Set the foreground color to black and use the brushes which you downloaded to create a dark fog. Use each brush in a new layer and set the opacity of each layer to 30-60%.
Then set the opacity of the “black glow” group to 60%. 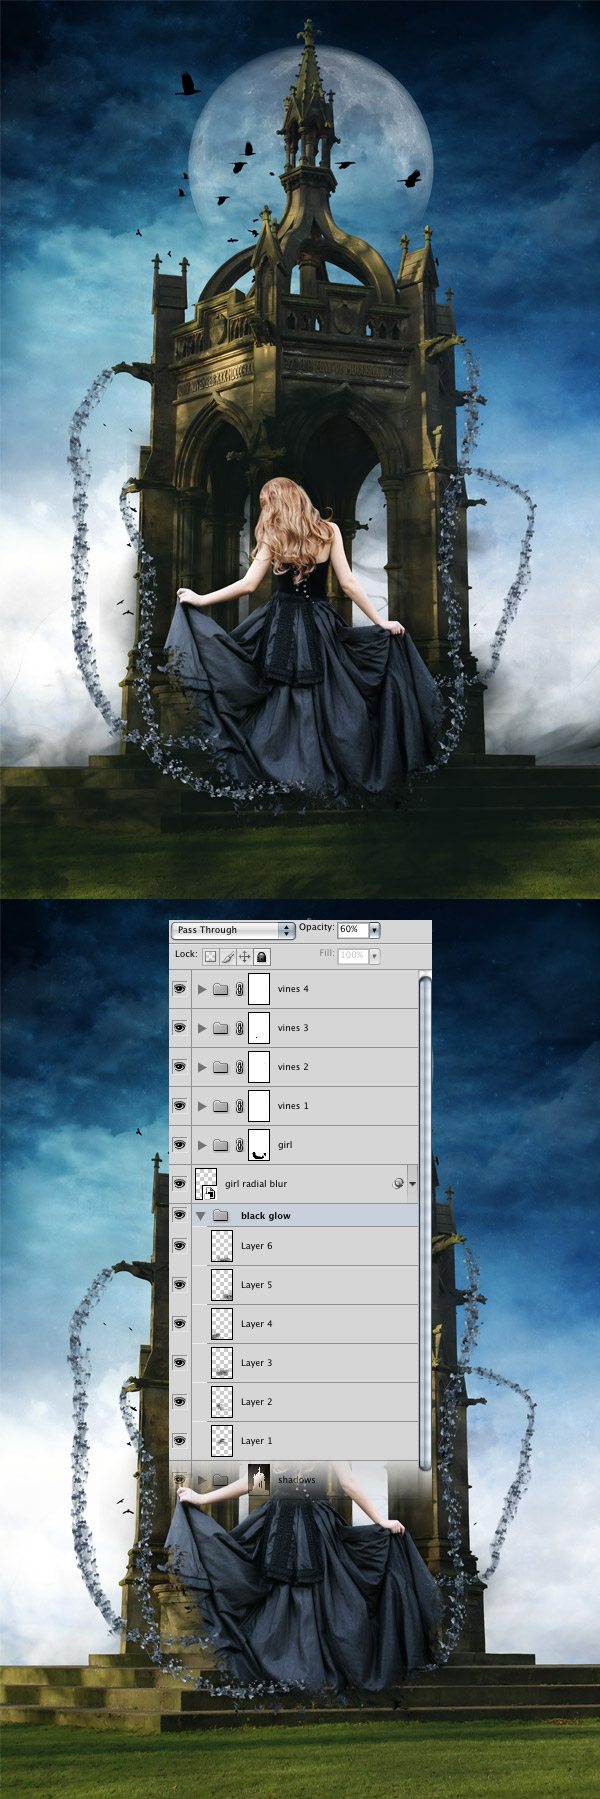
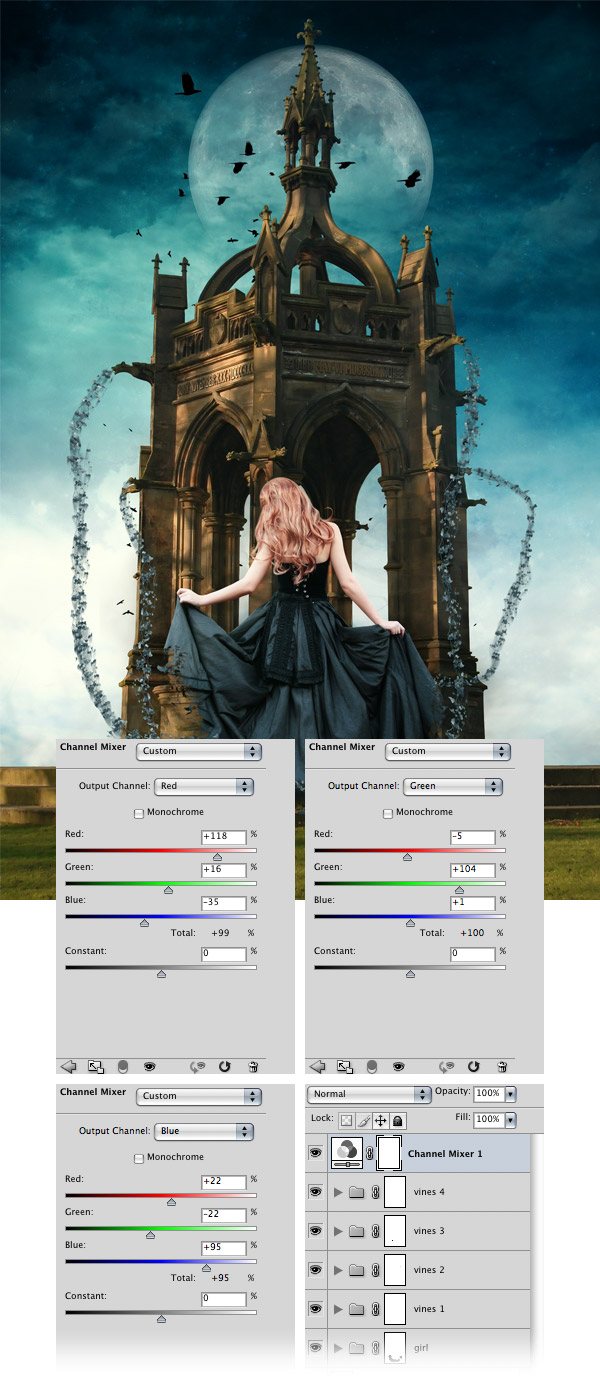
Step 28: Add a Color adjustment layer
Now we are going to do some color adjustments to the image. Go to Layer > New Adjustment Layer > Channel Mixer and use the settings from the following image.
Step 29: Add a Gradient Map adjustment layer
Go to Layer > New Adjustment Layer > Gradient Map and use the settings from the following image. Set the blend mode of this layer to Overlay and opacity at 25%. 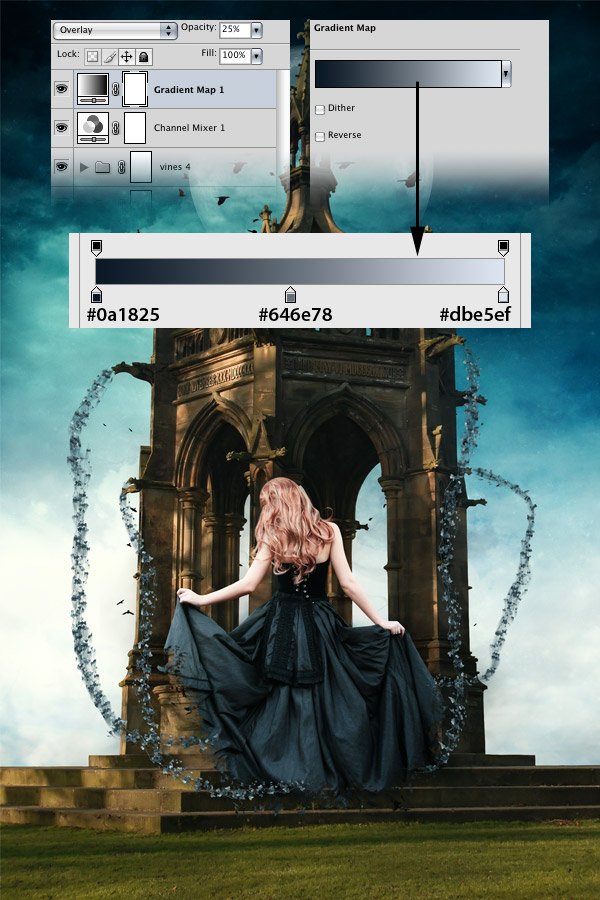
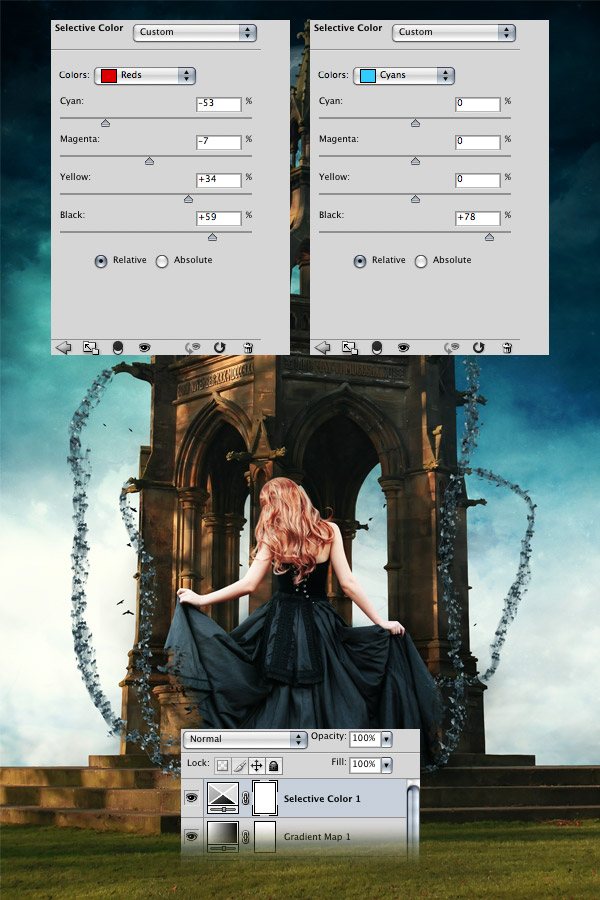
Step 30: Add a Selective Color adjustment layer
Go to Layer > New Adjustment Layer > Selective Color and use the settings from the following image.
Step 31: Moon color adjustments
Click on the “moon” layer to make it active. Then go to Layer > New Adjustment Layer > Brightness/Contrast, tick the “Use Previous Layer to Create Clipping Mask” option and use the settings from the following image. Add a Hue/Saturation adjustment layer, tick the Colorize option and use the settings from the image below.
Set the opacity of this layer to 25%. Then go to Layer > New Adjustment Layer > Color Balance and use the settings from the next image. 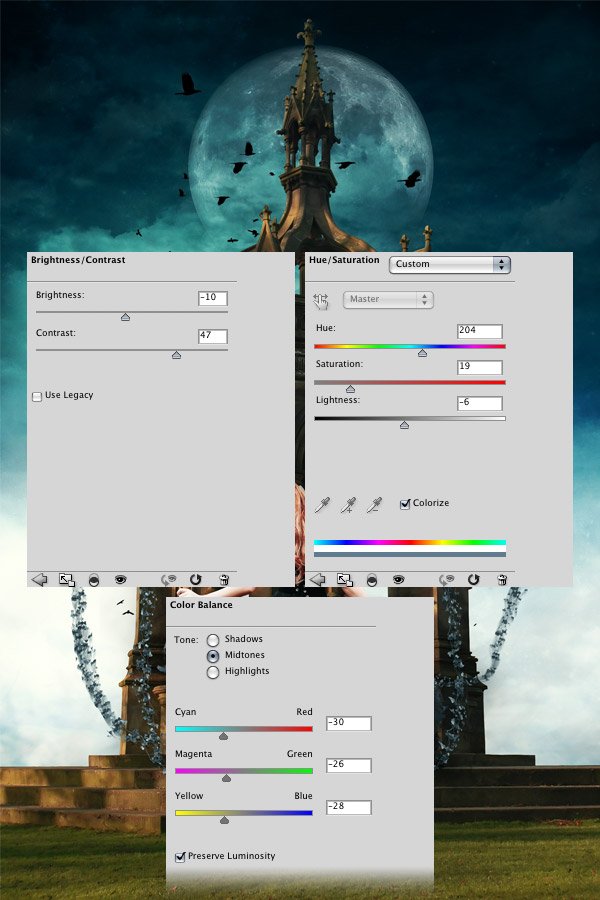
Step 32: Change the color of the grass for better blending
Now we will change the color of the grass to make it fit better with the rest of the image.
Click on the “building” layer to make it active. Then go to Layer > New Adjustment Layer > Color Balance, tick the Use Previous Layer to Create Clipping Mask option and use the settings from the following image. Fill the mask of this layer with black using the Paint Bucket Tool (G).
Then select a big white soft brush (B) and paint with it over the grass. Set the opacity of this layer to 80%. 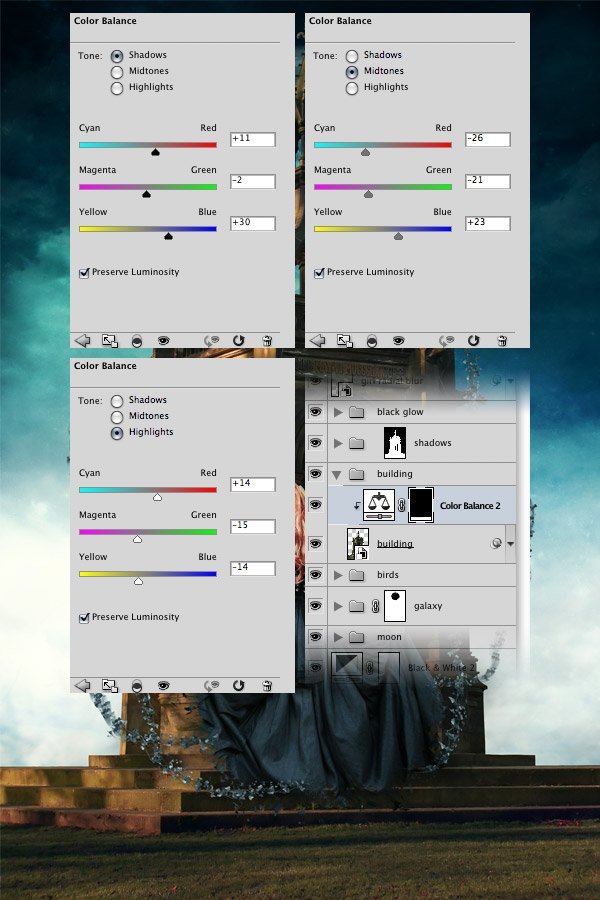
Step 33: Give the scene a Photo filter
Go to Layer > New Adjustment Layer > Photo Filter, tick the Use Previous Layer to Create Clipping Mask option and use the settings from the following image.
Set the opacity of this layer to 25%. Now we will make the top of the building a little bit more blue. Add a Color Balance adjustment layer with the settings from the image below.
Fill the mask of this layer with black. Then select a white soft brush (B) and paint with it over the top of the building. Set the opacity of this layer to 25%.

Step 34: Give the girl a shadow
Now we will do one final touch to the shadow of the girl. Go to the “shadows” group and create a new layer. Then select a black brush (B) with the size of 200px and the hardness at 40%.
Paint with this brush beneath the girl to create a shadow. Name this layer “girl shadow 2” and set its blend mode to Color Burn and drop the opacity down to 25%. 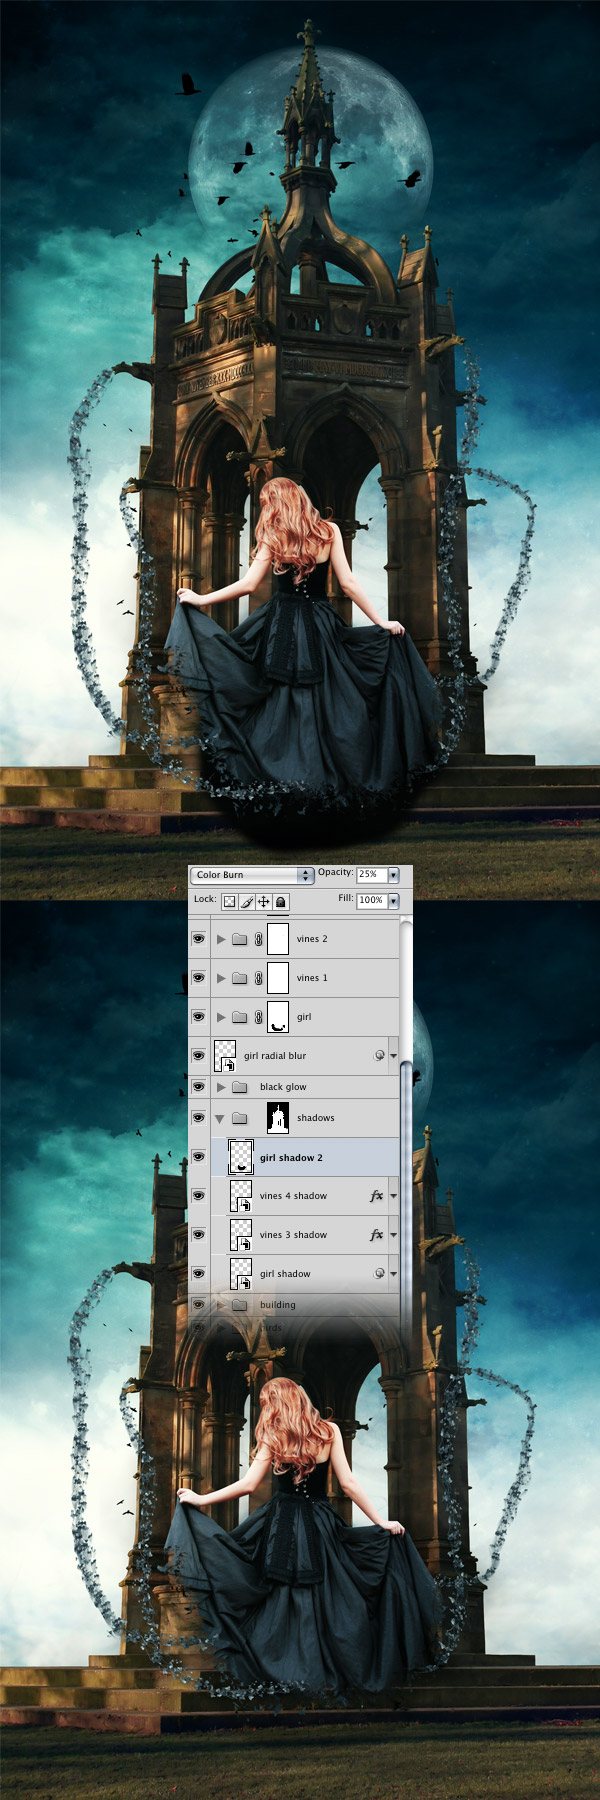
Step 35: Apply a High Pass filter
Create a new layer above all the other ones.
Then go to Image > Apply Image to merge a copy of all the visible layers into the new layer (or you can use the shortcut Ctrl/Cmd + Alt/Option + Shift + E). Convert this layer into a smart object. Then go to Filter > Other > High Pass and use the settings from the following image.
Name this layer “high pass” and set its blend mode to Hard Light and opacity to 50%. 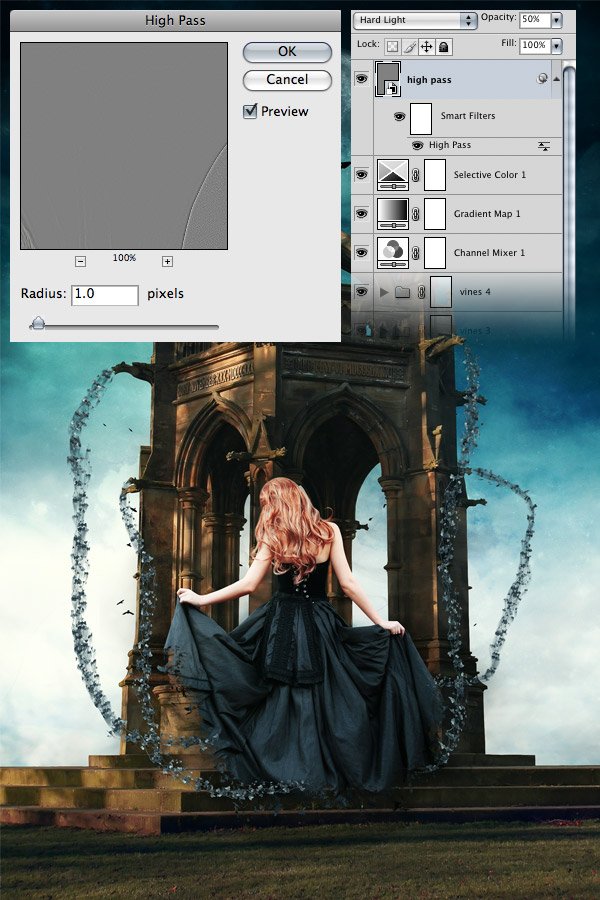
Step 36: Soften up the image with a Gaussian Blur
Create a new layer above all the other ones. Then go to Image > Apply Image (Ctrl/Cmd + Alt/Option + Shift + E).
Convert this layer into a smart object and add a 3px gaussian blur to it (Filter > Blur > Gaussian Blur). Name this layer “gaussian blur screen” and set its blend mode to Screen and opacity of about 20%. Hit Ctrl/Cmd + J to duplicate this layer.
Then set the blend mode of the new layer to Soft Light and name it “gaussian blur soft light”. 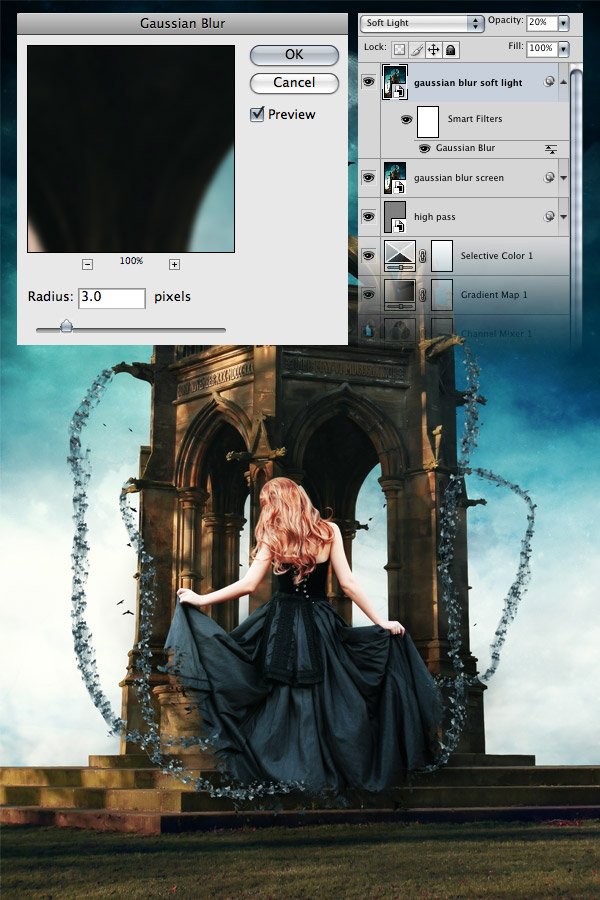
Conclusion
We are finished! We covered plenty of Photoshop techniques for composing a scene using various stock elements. We relied on blend modes and adjustment layers to blend different objects together, as well as to set the overall tone of our fantasy piece.
I hope you enjoyed this tutorial and you learned something new. Show us your version in the Design Instruct Flickr group. 
Download Source Files
- fantasy_nightday_composition (ZIP, 362 MB)
-
 Trevin serves as the VP of Marketing at WebFX. He has worked on over 450 marketing campaigns and has been building websites for over 25 years. His work has been featured by Search Engine Land, USA Today, Fast Company and Inc.
 -

WebFX is a full-service marketing agency with 1,100+ client reviews and a 4.9-star rating on Clutch! Find out how our expert team and revenue-accelerating tech can drive results for you! Learn more
Make estimating web design costs easy
Website design costs can be tricky to nail down. Get an instant estimate for a custom web design with our free website design cost calculator!
Try Our Free Web Design Cost Calculator
Table of Contents
- Preview
- Resources
- Step 1: Creating the Sky Background
- Step 2: Add Another Sky Texture
- Step 3: Add Another Sky Layer with a Different Blend Mode
- Step 4: Increase the Contrast of the Background
- Step 5: Isolate the Building from Its Background
- Step 6: Convert the Building to an Editable Smart Object
- Step 7: Adding a Moon
- Step 8: Add Stars
- Step 9: Add Some Birds to the Composition
- Step 10: Position the Birds
- Step 11: Add More Birds
- Step 12: Isolate the Subject from the Background
- Step 13: Adjusting the Hair
- Step 14: Position the Subject into the Composition
- Step 15: Create Two New Photoshop Brushes
- Step 16: Masking the Dress of the Girl
- Step 17: Adding the Vines
- Step 18: Creating a Smoke Effect
- Step 19: Changing the Color of the Vines
- Step 20:Mask the Vines Group
- Step 21: Create More Vines
- Step 22: Apply Some Shadows
- Step 23: Duplicate the Vines Group
- Step 24: Hair Color Adjustment
- Step 25: Image Adjustments the Subject
- Step 26: Apply a Radial Blur
- Step 27: Creating a Dark Fog
- Step 28: Add a Color Adjustment Layer
- Step 29: Add a Gradient Map Adjustment Layer
- Step 30: Add a Selective Color Adjustment Layer
- Step 31: Moon Color Adjustments
- Step 32: Change the Color of the Grass for Better Blending
- Step 33: Give the Scene a Photo Filter
- Step 34: Give the Girl a Shadow
- Step 35: Apply a High Pass Filter
- Step 36: Soften Up the Image with a Gaussian Blur
- Conclusion
- Download Source Files
Share this article


Web Design Calculator
Use our free tool to get a free, instant quote in under 60 seconds.
View Web Design CalculatorMake estimating web design costs easy
Website design costs can be tricky to nail down. Get an instant estimate for a custom web design with our free website design cost calculator!
Try Our Free Web Design Cost Calculator


