

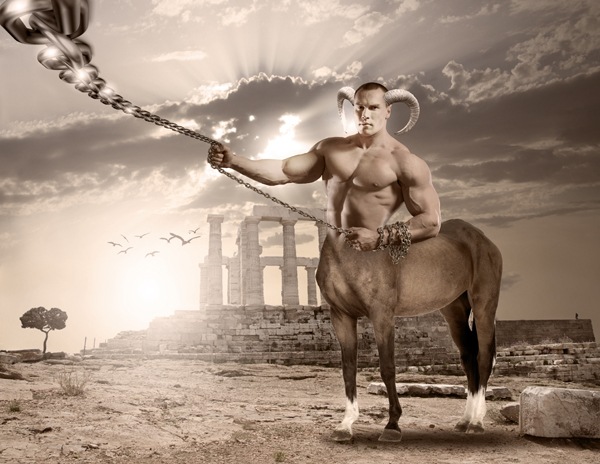
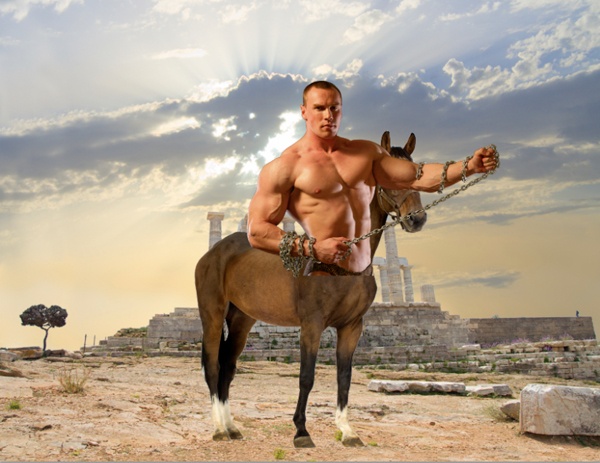
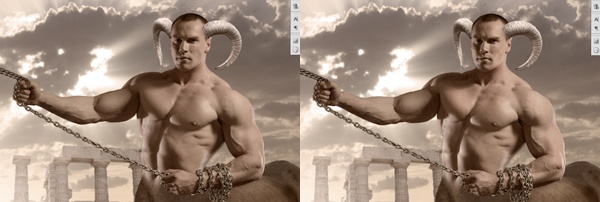
Preview
Tutorial Resources
- Stock image: Poseidon Temple – side by David H.Seymour (iStockPhoto)
- Stock image: Strength by Oleg Prikhodko (iStockPhoto)
- Stock image: Horse from by Life on White (iStockPhoto)
- Stock image: Chain by Özer Öner Tasarim (iStockPhoto)
- Stock image: Mouflon – Wild Sheep Goat Bighorn by Nils Kahle (iStockPhoto)
- Brushes: Birds Flying Brushes by redheadstock (deviantART)
Step 1: Setting the Stage
Fire up Photoshop and create a new document that is 11″ x 8.5″ so that we can work within a landscape, paper-sized canvas. Purchase and download the Poseidon Temple – side image and drag it onto the canvas of our new document. Next, press Cmd/Ctrl + T for the Free Transform command and, while holding down Shift, drag one of the corner transform controls of the Poseidon Temple image so that it fills the entire canvas.
Press Return/Enter to apply the transformation. 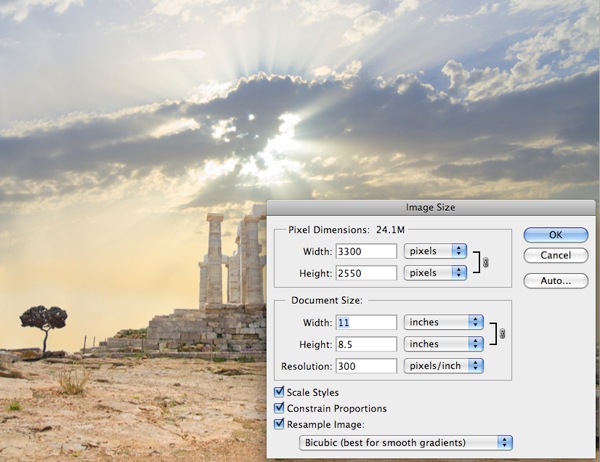
Step 2: Isolating the Upper Body
Next, purchase, download and open up the image of the body builder holding the chains (Strength). We want to remove the background here, so the quickest way of doing this would be to add a layer mask.
To do this, click on the Add layer mask icon at the bottom of the Layers Panel (shown below). 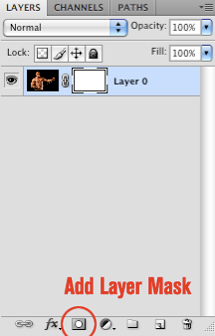 Choose the Magic Wand Tool (W) and click in the black area to load a selection on the background. Keep the selection active, switch over to the Paint Bucket Tool (G), set your Foreground color to black, and then click anywhere in the selection area to mask out the background.
The image that follows shows the before and after. 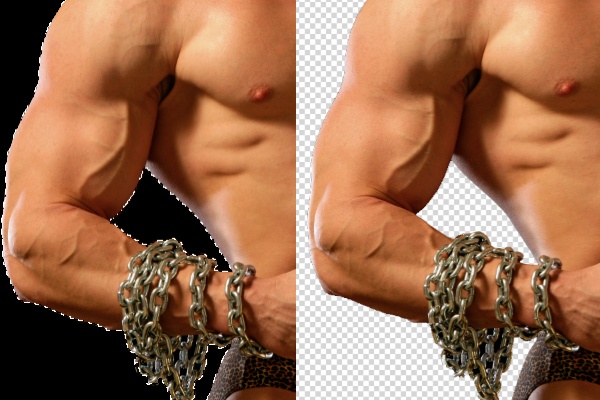
Step 3: Working On the Details
Now, you may notice that some areas that were masked out are either cutting into the image a bit or have been exempt from the layer mask. To fix this, we are going to select the Brush Tool (B), call up the Brushes Panel (F5 or Window > Brushes) and pick a small, hard, round brush.
Zoom in and begin to paint into the layer mask with your black Foreground color. Pay special to attention to the top of the figure’s head where some of his hair was chopped off from the Magic Wand masking in the previous step. Also, the inside of the chain links require a bit of special attention, as we will need to brush inside of the black areas in order to remove the color here and reveal the background.
Once you have completed this, drag the image over into our main 11″ x 8.5″ document and make sure to save your work! 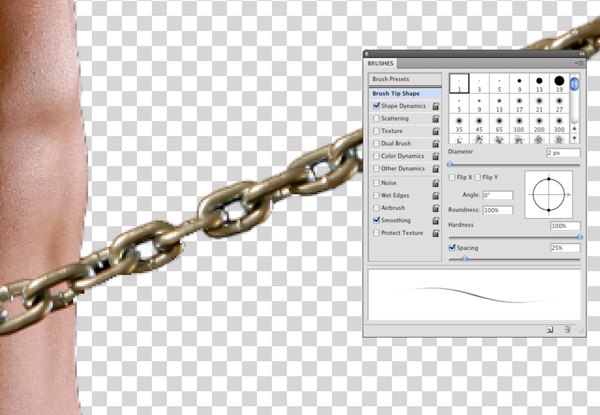
Step 4: Isolating the Lower Body
From here, we are going to purchase, download and open up the image of the Horse stock image and essentially repeat the previous steps to remove the background from the image. First, double-click the image, which will open up the New Layer window; just press OK in the New Layer window to unlock the Background layer.
Then, with the Magic Wand Tool (W), select the white background area around the horse, and press Delete to remove it. Add a layer mask, zoom in, and (with the same hard, round brush) paint with a black color in the areas of the horse’s reigns and around the tail area between the horse’s legs. Once you have removed the background from the image of the horse, drag it over to our main Photoshop document.

Step 5: Resizing and Beginning to Blend
At this point, we have our background image, the upper body, and the horse image (that will eventually be the lower half of the centaur). Move the horse layer below the body builder layer and press Cmd/Ctrl + T for Free Transform. Click-and-hold on one of the four transform controls at the corners of the transform box and, while holding down Shift, drag it outwards so that it is approximately the same size as the image below.
 Next, we are going to add a layer mask to both the horse layer and the layer with the body builder. After adding the layer masks on both of the layers, choose the Brush Tool (B), reduce the Opacity option to about 30% in the Options Bar, and change the brush tip to a soft brush. Ensure that your Foreground color is still black and then begin brushing out the horse’s head and the top of the body.
Switch over to the layer mask on the body builder layer and, with the same brush, begin to mask out some of his waistline so that it will blend into the horse. For some of the finer selections just underneath his hand, we will want a hard edge — so switch to a brush with 100% Hardness. Then, change the Opacity of your brush back up to 100% and brush out the area under his hand so that you are left with a nice, clean outline and a torso that fades into the lower body of the horse.
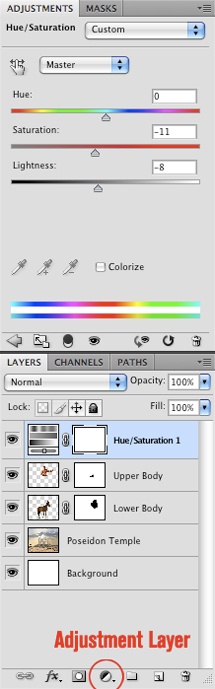
Step 6: Hue/Saturation Adjustments
Click on the Create new fill or adjustment layer icon at the bottom of the Layers Panel. Select Hue/Saturation and apply the following settings:
- Hue: 0
- Saturation: -11
- Lightness: -8
Once you have done that, hold down Cmd/Ctrl and select the mask that accompanies the Hue/Saturation layer. When the dropdown menu appears, choose Delete Mask. Next, hold down Cmd/Ctrl again and click on the upper body layer of the body builder.
This should load a selection around the outline of his body. While the selection is still active, select the Hue/Saturation adjustment layer and then click on the Add layer mask icon at the bottom of the Layers Panel. This will make it so that the settings we have applied will only affect the upper body.
Step 7: Levels Adjustment Layer
Now we want to add some contrast to the background by adding a Levels adjustment layer. Select the image layer containing the Poseidon Temple image and then click on the Add new fill or adjustment layer icon from the bottom of the Layers Panel. After this, slide the middle slider of the histogram so that it will be set to a value of 0.81. 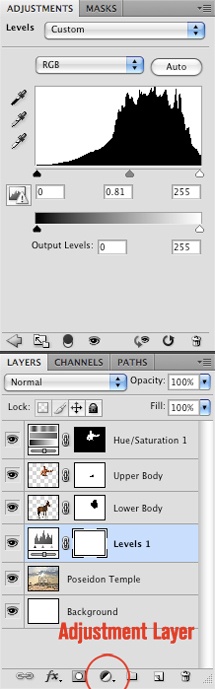 Next, hold down Cmd/Ctrl and click on the layer mask on the body builder layer. Once the dropdown appears, choose Apply Mask, and then repeat that for the lower body to apply the mask to that layer as well. Once the layer masks have been applied, select the upper body layer and press Cmd/Ctrl + E to merge the two layers together.
Rename this merged layer “Centaur” (to keep our work somewhat organized).
Step 8: Matching the Light Source
Click the top layer (which should be the Hue/Saturation adjustment layer from the previous step) and, while holding down Shift, select the merged “Centaur” layer below it to select both layers within the Layers Panel. Now that both of these layers are selected, press Cmd/Ctrl + T for Free Transform.
Hold down Shift and drag one of the four corners inwards to slightly reduce the size of the Centaur. Before accepting the changes, flip the Centaur and the Adjustment Layer horizontally (right-click inside the transform box, choose Flip Horizontal from the menu that appears) so that they are facing the opposite way. Then press Return/Enter to accept the transformations.
This way, we can have the figure matching the direction of the light source in the background. 
Step 9: Bring the Chain!
Purchase, download, and open the Chain stock image and drag it into the document. The size of the chain is okay, but we want to do a Free Transform so that we can flip the chain vertically and position it so that it appears to be coming from the top of the Centaur’s hand.
Next, change the Blend Mode of this layer to Multiply. 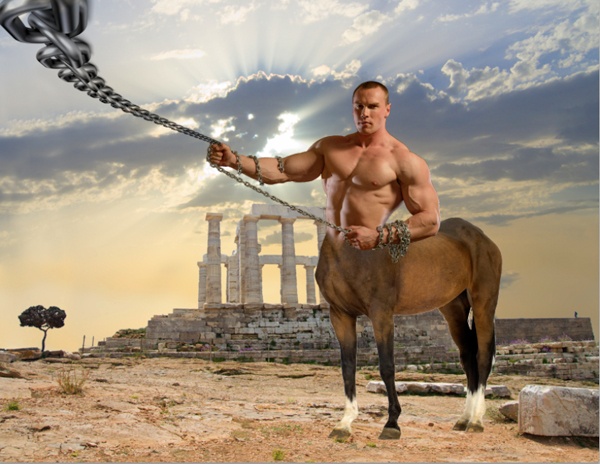 Create a layer mask on the chain layer and zoom in close. Choose the Brush Tool (B) and set it to a hard, round, black brush.
Brush out the parts of the chain that are currently in front of the hand so that it will look like the forefinger and thumb are actually in front of the chain. 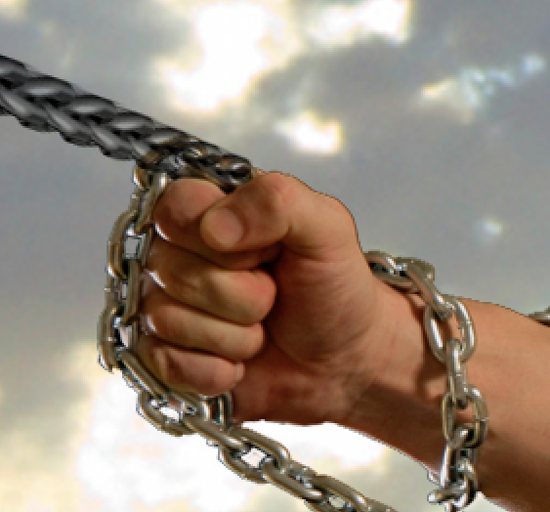
Step 10: Enhancing the Light Source
Switch to the Gradient Tool (G) and change the options of the tool to a radial gradient that fades from a solid white color to transparent (this can all be done in the Options Bar). On the layer just above the background layer, click and drag outwards to create a small- to medium-sized white gradient.
Change the Blend Mode of this layer to Overlay and place it to the left of the Centaur using the Move Tool (V) so that it makes a light in the sky of the background. 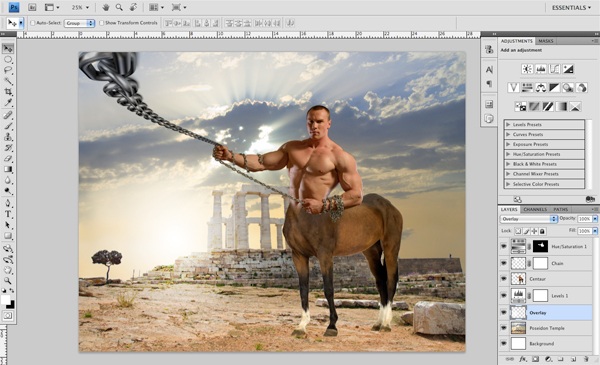
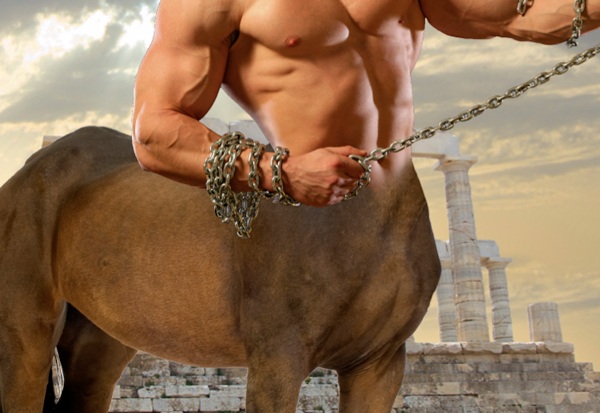
Step 11: Removing the Chain from the Arm
Select the “Centaur” layer and press Cmd/Ctrl + J to duplicate it. Toggle off the visibility of the original “Centaur” layer below it (we worked hard on it, it’s nice to have a backup).
Switch to the Pen Tool (P) and zoom in closely on the extended arm where the chain wraps around. On the new duplicated layer, begin to trace the contour of the arm and complete the selection by joining the two terminal anchor points. 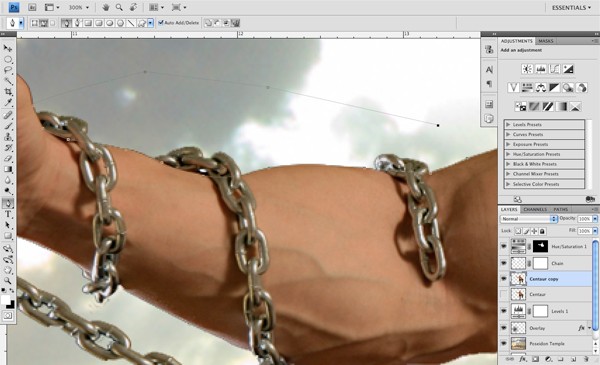 Now hold down Cmd/Ctrl and click on part of the path that we have just created (to select it).
Right-click somewhere inside the path, and when you are prompted with the dropdown menu, choose Make Selection and hit OK in the dialog window that appears. Press Delete to remove the selected area from the arm.  Repeat the process above for the part of the chain that sticks out at the bottom part of the arm; remove this area as well.
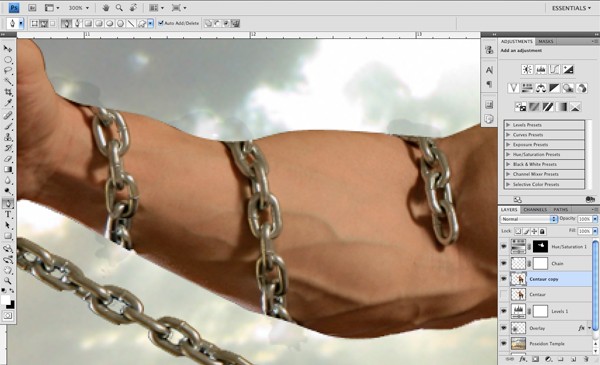 You will notice that there is still a faint outline of the chain in the image above — this is because when we originally made our Hue/Saturation adjustment layer, the chain was still part of the image. To fix this is fairly simple: Hold down Cmd/Ctrl and click on the “Centaur” layer to load a selection around him; this selection will reflect the updated part of the arm without the chain wrapping around it. Next, go to Select > Inverse (Shift + Cmd/Ctrl + I) to invert the selection.
Now with the selection still active, click on the mask on the Hue/Saturation adjustment layer and use the Paint Bucket Tool (G) to fill this area with black. 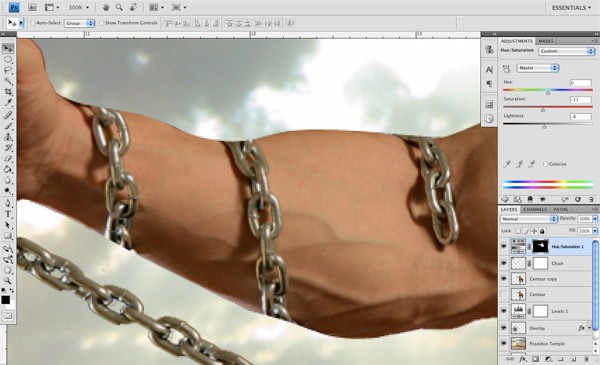
Step 12: Attack of the Clones!
For this step, we want to use a very handy Photoshop tool: the Clone Stamp Tool (S). Choose the Clone Stamp Tool from the Tools Panel, hold down Option/Alt and, on the “Centaur” duplicate layer, click to sample parts of the Centaur’s arm.
After selecting your sample point, click onto a segment of the chain to cover it with the skin sample. This may take a few tries, and you should definitely change the size of the brush tip and sample multiple times, but it really works well for not only removing or covering certain parts of an image, but also for adding onto images. 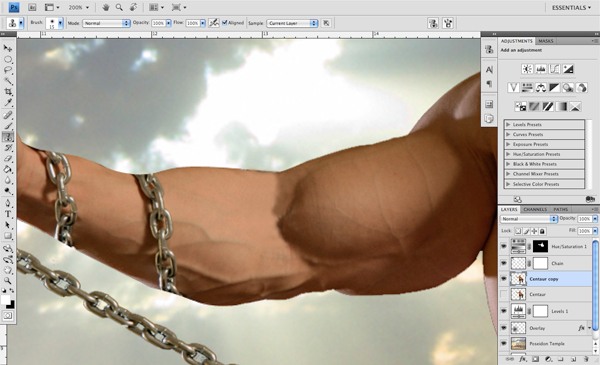 You don’t have to get every section exact as we can always use the Brush Tool to fix this later.
For now, we just want to focus on removing the chain links from this part of the Centaur’s arm. Continue this process, working with the Clone Stamp Tool, sampling and covering up various segments. 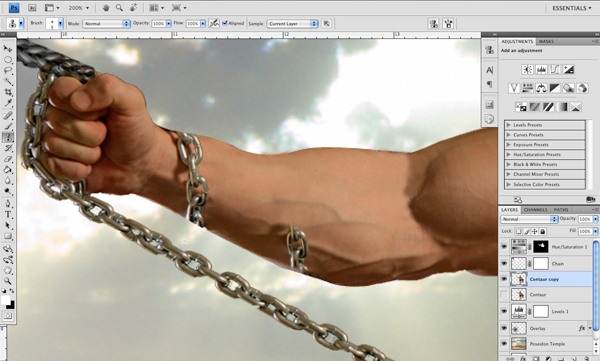 I have found in my own experience that in order to get the most convincing effect, it can be helpful to zoom in closely and sample from a section that is close to the area you want to cover.
Also, be mindful of the shadows and veins on the forearms. After working on this for a few minutes, this is the result (hopefully, you will also have something similar): 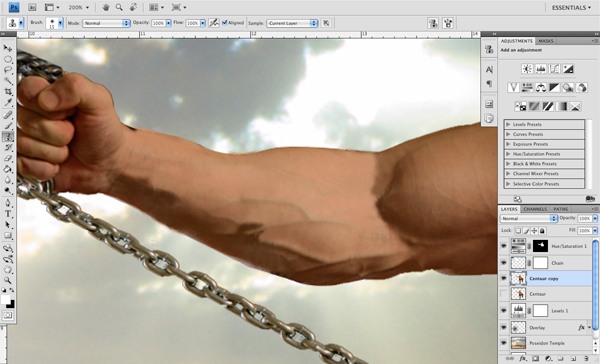 You may notice that when doing this, you might go outside of the lines or the boundaries of the arm, which is okay. Essentially, what we are going to do to fix this is to grab the Pen Tool (P) once again and make a path following the lines of the arm (above and below) and selecting the area we want to remove.
Once you close the path, right-click on it and choose Make Selection (as we did earlier), before deleting the area under the selection. This should leave you with a nice, clean outline, as if the chain was never even there to begin with! 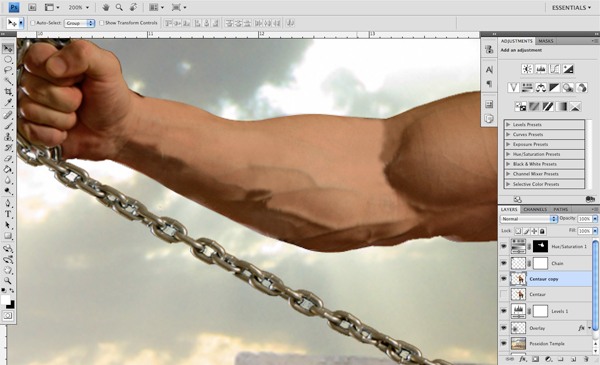
Step 13: Chain Highlights
Next, create a new layer above the chain layer and, with the Gradient Tool (G) selected, change the settings to a radial gradient that fades from solid white to transparent.
Click and drag outwards to create a small gradient on this new layer. Copy this layer a few more times by pressing Cmd/Ctrl + J and position the duplicate layers on the highlighted areas of the chain as shown in the image below: 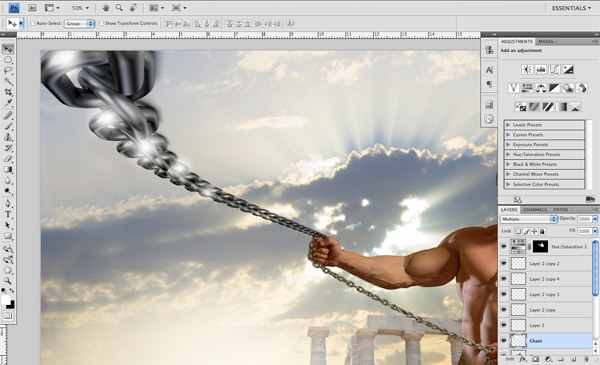
Step 14: Grab Life by the Horns!
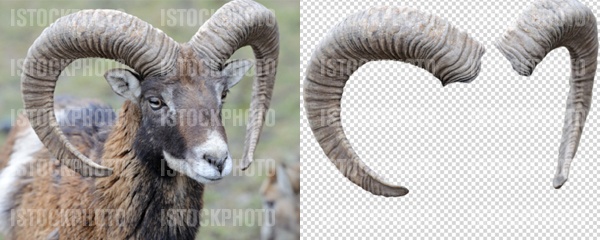
Now we are going to find a good image of some curved horns; like the ones we would see on a ram. I have found an image on iStockPhotos that I think will work nicely, but you don’t necessarily have to use the same one, as there are many good resources for stock photos that will cost you very little, if anything (check out Wikimedia Commons, for example).
If you’d like to use the one I used, purchase, download and open up the Mouflon – Wild Sheep Goat Bighorn stock image. We are going to isolate the horns on this image. There are several ways of doing this, but I like to use the layer mask technique so I have both the left and right horns isolated (as shown below).
 Once you have the horns, drag them over into our Photoshop document and press Cmd/Ctrl + T to initiate Free Transform. Flip the horns horizontally so they will match the perspective of our Centaur.
 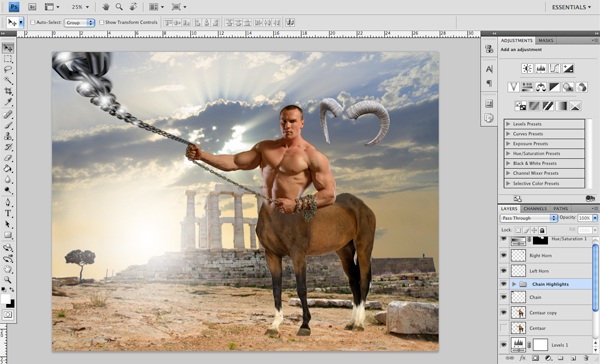 We may need to apply some further transformations to the horns in order to make them blend with our composition, so it will help if we have the right and left horns on their own layers.
I have done this in the previous step by isolating one horn at a time. However, if you happen to have both on the same layer, you can simply select one of them with the Lasso Tool (L) or Rectangular Marquee Tool, press Cmd/Ctrl + J to duplicate the selected area onto a new layer, and then erase it from the original layer.
Step 15: Placing the Horns
Before we move on, I am just going to do a bit of cleaning up with our layers.
Select all of the chain highlights that we made earlier, press Cmd/Ctrl + G to group them into a folder and name the folder something like “Chain Highlights”. I am also going to do this with both the left and right horns, putting them into a grouped folder called “Horns” — very original and creatively named, I know! Select the “Horns” layer group and drag it down to the Create a new layer icon at the bottom of the Layers Panel to make a duplicate of the group. Next, turn off the visibility of the original “Horns” layer group so that we can work from the duplicates (in case we need to revert to the original later).
Select the duplicate layer group and press Cmd/Ctrl + T to initiate Free Transform and, while holding Shift + Option/Alt, drag one of the four corners inwards to slightly reduce the size of the horns. If you are using a different image, then you will have to judge the size according to the object you are placing them onto. In this case, we just want to get a rough idea of where the horns will be so we are reducing the size and nudging the right and left ones into a general position that feels right.
Step 16: Masking the Horns
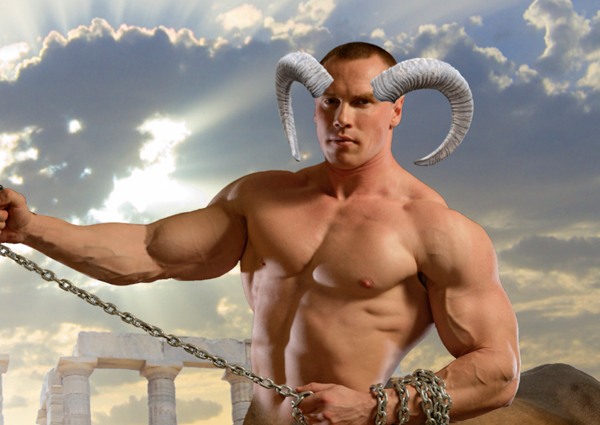
Now that we have a general idea of the size and placement of the horns, we are going to apply a mask to both the left and right horns. Lower the opacity of these layers so that you can see the head underneath, and then begin brushing out some of the extraneous areas with a hard, round, black brush. 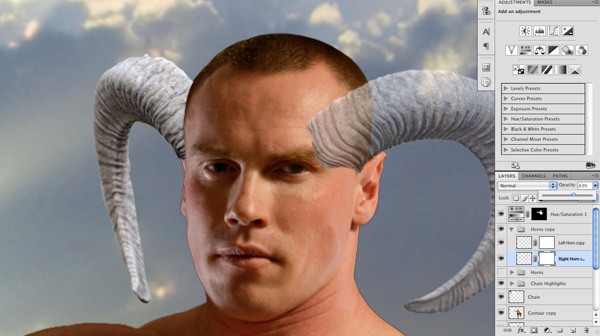 After working on this for a few minutes, you should now have something similar to the image below:
 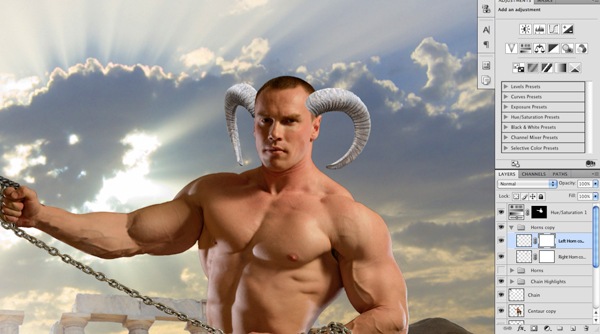 Up to this point, we have been mainly focused on just getting all of the separate pieces into the composition.
I feel pretty good about the way it is looking so far, and from here we will spend a little more time making the design feel unified in terms of the colors, highlights, and shadows.
Step 17: Additional Adjustments
We will add a Levels adjustment layer on top of the Poseidon Temple background layer by clicking on the Create new fill or adjustment layer at the bottom of the Layers Panel and then choosing Levels. Slide the middle slider to the right so it’s set to 0.89 — that will darken and add some contrast to the background.
This adjustment will affect only the layers beneath it, which at this point, is only the background image. 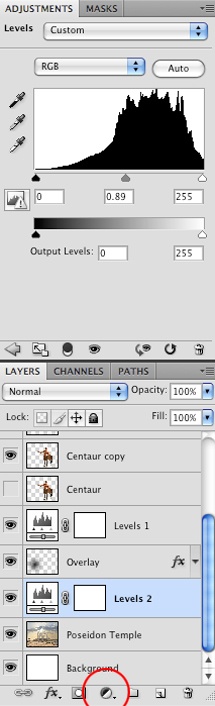 Next, select the top adjustment layer (i.e. the Hue/Saturation adjustment layer that is only affecting the upper body of the Centaur) and add another Hue/Saturation adjustment layer on top of it (which will affect all the visible layers).
Move the Saturation option slider down to about -18. 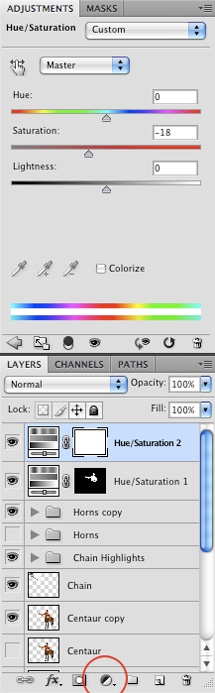 We don’t want the image to be completely desaturated, but it was feeling a bit too bright before. We want to try and create an overall mood or atmosphere to the image and that mood wasn’t really being conveyed as well as it could be prior to some of these adjustment layers.
Step 18: Adding a Shadow
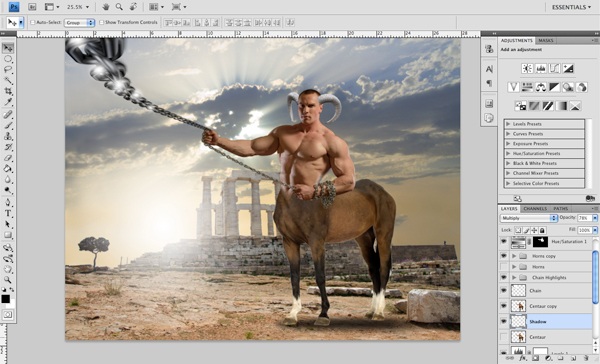
On a new layer just below the “Centaur” layer, create an elongated ellipse selection with the Elliptical Marquee Tool and fill it with a solid black color.
Once you have done that, go to the Filter > Blur > Gaussian Blur and set the Radius of the blur to about 21px. Next, lower the Opacity of this layer to 78% and then use the Move Tool (V) to position it similarly to the following image. Notice the direction of the shadow coming from the rock just behind the Centaur — it’s going down and to the right, so we want to try and move our shadow slightly off-centered and to the right, below the Centaur.
Step 19: Colorize!
Create a new layer at the top of the Layers Panel and, with the Paint Bucket Tool (G), fill the layer with a dark brown color (#4c3423). Change the Blend Mode of this layer to Color and lower the Opacity of this layer to 72%. 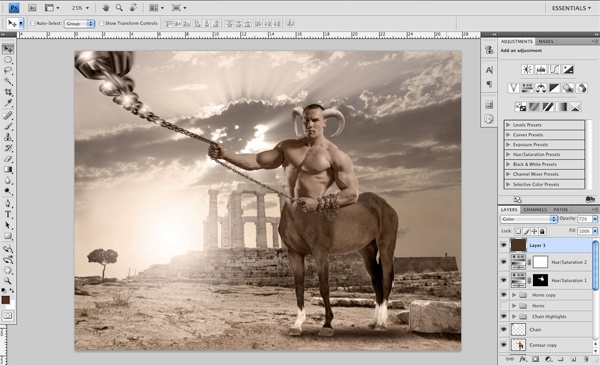
Step 20: Burn and Dodge
Click on the “Centaur” layer to make it the active layer, and then press O, which is a shortcut for the Burn and Dodge Tools.
Choose the Burn Tool and, in the Options Bar, set it to Midtones and for the Exposure we want to set it to 50%. 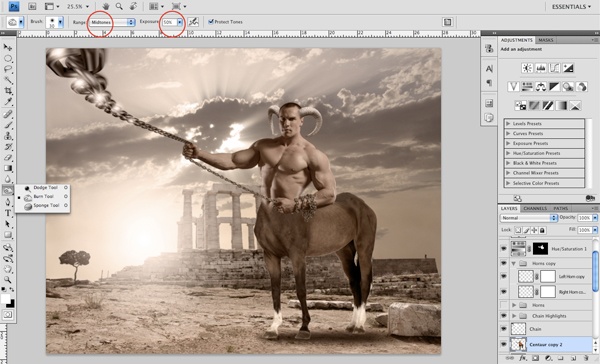 Next, press Cmd/Ctrl + J to make a copy of the “Centaur” layer so we will have a backup copy of the original in case we need to go back. Using the Burn Tool, begin to brush in the darker shadows of the Centaur as well as on the horns.
We simply want to enhance the lights and darks here, first focusing on the shadows in a subtle manner. Notice in the image that follows how the shadows have been darkened, and in doing so, we will make the scene a bit more dramatic by adding this contrast. 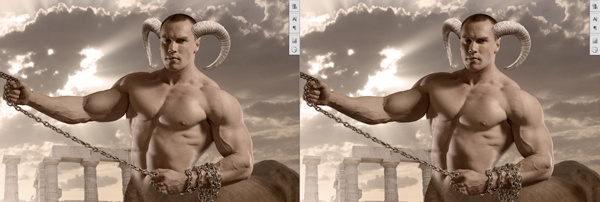 Select the “Centaur” layer again and make another duplicate in preparation for applying some dodging.
Click and hold down on the Burn Tool icon in the Tools Panel to reveal the Dodge Tool icon, and then click on the Dodge Tool icon to switch over to it. Once you have done that, change the settings in the Options Bar to Highlights and set the Exposure to 30%. 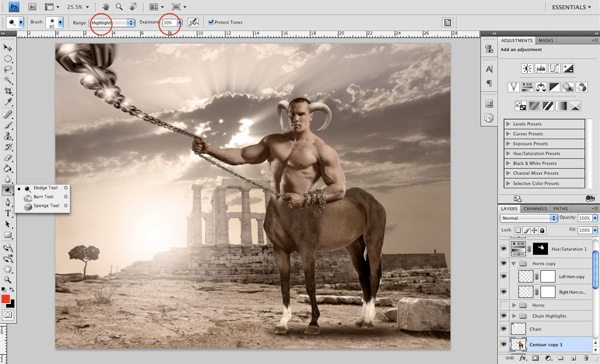 From here, we want to make a few passes in the lighter areas to further enhance the brightness in these areas — particularly the horns, face, and some of the areas of the chest and arms.
Step 21: Adding an Overlay Layer
Create a new layer above the chain layer and set the Blending Mode to Overlay. Next, switch over to the Brush Tool (B) and make sure that the color is set to solid white and the Opacity is low — around 20-30% should be good. Also, press Shift + [ a few times to reduce the hardness of the brush.
The size of the brush will vary depending on how large or small your composition is, but for the size I am working on, I will be using a Master Diameter of 200px. 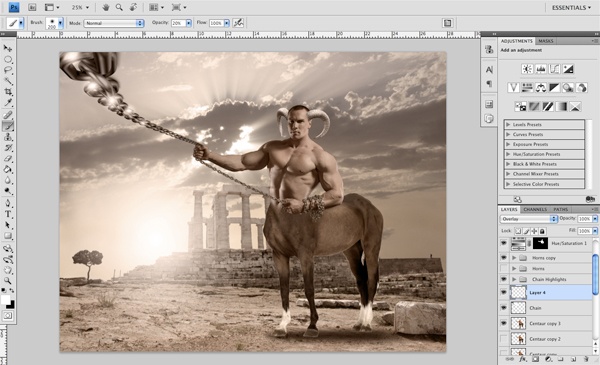 Now that we have set up the layer (along with our brush), we just want to make a few passes on the lighter parts of the Centaur, the chain, and the horns to make the image pop just a little bit more. You will notice the difference as you go along and you can adjust the opacity, if you wish, in order to get the best result.
Step 22: Additional Highlights
Create another new layer above the horns and, with the Gradient Tool (G) selected, pick a solid white and change the settings of the gradient so that it is set to Radial and fades from solid to transparent. Click and drag outwards to create a small- to mid-sized radial gradient. This will serve as a highlight on a few key areas of the design.
In the image below, I have used red circles to indicate the points where I have placed several of these gradients. 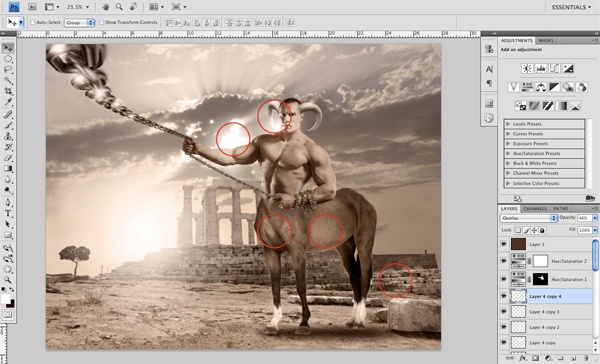
Step 23: Finishing Touches
To add some final details, I have decided to slightly darken the right side of the background so as to help direct the viewer over towards the Centaur and then to the light source. I also felt that, by doing this, it added a bit of an ominous overtone to the image.
To do this, I simply added a black linear gradient coming down from the top right of the image and reduced the layer’s opacity. Lastly, download and install the Birds Flying Brushes and add a new layer just above the background image of Poseidon. With a solid black color selected, paint in a few flying birds to the background that will be flying off into the distance.

Tutorial Summary
Save your Photoshop document and take a few moments to admire the nice work that we have done together! We did a lot, didn’t we? We prepared individual stock photos for photo manipulation using various isolation techniques.
We used adjustment layers to enhance the colors and lighting in our composition. We used some quick masking techniques to make sure that our photo blending is as seamless as possible. With did all that and a bunch of other stuff that I hope you can use in your own photo manipulation projects.
Thanks again for following along!
Download Source Files
- centaur_photo_manipulation (ZIP, 35.5 MB)
-
 Trevin serves as the VP of Marketing at WebFX. He has worked on over 450 marketing campaigns and has been building websites for over 25 years. His work has been featured by Search Engine Land, USA Today, Fast Company and Inc.
 -

WebFX is a full-service marketing agency with 1,100+ client reviews and a 4.9-star rating on Clutch! Find out how our expert team and revenue-accelerating tech can drive results for you! Learn more
Make estimating web design costs easy
Website design costs can be tricky to nail down. Get an instant estimate for a custom web design with our free website design cost calculator!
Try Our Free Web Design Cost Calculator
Table of Contents
- Preview
- Tutorial Resources
- Step 1: Setting the Stage
- Step 2: Isolating the Upper Body
- Step 3: Working on the Details
- Step 4: Isolating the Lower Body
- Step 5: Resizing and Beginning to Blend
- Step 6: Hue/Saturation Adjustments
- Step 7: Levels Adjustment Layer
- Step 8: Matching the Light Source
- Step 9: Bring the Chain!
- Step 10: Enhancing the Light Source
- Step 11: Removing the Chain from the Arm
- Step 12: Attack of the Clones!
- Step 13: Chain Highlights
- Step 14: Grab Life by the Horns!
- Step 15: Placing the Horns
- Step 16: Masking the Horns
- Step 17: Additional Adjustments
- Step 18: Adding a Shadow
- Step 19: Colorize!
- Step 20: Burn and Dodge
- Step 21: Adding an Overlay Layer
- Step 22: Additional Highlights
- Step 23: Finishing Touches
- Tutorial Summary
- Download Source Files
Share this article


Web Design Calculator
Use our free tool to get a free, instant quote in under 60 seconds.
View Web Design CalculatorMake estimating web design costs easy
Website design costs can be tricky to nail down. Get an instant estimate for a custom web design with our free website design cost calculator!
Try Our Free Web Design Cost Calculator


