

So you want to start a business blog? Congratulations on making this important decision! If you’re feeling lost or confused, never fear. This guide will help you get started in no time flat, and give you all the tools you need to succeed online.
In this beginner’s guide, you’ll get a definitive overview of how to start a blog for your business, set up WordPress, create an editorial calendar, and promote your posts on social media. You’ll also find links to helpful resources along the way, as well as a free tool to help you manage your blogging schedule and get ideas for new posts. We’ll start our beginners guide to business blogging with step one: Deciding why you’re going to blog in the first place.
Step One: Set Your Strategy and Goals
Before even start thinking about the first post you want to write, you should have some goals for your blog.
It’s important to set expectations right up front, and know what your general strategy is – otherwise you won’t be able to accurately measure or report your success. Here are a few example goals:
- Have 1,000 readers (via RSS or email subscription) in 12 months
- Rank on the first page with answers to five different industry questions
- Be able to attribute 5 sales per month to blog by end of the year
- Establish blog as industry and sales resource that grows general brand presence
 You should also have an understanding of how your business blog will relate to your overall business strategy. How will it help you further your goals? How will you use it to grow your business?
What appeal will it have not only to customers, but to your staff or C-suite as well? Joe Pulizzi of CMI advises that anyone launching a content marketing program – which includes blogging – create a “mission statement” to guide everything that is done. As he says on the CMI blog:
Marketing professionals from so many small and large businesses get so fixated on channels such as blogs, Facebook or Pinterest that they honestly have no clue of the underlying content strategy.
So, the why must come before the what. This seems obvious, but most marketers have no mission statement or core strategy behind the content they develop.
Consider calling a meeting with everyone who will have a hand in the blog, whether they will be writing or simply providing general direction. Work together to develop a clear, concise, and repeatable mission statement that you can use to guide all future activity.
Put your goals, strategy, and mission statement somewhere visible and accessible. This could be as simple as printing them out on a piece of paper taped to the wall of your office.
Step Two: Select and Set Up Your Blog
Now that you know why you’re blogging, it’s time to start the setup process. If you’re blogging for your business, this is your setup to-do list:
- Create a folder in the root directory of your website named “blog” (or something similar)
- Download and install your blogging software of choice
- Add user accounts for anyone who will be working on the blog
 Let’s go through this in a little more detail, shall we? First things first: access your website via FTP or File Manager and create a new directory (or subfolder). This directory is where your blog will live, so what you name the folder will show up in your URL.
For example, our blog lives in the “blog” directory, which is why the URL to access this page starts with “webfx.com/blog.” Want your URL to be a subdomain instead? Some companies prefer the look of “blog.domain.com,” but research shows that subdomains are seen as separate websites, which can reduce the SEO power of a link to your blog. A link to domain.com/blog means your domain benefits, SEO-wise, from the link, while blog.domain.com means only the subdomain benefits.
Moz has a detailed explanation of this that you may want to check out if you’re curious about this topic. Now that your destination is created, it’s time to install your blogging software. Although there are a number of choices available, we’re going to show you how to install WordPress, arguably the most popular option.
WordPress is flexible, free, and ultra-customizable, which is why it’s ideal for bloggers.
WordPress Installation Methods
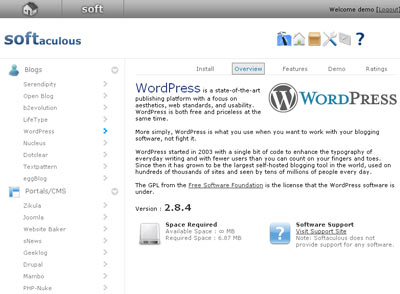
Many website hosting companies have made it extremely simple to install WordPress. Options like Fantastico Deluxe, Installatron, and Softaculous may already be installed on your server. These are one click software installation packages that keep you from touching your databases or doing any kind of manual work whatsoever.
Check with your host to see if you have one of these options — and if you do, simply click “WordPress” and follow the directions. That’s it!
If you don’t have one of these options, you’ll need to access your server and create a database and user. If you access your website’s server via cPanel, this should be a fairly simple step for you.
Log into your cPanel and look for an option named “MySQL Database Wizard.” Click to open the wizard. You will be walked through the process of creating a SQL database. You can name your database whatever you like, although we recommend something simple like “blog” or “wordpress.”
 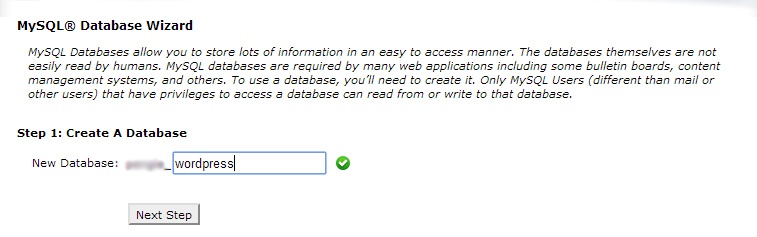 You will then create a user – again, preferably named something simple – and assign them a password.
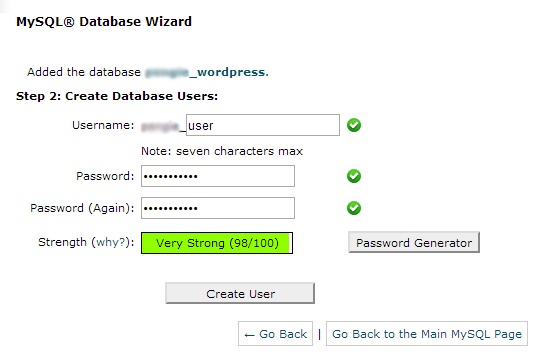 Be sure to write down all this information, including the password. You will need it again in just a few minutes! Once you’ve created your database and user, head over to WordPress.org and download the latest version, which will come in a ZIP file.
Unzip the file and move the folder to your desktop. Look for a file named “wp-config-sample.php.” Open this using a text editor (like Notepad). 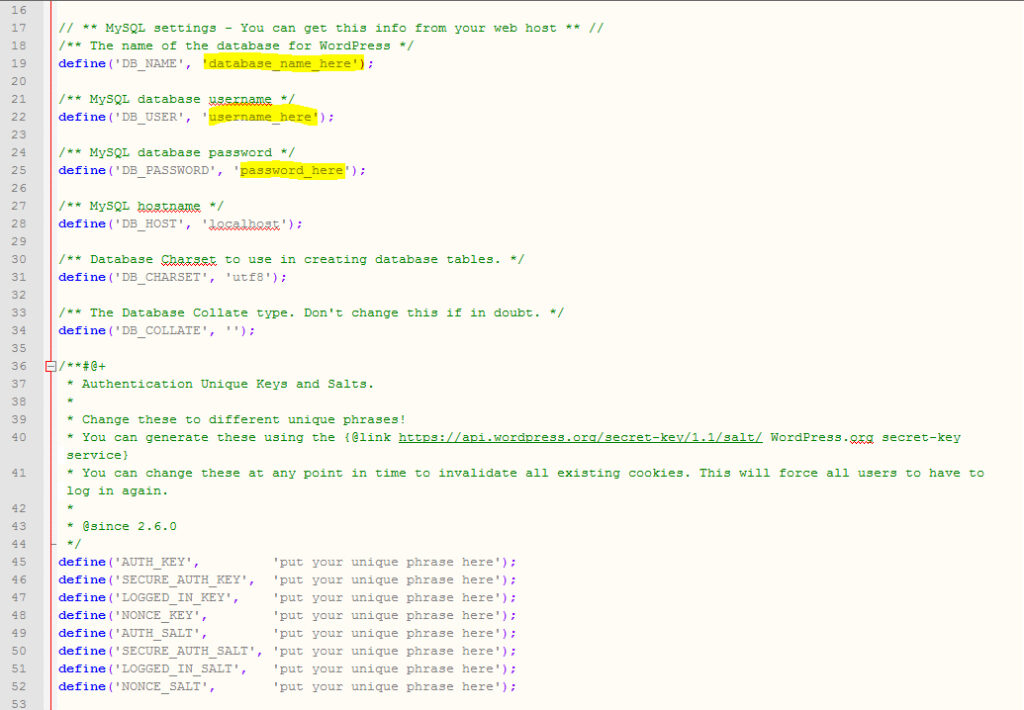 You will need to add your database, user, and password to this file (see the three fields highlighted above).
Make sure you include the full database and usernames – they will probably start with your cPanel username and an underscore. For additional security, you will also need to generate and add WordPress “secret keys,” which can be done in just a few seconds on this page. Once you’ve added the missing information, save this file, then rename it to wp-config.php.
Now you are ready to install WordPress! Upload the contents of the WordPress folder to your new directory. This may take a few minutes, so sit back and relax.
After your upload finishes, access the following URL in your browser (replacing “domain” and “blog” with your actual URL and blog directory):
http://www.domain.com/blog/wp-admin/install.php
This will start the (fairly quick) WordPress installation process. Simply fill in the username and password for your administrator account, a few other details, and you’ll be good to go.
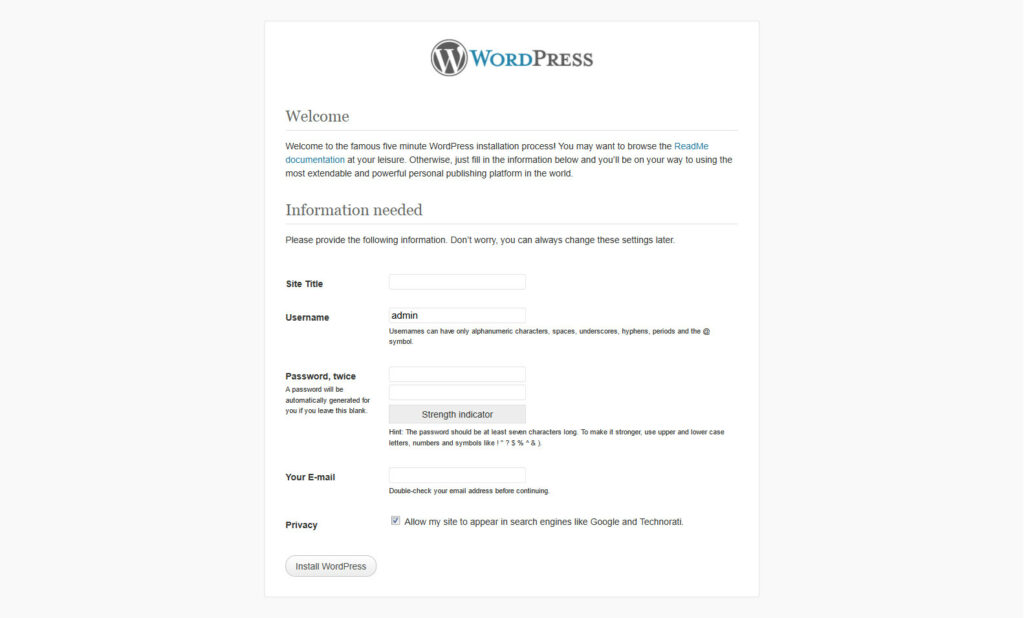
Once WordPress is completely installed, you’ll end up on the dashboard. You will probably want to bookmark this site for easy access in the future.
Additionally, your new blog will have a preinstalled theme set up, and a test post, page, and comment added (which you can delete). If your only choice is to install WordPress manually (by editing your PHP databases by hand), this tutorial on thesitewizard.com should be everything you need. If you have any problems installing WordPress, the official WordPress installation guide has both fast five minute and detailed tutorials, as well as installation options for other servers and scenarios.
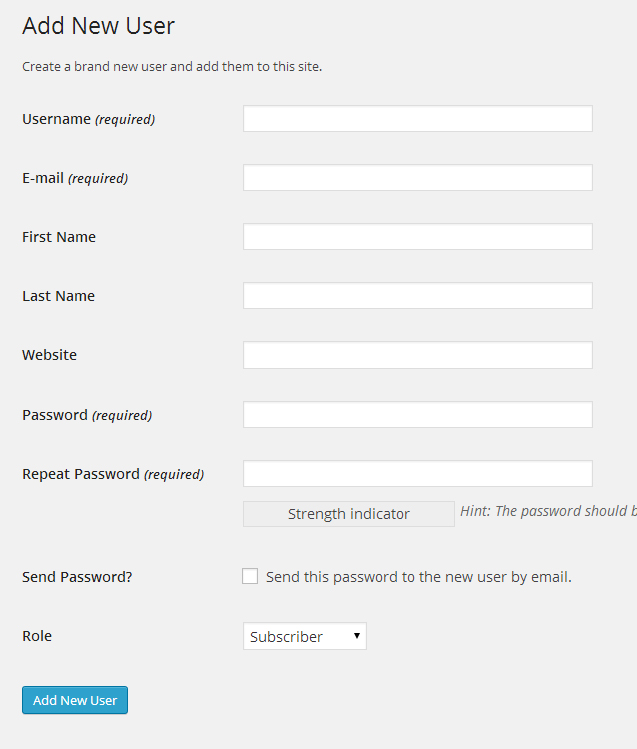
At this point, you should take a few minutes to create user accounts for everyone who will need to access the blog. Simply click “Users,” then “Add User,” and follow the instructions. There are several different user level options; if you’re not sure which is right, just add them as a “Contributor” for now.
Step Three: Design Your Blog
 Now that your blog has been set up, it’s time to think about design. Do you want your blog to look and function like a completely integrated part of your website? Or do you want it to have its own look and feel?
At this stage, you should consult a designer to determine how your blog will visually fit into the rest of your site. If you want to get up and running quickly, or aren’t concerned about a perfect match, you may want to locate a free or inexpensive WordPress theme that you can customize to match with minimal editing. Here are a few sources for professional WordPress themes:
- Official WordPress Theme Directory (free)
- Elegant Themes (free and paid)
- ThemeForest (paid)
- Graph Paper Press (free and paid)
- Themify (create your own for free or pay for completed theme)
If you are opting to have a custom theme designed to match the rest of your site, this may take anywhere from a few days to several weeks. While this is going on, you can always set up the rest of your blog – for example, add users, write their bios, and start drafting some posts. Let’s move on to the next step in the meantime, which involves establishing your blogging team.
Step Four: Gather Your Blogging Team
 If your business is a one person operation, you probably already know who your blogging team will be: you!
But if you’re working at a company with marketing, social media, writing, or management positions or teams, you’ll need to establish individual responsibilities and set expectations. Here are a few questions your team should answer right up front:
- How often are we going to post on the blog?
- What schedule will we be following? (ex. every Wednesday, Tuesdays and Fridays)
- Will the blog be written in a friendly tone? Will it be humorous, or serious? Will the tone of the blog match the “voice” used on social media or in other website content?
- Will blog posts be linked to employee names and social media profiles, or will they be posted by a single business account?
- How will we ensure that all content produced for the blog follows our mission statement?
These may not be easy questions to answer, but they are important ones. Take some time to talk it out and get everyone on the same page before you go any further. Once these questions are answered, it’s time to assign tasks to your team.
Determine who will be responsible for the following:
- Writing posts
- Editing or proofreading posts
- Maintaining the blog schedule/calendar
- Assigning new posts or ideas to writers
- Maintaining and/or responding to comments
- Responding to shares, mentions, or links on social media/other websites
- General blog maintenance (ex. responsible for testing or installing WordPress or plugin updates)
- Analytics reviews, tracking, and reporting
One person may be responsible for most or even all of these tasks, or you may split them out between members of your team. Sometimes two or three people will share all of these responsibilities, and simply trade duties based on who does what (for example, if person A writes, person B will edit). Regardless of your approach, you need to clearly communicate these responsibilities, and ensure that they are taken seriously.
Be as clear as you can about your expectations, needs, and wishes. Next, let’s learn about one of the most crucial elements of a great blog: the editorial calendar.
Step Five: Create an Editorial Calendar
 There’s one thing you should know about blogging for your business: working on your blog “when you feel like it” is a recipe for absolute disaster. A HubSpot study showed that blogs who published posts regularly – that is, on a reliable, predictable schedule – had higher readerships and subscription rates than those who did not.
Note that this doesn’t necessarily mean you have to write and post something every day. But if you start by posting twice a week, you should stick with that schedule as much as you can. The best way to stay on schedule, keep your team accountable, and organize your ideas and posts is through the use of an editorial calendar.
Often used by publications to keep track of upcoming stories or events, editorial (or content) calendars contain a schedule of posts or other responsibilities. There are a variety of ways you can manage your blog schedule and activities with an editorial calendar. Buffer has a great post about choosing or creating a calendar tool, or you can try our free editorial calendar tool, which we created just for blogging beginners like you!
The WebFX Editorial Calendar Tool
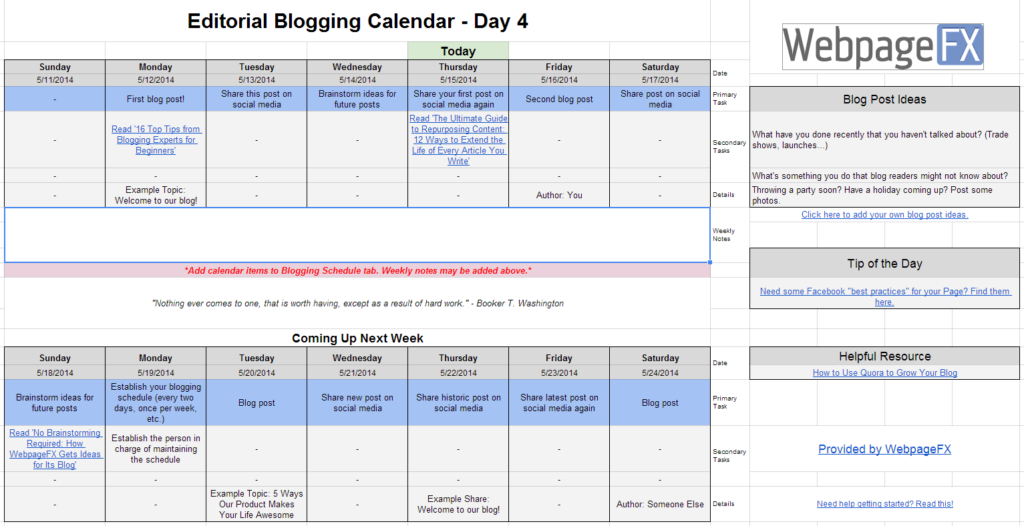 Our content calendar template contains an editable calendar, posting schedule, more than 50 blog post ideas, inspirational quotes, links to tips and resources, and more!
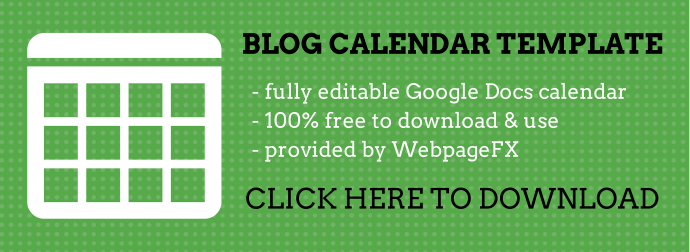 A content calendar isn’t just for scheduling your blog posts. It should also be used for keeping track of when and where you’ll share your posts on social media, dedicated brainstorming sessions, meetings, or other responsibilities (like reviewing visits or analytical data, or launching new features). Once you have an editorial calendar tool selected and set up, and you’ve given your team access, it’s time to start writing some posts!
Step Six: Start Planning and Writing Content
When you launch your blog, you may want to do so with more than one post.
If you’re planning to announce the launch via social media or email, it’s always a good idea to give visitors an “example” or two to look at, so they know whether or not your future content will be of interest to them. Here’s a crash course in using WordPress to write and publish blog posts. From your dashboard menu on the left side, select “Posts,” then “Add Post.” 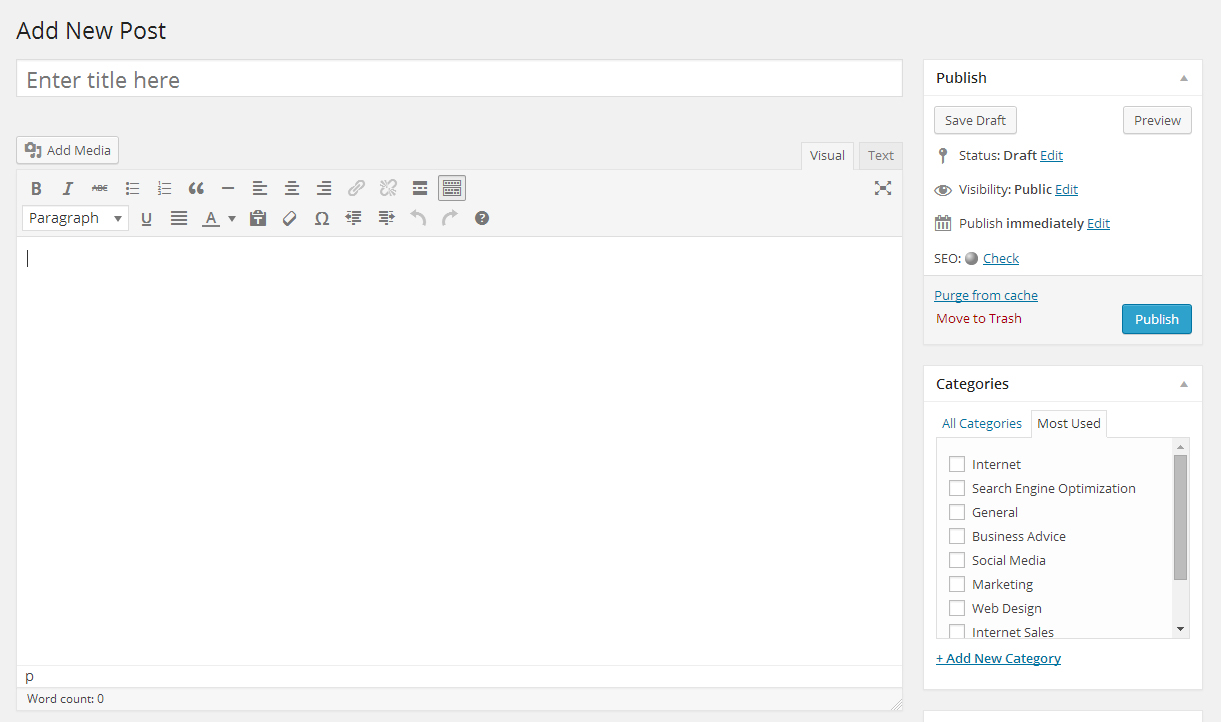 Now simply compose your post!
You can save your draft for later by clicking the “Save Draft” button, or when you’re ready to put up your completed post, tap the “Publish” button. Posts can also be scheduled for times in the future, or marked as “pending review” if you want to have full editorial control over what goes up on your blog. 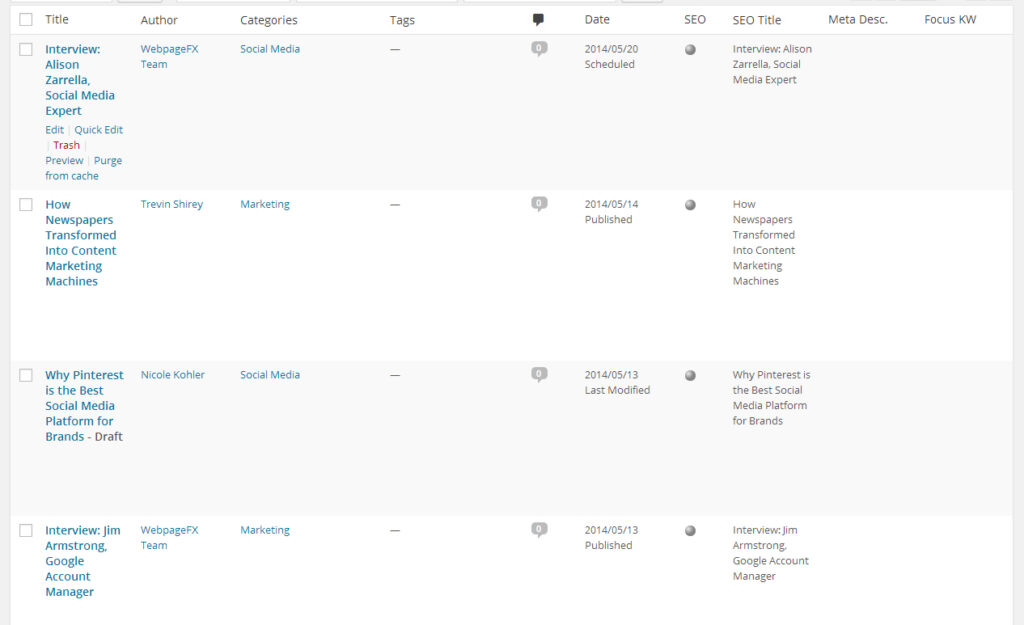 From the “All Posts” menu option, you can view, edit, or even delete all of your WordPress posts, whether they’re published or still in draft format.
To edit a post, simply hover over it in the list and click “Edit.” As you work on your posts, you’ll notice the option to add “Categories” or “Tags” to them. You can do with these as you like. Some blogs use categories as broad “buckets” for their posts, sorting individual items out by topic.
Tags are usually a little more nitty-gritty, and represent individual elements of posts. For example, you might put a post in the “Social Media” category, but add a “Twitter” tag to it. Depending on how your theme is set up, categories and tags may or may not be visible and able to be browsed by visitors.
 Keep your mission statement in mind when you or your team are working on your first few posts. Don’t just write what sounds good – write content that will help you meet your goals, grow your brand, and appeal to your website visitors. You will probably want to establish an editorial process for your posts, from brainstorming to publishing.
Do your blog topics require approval from a manager before they are written? Do you have a set process for editing content prior to publication? If so, work that into your schedule, and follow it the best you can.
To help you get started, here’s a look at the WebFX blogging process, including how we come up with ideas, keep track of them, and publish our posts on time.
Step Seven: Publish and Promote
At this stage, you should have the following tasks completed:
- Blogging team assigned and aware of their responsibilities
- Blog theme designed and integrated
- Content or editorial calendar created and set up
- One or more posts written, edited, and ready to publish
Once you’re happy with the way your blog looks and the content that is ready for it, publish your posts and publicize your blog! Add a link to your blog from somewhere visible on the homepage of your website (preferably in the header and footer), announce it on your social media channels, and let everyone in your company know that the new blog is live.  So now you just sit back and wait for the clicks to roll in, right?
Wrong! Promoting your content is just as important as publishing it. In fact, without promotion, you will drastically limit the amount of visitors who see, read, and share your blog posts. You need to create awareness of your blog to really get the ball rolling.
Social media sharing tool Buffer has a fantastic blog post about developing a social media promotion strategy for your content, and Neil Patel and Aaron Agius devoted a chapter to growing your blog via social media in their guide to growing your audience. Here are a few general tips we rely on when socially promoting our own posts:
- Use hashtags on Twitter and Google+ to increase the likelihood of your content being found.
- Include an image with your Facebook shares to increase engagement and curiosity.
- If you link to a person or company in your blog post, mention them when you share the post – it could lead to some additional shares or clicks.
- Don’t be afraid to share your content more than once, especially on Twitter. It’s unlikely that anyone will notice or complain, and re-shares are the best way to get your content read by a wider audience.
- You can always ask for shares or retweets – but be careful, because Facebook discourages this practice.
- Scared of Pinterest? Don’t be: Pinterest drives more traffic than any other social media network, save Facebook. Pin images from your post with rich descriptions and hashtags to get them found.
- Some of your fans might be following you on multiple social media channels. To keep from boring them, do something differently with each share. For example, on Facebook, you might share a quote from the post, while Twitter might be an image and link only.
- Think of social media shares as a fun A/B testing opportunity. Try different titles or headlines. If one does better than the original post title, you may want to edit your post!
We’re getting close to the end of our guide! Let’s proceed to the final step in our blog setup guide: outreach.
Step Eight: Outreach
As mentioned already, promotion is just as important as writing and publishing your posts. Additionally, if you want your blog or posts to rank well for related keywords, you’ll need to do a little bit of SEO.
One of the best ways to build authority and promote your blog at the same time is through targeted outreach and link building. Links to your post don’t just drive awareness and traffic – they also establish authority and help you rank better. If your blog is linked from a website with a lot of authority, search engines will see that as a “trust” factor, and will become more likely to trust your site, too.
Link building is an important part of SEO, but it can also dramatically increase your readership. There is a wealth of information out there about how to start outreaching to other websites and build links, so rather than reinvent the wheel, we’ll give you a couple options:
- Chapter 7 of Moz’s Beginner’s Guide to SEO
- Paddy Moogan’s List of Link Building Resources
- Neil Patel and Brian Dean’s Advanced Guide to Link Building
- The Essential Guide to Effective Link Building Outreach
- Real Life Link Building Strategies for Small Businesses
Final Step: Keep At It!
 Although the publishing, promoting, and link building process will seem a little clunky to you at first, or you might struggle to stick with an editorial schedule for your blog, keep it up! Sticking with your routine will help everyone get better at it, and before you know it, your blog will be a well-oiled machine. Don’t be disappointed when you don’t see immediate results, or when your comments are few and far between.
Everyone had to start somewhere. Even the most successful blogs spent months or years slowly building their readership, only getting a few comments or shares. If you focus on creating and sharing great content, and stick to your routine, you’ll start to see success in due time.
Well, you’ve reached the end of our guide! We hope it helped you learn about the process of creating a blog for your business. If you have any questions or suggestions or would like us to add another resource to this post, feel free to leave a comment below or reach out to us on Twitter @webfx.
Thanks for reading!
Want more advice on increasing your blog readership?
Check out our free guide to growing your website traffic. It’s the next best step you can take after setting up a new blog!
-
 Trevin serves as the VP of Marketing at WebFX. He has worked on over 450 marketing campaigns and has been building websites for over 25 years. His work has been featured by Search Engine Land, USA Today, Fast Company and Inc.
 -

WebFX is a full-service marketing agency with 1,100+ client reviews and a 4.9-star rating on Clutch! Find out how our expert team and revenue-accelerating tech can drive results for you! Learn more
Try our free Marketing Calculator
Craft a tailored online marketing strategy! Utilize our free Internet marketing calculator for a custom plan based on your location, reach, timeframe, and budget.
Plan Your Marketing Budget
Table of Contents
- Step One: Set Your Strategy and Goals
- Step Two: Select and Set Up Your Blog
- Step Three: Design Your Blog
- Step Four: Gather Your Blogging Team
- Step Five: Create an Editorial Calendar
- Step Six: Start Planning and Writing Content
- Step Seven: Publish and Promote
- Step Eight: Outreach
- Final Step: Keep at It!
Share this article
Maximize Your Marketing ROI
Claim your free eBook packed with proven strategies to boost your marketing efforts.
Get the GuideTry our free Marketing Calculator
Craft a tailored online marketing strategy! Utilize our free Internet marketing calculator for a custom plan based on your location, reach, timeframe, and budget.
Plan Your Marketing Budget


